Blog Details
Kubernetes: Container orchestration
Kubernetes is an open source platform for deploying and managing containers. It provides a container runtime, container orchestration, container-centric infrastructure orchestration, self-healing mechanisms, service discovery and load balancing. It’s used for the deployment, scaling, management, and composition of application containers across clusters of hosts.
Kubernetes Observability
Kubernetes Observability offers a complete picture of your infrastructure -- its strengths, gaps, and areas of improvement to help you build a resilient system. Logs, metrics, and traces make systems more observable, especially when working in the Kubernetes environment.
Observability, in its simplest form, refers to the potential to measure the current state of a system based on the generated data, including logs, metrics, and traces.
However, conventional observability tools were built to check monolithic systems’ health and behavior.
Therefore, they are incompatible with distributed and complex architectures like Kubernetes, wherein the architecture constantly changes, with multiple pods being simultaneously created and destroyed within minutes. Due to the dynamic and ephemeral nature of Kubernetes, pre-defined logs and metrics aren’t adequate to deal with troubleshooting problems.
As a result, adopting a tailored solution built for a distributed microservices architecture is ideal. Such a solution should match the inconsistent nature of Kubernetes and collect data that will help your teams identify and troubleshoot errors in real-time.
Observability vs. Monitoring
These two are often used interchangeably; however, they are different in their application. By monitoring Kubernetes, you can verify if the Kubernetes environment and its clusters, nodes, containers, pods, and app workloads are functioning as expected.On the other hand, observability provides you with a comprehensive picture and vital information to take steps towards improving performance and making the application, K8s components, and the entire infrastructure more stable and resilient. For instance, Prometheus – a popular Kubernetes monitoring tool, enables real-time monitoring, and alerting, checks the symptoms, and notifies your teams about the anomalies. A Kubernetes observability tool helps generate broad overviews and comprehensive summaries of the application performance and provides ways to connect changes in the metrics with Kubernetes events.
Kubernetes has become a developer’s choice for designing and deploying scalable and distributed applications. However, Kubernetes is unaware of the internal state of an application. Therefore, developers and SREs leverage telemetry data (logs, metrics, and traces) to understand how their code behaves during runtime. These are known as the three pillars of Kubernetes observability.
Kubernetes Observability Components
Logs are files that store events, warnings, and errors occurring in the software environment. They generally contain contextual information, like the specific time of an event and the user or endpoint connected with it. The log messages present data in plain text, either structured or binary format. But, it’s important to keep in mind that log messages need a vast amount to store; therefore, you must assess your storage strategy before generating them.
Metricsare numerical data representations reported over a specific period of time. They help to determine the overall system health and obtain insights with telemetry signals. These metrics are usually stored in time series data stores like Prometheus and can be optimized to store, compress, or process as per need. Metrics are better than logs in one aspect – they can be easily retrieved and queried, which makes them perfect for alerting and creating dynamic dashboards. With the help of these dashboards, you can view the system’s real-time and historical data.
Tracesrepresent consequent events. Such events demonstrate an end-to-end request path of a distributed system. If your team understands the request flow, troubleshooting performance bottlenecks and identifying dependencies between various services is comparatively less complicated.
Kubernetes Observability Challenges
Dealing with data silos
Conventional monitoring tools are built to collect metrics at the application and infrastructure levels. However, since Kubernetes is dynamic, ephemeral, and distributed in nature, the collection style of these tools creates data silos. Moreover, when DevOps include more metrics for observation, data silos can lead to uneven cross-references and data misinterpretation, leading to slower communication and error-prone analysis.
Managing large volumes of data
Deployments in Kubernetes depend on different components like pods, containers, and microservices. Moreover, these components are a part of the ephemeral and distributed infrastructure. As a result, the entire system generates a great volume of data at each layer, and it keeps increasing with the multiplying scale of services. It becomes difficult to track patterns and follow debugging, making observability and troubleshooting all the more complex.
Keeping up with the dynamic nature of Kubernetes

It’s no secret that Kubernetes clusters are complex and constantly evolving. The container instances will go up and down as the demand fluctuates. Or the estimates between storage limits and containers are subject to change depending on the storage needs. While the traditional approach to infrastructure management was fixed, Kubernetes mixes up the resources unimaginably. Therefore, the logs, traces, or metrics you accumulated at one point may not resemble the same ones or logs at another time. Similarly, the configurations for log and metric streams will change periodically.A best practice is to maintain observability in real-time and keep the historical observability data as a reference to let your teams get insights into the system, even if the existing state of clusters or resources is different.
Top 3 approaches to tackling observability challenges
Maintaining adequate visibility is no less challenging as cloud-native environments continue to help businesses evolve and drive customer success. Kubernetes is undoubtedly a great aid; however, its dynamic abstraction layer gives birth to new errors and makes it difficult to identify, troubleshoot, and prevent errors. Here are 3 tried and tested practical approaches to implementing observability in Kubernetes.

Practice data correlation
Kubernetes observability isn’t just about collecting and analyzing logs, metrics, and traces from different components of your cluster; it has to be contextualized with every event based on how the rest of the cluster functions at the event’s time. It also involves what happens after the event occurs.
Moreover, looking at it in the user’s context is crucial with so much data at hand. Typically organizations allow teams access to only the backend pictureand fail to show the impact of Kubernetes performance on business outcomes. Therefore, your teams must correlate between the codes pushed into production, the backend, and the frontend. One way to achieve this is by attaching Kubernetes monitoring data with your real-time metrics like insights on general user experience and conversions.
Encourage a full-stack approach to the environment
Typically, teams deploy Kubernetes across different environments as K8s run on any cloud and give organizations the liberty to deploy microservices across multiple platforms and leverage managed services like EKS, GKE, and AKS. Also, every organization adopts a different monitoring tool or cloud platform to manage their Kubernetes environments. Therefore, collecting data from all these sources can be extremely time-consuming and create silos among teams.
A solution to this problem is breaking down the silos between teams. The first step is to gather all the metrics, logs, and traces on one platform using a common data model. This data should also include information about traditional services and tech stacks, so your teams can view data across the entire environment in a single structure.
You can adopt all the best practices, follow every rule in the book, and still make errors. While the error may vary per the team structure and its development approaches, here are 3 mistakes you must avoid.
Tips while implementing Kubernetes observability
Avoid aggregating your logs
Observability may look like simply collecting all the log data from master nodes, worker nodes, containers, and physical infrastructure and then aggregating it all to believe that it will offer complete visibility of the ecosystem you need. Sadly, it is not.
Each component in your cluster records different kinds of information at various rates. Therefore, your aggregated data will not show how a pod crashed and its other relevant details. These details may have appeared in another component earlier, but you won’t see the information of a single event in these aggregated logs.
Reduce dependability on managed Kubernetes service
Whether it’s Amazon Kubernetes Service or Azure Kubernetes Service, these managed services cannot replace a systematic observability roadmap. These services will provide a simple alerting mechanism and a monitoring system and give you information about serious anomalies but don’t educate you about complete performance management. Therefore, you must prioritize collecting, correlating, and analyzing information to understand how the system performs compared to its predecessor.
Don’t restrict observability to only metrics
The Kubernetes metrics API can help you collect metrics data that ensure across-the-board visibility into a cluster, including crucial data from CPU and memory usage. However, collecting only the cluster-level data will not give you the detailed insights necessary to get the best observability and understand the current state of your cluster. Therefore, correlating data of different kinds across the cluster is vital in looking at what’s happening with the system as a whole.
We saw the challenges, best practices, and potential mistakes of Kubernetes observability. It is time to check out some tools that make this process seamless and less tiring for your teams.
Popular tools you can leverage for implementing Observability
Fluentd
It is an open-source data collector tool that unifies logging layers. Some of its key features include-
1. Combines well with Kubernetes when run as DaemonSet. It allows all nodes to run a copy of each pod.
2. Supports multiple data output plugins. It helps to export logs to third-party apps.
3. Fluentd agent ensures everything is well-distributed to a central logging point.
Jaeger
It’s an open-source distributed tracing system built by Uber. The tool is developed to monitor and repair distributed microservices. Some of its key features include-
1. Provides client libraries for top programming languages like Java, Go, and Python.
2. JaegerOperator helps deploy Kubernetes and enables deploying and managing Jaeger instances.
Prometheus
It’s a cloud-native data store based on time series. Prometheus is developed with a rich query language for metrics. Some of its key features include-
1. Runs in Kubernetes, either in stand-alone mode or with a Kubernetes Operator.
2. Leverages exporters to merge third-party data into its data store.
Summary
After going through every aspect of Kubernetes Observability, it’s clear that implementing it can bring significant benefits to how you handle your applications and how it affects your business. However, implementing it is no child’s play. Especially if your team has never worked with Kubernetes Observability before. Well, no worries.
With our expertise in digital product engineering, Ensar offers comprehensive consulting services to help you adopt the technology to make the most out of it. Our Kubernetes experts are skilled in building a customized roadmap for your organization without affecting your business. Connect with us today to know more about our services!
TOP 12 SOFTWARE DEVELOPMENT METHODOLOGIES
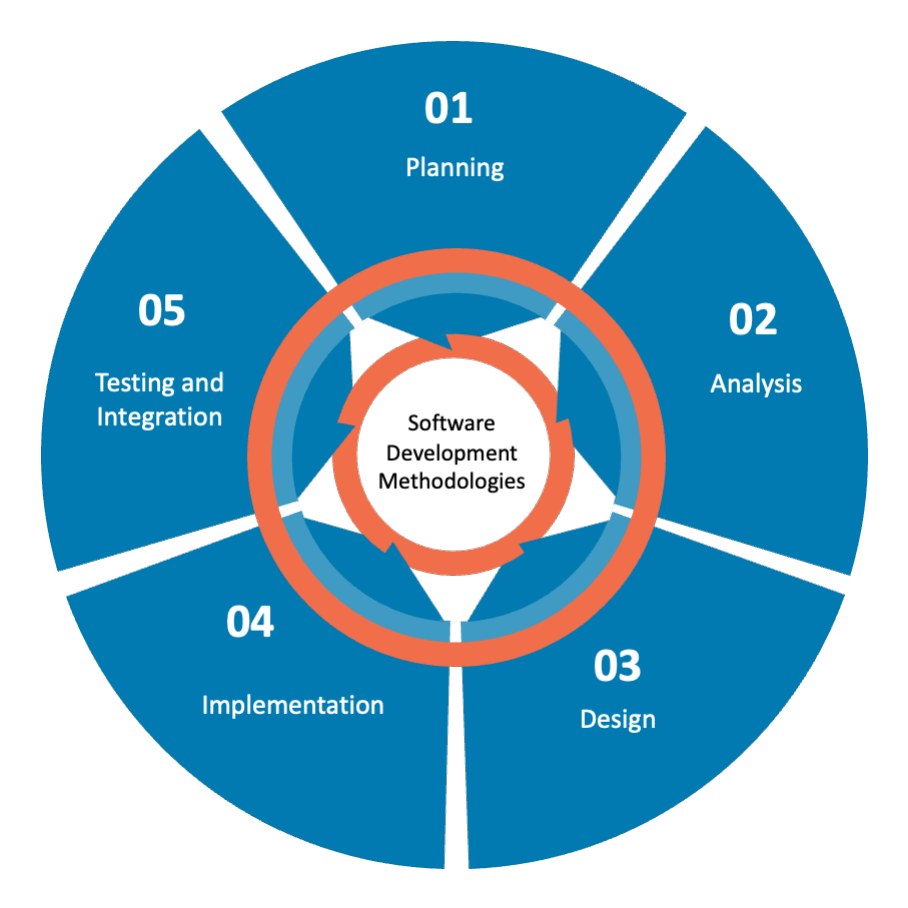
Software Development methodologies play a vital part in developing software system. Custom software development companies use many software development methodologies for their day-to-day operations. There are certain advantages and disadvantages associated with each of them. The basic purpose of these methodologies is to provide smooth software development according to the project requirements.
The software development methodology is a framework that is used to structure, plan, and control the process development of an information system. In this kind of development methodology, the only concern of software development process is that it does not involve any technical aspect but demands proper planning for the software development lifecycle by the development organization.
Below is 12 different software development methodologies list with their advantages and disadvantages
1. Agile Software Development Methodology
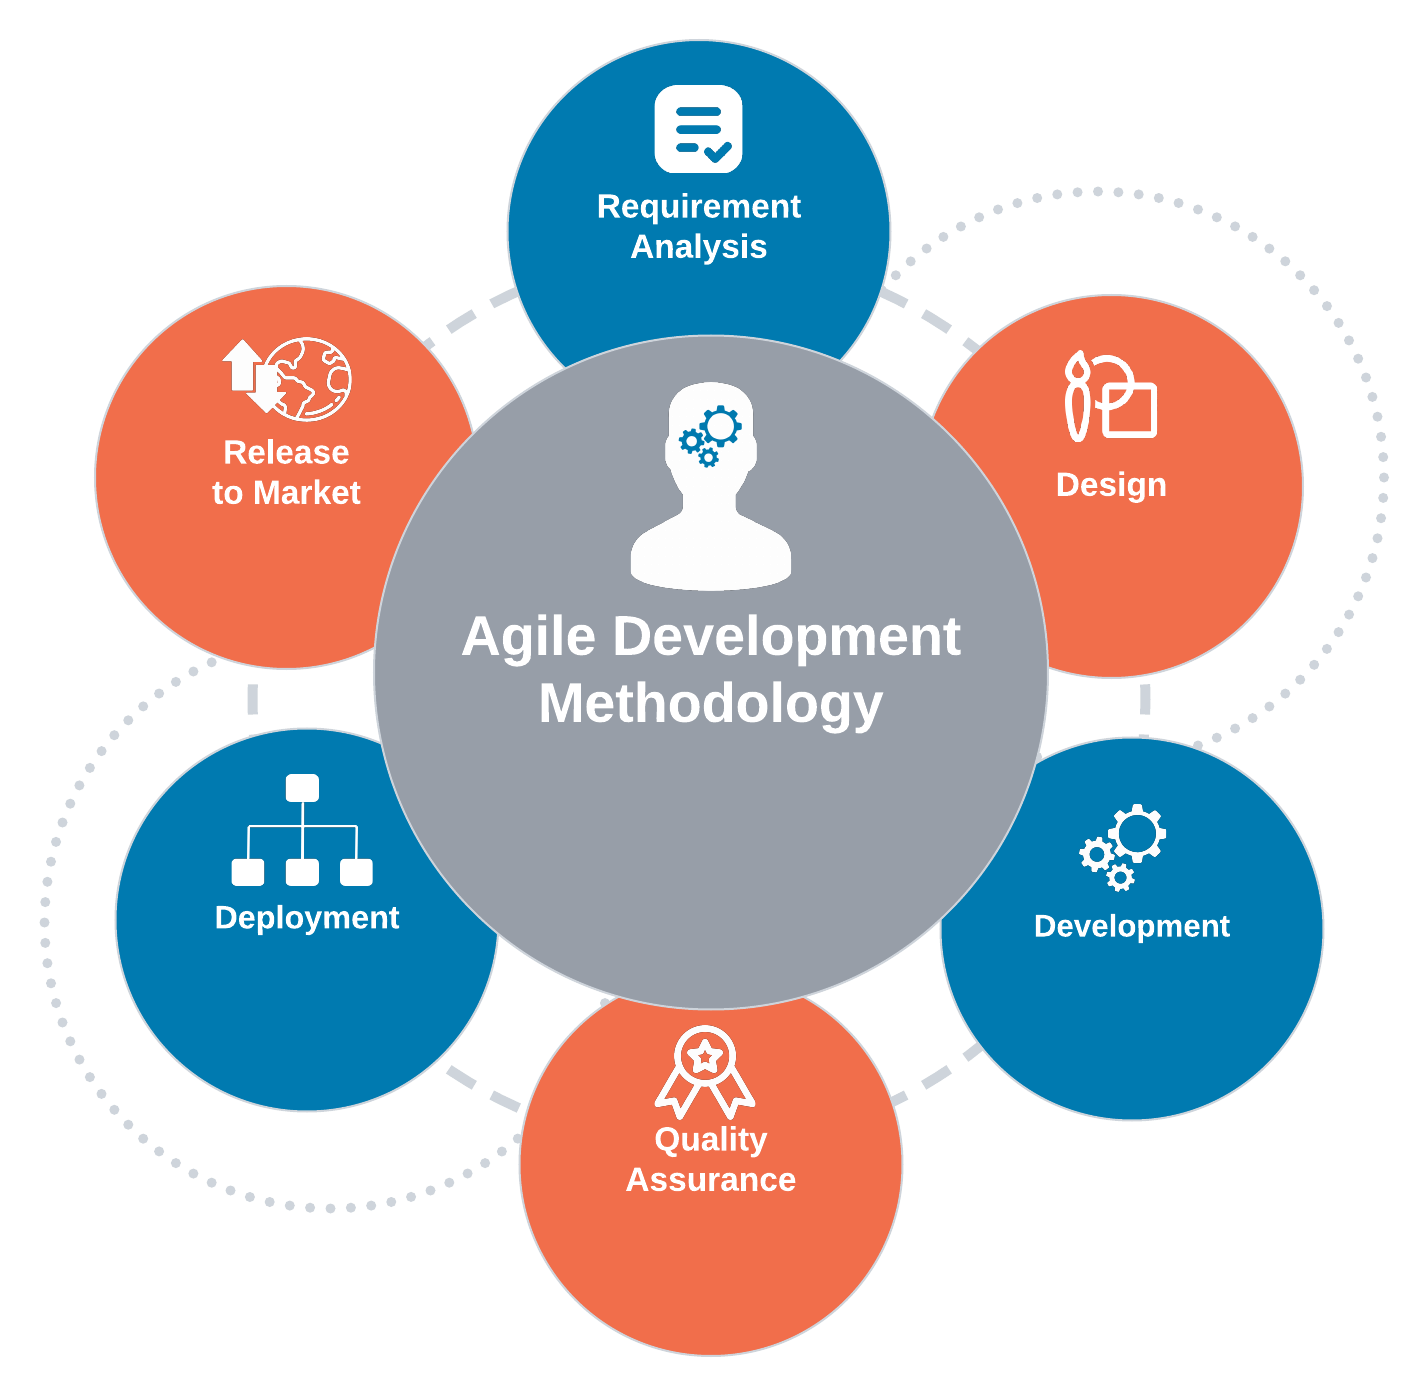
Agile Software Development methodology is one of the best software development approaches that is used to design a disciplined software management process which also allows some frequent alteration in the development project. This is a type of software development methodology that is one conceptual framework for undertaking various software engineering projects. Agile Development is used to minimize risk by developing software in short time boxes which are called iterations that generally last for one week to one month.
Advantages of Agile Development Methodology
Customer satisfaction by rapid, continuous delivery of useful software.
Human interaction is emphasized rather than process and development tools. Customers, developers and testers constantly interact with each other.
Agile methodology has an adaptive approach that is able to respond to the changing requirements of the clients.
Direct communication and constant feedback from customer representatives leave no space for any guesswork in the system.
Disadvantages of Agile Development Methodology
In the case of some software deliverables, especially the large ones, it is difficult to assess the effort required at the beginning of the software development life cycle.
Agile focuses on working software rather than documentation, hence it may result in a lack of documentation.
The project can easily get taken off track if the customer representative is not clear what final outcome that they want.
Only senior programmers are capable of taking the kind of decisions required during the development process. Hence it has no place for newbie programmers unless combined with experienced resources.
2. DevOps Methodology
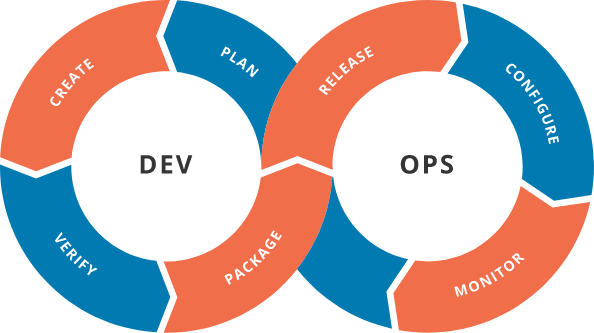
DevOps is a popular term gaining a lot of attention among all the software development methodologies because of the unconditional benefits it offers to its customers. The siloed process of Development and Operations is not the same as the inception of DevOps. These two departments are functioning together as a single team for all processes in the entire life-cycle. This works concurrently for all businesses. The continuous integration and continuous delivery model allow development and operational teams to perform everything simultaneously in development, quality assurance, security, and other operations.
Now businesses are turning more towards DevOps as an agile and lean approach that enables a crisp collaboration between all the stages of the development life cycle.
Advantages of DevOps
Faster Process Multiple ongoing processes work simultaneously which makes the process faster and easier for businesses to process on time. By adapting to changes in the market, DevOps enables businesses to grow efficiently and drive definite business results.
Offers Rapid DeliveriesMicroservices and Continuous delivery are some elements of DevOps that offer business continuity and recent updates rapidly. DevOps allows businesses to continuously innovate and improve products for a better software product.
ReliabilityWith increasing changes in the product and infrastructure, the developed products are robust and secure with a competitive advantage against all the peers.
CollaborationThis is a collaborative platform pillared on strong parameters of accountability and ownership. Both the development teams and operations team are in sync with all activities of the development lifecycle to deliver faster and effective products.
Disadvantages of Devops
DevOps demands Cultural change Yes, this is true if you adopt DevOps in your business, it demands cultural change and business needs to restart their processes in order to grow efficiently.
Organizational Upgradation is another important factor for companies to upgrade their business from conventional methods to dividing into multidisciplinary tasks that will allow them to use multiple skills at the same time.
Speed and security is not something that is achieved all the time using DevOps. For some critical software engineering projects, there are companies that may not assure both in a single stage and you may need to consider a separate plan for security at every stage of your DevOps workflow.
3. Scrum Development Methodology
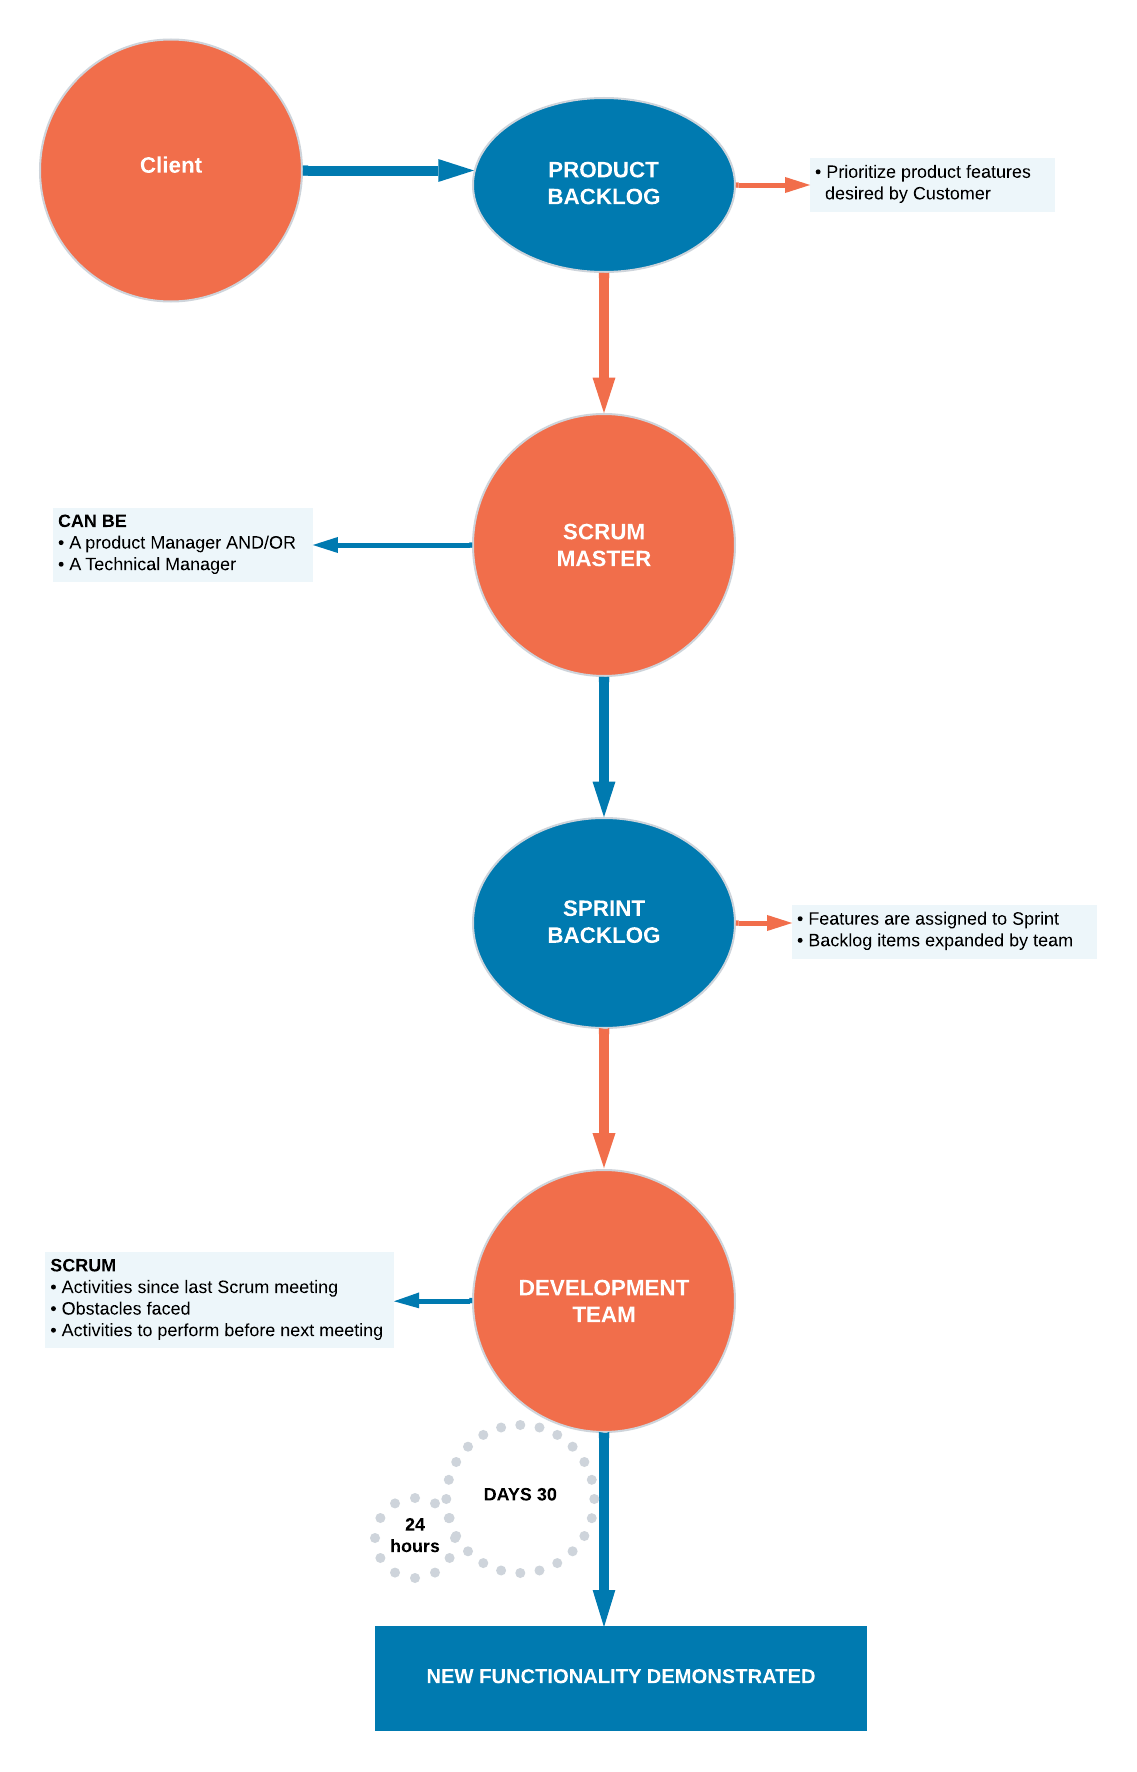
You can apply the Scrum Development Methodology in nearly all types of projects. For companies where the requirements are highly emerging and rapid changes are easily adhered to, we use this type of development method. The Scrum software development model begins with brief planning, meeting, and concludes with a final review. Businesses can accelerate the development of software using this method that allows a series of iterations in a single go. It is one of the best software development methodologies because it easily brings slowest progressing projects on track.
Advantages of Scrum Development
Use Scrum Development for fast-moving, cutting-edge developments, rapid codes, and testing mistakes that can be easily rectified.
In this methodology, decision-making is entirely in the hands of the teams.
This methodology enables projects with the business requirements documentation and other signs that contribute to success.
Enterprises can control the Project development steps visible in this method with emphasis on frequent updating of the progress.
A daily meeting easily helps the developer to make it possible to measure individual productivity. This leads to the improvement in the productivity of each of the team members.
Due to short sprints and constant feedback, it becomes easier to cope with the changes.
It is easier to deliver a quality product at a scheduled time.
Disadvantages of Scrum Development
- As one of the leading causes of scope creep is Agile Scrum thus there is no definite end date, the project management stakeholders will be tempted to keep demanding that new functionality be delivered.
- You should keep the estimation of project costs and time accurate if not then this kind of development model will suffer.
- It is good for small, fast-moving projects but not suitable for large complex projects.
- This methodology needs experienced team members only. If the team consists of people who are novices, the project cannot be completed within an exact time frame.
- Scrum works well for project management when the Scrum Master trusts the team they are managing. If they practice too strict control over the team members, it can be extremely frustrating for them, leading to demoralization and the failure of the project.
- Project quality manager is hard to implement and quantify unless the test team is able to conduct regression testing after each sprint.
4. Waterfall Model
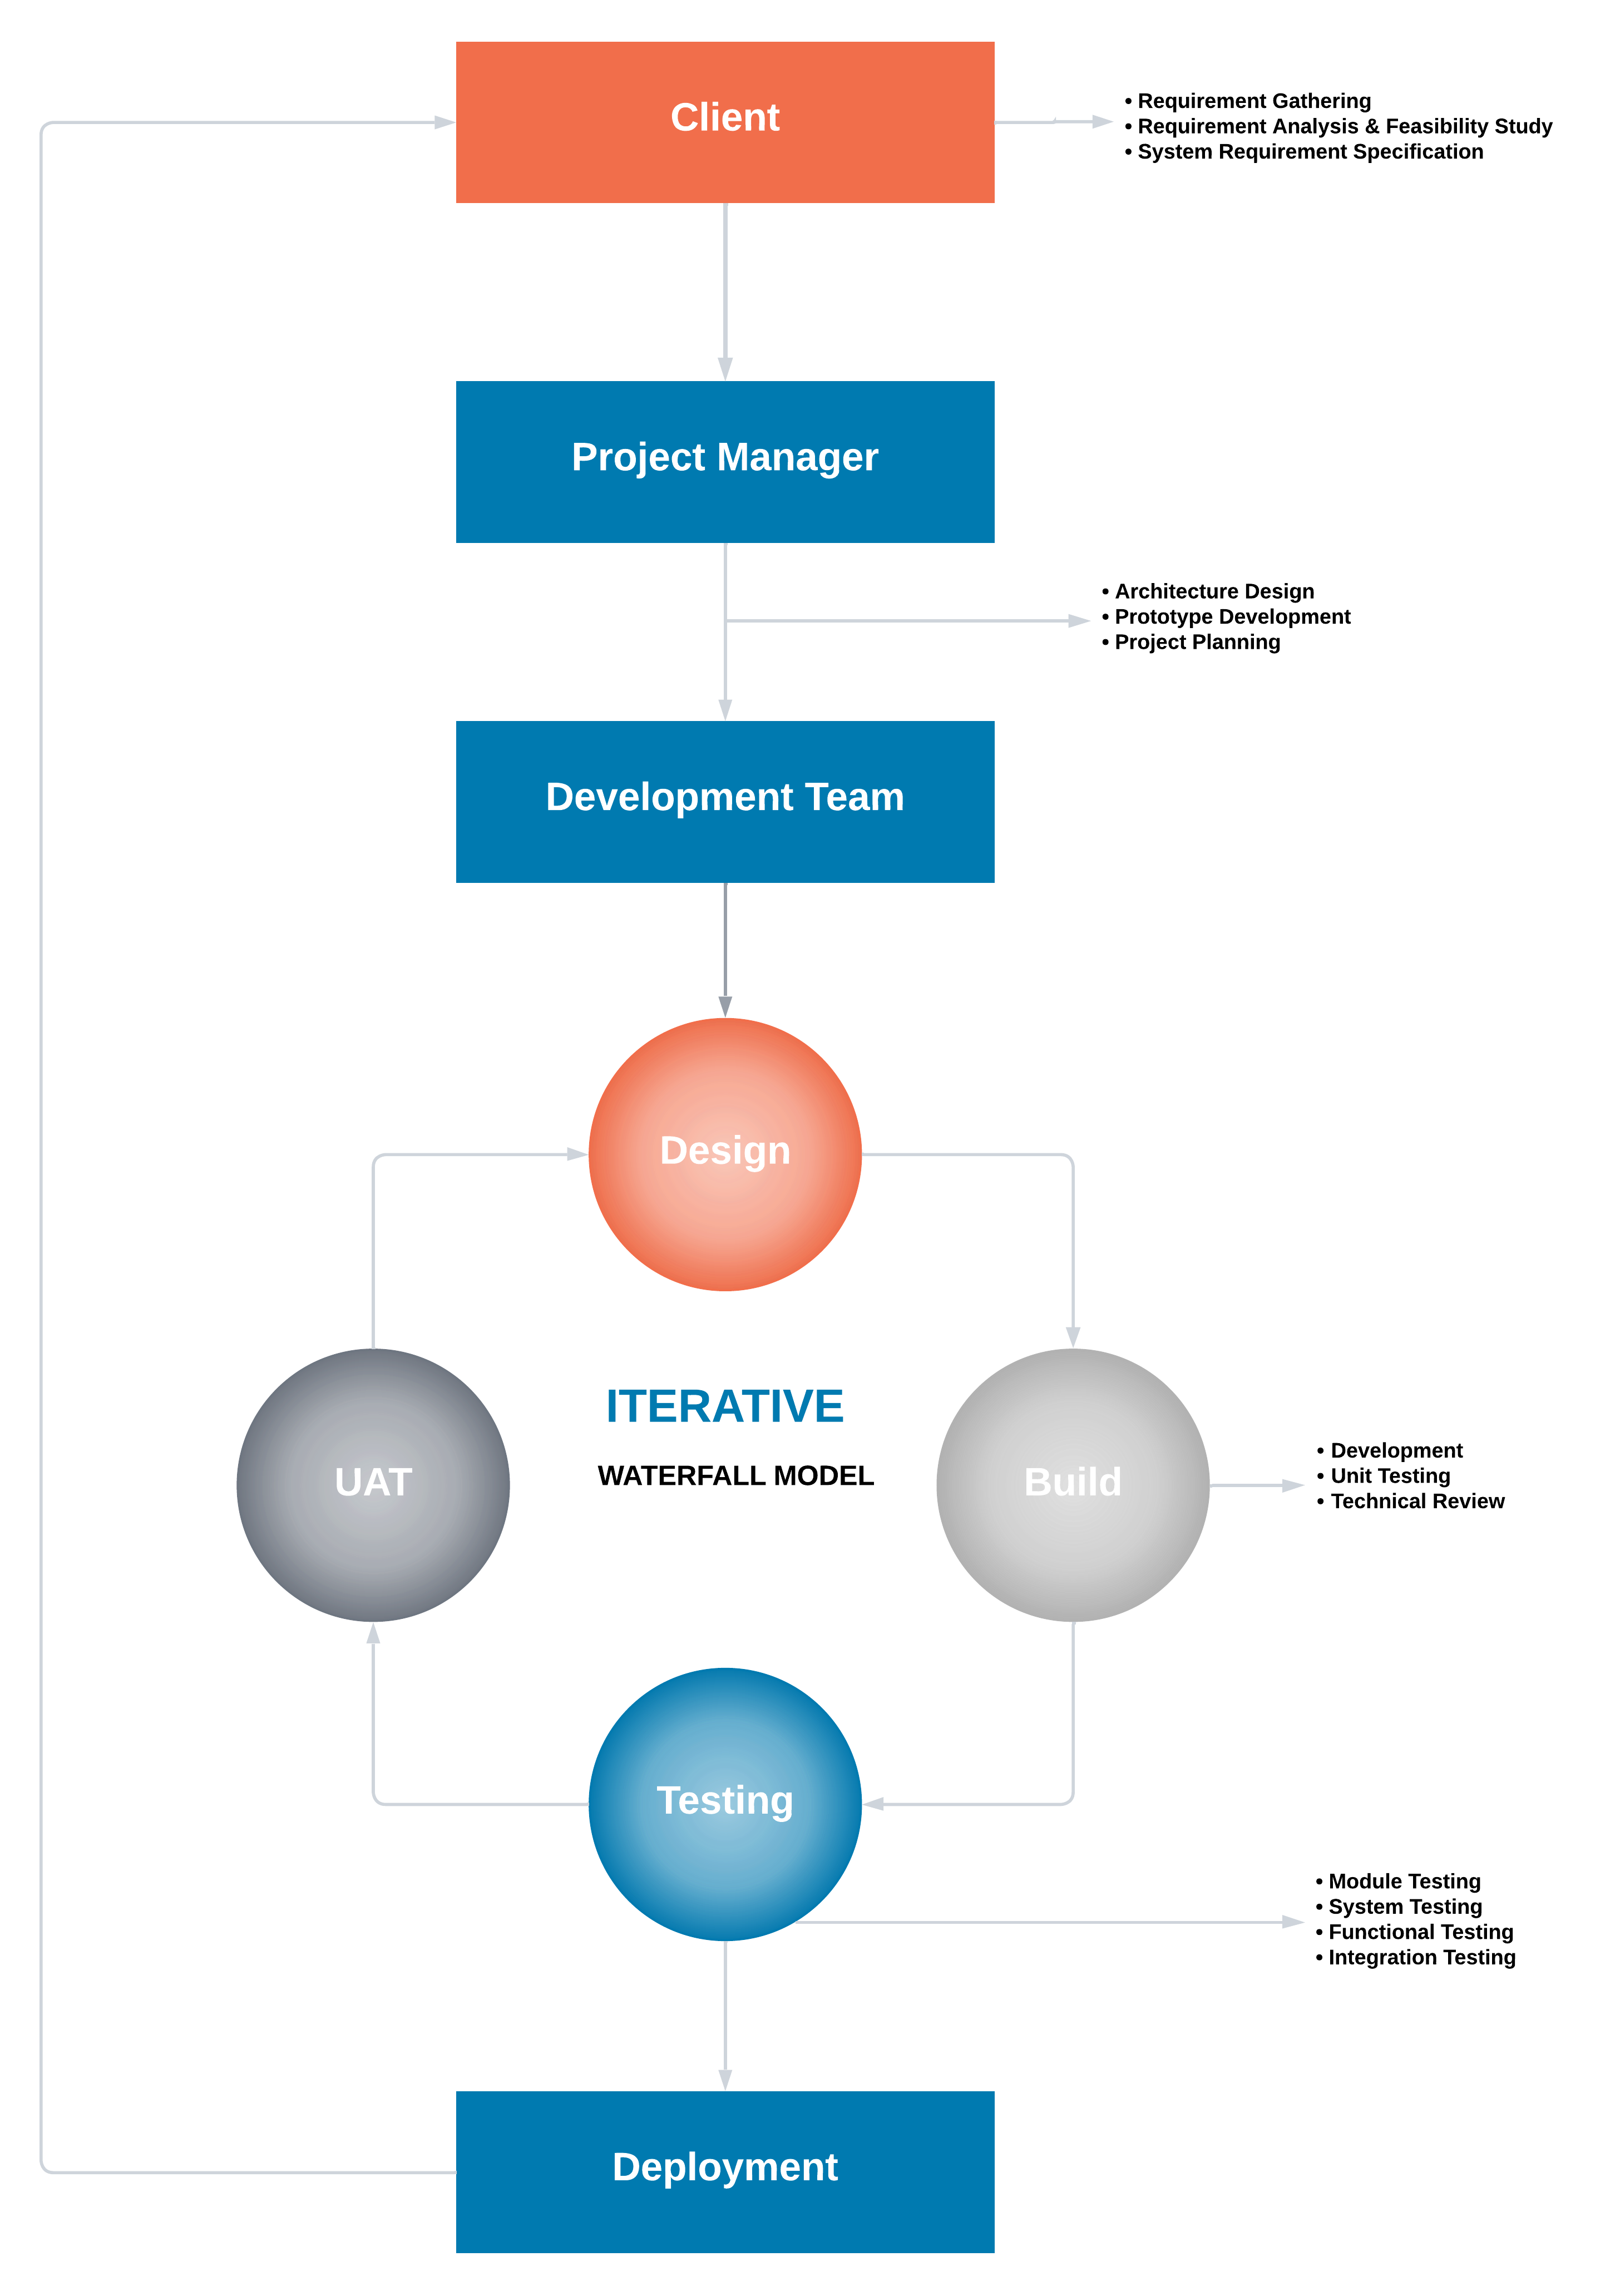
The Waterfall Methodology is one of the most popular software development methodologies. Most businesses consider this life cycle model as a classic style of software development. This model clarifies the software development process in a linear sequential flow. In any phase of the development cycle, you should always cross-check that the earlier phase is completed. This traditional software development method is a rigid linear model. This development approach does not define the process to go back to the previous phase to handle changes in requirements.
Advantages of the Waterfall Model
Waterfall model is very simple and easy to understand and uses methodology. That is why it is beneficial for the beginner or novice developer.
It is easy to manage the projects because of the rigidity of the model. Moreover, each phase has specific deliverables and an individual review process.
Waterfall development methodology saves a significant amount of time at all the phases processed and completed at a given time.
The requirements are very well understood/defined in the waterfall method. Also, it works effectively for smaller projects.
You can easily do the testing that refers to the defined scenarios in the earlier functional specification.
Disadvantages of Waterfall Model
If the requirements are precise and are available up-front, then the waterfall development method can only be used.
Waterfall method is not applicable to projects that demand continuous maintenance.
The main drawback of this method is that once an application is in the testing stage, it is not advisable to go back and do any amendments changes for completed software, it may cause a lot of problems.
There is no possibility that we can to develop any working software until it reaches the last stage of the cycle
You cannot include the client’s valuable feedback within the ongoing development phase.
In waterfall development method, there is no option to know the end result of the entire project
Make your requirements well-defined and clear or else this model is not suitable. It is effective for long and ongoing projects.
In waterfall methodology, Documentation occupies a lot of time for developers and testers.
5. Prototype Methodology
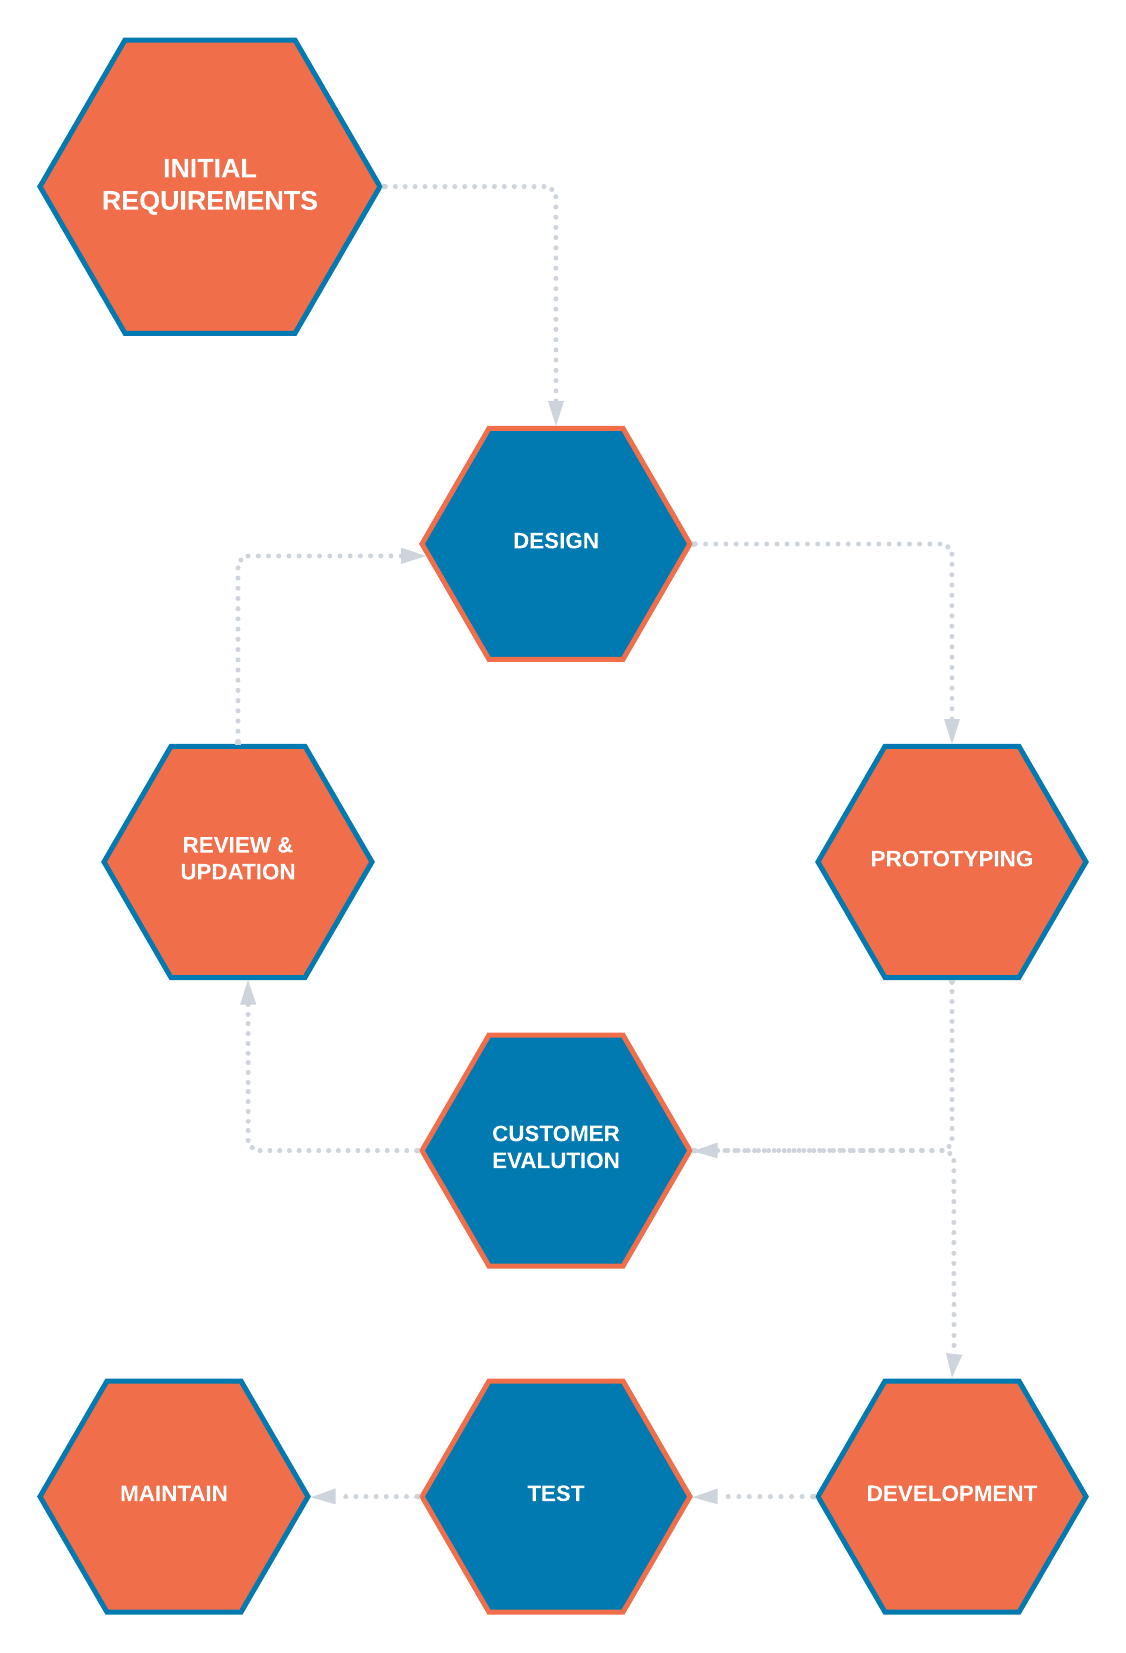
The Prototype Methodology is the software development process that allows developers to create only the prototype of the solution to demonstrate its functionality to the clients. Make all the necessary modifications before developing the actual application using this methodology. The best feature of this software development methodology is that it solves a plethora of issues that often occur in a traditional waterfall model.
Advantages of Prototype Model
Show the prototype to the client to have a clear understanding and complete ‘feel’ of the functionality developed in the software. It ensures a greater level of customer satisfaction and comfort.
Identify the scope of the refinement and accordingly accommodate new changes in the given requirements.
Significantly reduce the risk of failure using this method and identify the potential risks at an early stage and moderation steps can be taken quickly.
The communication between the software development team and the client makes a very good and conducive environment during a project.
It helps in requirement gathering and requirement analysis when there is a lack of required documents.
Disadvantages of Prototype Model
Prototyping is usually done at the cost of the developer, so it should be done using minimal resources otherwise the organization’s development cost stretches too much.
Customers sometimes demand the actual product to be delivered soon after seeing an early prototype.
The clients have too much involvement which is not always aligned with the software developer.
It does not appreciate too many modifications in the project as it easily disturbs the existing workflow of the entire software development process.
Customers may not be satisfied or interested in the product after seeing the initial prototype.
6. Feature Driven Development
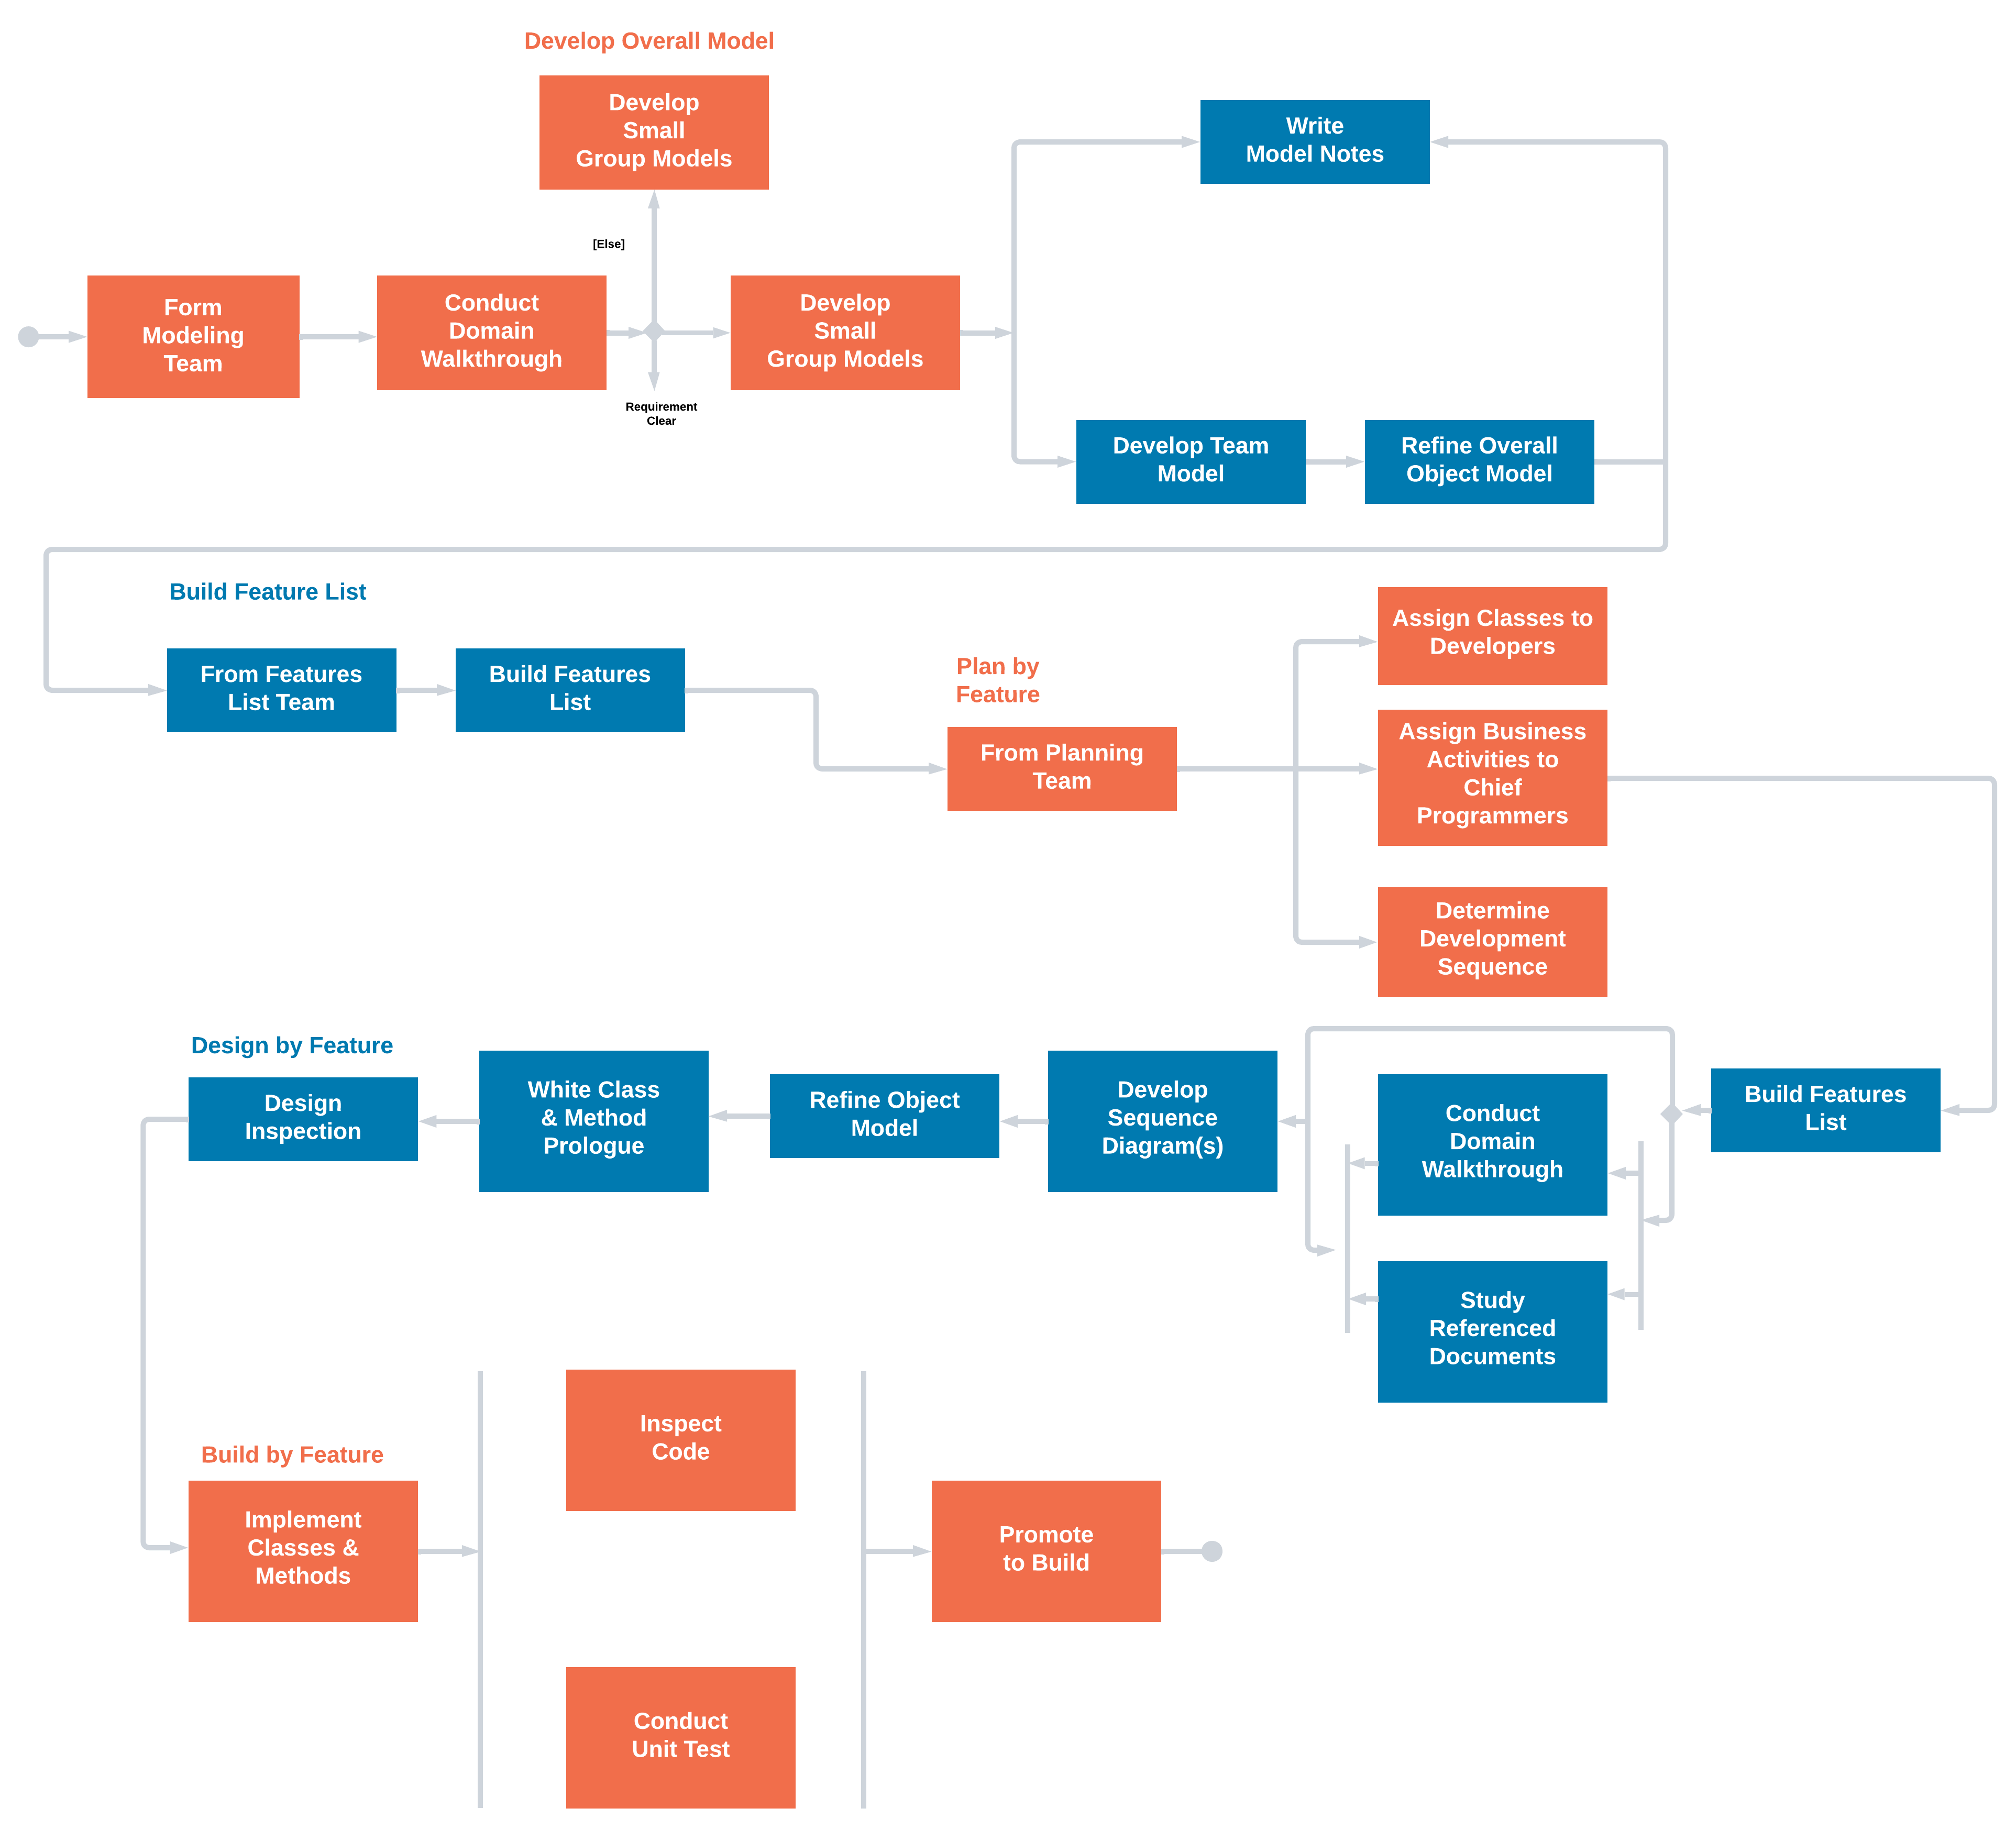
Feature Driven Development is an iterative approach out of all the software methodologies, intended for use by large teams working on a project using object-oriented technology. This type of model is good for organizations that are transitioning from a phase-based approach to an iterative approach. Feature Driven methodology is also known as an FDD methodology.
Advantages of FDD Methodology
With Feature Driven Development model, Progress tracking of the project happens by a feature that is a focused approach.
It allow multiple teams to work simultaneously. Which, in turn, reduces the time.
FDD Helps to move larger size projects and obtain repeatable success.
The simple five processes help to bring work done in a short time and easiest manner.
This type of model is built on set standards for the software development industry, so it helps easy development and industry-recognized best practices.
Disadvantages of FDD Methodology
Not an ideal methodology for smaller projects, so it is not good for an individual software developer.
High dependency on the main developer means the person should be fully equipped for an act as coordinator, lead designer, and mentor.
No written documentation is provided to clients in this methodology, so they are not able to get proof for their software.
7. Rapid Application Development (RAD)
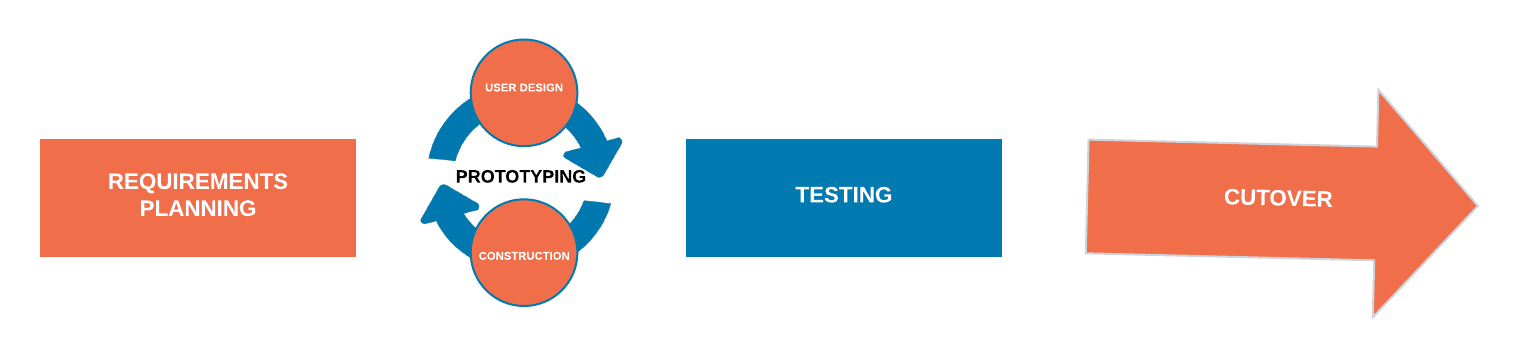
Rapid Application Development (RAD) is an effective methodology that provides much quicker development and higher-quality results than those achieved with the other software development methodologies. It is designed in such a way that it easily takes the maximum advantage of the software development. The main objective of rapid application development methodology is to accelerate the entire software development process. The goal is easily achievable because it allows active user participation in the development process.
Advantages of the RAD model
Rapid Application development model helps to reduce the risk and required efforts on the part of the software developer.
Additionally, this model also helps the clients to take quick reviews for the project.
This methodology encourages customer feedback which always provides improvement scope for any software development project.
As a result of prototyping in nature, there is a possibility of lesser defects.
Each phase in RAD delivers the highest priority functionality to the client.
Disadvantages RAD model
This model depends on the strong team and individual performances for clearly identifying the exact requirement of the business.
It only works on systems that can be modularized can be built using this methodology.
This approach demands highly skilled developers and a designer’s team which may not be possible for every organization.
This method is not applicable for the developer to use in small budget projects as the cost of modeling and automated code generation is very high.
Progress and problems accustomed are hard to track as such there is no documentation to demonstrate what has been done.
8. Spiral Model

The Spiral Model is a sophisticated model that focuses on the early identification and reduction of project risks. In this software development methodology, developers start on a small scale then explores the risks involved in the project, make a plan to handle the risks, and finally decides whether to take the next step of the project to do the next iteration of the spiral. The success of any Spiral Lifecycle Model depends on the reliable, attentive, and knowledgeable management of the project.
Advantages of Spiral Model
The high amount of risk analysis being done hence, avoidance of possible risk is certainly reduced with this model.
This model is good for large size and critical projects.
In the spiral model, additional functionality can be added at a later date.
Development is fast and features are added systematically in this model.
It is more suited for high-risk projects, where business needs may differ from time to time basis.
Disadvantages of Spiral Model
It is certainly a costly model to use in terms of development.
The success of the entire project is dependent on the risk analysis phase thus, failure in this phase may damage the entire project.
It is not appropriate for low-risk projects.
The big risk of this methodology is that it may continue indefinitely and never finish.
Documentation is more as it has intermediate phases.
9. Dynamic Systems Development Model Methodology

Dynamic Systems Development Model is a software development methodology originally based on the Rapid Application Development methodology. This is an iterative and incremental approach that emphasizes continuous user involvement. Its main aim is to deliver software systems on time and within budget. This model simply works on the philosophy that nothing is developed perfectly in the first attempt and considers it an ever-changing process.
Advantages of Dynamic Systems Development Model
Users are highly involved in the development of the system so, they are more likely to get a grip on the software development project.
In a dynamic systems model, the basic functionality is delivered quickly, with more functionality being delivered at frequent intervals.
This method provides easy access by developers to end-users.
In this kind of development, approach projects are delivered on time and within a specific budget.
Disadvantages of Dynamic Systems Development Model
The first thing is that DSDM is costly to implement, as it requires users and developers both to be trained to employ it effectively. It may not be suitable for small organizations or one-time projects.
It is a relatively new model, therefore, it is not very common and easy to understand.
Dynamic systems model Requires significant user involvement.
This model Involves the progressive development of project requirements.
10. Extreme Programming Methodology
Extreme Programming is an agile software engineering methodology. This methodology, which is shortly known as XP methodology, is mainly used for creating software within a very unstable environment. It allows greater flexibility within the modeling process. The main goal of this XP model is to lower the cost of software requirements. It is quite common in the XP model that the cost of changing the requirements at later stages in the project can be very high.
Advantages of Extreme Programming Methodology
The main advantage of Extreme Programming is that this methodology allows software development companies to save costs and time required for project realization. Time savings are available because of the fact that XP focuses on the timely delivery of final products. Extreme Programming teams save lots of money because they don’t use too much documentation. They usually solve problems through discussions inside of the team.
Extreme programming methodologies emphasize customer involvement.
This model helps to establish rational plans and schedules and to get the developers personally committed to their schedules which are surely a big advantage in the XP model.
This model is consistent with most modern development methods so, developers are able to produce quality software.
Disadvantages of Extreme Programming Methodology
Some specialists say that Extreme Programming is focused on the code rather than on design. That may be a problem because good design is extremely important for software applications. It helps sell them in the software market. Additionally, in XP projects the defect documentation is not always good. Lack of defect documentation may lead to the occurrence of similar bugs in the future.
This methodology is only as effective as the people involved, Agile does not solve this issue.
This kind of software development model requires meetings at frequent intervals at enormous expense to customers.
It requires too many development changes which are very difficult to adopt every time for the software developer.
In this methodology, it tends to be impossible to know exact estimates of work effort needed to provide a quote, because at the starting of the project nobody is aware of the entire scope and requirements of the project.
11. Joint Application Development Methodology
Joint Application Development (JAD) is a requirements-definition and user-interface development methodology in which end-users, clients, and developers attend intense off-site meetings to work out and finalize software systems. This methodology aims to involve the client in the design and development of an application. JAD sessions easily accomplish targeted goals with a series of collaborative workshops. The main focus of this model is to resolve the business problem rather than technical details. Thus it is most suitable for developing business systems.
Advantages JAD Methodology
This methodology allows for the simultaneous gathering and consolidating of large amounts of information. The collaboration between the company and the clients lowers all risks.
This software development mode effectively produces large amounts of high-quality information in a short period of time. It reduces the costs and time needed for project development.
With the proper assistance of the organizer, the differences are immediately resolved in this method.
This model provides a forum to explore multiple points of view regarding a topic.
Well-defined requirements improve system quality.
Disadvantages of JAD Methodology
JAD methodology takes a large amount of time as it requires significant planning and scheduling effort on the part of the project development team.
It requires significant investor commitment in terms of time and effort.
This approach requires trained and experienced personnel for the effective implementation of the entire project.
Different opinions within the team make it difficult to align goals and maintain focus.
12. Lean Development Methodology
Lean Development Methodology focuses on the creation of easily changeable software. This Software Development model is more strategically focused than any other type of agile methodology. The goal of this methodology is to develop software in one-third of the time, with a limited budget, and a very less amount of required workflow.
Advantages of Lean Development Methodology
The early elimination of the overall efficiency of the development process certainly helps to speeds up the process of entire software development which surely reduces the cost of the project.
Delivering the product early is a definite advantage. It means that the development team can deliver more functionality in a shorter period of time, hence enabling more software projects to be delivered.
Empowerment of the development team helps in developing the decision-making ability of the team members which creates more motivation among team members.
Disadvantages of Lean Development Methodology
Success in software development depends on how disciplined the team members are and how to advance their technical skills.
The role of a business analyst is vital to ensure the business requirements documentation is understood properly. If any organization doesn’t have a person with the right business analyst then this method may not be useful for them.
In this development model, great flexibility is given to the developer which is surely great, but too much of it will quickly lead to a development team that lost focus on its original objectives thus, it hearts the flow of the entire project development work.
Conclusion
The above software development methodologies are very important which are mostly used for various software development projects. Moreover, all these popular software development methodologies work well in certain projects depending upon the nature of the project. It often happens that one methodology that is suited for a particular project may not be suited for another project. Moreover, none of these software development methodologies are foolproof as each has its pros and cons. So, software developers must have information about all these methodologies before selecting any of these development methods for their software development projects. For better results, it is advisable to consult a professional software development company.
Agile Project Management for Dummies Cheat Sheet
Agile product development focuses on continuous improvement, scope flexibility, team input, and delivering essential valuable outcomes. Agile development approaches include scrum as a framework for exposing progress, extreme programming (XP) for building in quality upfront, and lean thinking to eliminate waste. These and many other tools and techniques help organizations, teams, and individuals adhere to the Agile Manifesto and the 12 Agile Principles, which focus on small, long-lived, self-organizing teams, effective communications, continuously releasable product, and flexibility.
Manifesto for Agile Software Development
The Manifesto for Agile Software Development, commonly known as the Agile Manifesto, is an intentionally streamlined expression of the core values of agile project management and product development. Use this manifesto as a guide to implement agile practices into your products.
“We are uncovering better ways of developing software by doing it and helping others do it. Through this work, we have come to value:
Individuals and interactions over processes and tools
Working software over comprehensive documentation
Customer collaboration over contract negotiation
Responding to change over following a plan
That is, while there is value in the items on the right, we value the items on the left more.”
12 Agile Principles
The principles behind the Agile Manifesto, commonly referred to as the 12 Agile Principles, are a set of guiding concepts that support product teams in implementing agile product development and project management techniques. Use these principles as a litmus test to determine whether or not you’re being agile in your product work and thinking:
Our highest priority is to satisfy the customer through early and continuous delivery of valuable software.
Welcome changing requirements, even late in development. Agile processes harness change for the customer’s competitive advantage.
Deliver working software frequently, from a couple of weeks to a couple of months, with a preference to the shorter timescale.
Business people and developers must work together daily throughout the project.
Build projects around motivated individuals. Give them the environment and support they need, and trust them to get the job done.
The most efficient and effective method of conveying information to and within a development team is face-to-face conversation.
Working software is the primary measure of progress.
Agile processes promote sustainable development. The sponsors, developers, and users should be able to maintain a constant pace indefinitely.
Continuous attention to technical excellence and good design enhances agility.
Simplicity — the art of maximizing the amount of work not done — is essential.
The best architecture, requirements, and designs emerge from self-organizing teams.
At regular intervals, the team reflects on how to become more effective, then tunes and adjusts its behavior accordingly.
The Platinum Edge Roadmap to Value
The Roadmap to Value, shown in the following figure, is a high-level view of an agile product development cycle.
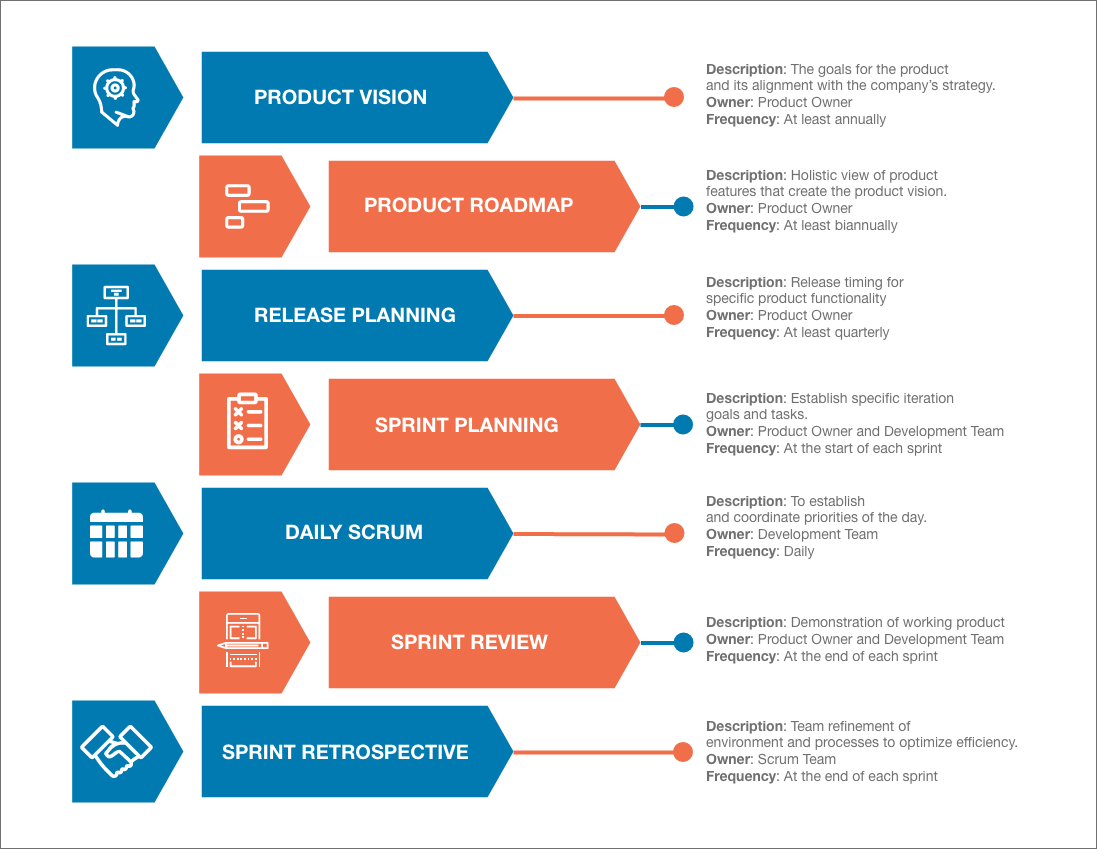
Following is a description of the stages of the Roadmap to Value:
In stage 1, the product owner identifies the product vision. The product vision is your product’s destination or end goal. The product vision includes the outer boundary of what your product will be, how the product is different than the competition, how the product will support your company or organization’s strategy, who will use the product, and why people will use the product. On longer development efforts, revisit the product vision at least once a year.
In stage 2, the product owner creates a product roadmap. The product roadmap is a high-level view of the product requirements, with a general time frame for when you will develop those requirements. It also gives context to the vision by showing the tangible features that will be produced during development. Identifying product requirements and then prioritizing and roughly estimating the effort for those requirements allow you to establish requirement themes and identify requirement gaps. The product owner, with support from the development team and stakeholders, should revise the product roadmap at least semiannually.
In stage 3, the product owner creates a release plan. The release plan identifies a high-level timetable for the release of working functionality to the customer. The release serves as a mid-term boundary against which the scrum team can mobilize. A product developed using agile techniques will have many releases, with the highest-priority features appearing first. You create a release plan at the beginning of each release, which are usually at least quarterly. Releases can also happen more frequently. Some organizations release multiple times every day.
In stage 4, the product owner, the development team, and the scrum master will plan iterations, also called sprints, and start creating the product functionality in those sprints. Sprint planning sessions take place at the start of each sprint. During sprint planning, the scrum team determines a sprint goal, which establishes the immediate boundary of work that the team forecasts to accomplish during the sprint, with requirements that support the goal and can be completed in the sprint. The scrum team also outlines how to complete those requirements.
In stage 5, the development team has daily scrum meetings during each sprint to coordinate the day’s priorities. In the daily scrum meeting, you discuss what you completed yesterday that will impact the work to be done today, what you will work on today, and any roadblocks you have, so that you can address issues immediately.
In stage 6, the scrum team holds a sprint review at the end of every sprint. In the sprint review, you demonstrate the working functionality to the product stakeholders.
In stage 7, the scrum team holds a sprint retrospective. The sprint retrospective is a meeting where the scrum team discusses the completed sprint with regard to their processes and environment, and makes plans for process improvements in the next sprint. Like the sprint review for inspecting and adapting the product, a sprint retrospective is held at the end of every sprint to inspect and adapt the team’s processes and environment.
Agile Product Development Roles
It takes a cooperative and collaborative team of people to successfully develop a product. Agile product teams are made up of many people and include the following five roles:
Product owner: The person responsible for bridging the gap between the customer, business stakeholders, and the development team, facilitating collaboration between all three roles. The product owner is an expert on the product and the customer’s needs and priorities. The product owner works with the development team daily to help clarify requirements and shields them from business prioritization noise. The product owner, above all, should be empowered to be decisive, making tough business decisions every day.
Development team members: The people who create the product. Developers, programmers, analysts, testers, designers, writers, engineers, editors, and anyone else with a hands-on role in creating the product are development team members. Development team members are cross-functional and have multiple skills they contribute to the product development work. Most importantly, development team members are versatile, able to contribute in multiple ways to the product’s goals.
Scrum master: The person responsible for supporting the development team, clearing organizational roadblocks, and helping the team and the organization embrace and enable agile values and principles in their practices and processes. Scrum masters are servant leaders, and are most effective when they have organizational clout, which is the ability to influence change in the organization without formal authority.
Stakeholders: Anyone with an interest in the product. Stakeholders are not ultimately responsible for the product, but they provide input and are affected by the product’s outcome. The group of stakeholders is diverse and can include people from different departments, or even different companies. For product development efforts to succeed, stakeholders must be involved, providing regular feedback and support to the development team and product owner. This role is outside the scrum team, but we explicitly acknowledge the role’s involvement to improve scrum team success.
Agile mentor or coach: Someone who has experience implementing agile product development techniques and can share that experience with an organization. The agile mentor can provide valuable feedback and advice to new teams and to teams that want to perform at a higher level. Although agile mentors are not responsible for executing product development, they should be experienced in applying agile principles in reality and be knowledgeable about many agile approaches and techniques. This role is outside the scrum team, but we explicitly acknowledge the role’s involvement to help improve team success.
Agile Product Development Artifacts
Product development progress needs to be transparent and measurable. Agile product development teams often use six main artifacts to enable transparency, inspection and adaptation, as listed here:
Product vision statement: An inspirational elevator pitch, or a quick summary, to communicate what your product will be and how your product supports the company’s or organization’s strategies. The vision statement must articulate the goals for the product. This artifact is outside of scrum but improves scrum team success.
Product roadmap: The product roadmap is a high-level initial view of the product backlog needed to achieve the product vision. It also enables a scrum team to outline a general timeframe for when you will develop and release those requirements. The product roadmap is a first cut and high-level view of the product backlog that identifies gaps and feature affinities, enabling funding committee decision-making with a reasonably complete picture. This artifact is outside of scrum but improves scrum team success.
Product backlog: The product’s to-do list — a full list of what is in the scope for your product, ordered by priority. After you have your first requirement, you have a product backlog.
Release plan: A high-level timetable of the next set of functionality for release to the customer. This artifact is outside of scrum but improves scrum team success.
Sprint backlog: The goal, user stories, and tasks associated with the current sprint.
Increment: The working product functionality, demonstrated to stakeholders at the end of the sprint, which is potentially shippable to the customer.
Agile Product Development Events
Most products navigate various levels of planning. Agile product development efforts include seven recurring events:
Product planning: The initial planning for your product. Product planning includes creating a product vision statement and a product roadmap, and can take place in as little time as one half of a day. This event is outside of scrum but improves scrum team success.
Release planning: Planning the next set of product functionality to release and identifying an imminent product launch date around which the scrum team can mobilize. With agile product development, you plan one release at a time. This event is outside of scrum but improves scrum team success.
Sprint: A short cycle of development, in which the team creates potentially shippable product functionality. Sprints, the scrum term for iterations, typically last between one and four weeks. Sprints can last as little as one day, but should not be longer than four weeks. Sprints should remain the same length throughout product development, which enables teams to plan future work more accurately based on their past performance.
Sprint planning: A meeting at the beginning of each sprint where the scrum team commits to a sprint goal. They also identify the requirements that support this goal and will be part of the sprint, and the individual tasks it will take to complete each requirement.
Daily scrum: A 15-minute coordination and synchronization meeting held each day in a sprint, where development team members state what they completed the day before that affects the work to be done today, what they will complete on the current day, and whether they have any roadblocks.
Sprint review: A meeting at the end of each sprint, introduced by the product owner, where the development team demonstrates the working product functionality it completed during the sprint to stakeholders, and the product owner collects feedback for updating the product backlog.
Sprint retrospective: A meeting at the end of each sprint where the scrum team inspects and adapts their processes, tools, environment, skills, communication, and distractions; discusses what went well and what could change; and makes a plan for implementing improvements in the next sprint.
Agile Product Development Resources, Organizations, and Certifications
A big agile product development world is out there. Here are a few useful links to members of the agile practitioner community:
Scrum For Dummies: In 2018, we published the second edition of Scrum For Dummies (Wiley) as a field guide not only to scrum but also to scrum in industries and business functions outside information technology (IT) and software development. Scrum can be applied in any situation where you want early empirical feedback on what you’re building or pursuing.
Scrum Alliance: The Scrum Alliance is a nonprofit professional membership organization that promotes the understanding and usage of scrum. The alliance achieves this goal by promoting scrum training and certification classes, hosting international and regional scrum gatherings, and supporting local scrum user communities. To find a scrum user group in your area, search your location.
Agile Alliance: The Agile Alliance is the original global agile community, with a mission to help advance the 12 Agile Principles and common agile practices, regardless of approach. The Agile Alliance site has an extensive resources section that includes articles, videos, and presentations. Find an index of independent and local agile community groups across the world.
International Consortium for Agile (ICAgile): ICAgile is a community-driven organization helping people become agile through education, awareness, and certification. Its learning roadmap provides career path development support in business agility, enterprise and team agile coaching, value management, delivery management, human resources, agile engineering, agile testing, and DevOps.
Mind the Product & Product Tank: Mind the Product is the world’s largest community of people passionate about product. They also founded ProductTank meetups to bring product leaders to connect, share and learn from each other. With over 150,000 members worldwide, they offer blogs, global, regional and local events, local meetups and training from the leading product management experts from all over the world. The resources at ProductTank tend to be high quality, and the content is both unique and relevant to the issues facing agile product development teams. Find a local ProductTank meetup in your area.
Lean Enterprise Institute: Lean Enterprise Institute publishes books, blogs, knowledge bases, news, and events for the broader community of lean thinkers and practitioners. As you pursue agile product development, remember to incorporate lean thinking in all that you do. Lean.org is a good launching pad for you to explore the lean topics relevant to your situation.
Extreme Programming: Ron Jeffries was one of the originators of the extreme programming (XP) development approach, along with Kent Beck and Ward Cunningham. Ron provides resources and services in support of XP’s advancement on his ronjeffries.com site. The “What Is Extreme Programming?” section of the site summarizes the core concepts of XP. Other articles and extreme programming resources are also available in wiki format.
PMI Agile Community: The Project Management Institute (PMI) is the largest nonprofit project management membership association in the world. With nearly 3 million members in most countries throughout the world. PMI supports an agile community of practice and multiple agile certifications, including the PMI Agile Certified Practitioner (PMI-ACP) and a series of Disciplined Agile (DA) certifications.
Platinum Edge: Formed in 2001, Platinum Edge is one of the original agile transformation Their blog provides insights on practices, tools, and innovative solutions emerging from their work with clients and the broader agile community. You can also learn about the following services to help make your transition successful.
Agile audits: An assessment of your current organizational structure and processes to create an agile implementation strategy. This assessment may include providing feedback on your current agile transition efforts to help you gauge whether the investment you’ve made is generating the expected results.
Recruiting: Help you find the right people to bootstrap your scrum teams, including scrum masters, product owners, developers, and agile mentors.
Training: Public and private agile and scrum training and certification including Certified ScrumMaster (CSM), Advanced Certified ScrumMaster (A-CSM), Certified Scrum Product Owner (CSPO), Certified Scrum Developer (CSD), LeSS, Scrum@Scale, SAFe approaches to scaling, and PMI Agile Certified Practitioner (PMI-ACP) test preparation.
Transformation: Nothing is a larger factor of future success than proper As a follow-up on agile training, professional agile mentoring and coaching are embedded in your organization to ensure that the right practices occur in the real world.
Best Practices for React Architecture from Subject-Matter Experts
Quick Summary: Our team of expert web developers have been building complex React for enterprises across the globe since 2005. Our team of 250+ creative and technical professionals include world-class React developers, who have a great passion for acquiring and sharing knowledgeable insights.
In this blog, our subject matter experts will discuss the best practices and hot tips for using the React Architecture in the best way possible. This will help you write better lines of code and develop secure, scalable and high-functioning React apps.
Let’s begin! We all know that ReactJS is one of the best web development frameworks to work with. Whether you want to build a small application or a complex one, a scalable architecture like that of React can help serve that purpose easily. Especially when you want your web app to serve a large number of users.
That’s why understanding the technical aspect of any architecture, in this case, React architecture to build large-scale websites can enable you to make better, smarter business decisions
Let’s dive deeper and learn everything there is to know about React Architecture.
Table of Contents:
What Exactly Is React Architecture?
Benefits Of React Architecture For Building Enterprise-Grade Apps
Diagram Of React Architecture For Building Enterprise-Grade Web Applications
React Architecture Best Practices- As Per Industry Experts
1. What exactly is React architecture?
Unlike other frameworks and libraries, ReactJS has a flexible architecture pattern. It is just a view that allocates to the needs of the user interface. Beneath the UI, there are many React components; a small structural unit- like a label, button, input text label or something as complex as a registration form, etc. And that’s not even its best feature: you can assign a state to every React component; this feature is optional and depends on the developer. The state can be defined as the data mandatorily required for the React app to function.
So whatever action the user takes will correspond to the necessary change in the state from time to time. That means whatever the current state of the data is, it will determine the elements displayed on the UI of the app. This is simply how the React architecture functions.
2. Benefits of React Architecture for Building Enterprise-Grade Apps
React js architecture is one of the best out of the lot to build large scale web applications. Here’s why:
A coherent global state: All of the data in the app can be stored in the global state. Modifications made to this state will automatically make changes to the rest of the views.
High scalability: ReactJS architecture can be used to handle heavy traffic and meet the needs of an enterprise-grade business when used with a scalable backend framework like NodeJS.
Easy testing: It is much easier for developers to test individual parts of the React application due to its independent features and component.
Decoupled components: Redux & Rsaga is used by React to tie decoupled components together. This lets you conduct better testing through asynchronous flow support.
3. Diagram of React Architecture for Building Enterprise-Grade Web Applications
Here’s how a React architecture diagram looks like:
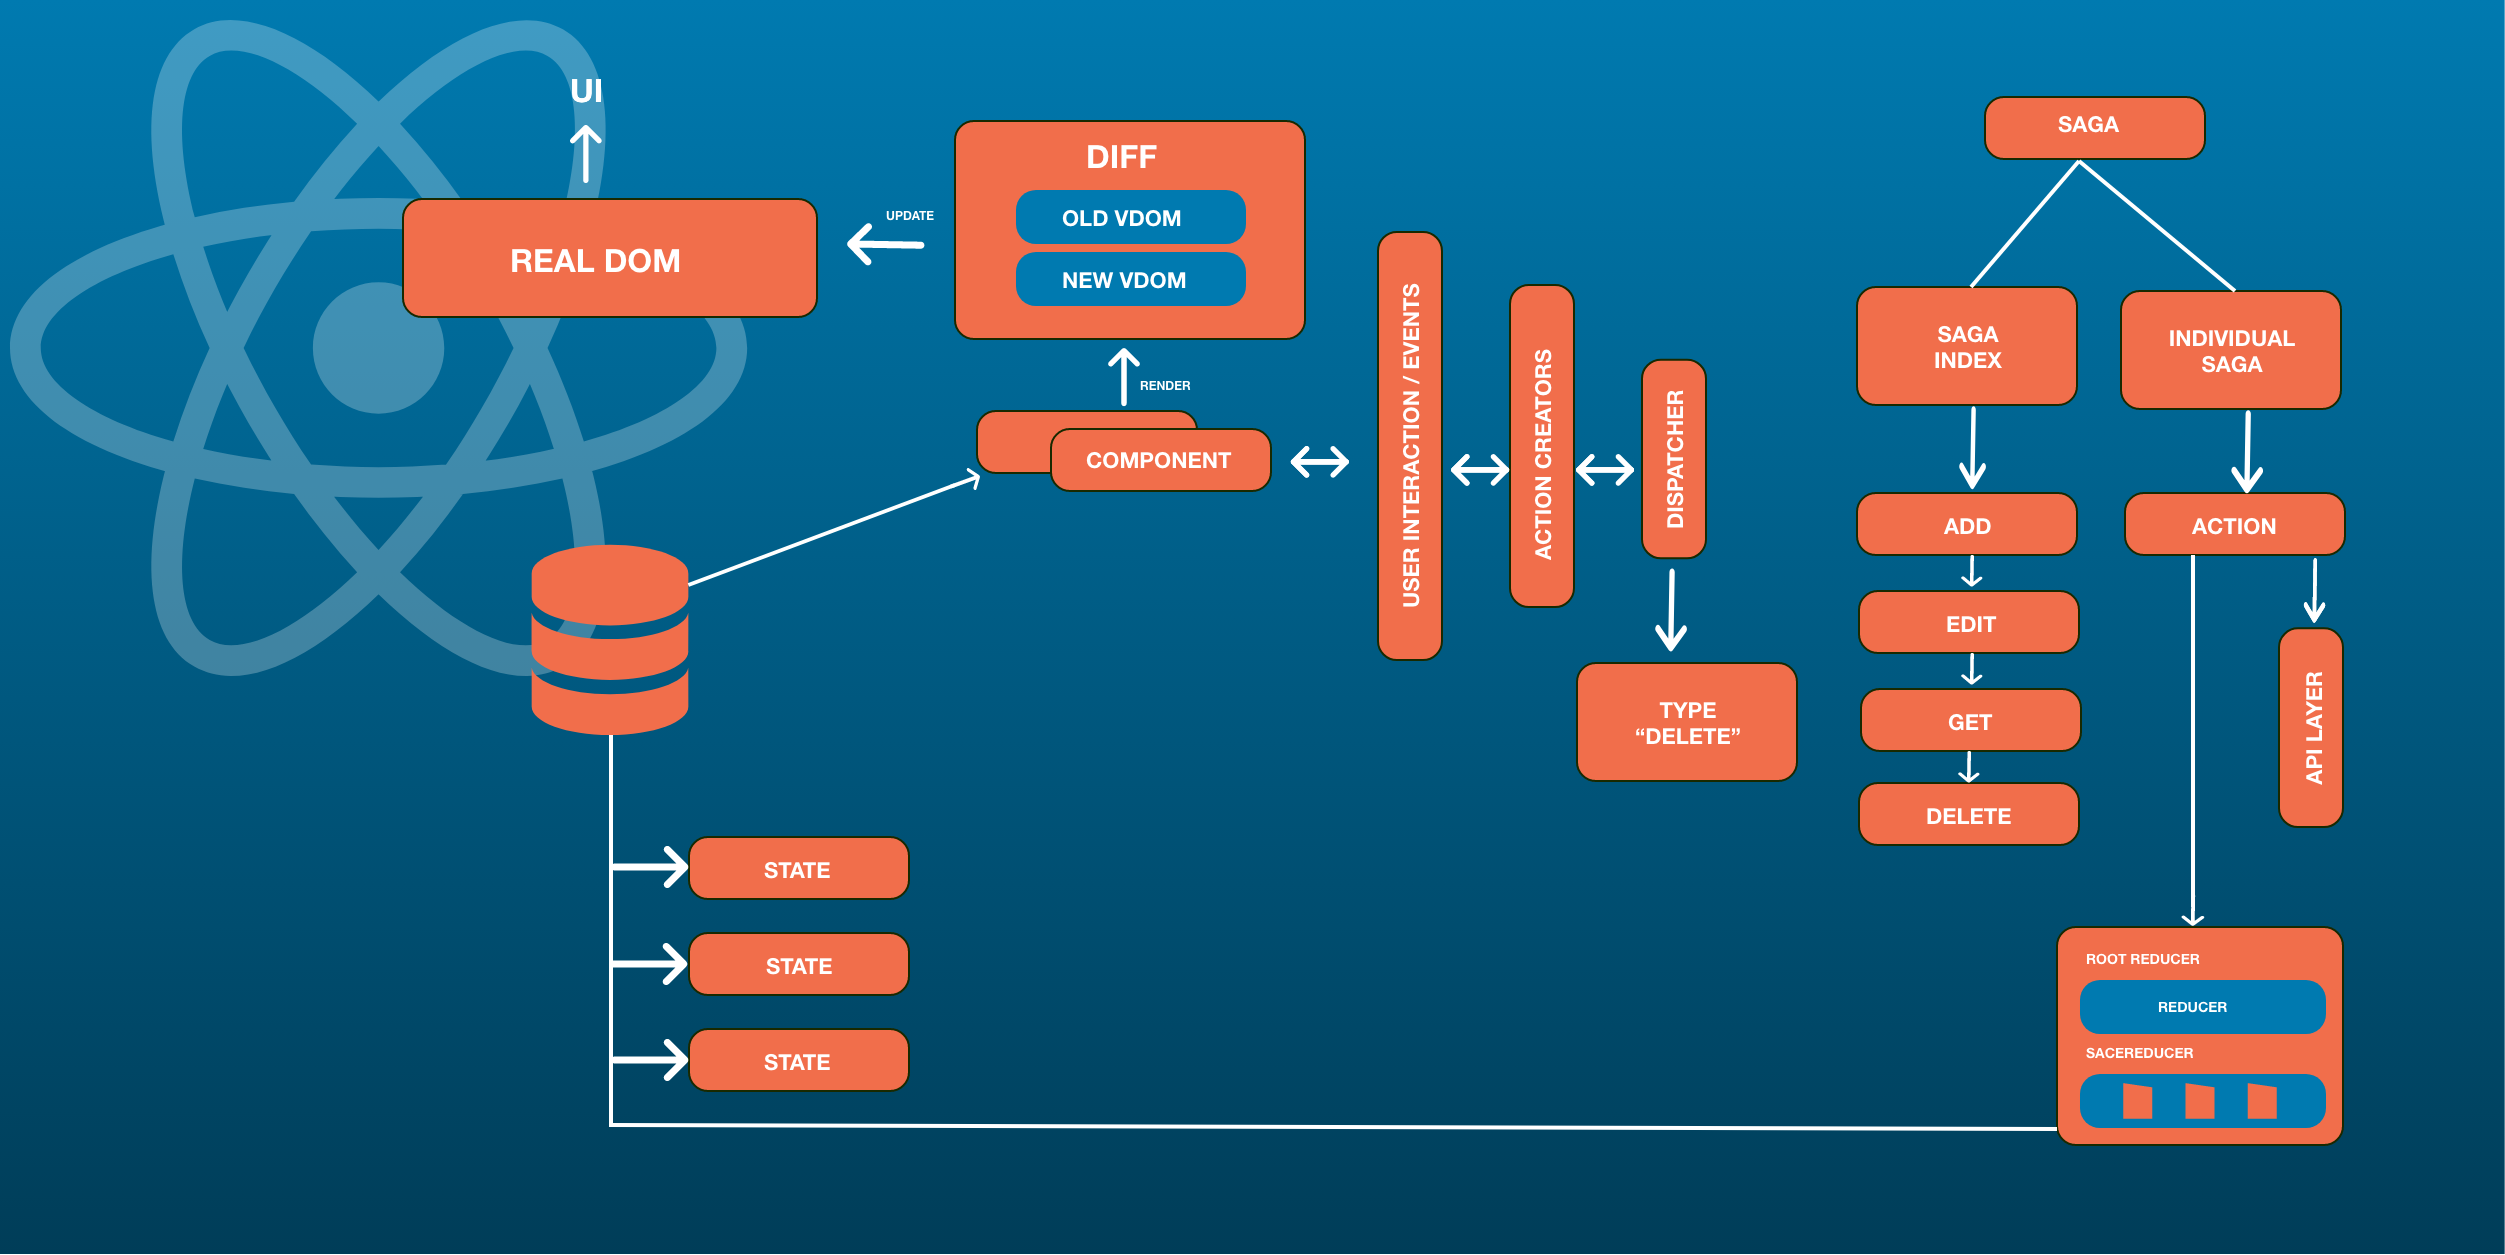
React architecture’s many efficient libraries: Immutable.js, Redux-saga &Redux are the secret ingredients to building highly scalable, performance-driven React apps.
4. React Architecture Best Practices
As Per Industry Experts We can’t stress this fact enough; it is integral to follow the best practices of React architecture to build a large application that stands the test of time.
From using the high-quality coding standards to organizing the folder structure for different t eams, if you ask us, best practices can never see the end of the light. Some developers would like to give names they can remember to their files, while for others, it could be using the best ReactJS libraries to enhance and increase the efficiency of the app.
Here are the best practices to follow using React architecture:
Avoid Using A Lot Of Nested Files & Folders
Reuse Your Components
Put CSS In JavaScript
Comment Only Where Necessary
Use Capitals For Component Names
Use React’s Bit Tool
Use Snippet Libraries
1. Avoid using a lot of nested files & folders
Some developers may believe that assigning purposeful tags to the files is the most effective practice when it comes to React web apps, while others may believe that workflow optimization works best by using the ideal libraries.
We have conducted in-depth research and discussions with industry experts to learn the React Architecture best practices for building and scaling enterprise-grade web applications. Here’s what we found out!
2. Reuse your components
The best way to use React is by developing one component for every function, this lets you use it repeatedly. This means that if you need to build a new component for a function that is the same as before, use that instead of creating the new one.
If the size of the component becomes large, it’s better to break them up into smaller components.
Reusing React components in your project or across multiple projects you develop will help you achieve better reliability.
Read more: React VS Angular: A Comprehensive Comparison for Successful Web Development
3. Put CSS in JavaScript
When you start with your React project, industry experts say that it’s best to keep all your CSS styles you are going to implement in one SCSS file. Some libraries like EmotionsJS & Glamorous will allow you to write CSS in JavaScript. If you’re thinking that some CSS names might collide, using global prefixes can help avoid that. But if your project size increases, this might not be a practical approach.
4. Comment only where necessary
When necessary, a developer must add comments to the lines of code. Comments are one of the most effective practices when using React Architecture. It will help:
Keep the codes easier to read.
If you are going to edit the code, later on, it can help avoid a conflict between the comment and code.
Also read: Vue VS React: A Complete Comparison Between React and Vue
5. Use capitals for Component Names
The majority of React developers use JSX (a JavaScript extension). If you are also planning to use that then you should make sure that the names of the components you create need to begin with uppercase letters.
For instance, you’ll name components as “SelectButton”, and not “ selectbutton”.By carrying this out, the JSX will automatically identify them uniquely from the default HTML tags.
The early React versions used to have a list of all built-in names to differentiate them from custom names. Since the list needed to be updated regularly, capital letters became the new standard.
However, this is specifically if you go with JSX. If you use any other language you can use lowercase letters. But keep in mind that it might help reduce the reusability of components beyond the scope of your project.
6. Use React’s Bit tool
The Bit tool is one of the best React tools that will help you better organize React components in your project easily. This tool also helps to increase the reusability of code, along with promoting teams to collaborate to build components.
Also read: Flutter vs React Native – The Future of Mobile App Development
Use snippet libraries
React architecture best practices also involve using code snippets
When you use code snippets, it will make it easy for you as a developer to keep up with the latest syntax. You’ll also be able to keep the code relatively bug free, which is why as a developer, this is one of the React bet practices to follow.
Some snippet React libraries you can use are:
ES7 React
Redux
JS Snippets
The Takeaway
Technological innovations have become fast-paced in this era. The expectations of your customers will always be more. So when it comes to creating a new website or an app for your business or even releasing a new enhanced feature for your app, being at par with the demands of your users becomes crucial to success. That’s why it’s necessary to build your digital product with a scalable architecture pattern. And React architecture is one of those scalable frameworks for web development. In this piece, we went over React JS architecture’s best practices to build remarkable and highly-performing React web apps.
SOFTWARE TESTING
Software testing is the act of examining the behavior of the software under test by validation and verification.
Software testing can be stated as the process of verifying and validating whether a software or application is bug-free, meets the technical requirements as guided by its design and development, and meets the user requirements effectively and efficiently by handling all the exceptional and boundary cases.
The process of software testing aims not only at finding faults in the existing software but also at finding measures to improve the software in terms of efficiency, accuracy, and usability. It mainly aims at measuring the specification, functionality, and performance of a software program or application.
There are seven principles in software testing:
Testing shows the presence of defects
Exhaustive testing is not possible
Early testing
Defect clustering
Pesticide paradox
Testing is context-dependent
Absence of errors fallacy
Testing shows the presence of defects
The goal of software testing is to make the software fail. Software testing reduces the presence of defects. Software testing talks about the presence of defects and doesn’t talk about the absence of defects. Software testing can ensure that defects are present but it cannot prove that software is defect-free. Even multiple testing can never ensure that software is 100% bug-free. Testing can reduce the number of defects but not remove all defects.
Exhaustive testing is not possible
It is the process of testing the functionality of the software in all possible inputs (valid or invalid) and pre-conditions is known as exhaustive testing. Exhaustive testing is impossible means the software can never test at every test case. It can test only some test cases and assume that the software is correct, and it will produce the correct output in every test case. If the software will test every test case, then it will take more cost, effort, etc., which is impractical.
Early Testing
To find the defect in the software, early test activity shall be started. The defect detected in the early phases of SDLC will be very less expensive. For better performance of software, software testing will start at the initial phase i.e. testing will perform at the requirement analysis phase.
Defect clustering
In a project, a small number of modules can contain most of the defects. Pareto Principle to software testing state that 80% of software defect comes from 20% of modules.
Pesticide paradox
Repeating the same test cases, again and again, will not find new bugs. So it is necessary to review the test cases and add or update test cases to find new bugs.
Testing is context-dependent
The testing approach depends on the context of the software developed. Different types of software need to perform different types of testing. For example, The testing of the e-commerce site is different from the testing of the Android application.
Absence of errors fallacy
If a built software is 99% bug-free but it does not follow the user requirement then it is unusable. It is not only necessary that software is 99% bug-free but it is also mandatory to fulfill all the customer requirements.
There are certain testing guidelines that should be followed while testing the software:
Development team should avoid testing the software: Testing should always be performed by the testing team. The developer team should never test the software themselves. This is because after spending several hours building the software, it might unconsciously become too proprietorial and that might prevent seeing any flaws in the system. The testers should have a destructive approach towards the product. Developers can perform unit testing and integration testing, but software testing should be done by the testing team.
Software can never be 100% bug-free: Testing can never prove the software to 100% bug-free. In other words, there is no way to prove that the software is free of errors even after making several test cases.
Software can never be 100% bug-free: Testing can never prove the software to 100% bug-free. In other words, there is no way to prove that the software is free of errors even after making several test cases.
Prioritize sections: If there are certain critical sections, then it should be ensured that these sections are tested with the highest priority and as early as possible.
The time available is limited: Testing time for software is limited. It must be kept in mind that the time available for testing is not unlimited and that an effective test plan is very crucial before starting the process of testing. There should be some criteria to decide when to terminate the process of testing. This criterion needs to be decided beforehand. For instance, when the system is left with an acceptable level of risk or according to timelines or budget constraints.
Testing must be done with unexpected and negative inputs: Testing should be done with correct data and test cases as well as with flawed test cases to make sure the system is leak proof. Test cases must be well documented to ensure future reuse for testing at later stages. This means that the test cases must be enlisted with proper definitions and descriptions of inputs passed and respective outputs expected. Testing should be done for functional as well as the non-functional requirements of the software product.
Inspecting test results properly: Quantitative assessment of tests and their results must be done. The documentation should be referred to properly while validating the results of the test cases to ensure proper testing. Testing must be supported by automated tools and techniques as much as possible. Besides ensuring that the system does what all it is supposed to do, testers also need to ensure that the system does not perform operations which it isn’t supposed to do.
Validating assumptions: The test cases should never be developed based on assumptions or hypothesis. They must always be validated properly. For instance, assuming that the software product is free from any bugs while designing test cases may result in extremely weak test cases.
Software Development Life Cycle (SDLC)
SDLC is a process that creates a structure of development of software. There are different phases within SDLC, and each phase has its various activities. It makes the development team able to design, create, and deliver a high-quality product.
SDLC describes various phases of software development and the order of execution of phases. Each phase requires deliverable from the previous phase in a life cycle of software development. Requirements are translated into design, design into development and development into testing; after testing, it is given to the client.

Requirement Phase
Design Phase
Build / Development Phase
Testing Phase
Deployment / Deliver Phase
Maintenance
Requirement Phase
This is the most crucial phase of the software development life cycle for the developing team as well as for the project manager. During this phase, the client states requirements, specifications, expectations, and any other special requirement related to the product or software. All these are gathered by the business manager or project manager or analyst of the service providing company.
The requirement includes how the product will be used and who will use the product to determine the load of operations. All information gathered from this phase is critical to developing the product as per the customer requirements.
Design Phase
The design phase includes a detailed analysis of new software according to the requirement phase. This is the high priority phase in the development life cycle of a system because the logical designing of the system is converted into physical designing. The output of the requirement phase is a collection of things that are required, and the design phase gives the way to accomplish these requirements. The decision of all required essential tools such as programming language like Java, .NET, PHP, a database like Oracle, MySQL, a combination of hardware and software to provide a platform on which software can run without any problem is taken in this phase.
There are several techniques and tools, such as data flow diagrams, flowcharts, decision tables, and decision trees, Data dictionary, and the structured dictionary are used for describing the system design.
Build /Development Phase
After the successful completion of the requirement and design phase, the next step is to implement the design into the development of a software system. In this phase, work is divided into small units, and coding starts by the team of developers according to the design discussed in the previous phase and according to the requirements of the client discussed in requirement phase to produce the desired result.
Front-end developers develop easy and attractive GUI and necessary interfaces to interact with back-end operations and back-end developers do back-end coding according to the required operations. All is done according to the procedure and guidelines demonstrated by the project manager.
Since this is the coding phase, it takes the longest time and more focused approach for the developer in the software development life cycle.
Testing Phase
Testing is the last step of completing a software system. In this phase, after getting the developed GUI and back-end combination, it is tested against the requirements stated in the requirement phase. Testing determines whether the software is actually giving the result as per the requirements addressed in the requirement phase or not. The Development team makes a test plan to start the test. This test plan includes all types of essential testing such as integration testing, unit testing, acceptance testing, and system testing. Non-functional testing is also done in this phase.
If there are any defects in the software or it is not working as per expectations, then the testing team gives information to the development team in detail about the issue. If it is a valid defect or worth to sort out, it will be fixed, and the development team replaces it with the new one, and it also needs to be verified.
Deployment/ Deliver Phase
When software testing is completed with a satisfying result, and there are no remaining issues in the working of the software, it is delivered to the customer for their use.
As soon as customers receive the product, they are recommended first to do the beta testing. In beta testing, customer can require any changes which are not present in the software but mentioned in the requirement document or any other GUI changes to make it more user-friendly. Besides this, if any type of defect is encountered while a customer using the software; it will be informed to the development team of that software to sort out the problem. If it is a severe issue, then the development team solves it in a short time; otherwise, if it is less severe, then it will wait for the next version. After the solution of all types of bugs and changes, the software finally deployed to the end-user.
Maintenance
The maintenance phase is the last and long-lasting phase of SDLC because it is the process which continues until the software's life cycle comes to an end. When a customer starts using software, then actual problems start to occur, and at that time there's a need to solve these problems. This phase also includes making changes in hardware and software to maintain its operational effectiveness like to improve its performance, enhance security features and according to customer's requirements with upcoming time. This process to take care of product time to time is called maintenance.
So, all these are six phases of software development life cycle (SDLC) under which the process of development of software takes place. All are compulsory phases without any one of the developments cannot be possible because development continues for the lifetime of software with maintenance phase".
Software Development Life Cycle (SDLC) Models
The software development models are those several process or approaches which are being selected for the development of project based on the project's objectives. To accomplish various purposes, we have many development life cycle models. And these models identify the multiple phases of the process. Picking up the correct model for developing the software application is very important because it will explain what, where, and when of our planned testing.
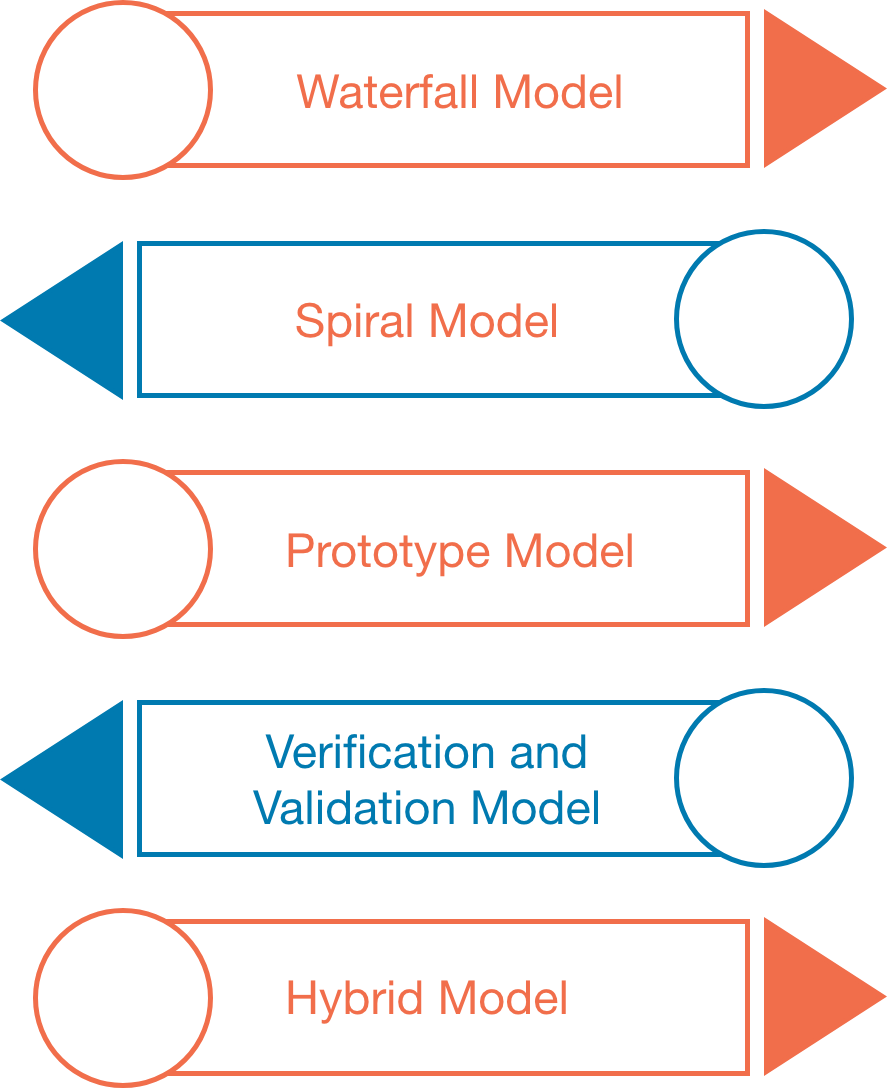
Here, are various software development models or methodologies:
Waterfall model
Spiral model
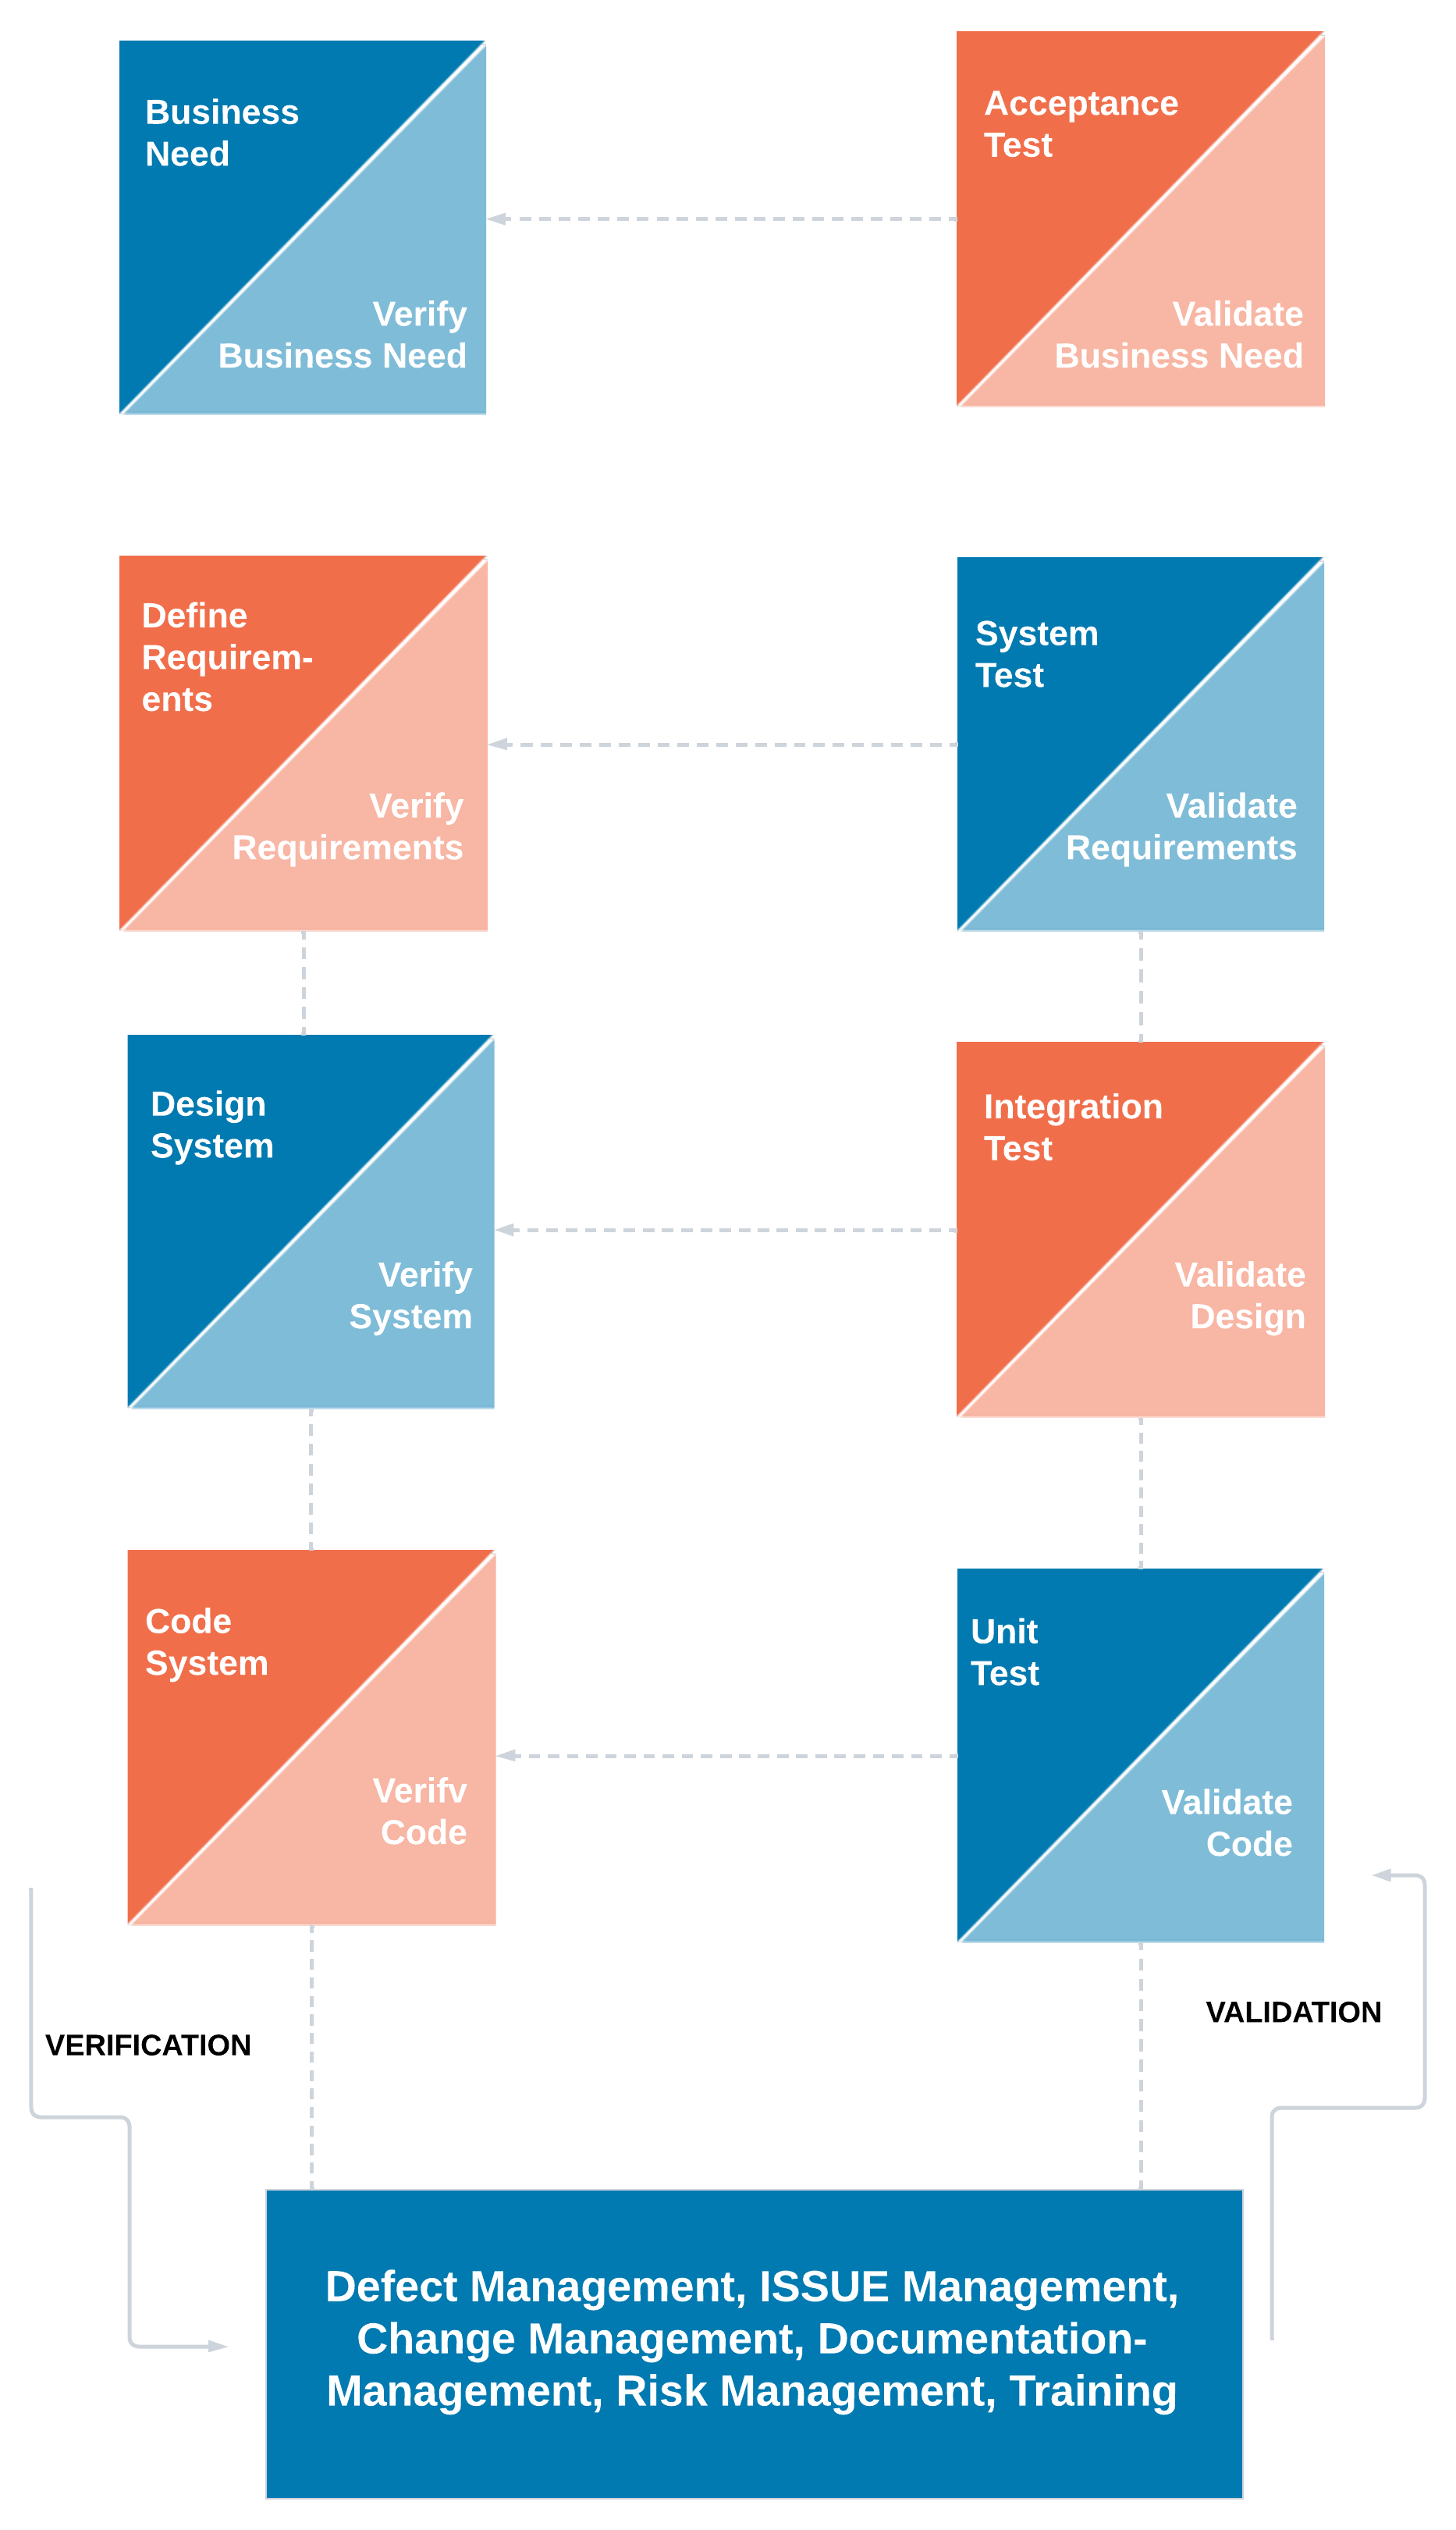
Verification and validation model
Prototype model
Hybrid model
Software Development life Cycle
Waterfall Model
It is the first sequential-linear model because the output of the one stage is the input of the next stage. It is simple and easy to understand, which is used for a small project. The various phases of the waterfall model are as follows:
Requirement analysis
Feasibility study
Design
Coding
Testing
Installation
Maintenance
Spiral Model
It is the best suites model for a medium level project. It is also called the Cyclic and Iteration model. Whenever the modules are dependent on each other, we go for this model. And here, we develop application model wise and then handed over to the customer. The different stages of the spiral model are as follows:
Requirement collection
Design
Coding
Testing
Prototype Model
From the time when customer rejection was more in the earlier model, we go for this model as customer rejection is less. And, it allows us to prepare a sample (prototype) in the early stage of the process, which we can show to the client and get their approval and start working on the original project. This model refers to the action of creating the prototype of the application.
Verification & Validation Model
It is an extended version of the waterfall model. It will implement in two phases wherein the first phase, we will perform the verification process, and when the application is ready, we will perform the validation process. In this model, the implementation happens in the V shape, which means that the verification process done under downward flow and the validation process complete in the upward flow.
Hybrid Model
The hybrid model is used when we need to acquire the properties of two models in the single model. This model is suitable for small, medium, and large projects because it is easy to apply, understand.
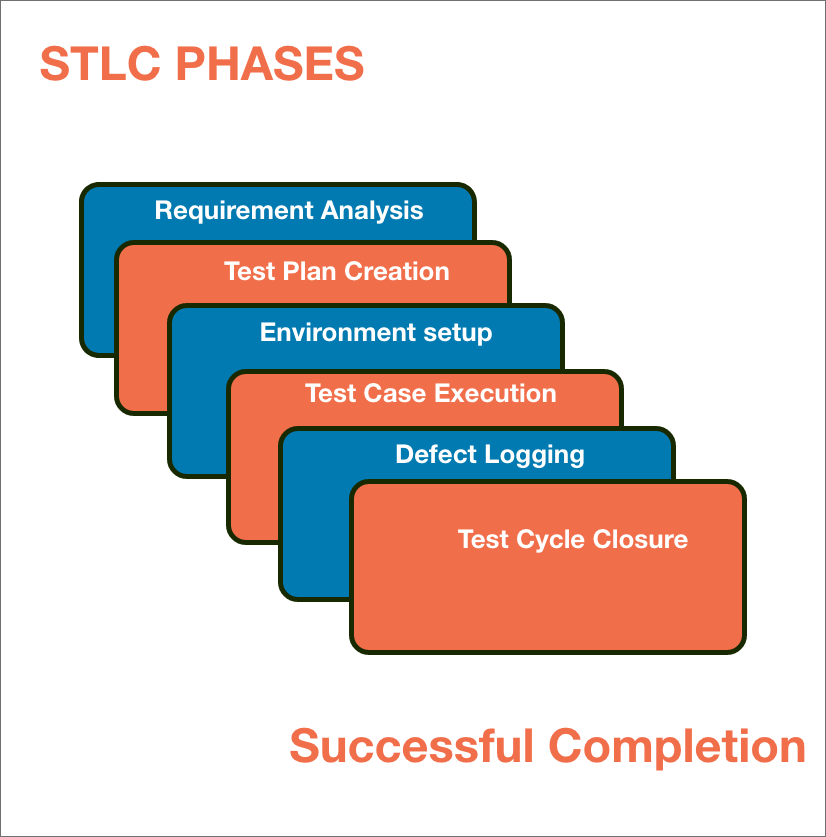
Software Testing Life Cycle (STLC)
The procedure of software testing is also known as STLC (Software Testing Life Cycle) which includes phases of the testing process.The testing process is executed in a well-planned and systematic manner. All activities are done to improve the quality of the software product. Let's see, the different steps of STLC.
Software testing life cycle contains the following steps:
Requirement Analysis
Test Plan Creation
Environment setup
Test Case Execution
Defect Logging
Test Cycle Closure
Requirement Analysis:
The first step of the manual testing procedure is requirement analysis. In this phase, tester analyses requirement document of SDLC (Software Development Life Cycle) to examine requirements stated by the client. After examining the requirements, the tester makes a test plan to check whether the software is meeting the requirements or not.
Test Plan Creation:
Test plan creation is the crucial phase of STLC where all the testing strategies are defined. Tester determines the estimated effort and cost of the entire project. This phase takes place after the successful completion of the Requirement Analysis Phase. Testing strategy and effort estimation documents provided by this phase. Test case execution can be started after the successful completion of Test Plan Creation.
Environment setup:
Setup of the test environment is an independent activity and can be started along with Test Case Development. This is an essential part of the manual testing procedure as without environment testing is not possible. Environment setup requires a group of essential software and hardware to create a test environment. The testing team is not involved in setting up the testing environment, its senior developers who create it.
Test case Execution:
Test case Execution takes place after the successful completion of test planning. In this phase, the testing team starts case development and execution activity. The testing team writes down the detailed test cases, also prepares the test data if required. The prepared test cases are reviewed by peer members of the team or Quality Assurance leader.
RTM (Requirement Traceability Matrix) is also prepared in this phase. Requirement Traceability Matrix is industry level format, used for tracking requirements. Each test case is mapped with the requirement specification. Backward & forward traceability can be done via RTM.
Defect Logging:
Testers and developers evaluate the completion criteria of the software based on test coverage, quality, time consumption, cost, and critical business objectives. This phase determines the characteristics and drawbacks of the software. Test cases and bug reports are analyzed in depth to detect the type of defect and its severity.
Defect logging analysis mainly works to find out defect distribution depending upon severity and types. If any defect is detected, then the software is returned to the development team to fix the defect, then the software is re-tested on all aspects of the testing. Once the test cycle is fully completed then test closure report, and test metrics are prepared.
Test Cycle Closure:
The test cycle closure report includes all the documentation related to software design, development, testing results, and defect reports.
This phase evaluates the strategy of development, testing procedure, possible defects to use these practices in the future if there is a software with the same specification.
Types
Software Testing can be broadly classified into two types:
1.Manual Testing:
Manual testing includes testing software manually, i.e., without using any automation tool or any script. In this type, the tester takes over the role of an end-user and tests the software to identify any unexpected behavior or bug. There are different stages for manual testing such as unit testing, integration testing, system testing, and user acceptance testing. Testers use test plans, test cases, or test scenarios to test software to ensure the completeness of testing. Manual testing also includes exploratory testing, as testers explore the software to identify errors in it.
2. Automation Testing:
Automation testing, which is also known as Test Automation, is when the tester writes scripts and uses another software to test the product. This process involves the automation of a manual process. Automation Testing is used to re-run the test scenarios quickly and repeatedly, that were performed manually in manual testing. Apart from regression testing, automation testing is also used to test the application from a load, performance, and stress point of view. It increases the test coverage, improves accuracy, and saves time and money when compared to manual testing.
TECHNIQUES
Software testing techniques can be majorly classified into two categories:
Black Box Testing:
The technique of testing in which the tester doesn’t have access to the source code of the software and is conducted at the software interface without any concern with the internal logical structure of the software is known as black-box testing.
White Box Testing:
The technique of testing in which the tester is aware of the internal workings of the product, has access to its source code, and is conducted by making sure that all internal operations are performed according to the specifications is known as white box testing.
FUNCTIONAL TESTING:
It is a type of software testing which is used to verify the functionality of the software application, whether the function is working according to the requirement specification. In functional testing, each function tested by giving the value, determining the output, and verifying the actual output with the expected value. Functional testing performed as black box testing which is presented to confirm that the functionality of an application or system behaves as we are expecting. It is done to verify the functionality of the application.
Functional testing also called as black-box testing, because it focuses on application specification rather than actual code. Tester must test only the program rather than the system.
The purpose of the functional testing is to check the primary entry function, necessarily usable function, the flow of screen GUI. Functional testing displays the error message so that the user can easily navigate throughout the application.
Testers follow the following steps in the functional testing:
Tester does verification of the requirement specification in the software application.
After analysis, the requirement specification tester will plan.
After planning the tests, the tester will design the test case.
After designing the test, case tester will make a document of the traceability matrix.
The tester will execute the test case design.
Analysis of the coverage to examine the covered testing area of the application.
Defect management should do to manage defect resolving.
The main objective of functional testing is checking the functionality of the software system. It concentrates on:
Basic Usability:
Functional Testing involves the usability testing of the system. It checks whether a user can navigate freely without any difficulty through screens.
Accessibility:
Functional testing test the accessibility of the function.
Mainline function:
It focuses on testing the main feature.
Error Condition:
Functional testing is used to check the error condition. It checks whether the error message displayed.
There are the following steps to perform functional testing:
There is a need to understand the software requirement.
Identify test input data
Compute the expected outcome with the selected input values.
Execute test cases
Comparison between the actual and the computed result

The main objective of functional testing is to test the functionality of the component.Functional testing is divided into multiple parts. Here are the following types of functional testing.
Unit Testing:
Unit testing is a type of software testing, where the individual unit or component of the software tested. Unit testing, examine the different part of the application, by unit testing functional testing also done, because unit testing ensures each module is working correctly. The developer does unit testing. Unit testing is done in the development phase of the application.
Smoke Testing:
Functional testing by smoke testing. Smoke testing includes only the basic (feature) functionality of the system. Smoke testing is known as "Build Verification Testing." Smoke testing aims to ensure that the most important function work.
For example, Smoke testing verifies that the application launches successfully will check that GUI is responsive.
Sanity Testing:
Sanity testing involves the entire high-level business scenario is working correctly. Sanity testing is done to check the functionality/bugs fixed. Sanity testing is little advance than smoke testing.
For example, login is working fine; all the buttons are working correctly; after clicking on the button navigation of the page is done or not.
Regression Testing:
This type of testing concentrates to make sure that the code changes should not side effect the existing functionality of the system. Regression testing specifies when bug arises in the system after fixing the bug, regression testing concentrate on that all parts are working or not. Regression testing focuses on is there any impact on the system.
Integration Testing:
Integration testing combined individual units and tested as a group. The purpose of this testing is to expose the faults in the interaction between the integrated units. Developers and testers perform integration testing.
Advantages of functional testing are:
It produces a defect-free product.
It ensures that the customer is satisfied.
It ensures that all requirements met.
It ensures the proper working of all the functionality of an application/software/product.
It ensures that the software/ product work as expected.
It ensures security and safety.
It improves the quality of the product.
Example:
Here, we are giving an example of banking software. In a bank when money transferred from bank A to bank B. And the bank B does not receive the correct amount, the fee is applied, or the money not converted into the correct currency, or incorrect transfer or bank A does not receive statement advice from bank B that the payment has received. These issues are critical and can be avoided by proper functional testing.
Disadvantages of functional testing are:
Functional testing can miss a critical and logical error in the system.
This testing is not a guarantee of the software to go live.
The possibility of conducting redundant testing is high in functional testing.
The functional testing can also be executed by various apart from manual testing. These tools simplify the process of testing and help to get accurate and useful results.
It is one of the significant and top priority-based techniques which were decided and specified before the development process.
Software level testing can be majorly classified into 4 levels:
1. Unit Testing:
A level of the software testing process where individual units/components of a software/system are tested. The purpose is to validate that each unit of the software performs as designed.
2. Integration Testing:
A level of the software testing process where individual units are combined and tested as a group. The purpose of this level of testing is to expose faults in the interaction between integrated units.
3. System Testing:
A level of the software testing process where a complete, integrated system/software is tested. The purpose of this test is to evaluate the system’s compliance with the specified requirements.
4. Acceptance Testing:
A level of the software testing process where a system is tested for acceptability. The purpose of this test is to evaluate the system’s compliance with the business requirements and assess whether it is acceptable for delivery.
NON – FUNCTIONAL TESTING:
Non-functional testing is a type of software testing to test non-functional parameters such as reliability, load test, performance and accountability of the software. The primary purpose of non-functional testing is to test the reading speed of the software system as per non-functional parameters. The parameters of non-functional testing are never tested before the functional testing. Non-functional testing is also very important as functional testing because it plays a crucial role in customer satisfaction.
For example, non-functional testing would be to test how many people can work simultaneously on any software.
Functional and Non-functional testing both are mandatory for newly developed software. Functional testing checks the correctness of internal functions while Non-Functional testing checks the ability to work in an external environment.
It sets the way for software installation, setup, and execution. The measurement and metrics used for internal research and development are collected and produced under non-functional testing.
Non-functional testing gives detailed knowledge of product behavior and used technologies. It helps in reducing the risk of production and associated costs of the software.
Parameters to be tested under Non-Functional Testing
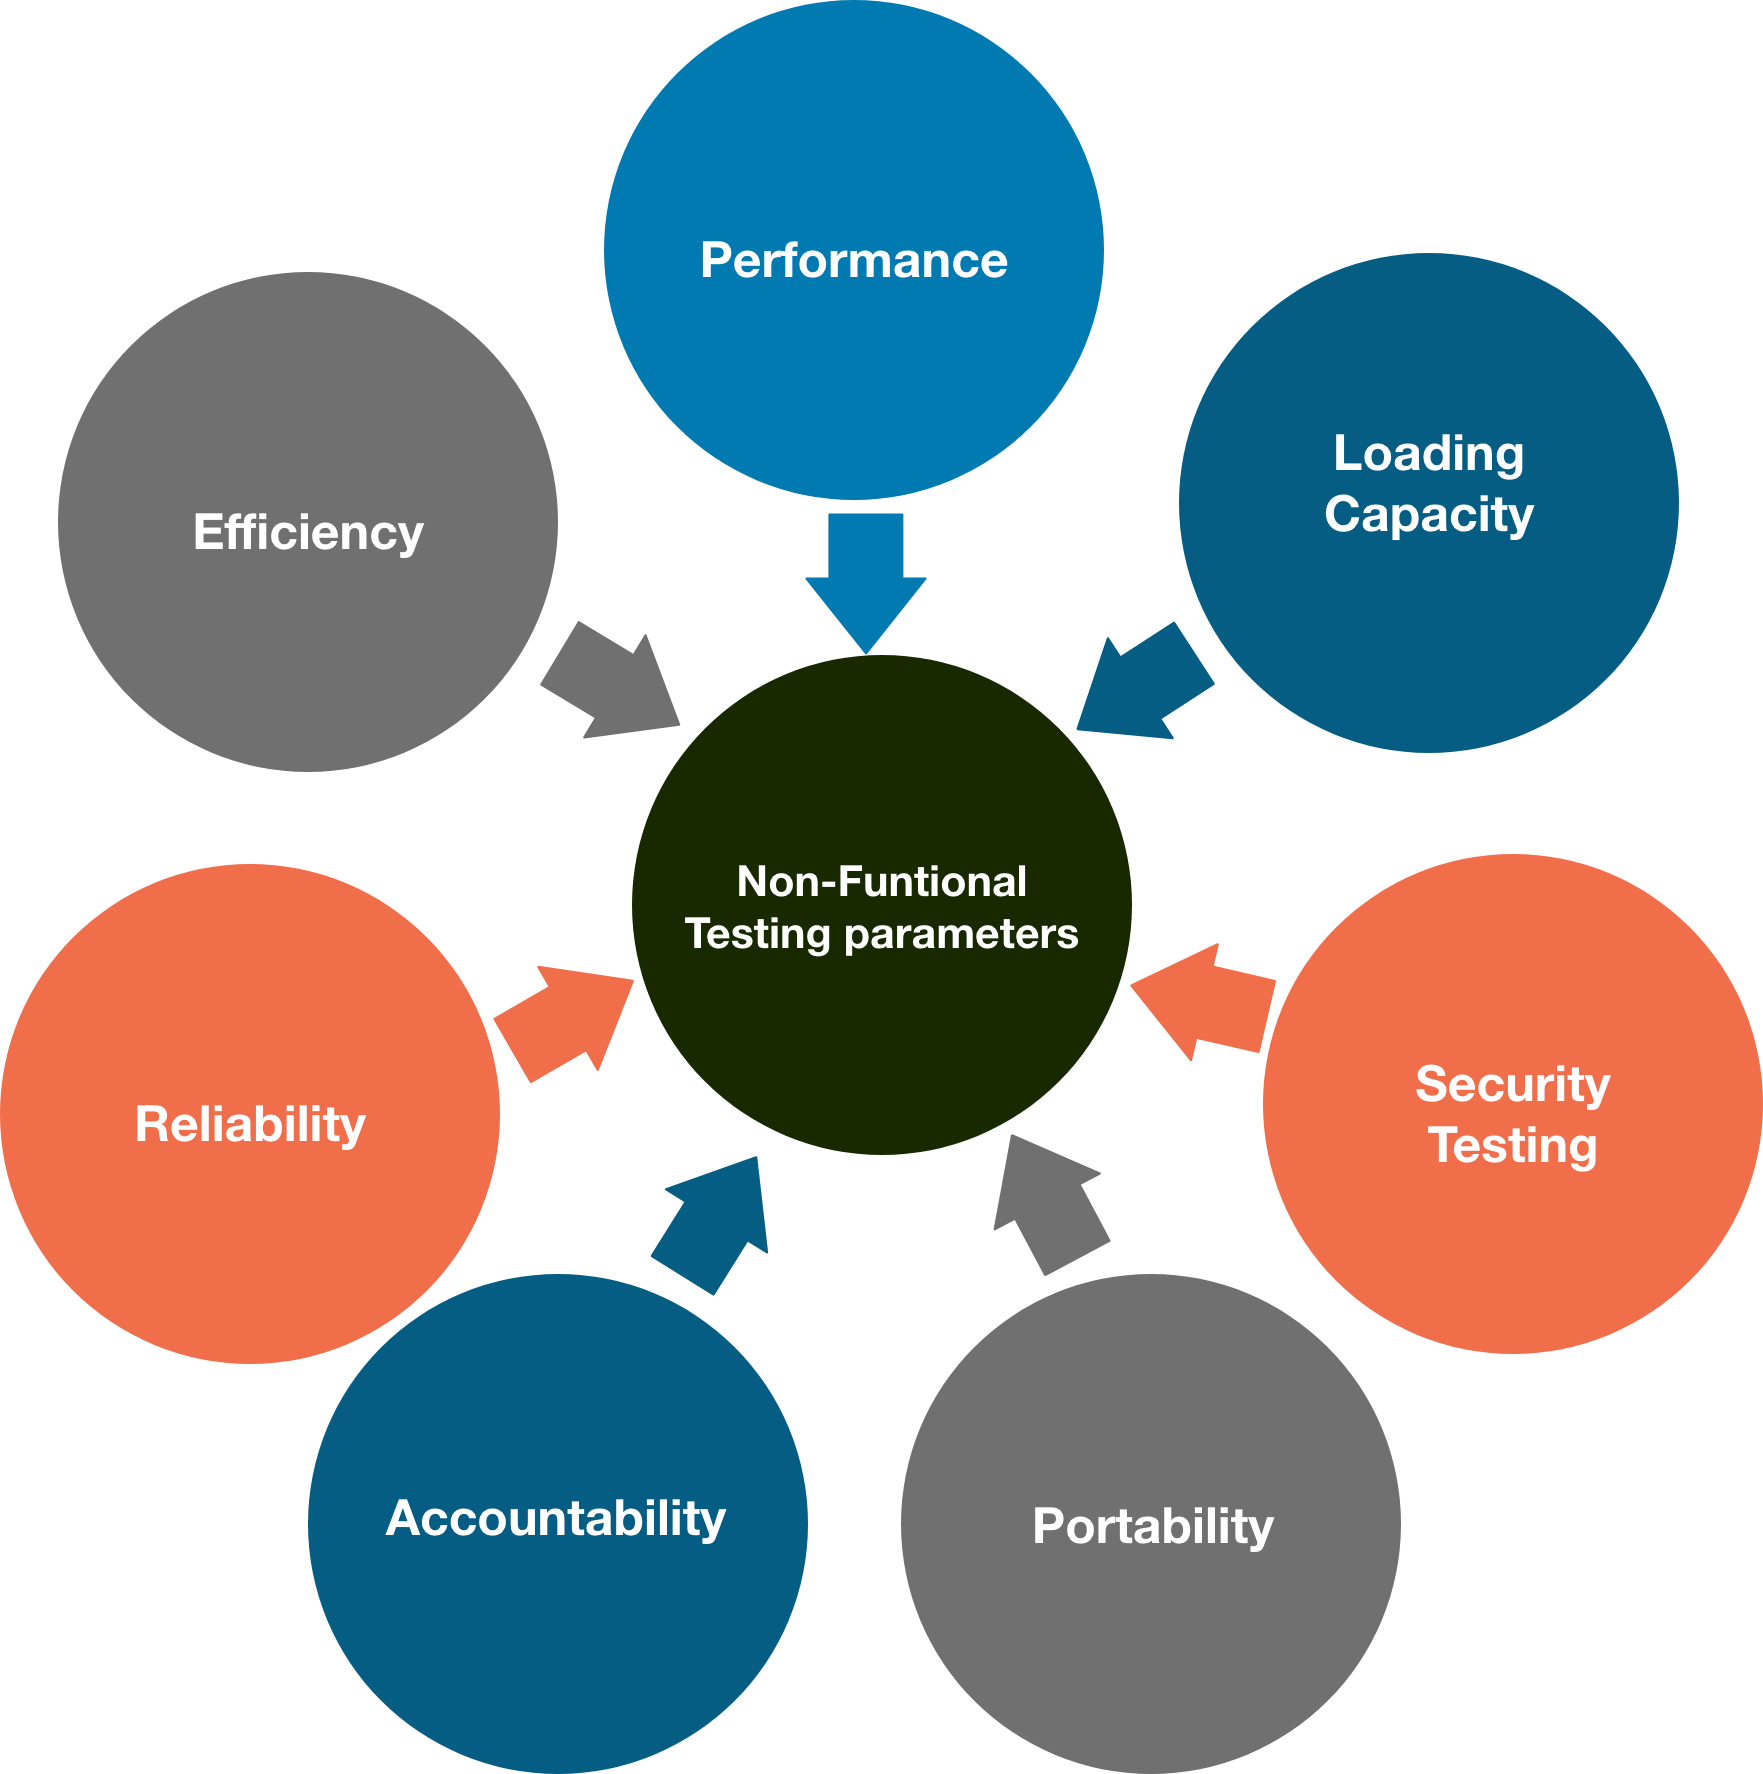
Performance Testing
Performance Testing eliminates the reason behind the slow and limited performance of the software. Reading speed of the software should be as fast as possible.
For Performance Testing, a well-structured and clear specification about expected speed must be defined. Otherwise, the outcome of the test (Success or Failure) will not be obvious.
Load Testing
Load testing involves testing the system's loading capacity. Loading capacity means more and more people can work on the system simultaneously.
Security Testing
Security testing is used to detect the security flaws of the software application. The testing is done via investigating system architecture and the mindset of an attacker. Test cases are conducted by finding areas of code where an attack is most likely to happen.
Portability Testing
The portability testing of the software is used to verify whether the system can run on different operating systems without occurring any bug. This test also tests the working of software when there is a same operating system but different hardware.
Accountability Testing
Accountability test is done to check whether the system is operating correctly or not. A function should give the same result for which it has been created. If the system gives expected output, it gets passed in the test otherwise failed.
Reliability Testing
Reliability test assumes that whether the software system is running without fail under specified conditions or not. The system must be run for a specific time and number of processes. If the system is failed under these specified conditions, reliability test will be failed.
Efficiency Testing
Efficiency test examines the number of resources needed to develop a software system, and how many of these were used. It also includes the test of these three points.
Customer's requirements must be satisfied by the software system.
A software system should achieve customer specifications.
Enough efforts should be made to develop a software system.
Advantages of Non-functional testing
It provides a higher level of security. Security is a fundamental feature due to which system is protected from cyber-attacks.
It ensures the loading capability of the system so that any number of users can use it simultaneously.
It improves the performance of the system.
Test cases are never changed so do not need to write them more than once.
Overall time consumption is less as compared to other testing processes.
Disadvantages of Non-Functional Testing
Every time the software is updated, non-functional tests are performed again.
Due to software updates, people must pay to re-examine the software; thus, software becomes very expensive.
Java Architecture and it's Components
Java Architecture is a combination of compilation and interpretation. This article explains how to create a Java programming program. Let me first introduce the article’s agenda.
These are the topics we will discuss:
What is Java Architecture?
In this article, I will show you how to use Java architecture in easy steps.
Java has a process for compilation and interpretation.
The Java Compiler converts Java code into byte codes.
The JVM then converts the byte codes into machine code.
The machine executes the Machine code directly.
This diagram shows the internal workings of Java Code, or more precisely Java Architecture.
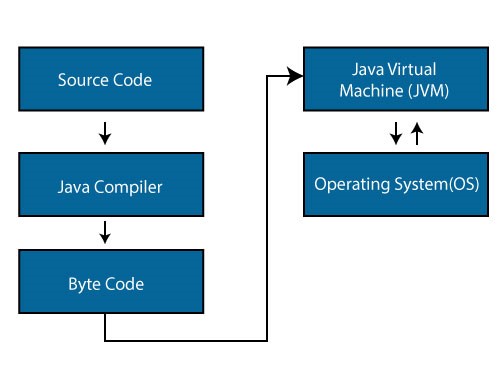
Components of Java Architecture
The three main components of the Java language are JVM vs JRE vs JVM. Java Virtual Machine, Java Runtime Environment, and Java Development Kit are the respective Java Virtual Machines. Let me go over each one by one.
Java Virtual Machine:
Have you heard of WORA? WORA stands for Write once, Run Anywhere. Because Java applications can run code on any platform, they are known as WORA. JVM is the only reason this happens. JVM is a Java platform component that provides an environment for Java programs to be executed. JVM converts the bytecode to machine code, which is executed on the machine where the Java program runs.
In a nutshell, JVM does the following:
Loads the code
Verifies the code
Executes the code
Provides runtime environment
Show you the JVM architecture, here —
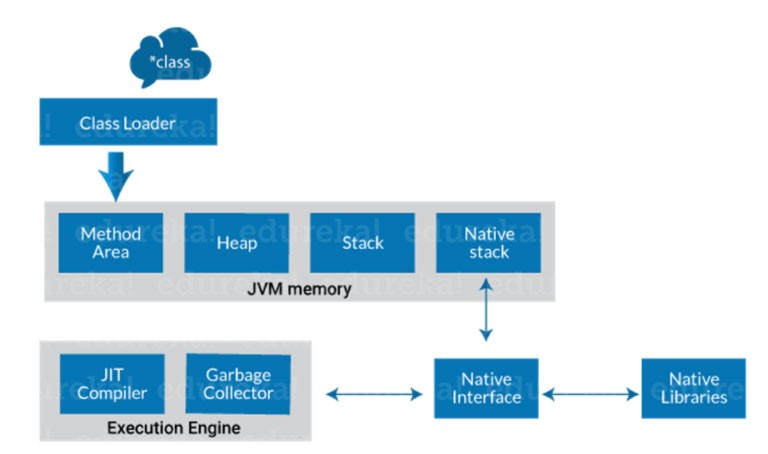
Class Loader:
The class loader is a subsystem within JVM. It is used for loading class files. Class loader loads the Java program first when we run it.
Class method area:
It is where Class data will be kept. This area stores static variables, static blocks, static methods, and instance methods.
Heap:
A heap is created by the JVM when it starts up. It can grow or shrink depending on the application’s performance.
Stack is a JVM stack:
It’s also known as a Thread Stack. It is a JVM memory data area that is used to store one execution thread. A thread uses the JVM stack to store different elements, e.g. The thread uses the JVM stack to store various elements, including local variables, partial results, and data for calling methods or returns.
Native stack:
This includes all native methods that are used in your application.
Execution engine:
JIT compiler
Garbage collector
JIT compiler:
The Just-In-Time (JIT) compiler is part of the runtime environment. This compiler compiles bytecodes at runtime to improve the performance of Java applications. By default, the JIT compiler is activated. The JVM calls the compiled method a method when it is compiled. The JIT compiler converts the bytecode into machine code and compiles it “just-in-time” to run.
Garbage collector:
The name Garbage Collector refers to the act of collecting unused material. This is what Garbage Collection does in JVM. It records every object in the JVM heap space and removes any that are not needed.
Two simple steps are required to collect garbage: Mark and Sweep
Mark – It is where the garbage collector determines which memory pieces are in use and which ones are not
Sweep – It is used to remove objects that were identified in the “mark” phase.
Java Runtime Environment:
The JRE software creates a runtime environment where Java programs can execute. The JRE software is an on-disk system that takes Java code and combines it with required libraries. Finally, the JVM starts to execute the Java code. JRE includes the libraries and software that Java programs need to run. JRE is part of JDK (which will be studied later), but you can download it separately.
Java Development Kit:
Java Development Kit (JDK), is a software environment that allows you to create Java applets and applications. It includes JRE, several development tools, an executor/loader (java), a compiler (javac), an archiver (jar), and a documentation generator(javadoc), along with another tool.
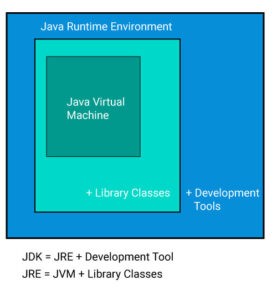
Let me explain the development tools to all of you.
Java: It is the launcher of all java applications.
javac: Complier of the Java programming languages.
Javadoc: It is the API documentation generator.
Jar: Creates and manages all JAR files
Let’s continue with Java architecture.
How is Java platform independent?
When is any programming language called platform-independent? It is only possible if the programming language can be used on all operating systems that are available for its compilation and development.
Java is platform-independent because of the use of bytecode. Let me explain what bytecode is. In simple terms, Bytecode is a code of the JVM which is machine-understandable. Java executes Bytecode, proving it to be a platform-independent programming language. This article will explain the steps involved with the execution of Java bytecode.

sample.java → javac (sample. class) → JVM(sample.obj) → final output
Java compiler uses the first source code and converts it in.class files. The class file code is in byte form. JVM uses that class file to convert into an object. The final output will be displayed on your screen.
JIT in Java
The Just In Time compiler, also known as JIT is responsible for optimizing Java-based applications’ performance at runtime. A compiler is a key factor in the performance of any application.
The JIT compiler converts the byte code into machine code and compiles it “Just in Time” for you to run. The JVM calls the compiled method when a method has been compiled.
Let’s dive deeper:
Based on the instruction set, the byte code must be interpreted and compiled to correct machine instructions. These can also be executed directly in the instruction architecture that uses byte code. The execution speed is affected by how the byte code is interpreted.
JIT compilers communicate with the Java Virtual Machine at run-time and convert suitable bytecode sequences to native machine code (as illustrated in the diagram). This improves performance. A JIT compiler is more efficient than having the JVM interpret the same bytecode sequence repeatedly, causing overhead and causing delays in the translation process.
This brings me to the end of my article on Java Architecture. I trust the topics discussed above will add value to your Java knowledge.
After you’ve learned the basics of Java, take the Java Online Course from Edureka. This trusted online learning company has more than 250,000 learners around the world. Edureka’s Java J2EE/SOA certification and training course are for professionals and students who are interested in becoming a Java Developer. This course will give you a headstart in Java programming. It will teach you how to use both core and advanced Java concepts, as well as various Java frameworks such as Hibernate and Spring.
How React Native Is The Future Of Hybrid App Development?
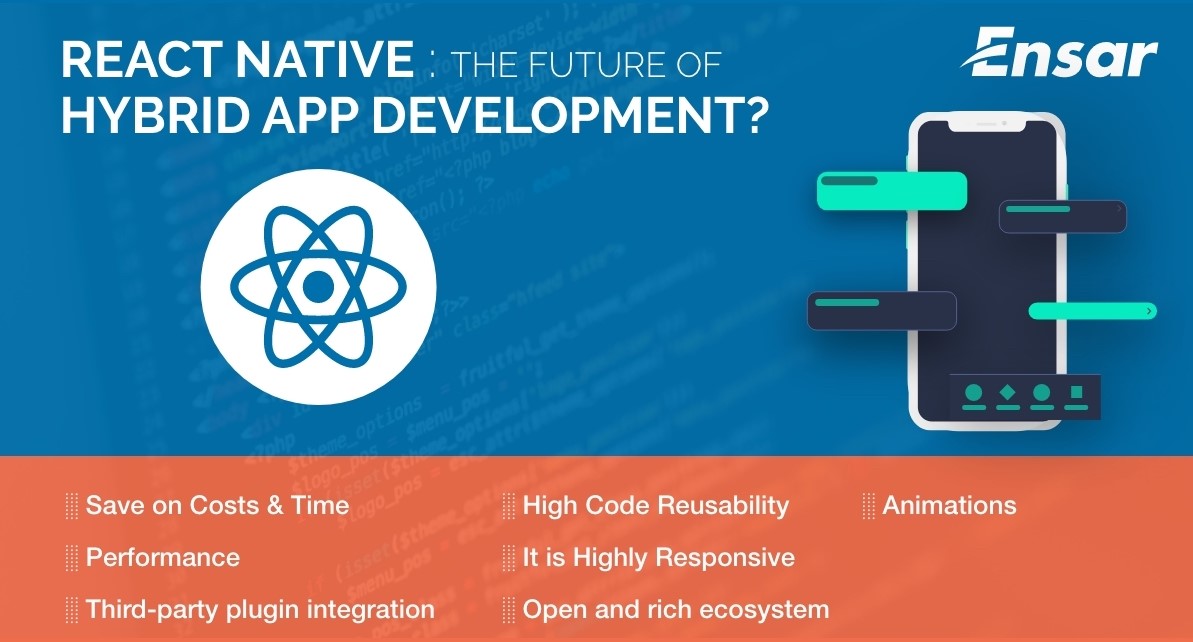
It might be the fact that you want to create an app like Instagram, or maybe Skype, Twitter, or Facebook. Once any company makes plans for mobile application development, one question that arises in their mind will be create an app for Android or iOS. Each platform has its pros and cons, such as while iOS offers a superior UX, Android is loaded with the benefits of quicker deployment while maintaining a low cost of development.
It is a fact that the appropriate blend of these platforms will provide faster deployment time, shorter development cycles while exhibiting superior performance as well.
Hybrid applications will bridge the gap between the simplicity of development and user experience while gradually brightening the future of mobile hybrid app development. This choice made the developers create applications for Android and iOS by using a single framework or language. Apart from this, there are certain technologies to provide support fordeveloping hybrid applications. Amongst a lot of choices, React Native, which Facebook supports, leads the way when it comes to UI design framework.
What is React Native?
Mobile app framework React Native is open-source and free. It’s JavaScript’s native library. It simplifies development, improves user experience, and shapes the UI component hierarchy to build mobile apps.
Benefits of React Native in Hybrid App Development
Save on Costs & Time
The cross-platform applications of this platform make it an absolute time saver when it comes to development. Since the code is applicable for both iOS and Android, the business does not have to spend on creating separate apps, instead can focus on investing and creating a unified entity.
In terms of sheer costs, this can be lower than the cost of creating a single app. Moreover, in terms of sheer decision-making, it becomes much easier to launch the app on both platforms simultaneously, saving a ton of time.
Moreover, the fact this is a common platform for both Oss, any updates or maintenance done can simultaneously be applied for both iOS and Android.
Performance
The performance of the hybrid app has been in question for a long time. Frequent crashes, inadequate offline support, poor network conditions, and low speed are some of them. Apart from this, the apps likewise generate some bugs, which make them less user-friendly. Furthermore, hybrid apps take a long time to open, which can frustrate the users out there.
Third-party plugin integration
Does your app idea involve interacting with native apps? Worry not, as the react native platform allows building applications that can use the functionality of native apps. The native interaction enables.
Agile development
Increases app loading speed
Uses less memory
Improve UI experience provides
DOM abstraction
Simplifies programming methodology
It is Highly Responsive
React Native emphasizes the UI design, which makes it responsive and loaded with the best features. Consequently, it reduces the loading time of apps and provides an extremely smoother navigation experience throughout. React Native develops apps with a responsive UI, leading to robust performance and making apps compatible with various mobile devices’ screen resolutions.
Open and rich ecosystem
There has been a massive transformation ever since React Native was released. Lots of industry giants have turned to React Native, particularly due to its richness in an extensive range of modules plus free access.
Despite having different libraries before React Native, different challenges are faced by the developers for coding their apps with superior UX. React Native has helped to make things extremely simple for the developers at present. It provides them with the advantage of customizing until and unless React Native supports it.
Animations
React Native has been adopted by many industry giants at present, particularly social media sites, mainly due to its smooth animated mechanisms. It aids in offering a fantastic user experience which helps to improve the reviews as well as ratings of the apps. As it is known to everybody, visual aid can be considered the most effective aid for showcasing.
Conclusion
It is a fact that Native and hybrid apps come with their advantages and drawbacks. Therefore, the companies must evaluate the option matching their requirements. The native apps will be an appropriate choice in case you are looking forward to the performance and stability of the app. The native apps will coordinate with several other features of a smartphone, including GPS, camera, and calendar. Nevertheless, businesses are in search of quick application development and need good performance across various platforms.
React Native will be most effective for hybrid apps when the top priority of the companies will be to capture the marketing opportunities before other competitors can enter the market. React Native can boast of having a bright future if you are in the requirement of an app delivering an identical experience such as native apps sans compromising the performance.
Why Are iOS App Development Services Best for Businesses?
The area of app development services provides some advantages to businesses and startups. Enterprise-level apps provide the technical scaffold to businesses based on their progress. Several app development services, and platforms businesses use to develop apps. One of the leading app development services is based on the IOS interface and tools that develop apps. IOS apps are best suited for devices powered by IOS operating system. IOS is one of the best-operating systems many devices are based on. Therefore, iOS app development services count among those used for robust, business-oriented app development.
The Benefits of IOS App Development
Here we are going to discuss iPhone application development and explore how it benefits your business for a long time. Read it entire benefit to clear your confusion on why to choose iPhone app development for your next app
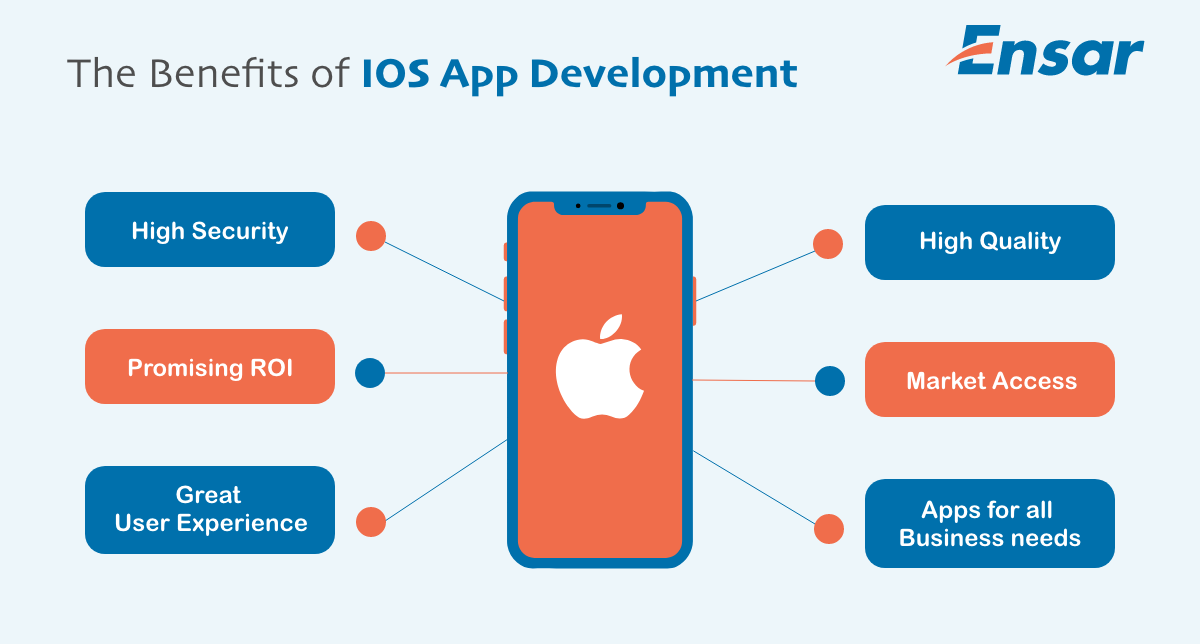
High Security
Businesses are now focusing on creating secure and highly conserved app environments that are private to the organization and work best for highly sensitive data operations and processes. Business organizations want to invest in apps that are safe and maintain data privacy. As cyberspace evolves, the cyber security provisions also get enhanced.
IOS app development services provide highly secure frameworks for app development so that the output is very safe for use in business environments. The IOS system and apps have a layer of high-security provisions that protect the app from outer and internal security threats. The business work structure progresses in a conserved, highly secure app environment. The security of Metadata and information flow inside a business organization is also highly conserved with the help of IOS apps. IOS-powered apps reduce the chances of data duplication so that data migration and processing are smooth and accurate.
High Quality
The high-quality standards of Apple’s Store are also a great reason why businesses choose iOS development over others. The high-quality standards of Apple lead to building a high-quality app. Therefore, when a user downloads an iOS app, s/he is assured of flawless performance and impeccable experience. This trust and goodwill in Apple’s legacy have managed to garner a large and loyal customer base.
Promising ROI
Every business desire a strong ROI. Guess what? Apple guarantees higher ROI to some extent. iOS users are more likely to pay for an app (that’s also called in-app purchases) than those using Android apps. Also, the average cost of an iOS application is lower than an Android app. Hence, using iOS apps can lead your company towards healthy finances with higher revenue and increased ROI.
Apps for all business needs
Brands of all scales and sizes have recognized the advantages of having mobile apps for business. Consumers expect mobility and responsiveness from any business they deal with – something that comes attached with the process of iPhone app development for business. Mobile applications are the perfect gateway to reach consumers on the go and remain connected with them every moment. iPhone apps, custom-built or off-the-shelf, are available to suit all business needs. Even though the cost of iPhone app development is somewhat higher than other options available, iPhone apps are found to be more lucrative for businesses due to their assured market reach and better-paying clients.
Great User Experience
The user experience offered by apps matters, whether B2B or B2C. IOS apps’ user experience is better than other platforms such as android apps. The user experience ensures that the professional use the app easily and rapidly finishes his task. With a great user experience, the workforce’s productivity is automatically enhanced. Great coordination between the software and hardware of the device and apps creates a seamless user experience that is great for professional use. As the efficiency of business apps needs to be higher than other apps, IOS apps are the perfect ones to choose from.
Market Access
Developing the business and setting up the roots in remote nations is a definitive dream of each organization. iPhones are very well known in nations like the USA and UK and having an iOS application empowers the organization to extend its business in such nations. Because of the prominence of iPhones in these nations, the organization stands a decent opportunity to take a firm remain in its market.
Conclusion
iOS apps deliver the assurance of improved profitability, customer loyalty, and visibility. Businesses can trust on the legacy of Apple to secure a prominent position in the highly competitive market. The secret to success is hiring a reliable Mobile app development company for improved results.
Augmented Reality App Development
Augmented Reality provides easy accessibility of the smart devices. Augmented Reality lets users experience a real-life environment. The technology enhances real-world objects by computer-generated perceptual information. AR can be considered as a system combining three key features, which are as follows:
A combination of real and virtual worlds
3D registration of virtual and real objects
Real-time interaction
The technology primarily focuses not only on displaying objects in the form of electronic data but also on blending digital components into a person’s real-world perception.
With the integration of immersive sensations, AR made this real-world-like experience possible. Augmented Reality is basically a standard practice of creating a composite view of the real world.
Different Categories of Augmented Reality Apps
The best part of AR technology is that it is easily accessible to every individual. There are no restrictions to utilize this great tech innovation. Today, the majority of people are smartphone holders and AR apps are helping them to experience augmented reality via their mobile devices. This is the reason why AR is prevalent in different industry verticals.
The evolution of Augmented Reality has increased the demand for AR app development services.
Marker-Based Augmented Reality
Marker-based AR is also known as recognition-based AR. This type of AR provides accurate information about the object being recognized by the AR system. Marker-based AR offers diverse usage for different purposes in the market. It detects the object placed in front of the camera and delivers the exact detail for the same on the screen.
It streamlines the quick way of generating accurate details about a particular object. The object recognition is done by the marker where the marker has been replaced with the 3D version of the selected object. It allows users to have a detailed view of the object. Users can also rotate the 3D image while rotating the marker.
Marker less Augmented Reality
This type of AR-based application is one of the widely implemented apps in the industry. It is also known as location-based AR. It implements a feature in the app that offers location detection. The travel industry is taking the best advantage of such apps. Moreover, people are more fascinated with travel mobile app development to discover nearby locations within their current location.
The method works by reading the mobile’s GPS data, accelerometers, and digital compass while predicting the user’s focus. This type of app is primarily focused on providing the location information about the object placed in front of the user’s camera.
Projection Augmented Reality
This is the most minimalist type of AR technology that works on the projection of light on the surface. Projection AR is interactive and appealing that is focused on creating deception about the orientation, depth, and position of the object. Users can study the structure and depth by taking different objects into consideration. The use of this technology is widespread for creating huge deployments for experiencing Virtual Reality.
Superimposition Based Augmented Reality
This AR brings a replacement view of the object in focus. The program works by replacing the partial or complete view of an object using augmented view. Here object recognition plays an important role.
AR-Powered Art Exhibits
It provides an enhanced view and understanding of the artifacts on display to the user via the museum’s AR app.
AR in Automotive & Manufacturing
Automotive industries are using it to streamlining prototyping, optimize the automobile manufacturing process and assembly processes.
Use of AR in social media
Different filters, lenses, and effects on social media platforms are a result of Augmented Reality. Instagram, Pinterest, Facebook, Snapchat, and many other social media platforms are enhancing user engagements with the power of AR.
AR Indoor Navigation
Indoor navigation helps users find the shortest possible route to a particular area or destination.
AR Avatars
You can consider it as a digital persona of yourself that allows you to share expressions and emotions as well.
Augmented Reality vs Virtual Reality
Augmented Reality and Virtual Reality are two trending technologies. Both of these technologies have completely changed the perspective of how people see the real world.
Augmented Reality
AR is considered the enhanced version of real-world objects. It provides detailed information about the object in focus using the computer-generated image. The AR-based application helps users to have a closer look at the real world. It delivers a bulk of information which includes images, text, and a motion view of the object.
Virtual Reality
Virtual Reality is a computer-generated simulation that allows users to explore a different view of the real world, such as animated scenes of the real-world objects that have been photographed. The virtual reality mobile app development service help users explore the place they have never been like the peak of the mt. Everest, areas deep under the sea, the surface of mars. These apps let users experience the virtual reality of other planets and earth.
Virtual Reality replaces the real world whereas Augmented Reality adds to the real world.
Industries Leveraging the Power of Augmented Reality
Healthcare
The AR-enabled healthcare app development provides video platforms and can project augmented hands on the patient. It helps experienced surgeons to help beginners via augmented hands applied to the patients without staying at the same location.
AR Dating Services
The implementation of AR in dating apps is helping people to find their dates in the same city or location.
AR for Smart Glasses
Smart glasses offer both comfort and a fashionable look to users. It has the potential to offer augmented reality experiences and also an affordable product. It is one of the proven innovations that help many industries, especially retailers.
AR-Aided Education
AR has changed the way of delivering educational content. Especially for kids, it has transformed their imagination and development. A successful app like Google Sky Map is best for learning astronomy. It allows students to place their device’s camera in the sky and move it in any direction. The app will automatically denote the stars and constellations.
AR in Live Events
Many musical bands conduct live shows for their fans. Augmented Reality helps viewers to watch the live performance of their favorite musical bands. Bands can record their live performance by utilizing a solid green screen. The recording can be watched in the AR-enabled app via smartphone. On the other hand, VR will allow you to join the concert virtually, and AR will lend the concert to your personal smart device.
Travel & Tourism
Local and international travelers are also benefiting from AR capabilities. The travel and tourism industry provides accurate information about the surroundings and localities. The tour and travel AR application allow users to post a particular location, and AR features will cater to the details about the same. Such apps act as guides for voyagers who travel to new locations.
AR in Gaming
The gaming industry is gaining a height of success because of AR technology. The most famous innovation of AR in gaming is Pokemon Go. The implementation of AR in gaming apps has enhanced the user experience and made the gaming experience more enjoyable. Also, the Ar-based apps can be seen in real-world sports like NBA or FIFA. It allows fans to view the stats and analyze the players during the match.
AR in Retail and E-commerce
Many businesses are leveraging the power of AR in retailing and e-commerce businesses. The customers can easily view the product’s price, details and have a closer look at the product. The AR features help eCommerce businesses to showcase the products and all the required details of it in a better way. It eliminates the need to visit the physical store in the real world by providing the digitally generated image of a real-world object.
Benefits of AR in Businesses
IKEA
The brand uses an AR app to help online shoppers visualize how the product will look while placing it inside their homes.
Lacoste
Using this app, shoppers can put up their foot on the designated AR graphic area and look into their smartphones. They will show the customized image of the show as per the foot size of the customers.
MTV
MTV introduced an AR application which allows people to view custom MTV animations and graphics related to a particular performance. The app also provides AR-enabled 3D rendered objects for its audiences.
New York Times
The New York Times AR-enabled app allows them to view sports like ice hockey, figure skating.
Developing AR Application?
Influencing factors of AR app development.
Choosing SDK
Below are the most popular SDKs. You can choose anyone from the list.
Kudan
Wikitude
Xing
Max
AR Toolkit
ARtoolKit implements the following features:
Flat-panel image tracking
Sufficient speed for real-time AR apps
Orientation tracking for devices with stereoscopic cameras
camera calibration
Potentially work with optical helmets and glasses
Tracking simple black squares
Plugins for OpenSceneGraph and Unity
Free, open-source software
Vuforia
It implements the following features:
Recognition of different types of visual objects
Environment and text recognition
Numark (a combination of QR code and image)
EasyAR (alternative to Vuforia)
Version 2.0 includes the following features:
Work with smart glasses
Perception of the environment
3D object recognition
Cloud-based deployment of apps
Cloud recognition
App Coding
The AR app development process is generally focused on two main principles, which are
Based on the marker
Based on the user location
App Design
When it comes to the 3D model of AR apps, designing becomes the most sensitive and priority task. The design process includes:
Building wireframe
3D models creation
UI/UX and graphic design
Creation of animated images
App Features
The AR app offers the following features like:
Push notifications
Sign-up through email, SMS, and social media.
Access to the gallery, phone contacts, and other smartphone resources.
The Payment system
Messaging feature
Feedback
AUTOMATION TESTING
Automation testing is the use of tool to automate a repeatable manual procedure carried out by a tester. Long-term cost benefits are achieved through test automation by lowering the time spent on regression testing and accelerating time to market. To ensure the proper return on investment for the automation activities, a defined automation strategy and roadmap are essential. A standardised and uniform automation method is necessary to enable high reusability, simplicity of maintenance, and reduced upfront costs in the face of varied application design, numerous environments, third-party connections, and multiple user devices.
Why Automate?
The conventional definition of automation found in industrial automation describes, a system that may automate manual activities while also providing the following benefits:
Improvement in quality, as there are fewer human errors.
Improvement in production performance, given that more work can be achieved with the same amount of people, at a higher speed and larger scale.
In essence, as time passes, the features develop but the tests remain static. Due to the reality that features evolve over time, testing efforts should also evolve proportionally.
The hardest thing in testing is design and execution – because test executions are not cumulative, and this presents a challenge.
It is essential to test all of the system’s features, not just the most recent additions, each time a new version is launched. This is because, it’s convincible that the new modifications will cause some of the functions included in earlier versions to behave differently than intended.
For all these, automation is the only way to make testing constant. The good is that Automation is Cumulative.
How is the Return on Investment of Test Automation?
There is a high ROI of test automation. The cost of a single defect in most organizations can offset the price of one or more tool licenses. Also, coding defects found post-release can cost up to 5x more to fix than those found during unit testing.
The Business Value-
Improve Software Quality
Avoid Operational Problems
Maintain a good customer image
Avoid legal problems and minimize risk
Decrease the cost of fixing bugs by 5x
The IT Value-
Test in parallel, in an unattended manner, on different platforms
Simplify routine tasks
Run more tests without increasing costs in the same amount of time
Increase scope of coverage
Finds the “hard to detect” defects earlier, when they are easier to fix
Improve overall software quality
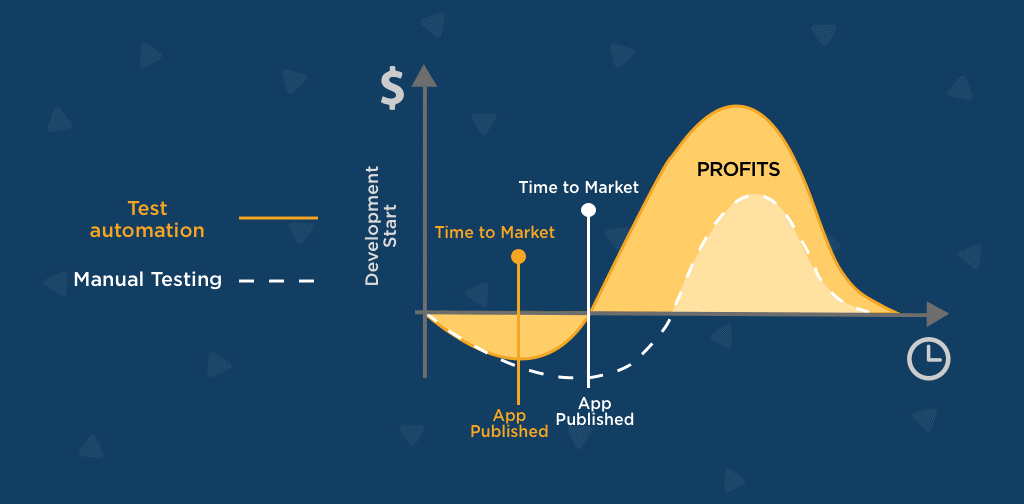
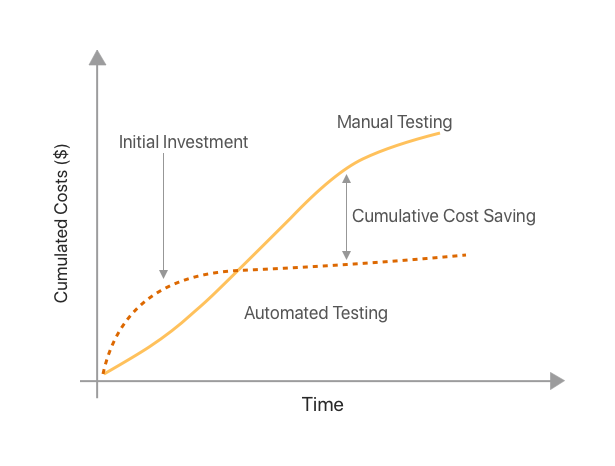
What to Automate and What Not to Automate?
After designing the tests, it’s necessary to execute them every time there’s a change in the system. All the automation tools provide the possibility of recording the tests and executing them later, which is known as record and playback.
The best tests to automate are the ones which are highly repetitive, given that it’s necessary to execute them many times.
If tests for a development cycle are automated, the automated tests for the following cycle may quickly verify everything that has previously been automated, enabling the testing team to expand the number of tests in the set and thus boost coverage.
It will avoid the risk of things being untested and avoid the test cycles being longer than development cycles.
Automation Testing Process
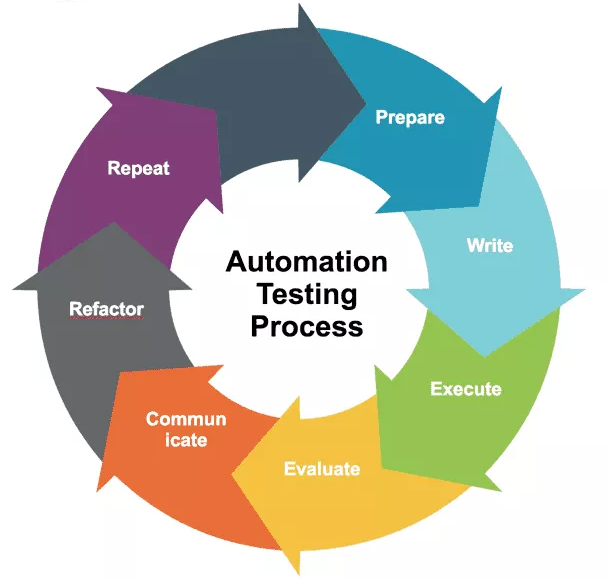
Here are six steps to follow in an Automation Process:
1. Prepare –
First, Prepare- understand the functional testing objectives. Understand what test data is needed. Know what needs to be verified.
2. Write –
Turn the requirements into an automated solution. Know what the start and end conditions are for each test. Tests should be completely independent of other tests. Add proper assertion check to ensure the application is behaving according to the specifications. Each test should have a particular purpose.
3. Execute –
Executing tests should be reliable. Run each test at least three times in a row before checking in the code.
4. Evaluate –
Verify that the automated test is doing what you except it to do. Have manual tests to verify that it is working as expected. Remember- if it’s not asserted, it’s not checked.
5. Communicate –
Be sure that every on the team is aware of the results. Flaky tests should be fixed ASAP, or it results in the risk of the team ignoring your test results.
6. Repeat / Refactor –
If any flaky test is noticed, refactor it to make it more reliable. Most importantly delete any tests that are not reliable.
Automation Framework
An automation framework is a common set of tools, guidelines, and principles of the tests. Having an automation test tool framework helps to minimize test scrip maintenance.
The best practices of a framework are:
Break automation framework into abstraction layers
Use proper synchronization methods
Determine a strategy for training and retraining framework users
Use version control
Look for existing libraries/ tools before inviting on own
Do code reviews on all automated tests
Include reporting and logging that make debugging easy
Have a test data management strategy
Include automation on the sprint team’s definition of done (DOD)
Separate your tests from your framework
How to Avoid Common Automation Failures?
Your efforts to use an automated testing framework might potentially fail due to several important factors.
Flakiness in tests
Script maintenance
Your team not being up to date with the best test automation practices
Building up technical debt can cause your overall automation testing efforts to fail, as this would keep growing in your backlogs.
What can you do to avoid the above?
You can do a lot of things, including:
Build the right coverage you need, focus mainly on risk. Too many automated tests sometimes are red flags that something is wrong with your automation approach.
Avoid duplication and low-value tests.
Test workflows and not the features.
It's a good practice to automate in-sprint so that you can automate tests together with the dev team.
Run tests during code check-in instead of pre-release
Get testing into your team's DOD (definition of done)
Automation in CI/CD Pipelines
Do you employ continuous delivery or continuous integration? If so, your pipeline has to include automation.
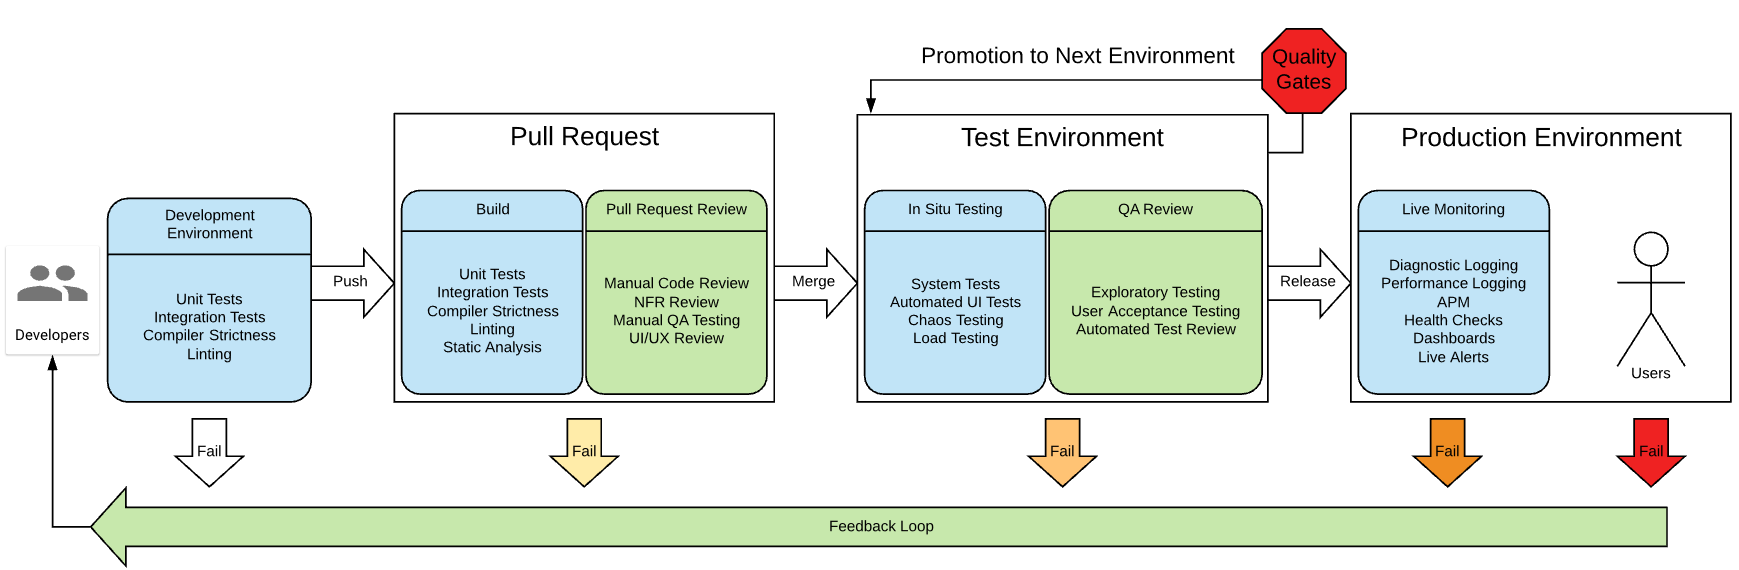
Automation helps with:
To Plan as opposed to running ad hoc tests
Only run smoke tests that are key to deployment
Containerized in-sprint testing or as part of nightly runs
Run scheduled headless test remotely
Run as part of the Azure pipelines or on Microsoft-hosted agents
Be sure to avoid the following practices:
Releasing unknowns
Seeing testing as a bottleneck
Seeing testers as quality gatekeepers instead of information brokers
Not understanding priorities
Testing late in sprint + too long regression cycles
Focusing too much on writing test cases
Test Tool Selection – How to Pick
The "best" test tool for automated testing does not exist. In the end, it all comes down to the specific requirements and skill set of the team.
Additionally, to acquire the coverage the application needs, you might need to combine many distinct technologies.
As a result, there are a few aspects to consider while choosing a test tool:
Look at the product roadmap and makes sure the tools you select will handle future features and technologies.
Evaluate the cost, including maintenance.
Use a tool that leverages the same tools and languages your developers use.
Don't just assume a tool will work for you. Create a small POC for each tool and get team feedback before committing to anything.
Is the tool extensible?
How easy is it to use and get started?
Does it provide reporting and debugging capabilities?
Does it recognize all the objects in your application?
Can it integrate with other tools like version control, test management tools, and continuous integration tools?
Find out if the tool has an active user base.
Select tools that other companies are using.
How much training will it take to get your teams up to speed with the tool?
Finally, determine how easy it is to hire folks that have the skills needed to create your automated tests.
Skills, A Test Engineer Need to Automate
Things a Test Automator should know about:
The application and business domain
The automation tools
The platform with which they are working (for typical technical problems)
Testing techniques for generating test cases.
Each ability will provide value in a unique way, moving your profile in the many knowledge areas depicted in the image below.
You will undoubtedly have greater ability to provide value to the creation of a product the closer you are to the centre, but you could prefer to focus on one of these areas or any unique junction. These talents are also referred to as being "T-shaped."

Popular Automation Testing Frameworks & Tools
There are many more. Here are few of them.
1. Selenium WebDriver
Selenium is now the leading open-source automated regression testing option for browser-based website automation.
Advantages
It’s an API that allows you to programmatically write tests using most programming languages to interact with a browser the way the real user would.
It is also the quality software that started Agile and DevOps automation revolution and is in most demand.
2. Cucumber
Cucumber is a tool that helps convert and removes ambiguity from requirements before your team invests in writing code.
Advantages-
Using any automation library that is supported by the programming language you use; you may produce what they call "executable specifications" after creating test scenarios.
Although Cucumber’s main benefit is helping communication and collaboration, many teams use it simply as an automated testing tools framework.
3. Serenity
Serenity is a great open-source tool because it acts as a wrapper over Selenium and Behaviour Driven Development (BDD) tools like jBehave and Cucumber JVM.
Advantages-
Serenity also offers plenty of built-in functionality. This includes such as handling WebDriver management, managing state between steps, taking screenshots, running tests in parallel, facilitating Jira integration, and more—all without having to write a single line of code.
Serenity creates highly detailed reports. Out of the box, it creates living documentation you can use not only to view your Selenium BDD test results but also as documentation for your application.
It also has an extra annotation method called @Step. When used correctly, @Step gives you an extra level of abstraction that makes your tests more reusable and maintainable.
Serenity takes care of many things you would typically have to code from scratch if you were creating your own BDD framework. It’s one of the better open-source frameworks available, although I might be a bit biased; it’s the tool I use for my day-to-day test automation efforts.
4. Appium
Appium is a free, open-source, cross-platform UI mobile testing tool. It allows you to write UI tests for your mobile apps, Android and iOS, and some other OSs.
Advantages-
It lets you create test scripts using the Selenium JSON writer you know from web automation assurance.
Appium is becoming an industry standard for mobile testing, much as Selenium WebDriver became the standard for browser-based automation a few years ago.
5. Gauge
Gauge is one of the newest open-source test automation tools for Mac, Windows and Linux. It was developed by the folks at ThoughtWorks–the same company that created Selenium.
Advantages-
Gauge automation tests, called “specs,” are written in a simple markdown language syntax using Java, Ruby, and C# within developer IDEs such as Eclipse and Visual Studio. You can also extend Gauge’s functionality with its support for plugins.
6. Robot Framework
If you want to utilise Python for test automation, you can't go wrong with the Robot Framework.
Advantages-
This mature product, created for testers, uses a keyword-driven approach to make tests readable and easy to create.
It also includes many test libraries and other tools you can use.
While the Selenium WebDriver library may be the most used external test library, Robot Framework can test things other than websites, including FTP, MongoDB, Android, and Appium.
In addition to all this open-source awesomeness, it has a lot of APIs that help make it as extensible as possible.
The keyword approach used by Robot Framework is excellent for testers who are already familiar with other vendor-based, keyword-driven test tools, making the transition to open source much more comfortable for them.
7. AutoIT
AutoIT v3 is a freeware, BASIC-like scripting language designed for automating the Windows GUI and general scripting.
While not the most robust tool of all the other automated testing tools, many teams integrate AutoIt with Selenium to work around non-browser windows that appear in an automated test workflow.
Differences Between Mobile Application Testing and Web Application Testing
Web Applications
Web applications are software applications that reside on web servers and are accessed using a web browser. These applications are developed using popular technologies like HTML, CSS, JavaScript, and are utilized through multiple browsers like Chrome, Safari, Firefox, etc.
Adequately optimized web applications can also be viewed across multiple devices like mobiles, tablets, and desktops that provide active internet connections.
Mobile Applications
Mobile applications, as the name suggests, are specifically designed for operating on mobile devices. At a high level, mobile apps can be categorized into three types:
Mobile Web Applications are basically standard web-applications that can be accessed through mobile browsers. While these web-apps might be designed in a way that resembles mobile apps, they differ significantly.
Native applications are platform-specific apps, and users can install them from specific app stores (like Google Play Store or App Store). These applications are developed using specific programming languages for a particular operating system like Android or iOS. For example, native iOS apps are written using Objective-C, and native Android apps are written in Java. These applications are costly and effort-intensive to build as developers have to maintain two distinct codebases for Android and iOS.
Hybrid applications are developed by combining the characteristics of native and web apps. These applications are built using a standard web stack (HTML, CSS, JavaScript) and are wrapped in a native environment using several frameworks.
Similar to native apps, these applications are downloadable and have access to mobile features like camera, GPS, contact list, etc. Unlike native apps development, they are far easier to develop as one can maintain a unified code base for both Android and iOS.
From the explanation above, it’s quite prominent that web apps and mobile apps differ significantly in terms of how they are built. Moreover, users’ way of interacting with them also differs as mobile users use gestures like scrolling and pinch to zoom on their touch screen mobiles. Naturally, the methods to test both are bound to differ as well.
Although the testing tools and techniques used for both differ significantly, there are certain tests that are common for both:
Functional tests
Performance tests
Usability tests
Compatibility tests
Localization tests
Web app testing aims to ensure that websites deliver a highly functional, bug-free experience across browsers and devices. On the other hand, mobile app testing aims to identify any compatibility issues or bugs for the native or hybrid mobile app across a wide range of Android and iOS devices.
Tools or Frameworks for Web Application Testing
Web app testing aims at rolling out applications that deliver a seamless user experience across multiple browsers. It also aims at ensuring that web-applications continue to perform perfectly when accessed from different platforms.
Although there are several commercial tools available, Selenium has been the most preferred tool suite among the QA community for years. It allows QAs to automate website UI tests across popular web browsers like Chrome, Safari, Firefox, etc. QAs can also run parallel tests across desired environments using a Selenium Grid.
Additionally, QAs can also simulate keyboard and mouse inputs using Selenium to replicate end-user actions. A key reason why Selenium has gained popularity is that it provides compatibility with several programming languages. This makes it very convenient for the testers to design test cases.
Tools or Frameworks Used for Mobile App Testing
As mentioned earlier, the mobile app ecosystem is complex as there are different categories of apps. Before testing mobile apps, testers need to identify whether the app to be tested is the native, hybrid, or mobile web.
Listed below are a few popular tools that can be used for running automated tests for native, hybrid, and mobile web apps.
1. Appium
Based on Selenium, Appium is the most preferred open-source tool when it comes to testing hybrid, native and mobile web apps. Using this tool one can automate test scenarios for both Android and iOS apps on real mobiles, emulators, or simulators. QAs need to create separate test scripts for Android and iOS. Appium also allows QAs to choose the programming language to work with.
2. Espresso
Developed by Google, Espresso is a native open-source framework designed specifically for automated UI testing of Android applications. Espresso is a part of the Android SDK and is used for native mobile app development. Intuitive API and automatic synchronization are a couple of key benefits this framework offers. Espresso tests can be written in Java and Kotlin.
3. XCUITest
XCUITest is a UI testing framework that is bundled along with the XCode IDE. It allows testers to automate UI tests for native iOS apps. XCUITests can only be written in Objective-C or Swift. This framework executes iOS tests much faster and is more known for its reliability.
The Role of Real Devices in Testing Mobile and Web Applications
The sole purpose of test automation is to gain faster and accurate feedback to develop bug-free applications. This can only be achieved by running test automation scripts on real devices. Testing in real user conditions will help yield results similar to those in the real world.
Testing on real devices requires an on-premise device lab. However, this requires enormous investment, and it is naturally not feasible for small organizations. To overcome this challenge, opt for a cloud-based testing infrastructure like Browser Stack.
BrowserStack’s real device cloud provides teams with 2000+ real devices and browsers for comprehensive manual and automated testing of mobile and web applications. One can test on a wide range of devices (both mobile and desktops) running on unique operating systems like Android, iOS, Windows, or macOS. Users simply need to sign up and get started for free by selecting the desired device-browser-OS combination to test on.
As mentioned earlier, the digital landscape is constantly evolving towards a mobile-centric ecosystem. To maintain a competitive edge in the market, businesses need to ensure that they incorporate both mobile and web app testing strategies with equal importance.
Business Intelligence in Mobile AppDevelopment
Business intelligence is an integrated software platform that is used for business data analysis and management. With the help of BI mobile app development, many businesses can analyze their data, without the help of any IT departments. Thus, BI mobile app development has taken mobile applications to a new level.
Artificial intelligence has changed the face of the modern era. And smartphones in our hands are the best example of it. With these technologies, new fields of business intelligence are getting explored and lots of things are yet to be explored.
Today, lots of businesses are collaborating with mobile manufacturers to design and develop smartphones that are capable of handling machine learning operations. It helps mobile users even more effectively and efficiently.
What Is Mobile Business Intelligence?
Mobile Intelligence is the power of mobile devices to learn, adapt, analyze and understand user behavior through various aspects. For example, if any mobile user switches off the vibrate option with silent mode more frequently, the next time the user turns on the silent mode, the vibrate option gets disabled itself. In this example, the smartphone analyzed and understood settings to be set to make it easier for the user.
A business intelligence roadmaps in mobile app development is also referred to as accessing the information and using it. Today, thousands of mobile apps are integrated with analytics tools and business intelligence to serve smart information to the end-user.
There is a constant evolution of cellphones, and now the use of mobile devices is not only limited to communicating with people but also utilizing them to obtain information and utilize this information for data analysis purposes. In layman’s words, we can define business intelligence roadmaps as technology, application, or program that is used to store, retrieve, and analyze data or user behavior to assist management in making better choices. The main goal behind BI in mobile apps is to bring critical business data directly into company managers’ analysis devices.
Mobile Intelligence is the capability of business owners to deliver relevant service to the customer at any point of time, any place with the help of collected information. It allows them to extend their decision-making ability and serve better.
Benefits Of Mobile BI
The major benefit of mobile BI is that your customers can access their data at any time and from anywhere. It enhances the functioning of mobile applications. Here are some awesome benefits of mobile BI for your business. This has initiated a new era in the BI industry and has offered several benefits to users across the globe.
#Information Gathering
When you integrate the machine learning model with your mobile app, you probably get the data more frequently or in real-time. With the help of this data, you can perform various operations in less time with efficiency.
#Decision Making
When the gathered information is available to you all the time, and it is also analyzed using various analysis tools, it makes it easier for business owners to make any decision effectively and in less or no time.
#Advantage In Competition
In today’s world, every business owner wants to make their business responsive, flexible and want to make it have a unique identity in the competition. Having access to the data in real-time increases the opportunity to reach out to clients more frequently and amplify your sales higher.
#Increase In Productivity
As we already have access to real-time data, it makes it easier for quick decision making, and when the decision-making process takes less time, it means there is ample time to make that decision which ultimately results in increased productivity.
#Improved Customer Satisfaction
When your performance is commendable and you are certainly ahead of your competition, your productivity increases and with increased productivity, you will reach your customers faster and can serve better. Once you connect with your customers, it will fulfill their requirements and make them satisfied with your services.
#Increase in Revenue
With more customer satisfaction, a faster decision-making process, increased productivity, and other accomplishments in every aspect of business, your revenue will increase. A satisfied customer’s testimonial will help you to generate more revenue and will increase your customer reach.
Challenges in Mobile BI
Network Condition
Customers living in rural areas face unstable network conditions. Sometimes it takes a lot of time for them to get online or have an internet connection in the first place. So, the network issue is the main challenge every online service provider encounters.
Complexity and Size
An increase in customers and fulfilling their requirements result in complexity in the machine learning model and increases in the size of the data collected. As data size increases, it directly affects the performance of service availability.
Hardware Capability
As all the operations are done on a mobile device, high-performance hardware is needed to run those programs. High-performance hardware may affect the price of mobile devices.
Business Intelligence Tools

Business intelligence (BI) tools are applications that collect and interpret massive amounts of unstructured data from different systems such as websites, mobile apps, videos, emails, and other business sources. While not as versatile as business analytics tools, BI tools mostly use queries to acquire data and find insights. These technologies also aid in the preparation of data for analysis, allowing you to build reports, dashboards, and data visualizations. Employees and managers will be able to use the data to speed and enhance decision making, increase operational efficiency, identify new income potentials, identify market trends, provide genuine KPIs, and identify new business prospects.
Google Analytics
Trustpilot
Databox
G2 Crowd
Zoho Analytics
Google Analytics is the first and most famous app used for keeping track of business performance. This app provides real-time information about every aspect of the business including the number of users on the website or installed apps on the device, service sales, errors or problems users are facing, and other things. This tool is specially used for tracking user session duration, the bounce rate of individual products.
Just after Google Analytics, Trustpilot came into the business. This is an online review community that links businesses and customers by allowing users to leave authentic feedback on their purchasing and service experiences. Their sole purpose is to help people and business owners with their honest feedback.
Databox comes next on our list. It is an automated tool used to refresh the user dashboard automatically. Which helps accurate and up to data storing and monitoring process effectively. This up-to-date data is used for generating reports and analysis purposes especially used by data scientists and data analyst
G2 Crowd is another feedback and review website similar to Trustpilot. It is popular because of its unique algorithm structure. Its algorithm identifies and marks spam and fraudulent user reviews to avoid false and unhelpful comments.
Lastly, Zoho Analytics, this tool helps you analyze your data from various sources. This tool is specially designed for inexperienced users to work in this Business intelligence environment and with an enhanced security algorithm your data gets encrypted at various levels of the analysis process.
Business intelligence tools can combine a broad set of data analysis applications such as online analytical processing (OLAP), operational BI, enterprise reporting, open-source BI, mobile BI, ad hoc analysis, and querying real-time BI, collaborative BI, and software as a service BI, and location intelligence. It may also include data visualization software for creating charts, as well as tools for creating BI dashboards and performance scorecards that display business indicators and KPIs in easy-to-understand visuals.
Conclusion
Business Intelligence has given a new definition to businesses today and made them reach the paradigm of success. The term Business Intelligence – refers to technologies and processes that enable a business to acquire data from internal and external systems. All of this comprises query building, analysis, data visualization, analytical report creation, and report generation in order to maximize corporate decision-making for improved performance and incorporate decisions based on current demand.
Many business owners are developing mobile apps to make their businesses smarter, more efficient, productive, and have higher customer satisfaction. The best way to go about making decisions will be by having access to real-time data operating in a similar environment that they are used to. Yet, there is a lot of scope for this field and a lot of work must be done. And as much as this market is still new, there is also room for the evolution of innovation in the future.
Benefits of Using Docker
Docker has been gaining momentum for the past few years. Every organization, irrespective of its business size, is adopting the containerization platform to improve the app development process. It offers numerous benefits when it comes to containerization-based architecture.
Docker has been gaining momentum for the past few years. Every organization, irrespective of its business size, is adopting the containerization platform to improve the app development process. It offers numerous benefits when it comes to containerization-based architecture.
With Docker, you can build, test, deploy, and redeploy small or large applications on any platform, irrespective of the underlying infrastructure. The containerization platform has eased the life of developers by saving time and effort in managing extensive infrastructure.
What is Docker?
Docker was introduced as an open-source project in 2013 by a community of developers. Since then, it is getting on the top with its immense benefits. With it, you are able to automate and manage the development and deployment of small or large applications within the Docker containers.
Docker is a tool that helps you to build, test, and run containers within an environment. A container will bundle up a complete application or fragments of applications along with required files into a package that will run on any platform without going into the system details.
With Docker containers, there is no vendor lock-in situation. You can run containers on any platform or transfer from one platform to another without changing the system requirements. As Docker is an open-source platform, everyone can contribute to develop and add new features that are still not available.
Docker helps developers focus on code development without getting in-depth into the details of a target system. It helps in creating portable applications that can run on any machine.
Docker also allows the IT operations team to easily manage and deploy applications having different system requirements within other containers. In this way, you can utilize the provided resources to their best, resulting in a cost-effective approach.
Advantages of Docker
Can be started within seconds as a Docker container is just a process running on the operating system.
Ensures faster deployment. With Docker, you do not have to create a new environment and only have to download the Docker image to run on a different server.
Allows you to scale and maintain the containers efficiently. You can run multiple containers containing isolated applications on the same host or server.
Docker containers require fewer resources as these are being shared by multiple containers running on the same server.
You can install and run Docker on various platforms using Docker images, like Windows, Linux, and macOS.
Disadvantages of Docker
Many of the Docker features, like container self-registration and copying the files from host to the container, are in-progress i.e. they aren’t fully developed yet. As such, these may hinder your work to some extent.
It is challenging to handle Docker containers during failure as the task cannot be automated or scaled efficiently.
With containers, you can have less overhead but not zero overhead. Containers will run at bare-metal speed.
There are some limitations to running Windows Docker applications on Linux or vice-versa. Also, it is challenging to run Docker in a heterogeneous environment.
Docker comes with some security risks like handling/moving large containers within a dynamic Docker environment.
Features of Docker
Below are a few features of Docker:
Serves as an isolated and rapid framework.
It is an open-source solution or platform to manage, build, and run the containers.
Comes with cross-platform compatibility.
Highly optimizes the use of available resources and reduces the system overhead.
It is a cost-effective approach, as you have to pay for the used resources only.
Can be configured quickly on any platform, on-premise, cloud, or VPN.
Ensures smoother application development and deployment.
Enhances team productivity by reducing/eliminating extra efforts.
Components of Docker
Docker has the following 5 significant components:
Docker daemon – It is a service running on the host system. You cannot interact with the Docker daemon (as it is a process running in the background) directly. You can provide Docker commands, which will be translated and sent to the daemon to work accordingly.
Docker Client – It works as an interface for the users to interact with the Docker daemon. It processes the commands provided by the user and communicates with the Docker daemon process for executing the same.
Docker Images- Docker images are the read-only templates that help in launching Docker containers. You can download the Docker image for any platform and create a Docker container with it. You can create your Docker image or update the existing one.
Docker Registries – These registries can be private or public holding the Docker images. You can upload or download the Docker images from the repository. The public registry is the Docker Hub that offers a vast collection of Docker images. Any user can update the images accordingly and upload them back.
Docker Container – It is an isolated application platform that bundles together everything required to run an application.
Benefits of using Docker
Although Docker has its own fair share of disadvantages, its advantages easily outlast them and make it an excellent choice for app development and deployment. Some of the most important benefits of leveraging Docker are detailed as follows:
1. Support for Multi-cloud Platforms
Docker offers excellent portability and is adopted by major cloud service providers. You can run a Docker container either on an Amazon EC2 instance, Rackspace server, or any VM.
Irrespective of the platform, you will get the same and consistent functionality with the same intended output and productivity. You can also integrate Docker with other cloud providers, like Azure and GCP, and config managers efficiently.
2. An Isolated Environment at your Disposal
With Docker, your application will run as an isolated unit within a container and segregated from other running applications. Each Docker container will have its complete file and resources to not interfere in the working of another container.
If you want to remove any Docker container, you can do so effortlessly as there is no dependency on one container. Also, removing any application will not impact the complete project. Each application, running inside a container, will have its dedicated resources, so there will be no downtime or performance degradation if any application fails.
3. High Level of Security
Docker ensures complete security by isolating one container’s application from the other. It allows you to control the traffic flow and the management of Docker containers.
One Docker container cannot interfere with another container and, thus, is not able to change the configuration of the other. If any of the containers get hacked or comes under a security threat, other containers will be safe.
4. Continuous Deployment and Testing
With Docker, you will get a consistent deployment and testing environment. All the configurations of containers are maintained internally, ensuring you can use the same container application throughout different phases of the software development life cycle.
This ensures that there will be no in-between manual intervention and, hence, no impact on the deployment in production. Due to isolated containers, you can even upgrade during the release phase without disturbing the working of the complete project. It further eases the process of running Docker containers across various platforms.
5. Good ROI
Docker helps in reducing the infrastructure resource costs. With Docker, you can run multiple applications using fewer resources to reduce the cost of the server and IT staff. Moreover, you only require a small engineering team.
6. Agile Development and Deployment
Docker makes your CI/CD development process more agile and responsive. It helps in improving the CI/CD process that helps in delivering a quality product within time.
How is a Docker Container Different from a Virtual Machine?
You can run Docker as a daemon or using the client commands. You can consider Docker as a virtual machine, but not entirely as it is different in some aspects.
For running a virtual machine, you will require a dedicated CPU and memory. This gets complicated if you are running multiple instances of a virtual machine, resulting in more resource consumption. But with Docker containers, there is no need to duplicate the virtualized resources as they share the host OS kernel and system resources.
Docker containers are more modular than VMs i.e. they can run multiple instances of the same program without changing the system configuration every time. Rather than using multiple virtual machines to run an application, you can use the Docker Compose tool.
It allows you to link independent applications and their services into a single unit, which can be efficiently scaled without creating a significant overhead.
Conclusion
Today, more and more companies are leveraging Docker containers, may it be big tech giants or humble startups. Doing so not only streamlines the development process but increases the pace of the same and the quality of the developed product.
In the above sections, we talked about Docker, why is it necessary within a business of any size, why Docker tends to fail in certain situations, and the benefits of employing it.
Once you start working with Docker and its tools, you will realize the difference that it brings. It will definitely improve the operational capability of your DevOps and IT teams.
Lift and shift to containers with AKS
Easily migrate existing application to container(s) and run within the Azure managed Kubernetes service (AKS). Control access via integration with Azure Active Directory and access SLA-backed Azure Services, such as Azure Database for MySQL using OSBA (Open Service Broker for Azure), for your data needs.
AzureKubernetServicesContent
This solution is for migrating current applications.
Architecture
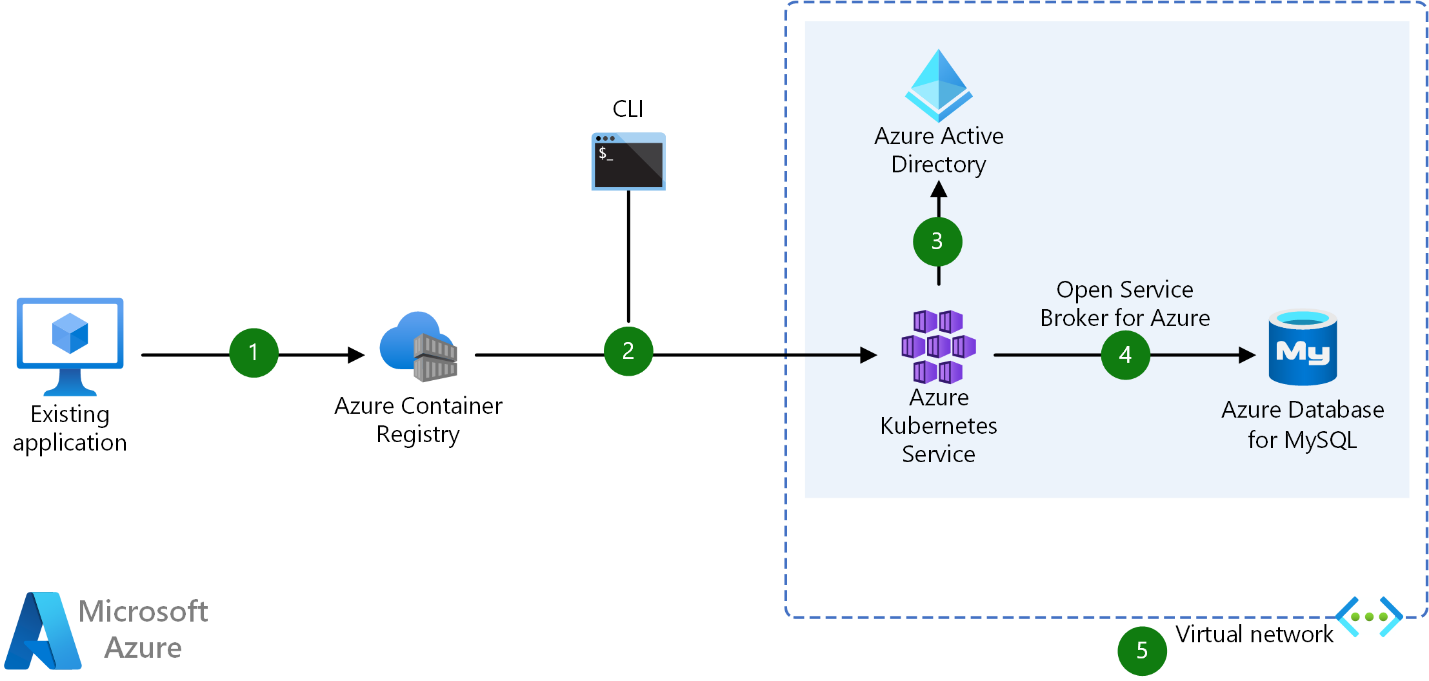
Dataflow
User converts existing application to container(s) & publishes container image(s)to the Azure Container Registry
By using Azure portal or command line, user deploys containers to AKS cluster
Azure Active Directory is used to control access to AKS resources
Easily access SLA-backed Azure Services such as Azure Database for MySQL using OSBA (Open Service Broker for Azure)
Optionally, AKS can be deployed with a VNET virtual network
Microservices with AKS and Azure DevOps
Potential use cases
Use AKS to simplify the deployment and management of microservices-based architecture. AKS streamlines horizontal scaling, self-healing, load balancing, and secret management.
Architecture
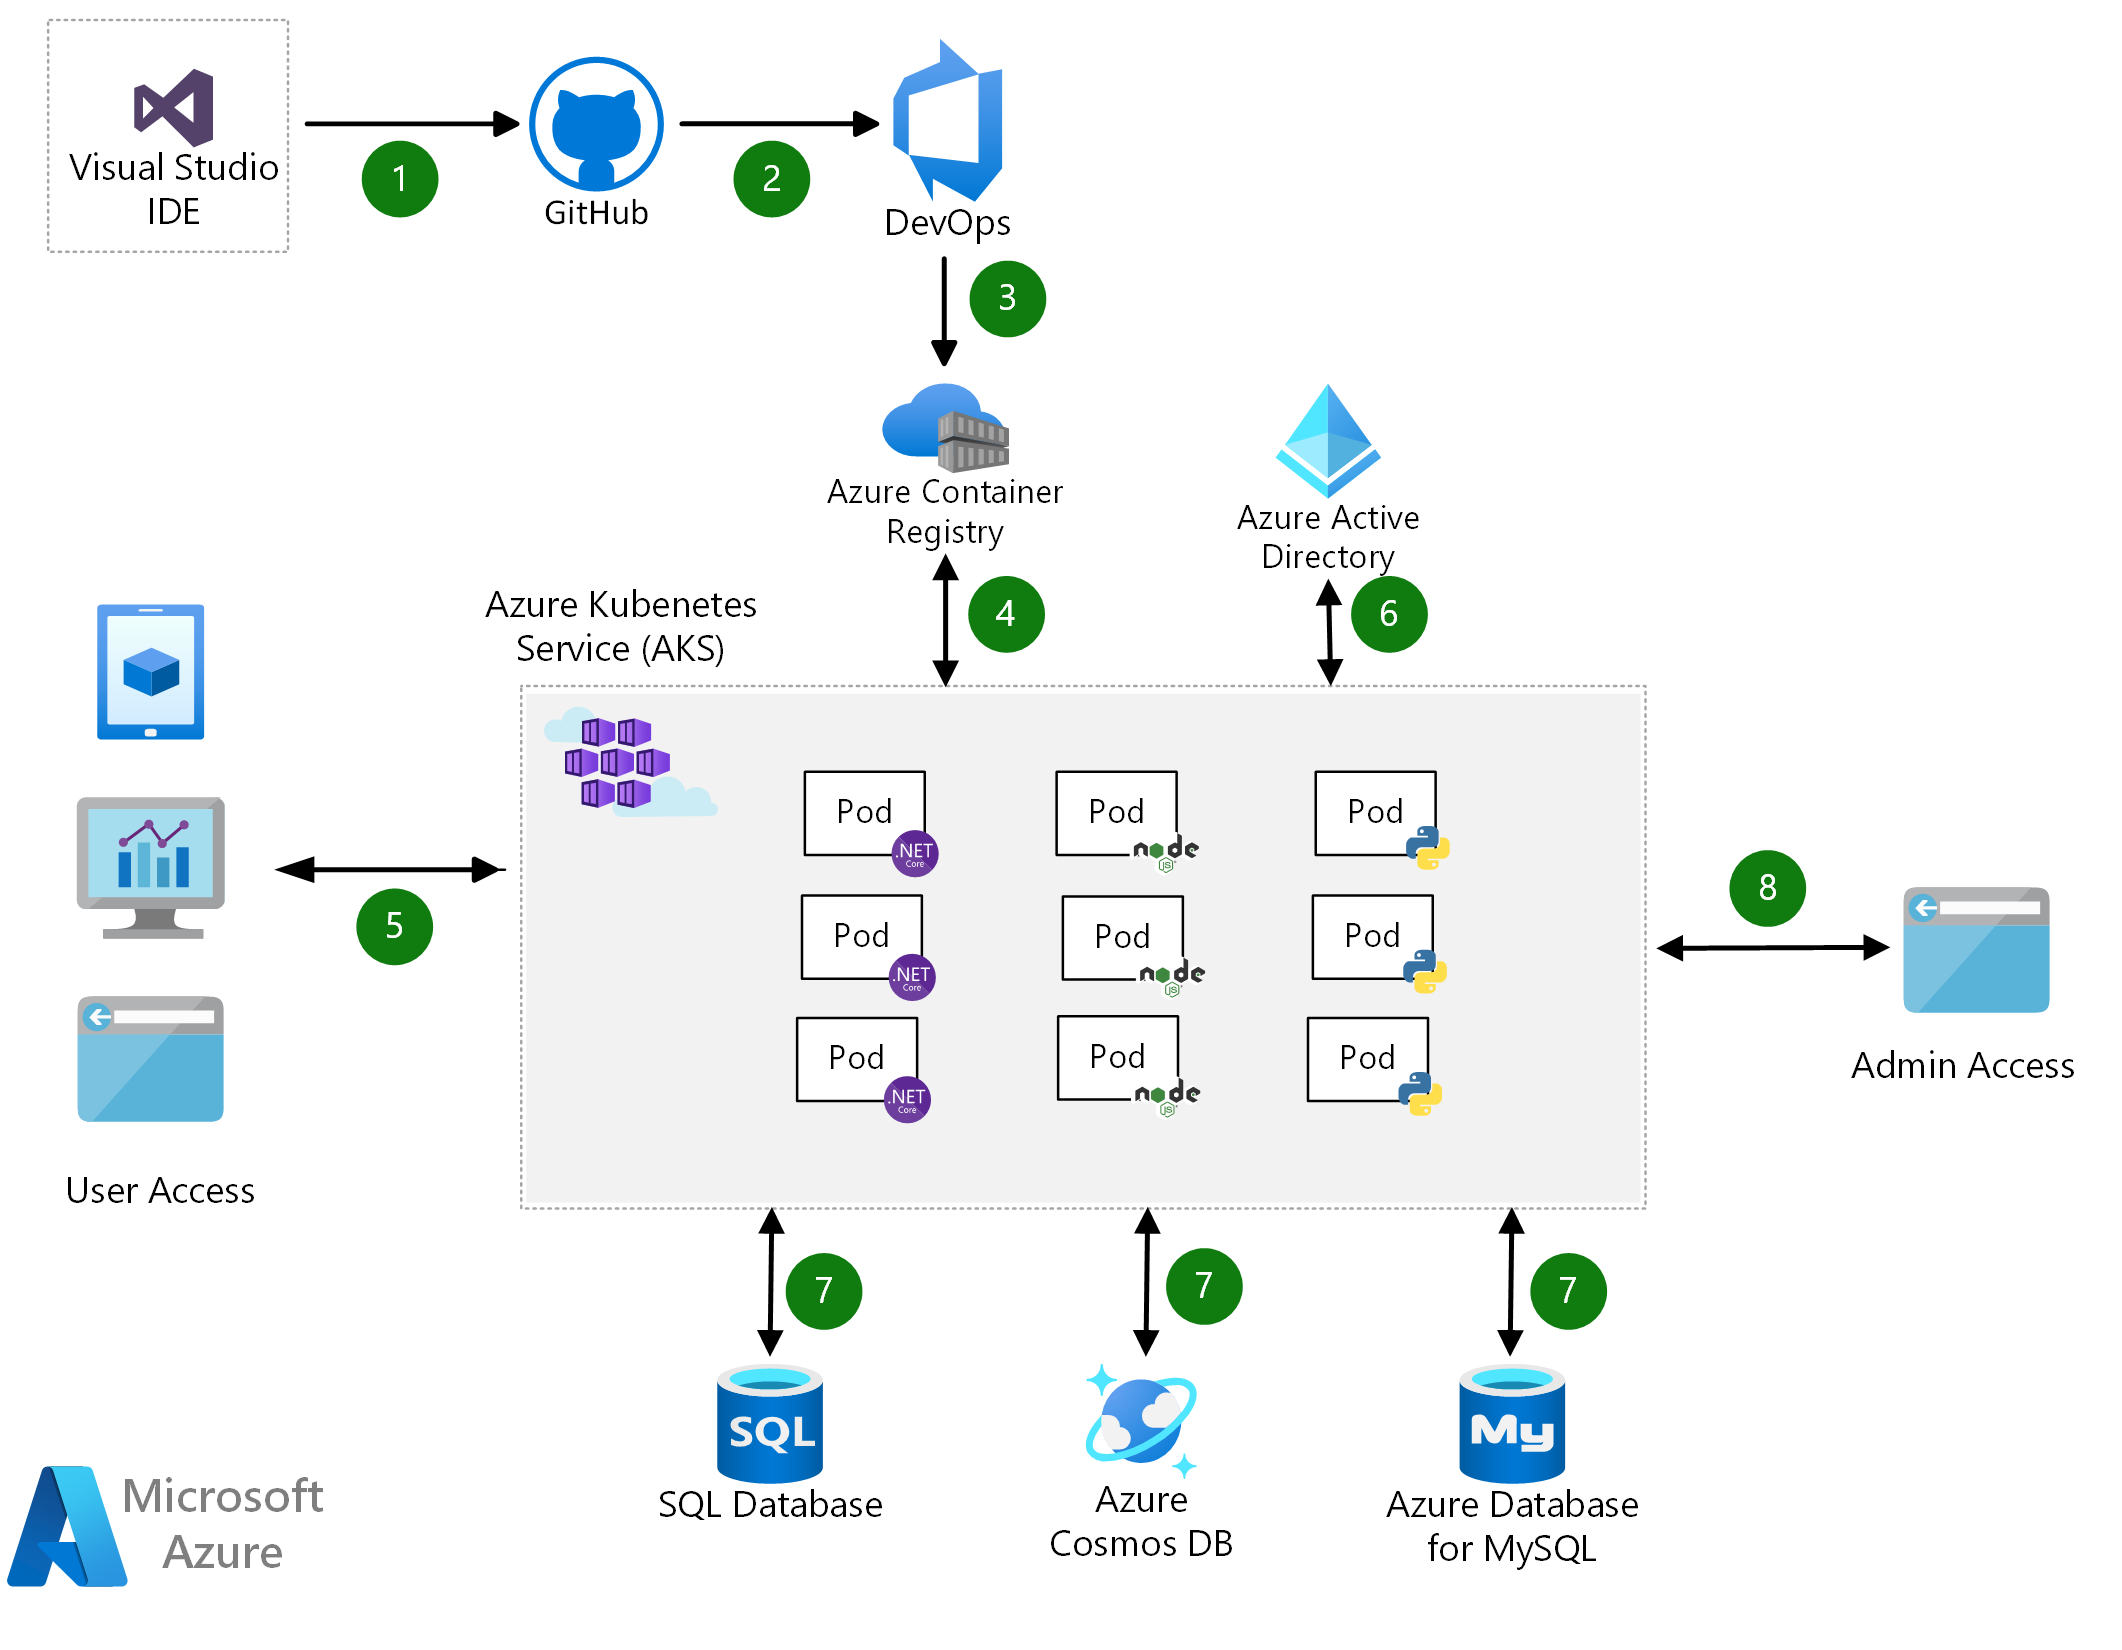
Dataflow
Developer uses an IDE, such as Visual Studio, to commit changes to GitHub.
GitHub triggers a new build on Azure DevOps.
Azure DevOps packages the microservices as containers and pushes them to the Azure Container Registry.
Containers are deployed to the AKS cluster.
Users access services via apps and a website.
Azure Active Directory is used to secure access to the resources.
Microservices use databases to store and retrieve information.
Administrator accesses via a separate admin portal.
Secure DevOps for AKS
DevOps and Kubernetes are better together. By implementing secure DevOps together with Kubernetes on Azure, you can achieve the balance between speed and security and deliver code faster, at scale.
Potential use cases
Put guardrails around the development processes, by using CI/CD with dynamic policy controls, and then accelerate your feedback loop with constant monitoring. Use Azure Pipelines to deliver fast, while ensuring the enforcement of critical policies, with Azure Policy. Azure provides you real-time observability for your build and release pipelines, and the ability to apply a compliance audit and reconfigurations easily.
Architecture

Dataflow
Developers rapidly iterate, test, and debug different parts of an application together, in the same Kubernetes cluster.
Code is merged into a GitHub repository, after which automated builds and tests are run by Azure Pipelines.
Release pipeline automatically executes a pre-defined deployment strategy, with each code change.
Kubernetes clusters are provisioned, by using tools like Helm charts that define the desired state of app resources and configurations.
Container image is pushed to Azure Container Registry.
Cluster operators define policies in Azure Policy, to govern deployments to the AKS cluster.
Azure Policy audits requests from the pipeline, at the AKS control-plane level.
App telemetry, container health monitoring, and real-time log analytics are obtained using Azure Monitor.
Insights are used to address issues and are fed into next sprint plans.
Bursting from AKS with ACI
Use the AKS virtual node to provision pods inside ACI that start in seconds. This enables AKS to run with just enough capacity for your average workload. As you run out of capacity in your AKS cluster, scale out additional pods in ACI, without any additional servers to manage.
Potential use cases
Organizations utilize this solution, so they don't need extra servers to perform this type of scaling.
Architecture
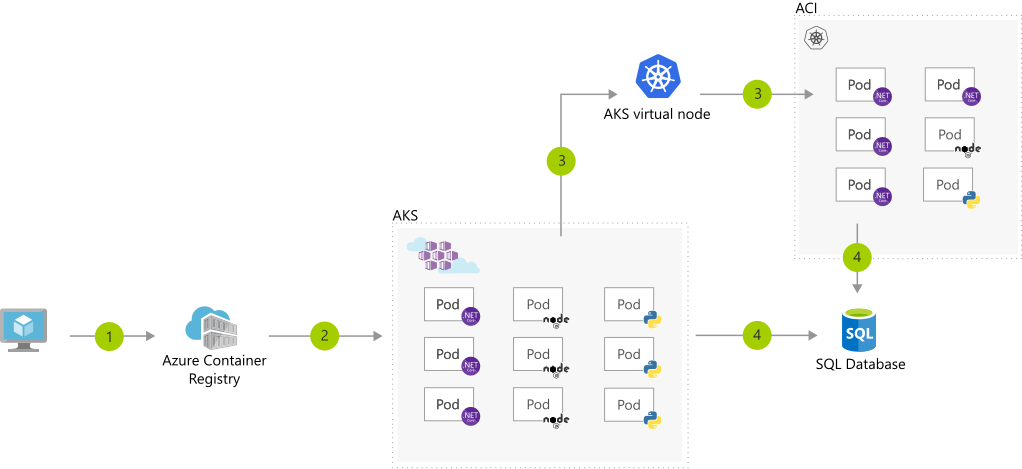
Dataflow
User registers a container in Azure Container Registry.
Container images are pulled from the Azure Container Registry.
AKS virtual node, a Virtual Kubelet implementation, provisions pods inside ACI from AKS, when traffic comes in spikes.
AKS and ACI containers write to a shared data store.
Data streaming with AKS
Use Azure Kubernetes Services to easily ingest & process a real-time data stream with millions of data points collected via sensors. Perform fast analysis and computations to develop insights into complex scenarios quickly.
Potential use cases
Industries have employed this solution in the following areas:
Vehicle safety (automotive)
Customer service (retail and other industries)
Healthcare cloud solutions
Financial technology solutions (in the finance industry)
Architecture
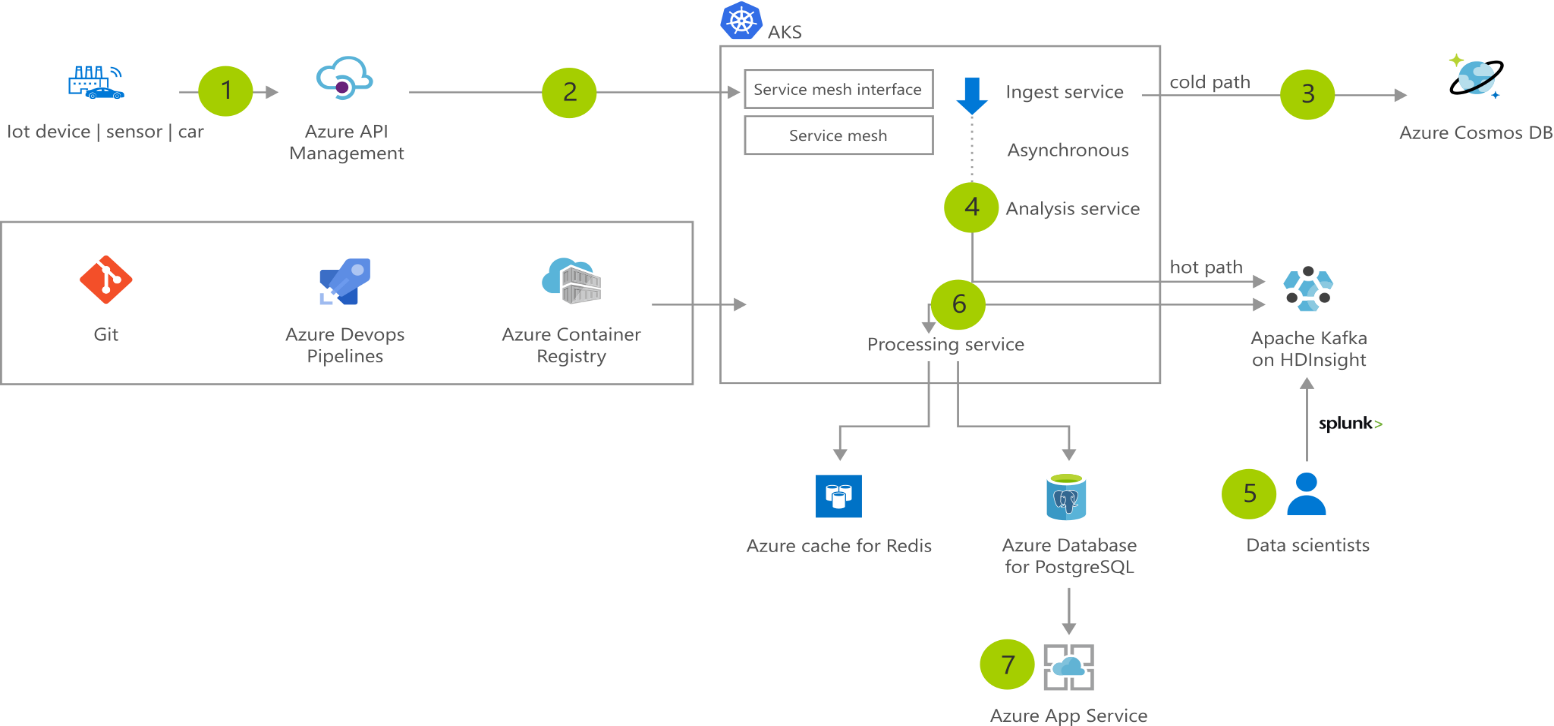
Dataflow
Sensor data is generated and streamed to Azure API Management.
AKS cluster runs microservice that are deployed as containers behind a service mesh. Containers are built using a DevOps process and stored in Azure Container Registry.
ngest service stores data in Azure Cosmos DB.
Asynchronously, the Analysis service receives the data and streams it to Apache Kafka and Azure HDInsight.
Data scientists can analyze the large big data for use in machine learning models using Splunk.
Data is processed by the processing service, which stores the result in Azure Database for PostgreSQL and caches the data in an Azure Cache for Redis.
A web app running in Azure App Service is used to visualize the results.
Elastic demand handling with AKS
This example shows how to achieve fast and reliable service quality during seasonal and other high-traffic demand periods.
Potential use cases
This approach can be used to manage the following scenarios:
Elastic scaling handles traffic and sales bursts without managing infrastructures.
Low-latency data access is from anywhere in the world for fast, robust user experiences.
High availability is achieved across multiple data centers.
Architecture
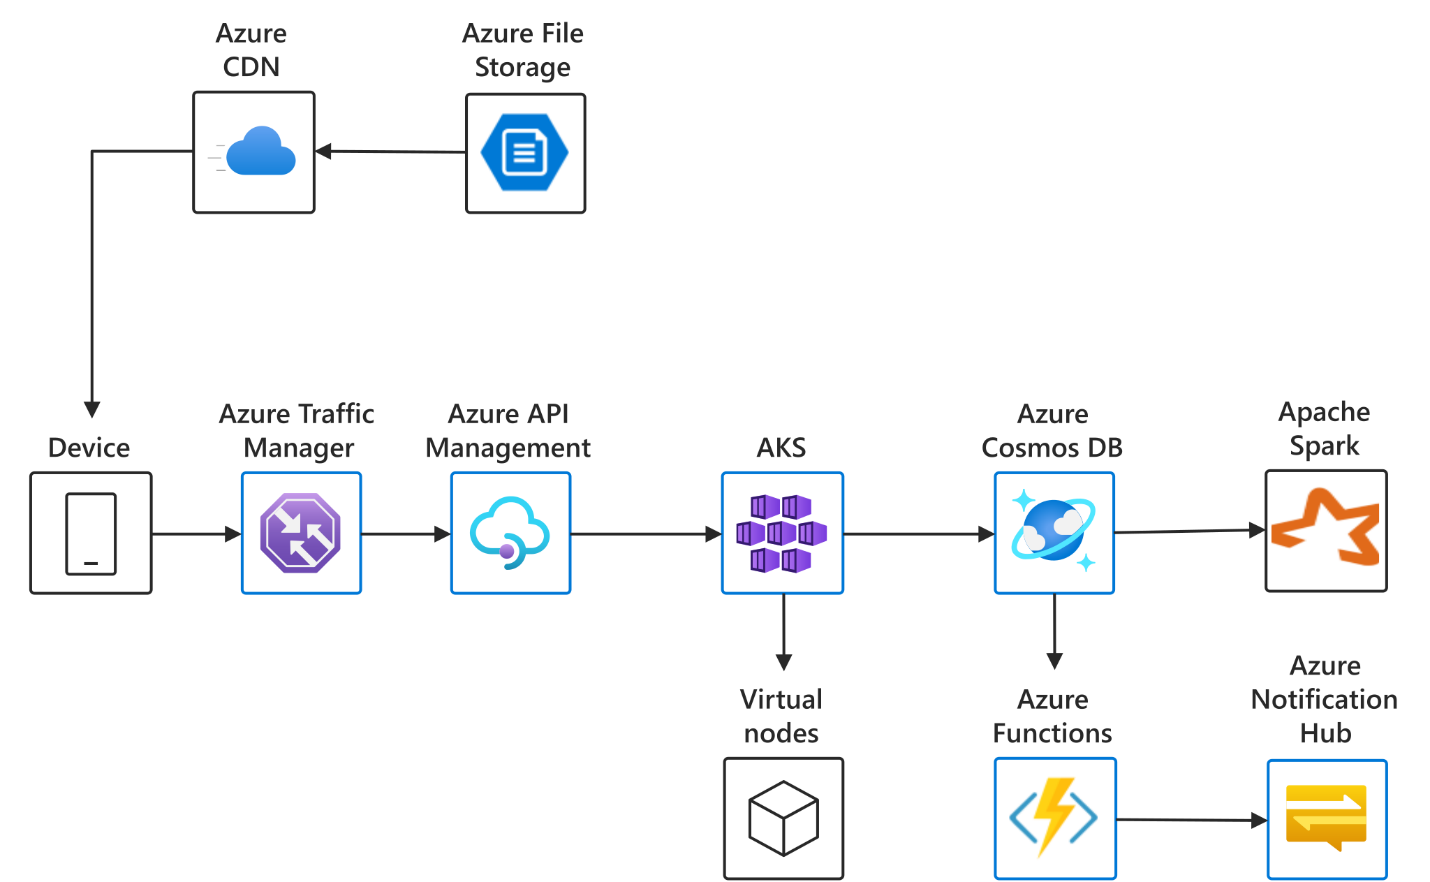
Dataflow
The data flows through the solution as follows:
Azure Traffic Manager routes incoming requests to Azure API management Gateway.
API Gateway ensures requests meet security and other policies, and then routes them to service running in Azure Kubernetes Service.
Services uses Azure Cosmos DB, Azure CDN, and Azure Functions to achieve low-latency data access data as needed from anywhere in the world.
When demand spikes past current capacity, AKS uses virtual nodes to dynamically scale up the service.
Instant IoT data streaming with AKS
This solution demonstrates how to ingest and analyze high volumes of IoT data and generate real-time recommendations and insights.
Potential use cases
This solution utilizes the following functionality:
Real-time data ingestion and processing pipeline capable of detection and notification within seconds.
A secure API gateway that connects to back-end services running anywhere.
Elastic provisioning of compute capacity without the need to manage the infrastructure.
Architecture
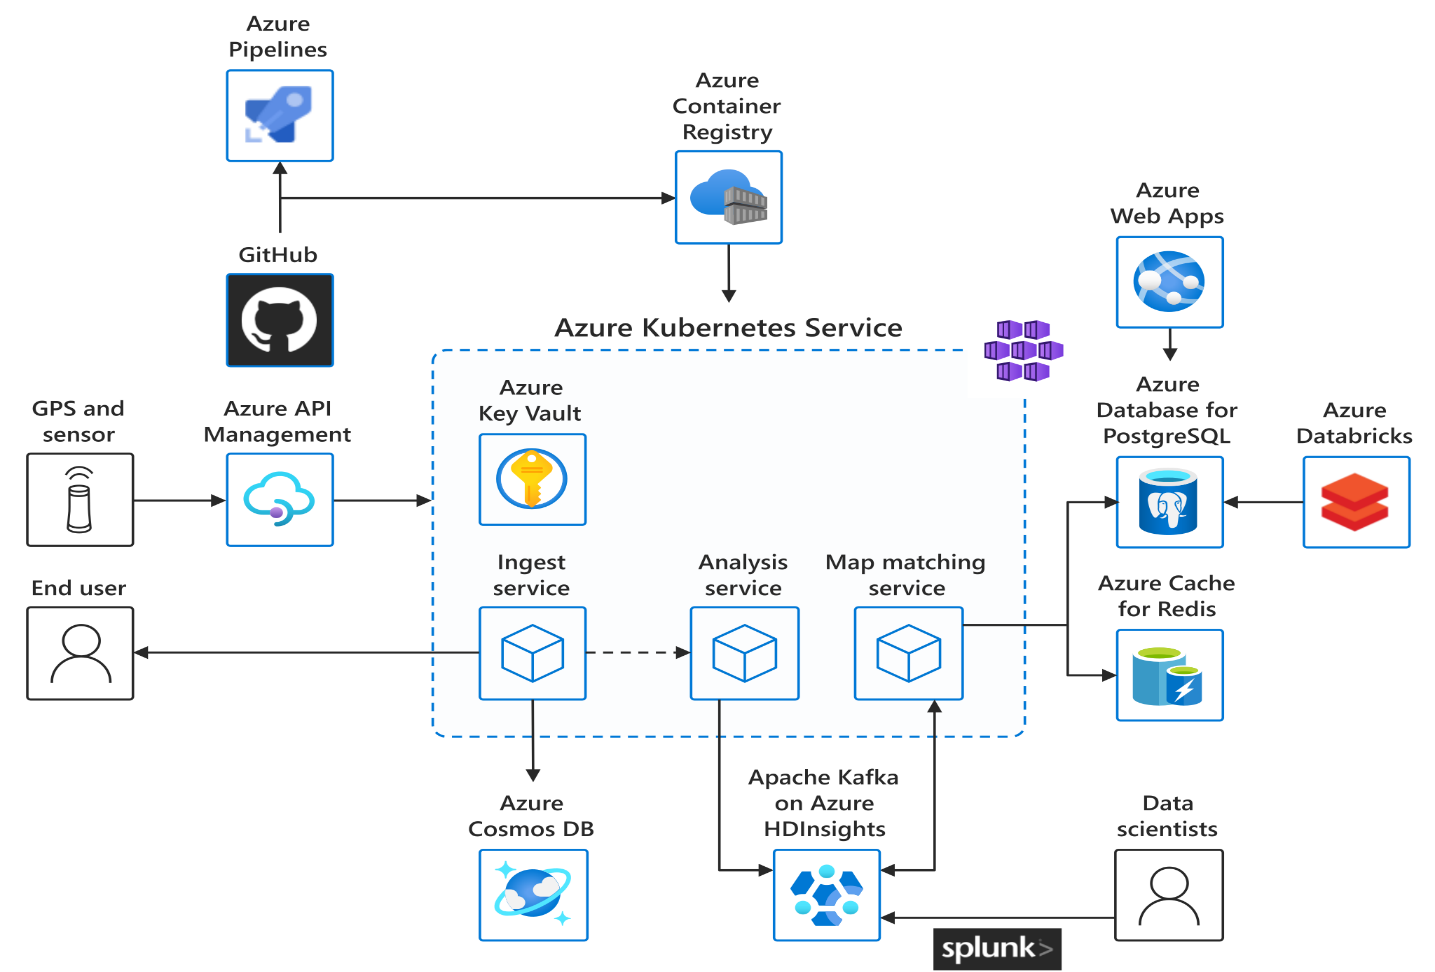
Dataflow
The data flows through the solution as follows:
Sensor data is generated and streamed to Azure API Management.
AKS cluster runs microservices that are deployed as containers behind a service mesh; containers are built using a DevOps process and stored in Azure Container Registry.
Ingest service stores data in an Azure Cosmos DB.
Asynchronously, the analysis service receives the data and streams it to Apache Kafka and Azure HDInsight.
Data scientists can analyze the big data for use in machine learning models using Splunk.
Data is processed by the processing service, which stores the result in Azure Database for PostgreSQL and caches the data in an Azure Cache for Redis.
A web app running in Azure App Service is used to visualize the results.
Container CI/CD using Jenkins and Kubernetes on Azure Kubernetes Service (AKS)
Containers make it easy for you to continuously build and deploy applications. By orchestrating the deployment of those containers using Azure Kubernetes Service (AKS), you can achieve replicable, manageable clusters of containers.
By setting up a continuous build to produce your container images and orchestration, you can increase the speed and reliability of your deployment.
Potential use cases
Modernize application development practices to a microservice, container-based approach.
Speeding up application development and deployment lifecycles.
Automating deployments to test or acceptance environments for validation.
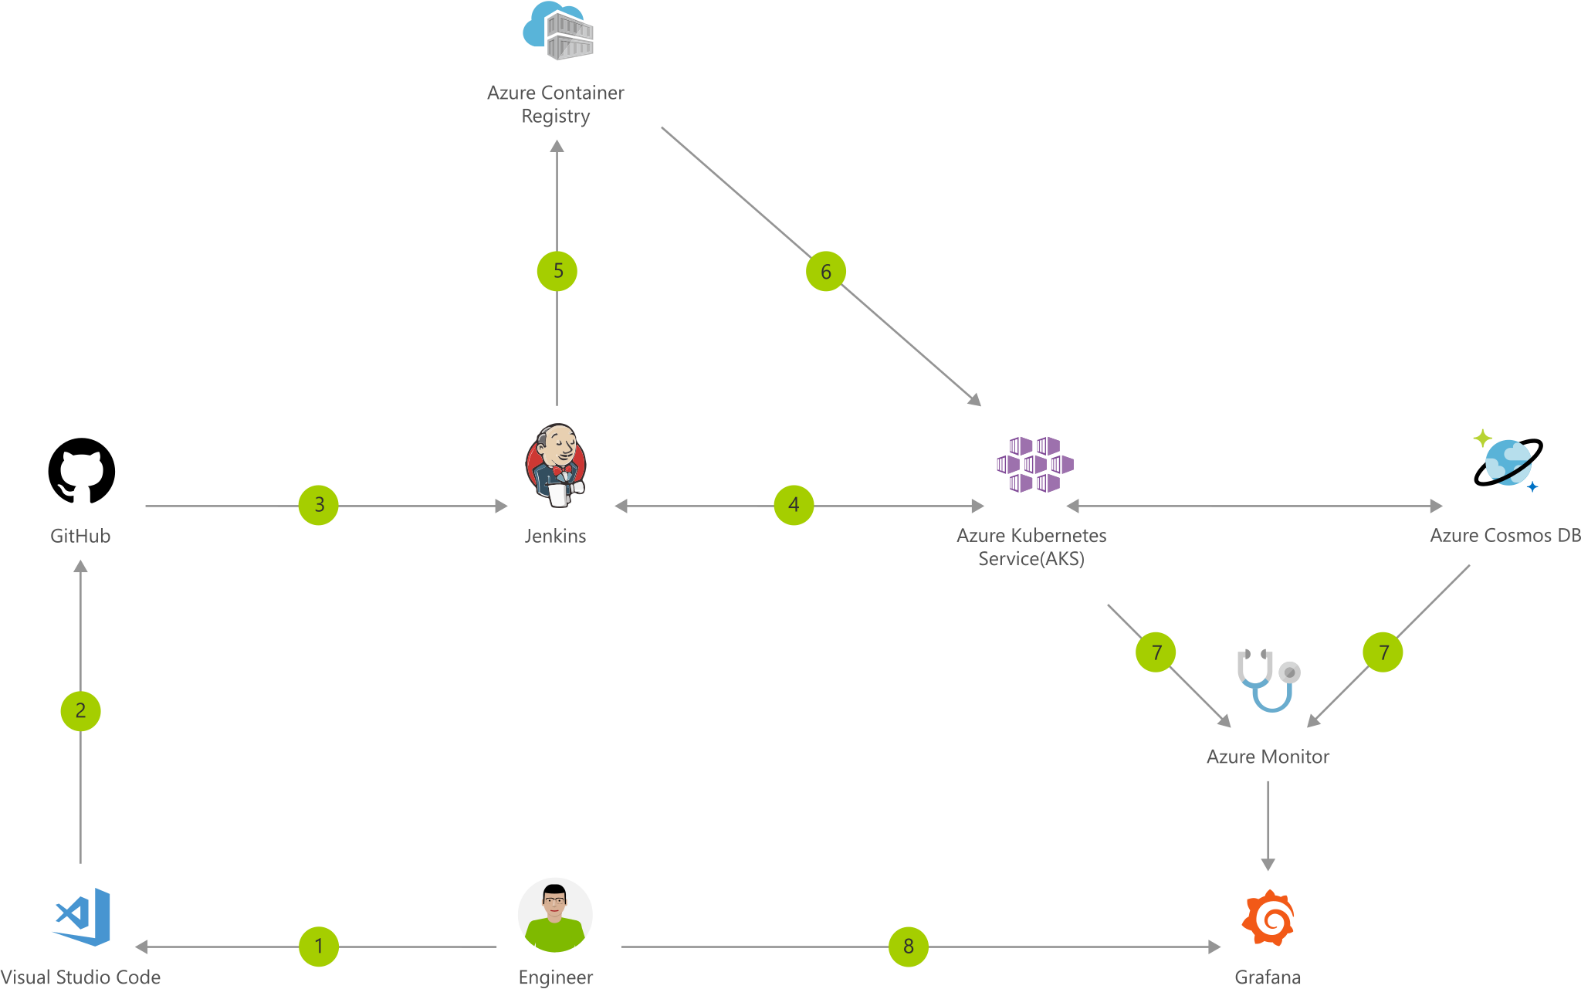
Dataflow
Change application source code.
Commit code to GitHub.
Continuous Integration Trigger to Jenkins.
Jenkins triggers a build job using Azure Kubernetes Service (AKS) for a dynamic build agent.
Jenkins builds and pushes Docker container to Azure Container Registry.
Jenkins deploys your new containerized app to Kubernetes on Azure.
Container Service (AKS), backed by Azure Cosmos DB.
Grafana displays visualization of infrastructure and application metrics via Azure Monitor.
Monitor application and make improvements.
App Development Methodologies: Agile vs. Waterfall

So you rounded up a crew of first-class app developers and some fortune 500 company commissions you to build an app that will change the game but you don’t exactly know how to go about building it?
Well, you’ve come to the right place. And even if your case is more low-key the same practices apply.
There are two main development methodologies that we use in the app development industry: Agile and Waterfall. The end goal of each is the same, to create an application, but the way they go about this feat is different.
What is Agile?
Agile is a development methodology that emphasizes the rapid delivery of an application. It is defined by “sprints,” a period of time allocated for a particular project component to be completed. The completed sprint results in a deliverable which in our industry is referred to as a “build.” A build is a pre-release version of an app; it is a portion of an app.
The features in the app are prioritized from most important to least depending on the business value the customer places them.
As work is completed and a deliverable is pushed, it can be reviewed by the project team as well as the customer.
What is Waterfall?
The Waterfall model or “traditional” approach emphasizes a logical progression of steps; it is a linear approach to software development. Unlike Agile which boasts its adaptability, one stage of development must end before the other commences and there is no going back to previous steps.
Below is a basic model of logical progression using the Waterfall method:
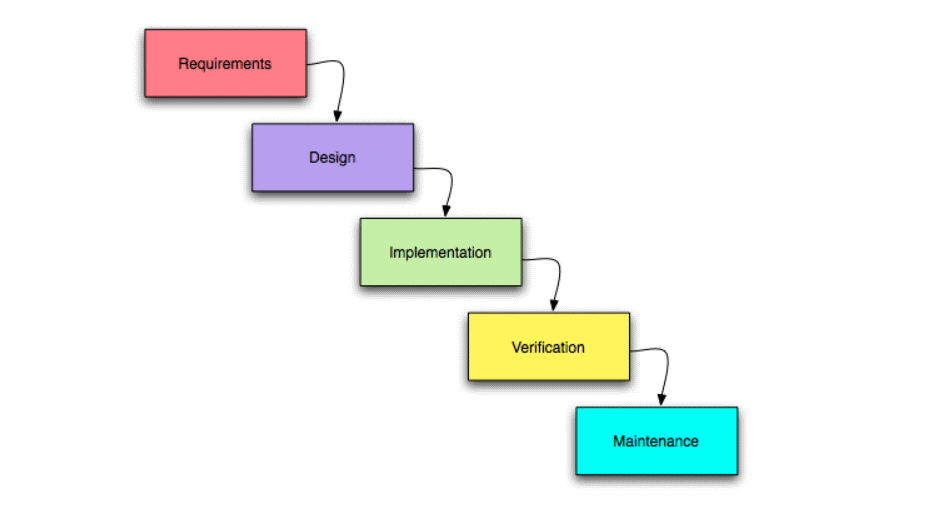
Project traits and Development Methodologies
Next, we will look at how these models act in accordance with common project traits as well as point out a pro and con of each.
Customer Involvement
Agile:
The customer will be weighing in on many aspects of the project. Due to the greater number of deliverables (builds) in the development process, the customer develops a strong sense of ownership by working directly with the team to progress the project.
Pro
When the customer is invested in the project themselves, they are likely to provide more assistance or capital as they feel like most of the success of the project rests on their shoulders.
Con
Since the nature of Agile relies so heavily on customer involvement if they do not have the time to test or discuss certain features this can pose problems.
Waterfall:
When project requirements are defined it’s as if they’re set in stone.
Pro
App developers and customers agree on what is to be delivered before any of the actual development begins. This makes the planning phase more straightforward and progress is more easily measured.
Con
As all deliverables are based upon requirements documented before initial development, a customer may not see what is being delivered until it’s almost finished.
Feature Prioritization
Agile:
The most essential features get developed first. As the scope in many cases is undefined this is practiced so at least a basic version of the app gets produced when funding gets low.
Pro
Say for some reason funding for the project has dissipated. With a basic version, you’ll at least be able to reach out to friends or investors that may be able to help progress your vision.
Con
It’s hard to see the full picture without all the features included. This may lead the customer to make poor decisions before everything is said and done.
Waterfall:
The customer gets what was agreed upon. There is no partial package; it’s all or nothing with this approach.
Pro
This eliminates dilemmas and speeds up project time.
Con
Customers are not always able to visualize an application from a requirements document. The app might not turn out as they had hoped.
Team
Agile:
Since the fate of Agile’s effectiveness rests upon the cohesiveness of a team, a smaller team is preferred. There is a high degree of coordination and synchronization required using this method and increasing the size of your team naturally reduces the strength of these traits.
Pro
What is being done and should be done is clearer due to the small nature of your organization.
Con
It takes longer to implement features since fewer individuals are working on them.
Waterfall:
With this methodology, it’s like passing a baton to the next runner on a track. Coordination and synchronization are limited to handoff points.
Pro
Progress is more easily measured; the full scope of work is known in advanced.
Con
May be difficult to follow the narrative of a project. You might end up with a bunch of pieces that simply don’t fit together.
Funding
Agile:
Since this methodology welcomes changes with open arms, fixed-funding is risky. Customer involvement is so high that if you don’t stand your ground as the developer you’ll become the slave to the increasing wants, needs, and changes. That’s why Pay-as-you-go is the name of Agile’s game.
Pro
If the customer is excited about how the project is turning out, they will likely call for additional features to be built. This gives you more work.
Con
If you choose fixed-funding, an argument may ensue between the customer about what/what-not was included in the original scope.
Waterfall:
Fixed-price contracts work well here. Since the project requirements are so rigid, the scope must be defined in advance and remain steadfast.
Pro
What you earn is dictated beforehand. There shall be no ambiguities once the project begins.
Con
The customer may feel that they did not get what they paid for once all is done.
Which methodology comes out on top?
The simple answer is: it depends.
Across the board, Agile is implemented in projects more. A 2015 survey done by Hewlett-Packard survey puts this into perspective:
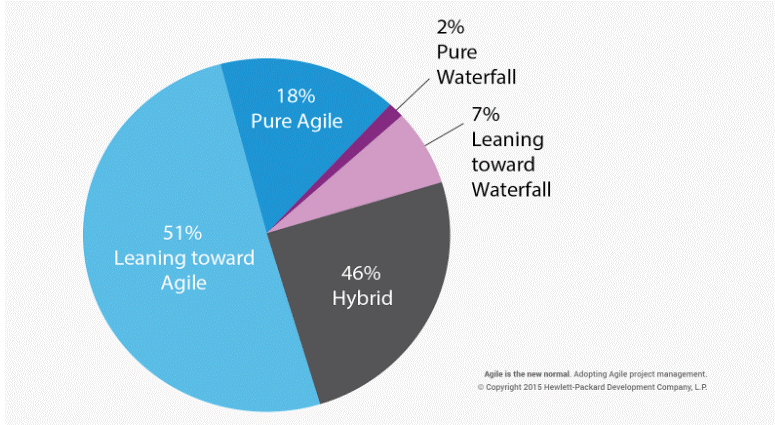
Agile principles seem to fit the current digital landscape better. Evolving needs and change seem to be present throughout all projects.
But what we would recommend is developing your own hybrid methodology. Don’t look at these methodologies as commandments, look at them as recommendations. Take the flexibility of Agile and mesh it together with the rigidity of the Waterfall. You are unique and so should be your methodology. Tailor it to what suits your environment best.
Architecting for DevOps
Under a DevOps model, the development and operations teams work together and share their skills and knowledge. Sometimes, these teams are merged into a single team where the engineers work across the entire application lifecycle, from development to deployment.
Under a DevOps model, the development and operations teams work together and share their skills and knowledge. Sometimes, these teams are merged into a single team where the engineers work across the entire application lifecycle, from development to deployment.
In this edition of Let’s Architect!, we’ll talk about DevOps culture and share content to provide helpful mental models and strategies for your work as an architect or engineer.
Automating cross-account CI/CD pipelines
Companies often use the cloud to run their microservices. This means they’re working with different AWS accounts and hosting each microservice in a dedicated account.
This method can be helpful to isolate different environments for software deployment pipelines. A well-designed pipeline is fundamental to releasing software quickly because it allows DevOps engineers to automate the software deployment process.
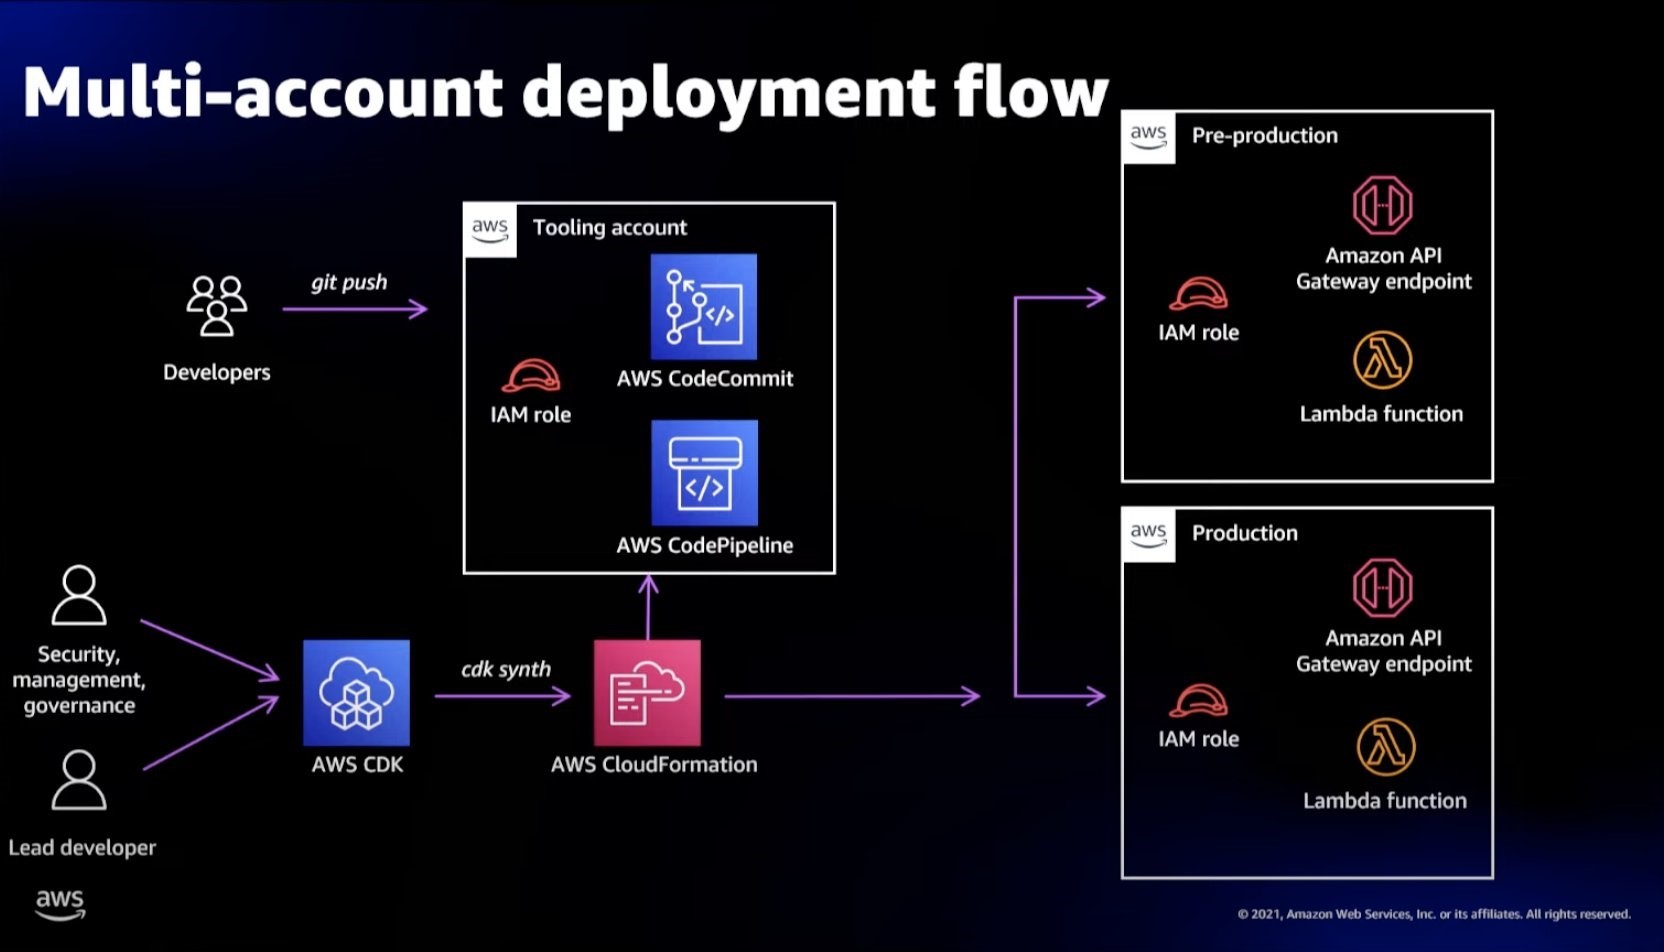
Automating safe, hands-off deployments
Amazon adopted continuous delivery across the company as a way to automate and standardize how software is deployed and to reduce the time it takes for changes to reach production. In this system, improvements to the release process build up over time. Once deployment risks are identified, teams iterate on the release process and add extra safety in the automated pipeline.
A typical continuous delivery pipeline has four major phases—source, build, test, and production (prod). This article describes the mental models and approaches that engineer use at Amazon to help you understand the design considerations for each step of the pipeline and learn some recommended practices.
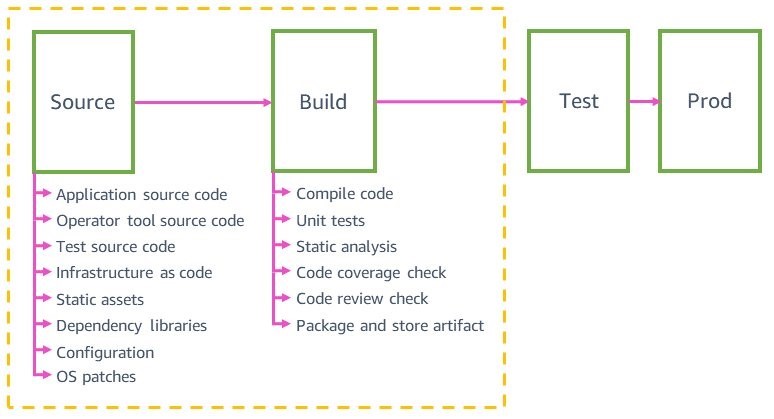
Each pipeline has these four major steps; however, more granularity is often added in the testing stage to take advantage of multiple pre-production environments
Covert ops on DevOps: Leveraging security to shift left
Architects often deal with complexity and ambiguity while designing architectures and interacting with stakeholders. Consequently, their architectures evolve and grow in complexity.
When your workload becomes more complex, security is an important area to consider and requires attention during the entire Software Development Life Cycle (SDLC). This video shows some methods to add security in a DevOps culture. You’ll learn about shifting your security left to create collaborations between developers and the security team. It will also show you how to uncover vulnerabilities in the SDLC as well as the strategies to implement and automate security in the process through a security as code mindset.
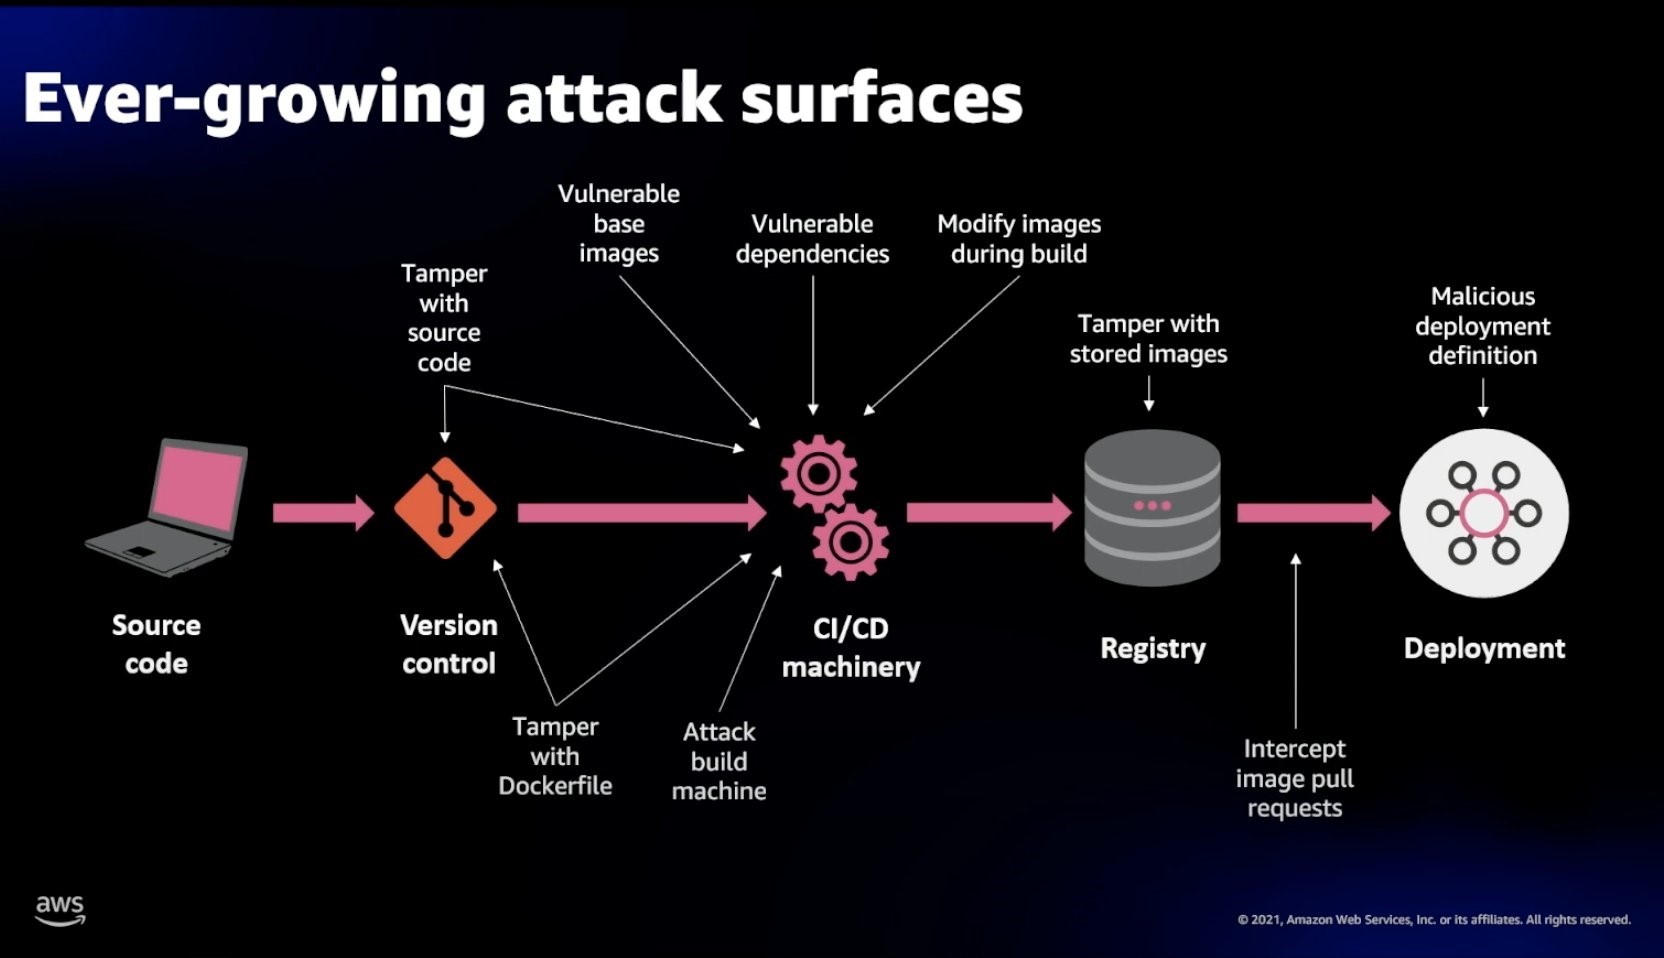
At a high level, people build applications with source code, version control, CI/CD, registries and deployments, and during each step we should design to prevent specific vulnerabilities.
Instrumenting distributed systems for operational visibility
Every member of a development team works like an owner and operator of the service, whether that member is a developer, manager, or another role. Software developers and architects usually work with logs to see the status of their systems. Logs act as the mechanism to share what’s happening in the software that is running. This information is used for troubleshooting and performance improvement.
This article describes some approaches to feed data into operational dashboards to measure real-time metrics, invoke alarms, and engage with operators to diagnose problems. You’ll learn some mental models and best practices to design a logging system through a set of stories, considerations, and common examples with code samples.
What is Flutter?
Flutter is a cross-platform app development framework made by Google. It is based on the Dart language. Release of the first stable version was in 2018.
Cross-platform development means that your app could be deployed simultaneously to both Android and iOS using a single codebase. The main components of this framework are the Dart platform, the Flutter engine, the Foundation library, widget sets and development tools (Flutter DevTools).
Why use it?
As with any other cross-platform framework, it significantly simplifies the development process. In other words, by writing code for only one application, Flutter allows you to have an application for several different platforms.
Apps built on Flutter are better for industries where how the interface looks is not super important. For example, it would be perfect for internal use by employees. It's very common in the retail industry, when a shop assistant may tell customers which sizes are available or if they have a similar shirt in different color using the company's internal app.
Another field for cross-platform mobile apps is startup or small new company. This method is faster and cheaper. For example, if it is necessary for a business to release the MVP to the market as a pilot version. Or, when the market is formed, but the company wants to overtake competitors with a new feature. You do not need a lot of time for writing code, testing, and you can save resources.
Pros and cons of using Flutter framework
As any other development tool, Flutter has its own advantages and disadvantages. Because of that, it could be perfect for one business and terrible for another. Everything depends on your needs.
iOS vs. Android
Flutter was made by Google. Hence, it works perfectly fine with the Android platform but has some issues on iOS. For example, on iOS, it will be a little noticeable that the application is not native. Animation and scrolling made on Flutter will be displayed differently on the iPhone, more like in Android.
Performance
In spite of minor iOS issues, Flutter is the best cross-platform framework that exists today. This is achieved through AOT (Ahead-of-time) compilation. It means that the whole compilation process is performed before the program is executed. It takes a minimum load on the system and does not require additional memory allocation.
Popularity
Popularity is an undeniable advantage of this framework. Because of that, you can find a lot of plugins which allows to work with phone hardware, such as camera, bluetooth, wifi, etc..
Another good reason is big community around the world with meetups, events, and exclusive resources.
Reliability
Flutter was made by Google in 2015. So it has been supported and developed by Google since then. New updates come out almost every month. Constant improvements of the framework lead to better performance of the app. For example, when the new version releases, which includes improvements regarding app startup delay, you can update your app to get new benefits.
Somewhere in between
A Flutter developer can simultaneously complete tasks of two native developers (iOS, Android). On the other hand, if the application has a lot of native functions, you could combine native development (for example, for libraries) and Flutter (to create a single logic and UI).
Examples
On flutter.dev you can find a lot of examples of companies which already implemented Flutter to their products.
These include:
BMW – My BMW application for driving and checking the condition of the car.
eBay – eBay Motors service for selling cars.
Alibaba – Alibaba Xianyu app for selling used goods.
KFC is an analytical BPM system for restaurant managers and employees.
Education is Now Mobile

According to the Pearson Student Mobile Device Survey, 78% of elementary school students claim that they “regularly” use a tablet. With the younger students, tablets seem to be the device of choice but the favor shifts as you go upgrade levels. With decreased tablet use comes increased smartphone use at 82% of high school students using one on the regular.
The Pearson Study also found that 64% of college students use their mobile device for schoolwork, only 20% shy of the most common device used for schoolwork, a laptop.
The study makes it evident that mobile is becoming increasingly prominent in the scholastic sphere, not only in the upper levels of education but in the lower ones as well. Education tools are now being developed across almost all portable platforms making it a perfect opportunity to jump in the market as it’s still young.
Below are tips for educators who have a vision and are looking for ways to supplement it.
Tips for Educators on Creating a Successful App
A successful education app will encompass both “in school” and “out of school,” or online functions.
In School:
“In school” pertains to functions that correspond to elements of teaching that are strict to the administrative part of education.
The app should offer educators the ability too:
Track Attendance
In the past, educators have kept track of attendance on sheets of paper that they later stick into a folder and refer back to during grading time.
The issues with this form of keeping records are human error. Attendance sheets can easily be lost or misplaced. If this is indeed the case, proper grading is no longer possible. The student that had perfect attendance might as well of been out all semester.
A sheet of paper is also not password protected. Attendance records can fall into the wrong hands. With just a bit of editing skill, it’ll be unlikely for a teacher to notice that their records have been tampered with.
With an app, the attendance records would be safely stored in servers, password protected, unable to be meddled with by those with malicious intentions.
Book Classes
The app could give students the ability to pick and choose their classes for the semester. It would display information such as the name of the course, the level, who the professor teaching the class is, the requirements for placement, a short description of the course material, and how many seats are available. The functionality doesn’t have to be limited to semester-long courses, it should also feature specialized classes with shorter time frames.
Book Lab / Study Rooms
An educator may want to hold a specific class in a particular room. They may want to dedicate a class period for the intent of helping students study for a final. Or labs may be in high demand making it difficult to book a time necessary to complete certain course assignments.

An app could streamline the process of booking various facilities not limited to study spaces or laboratories. Booking could be performed directly on the application itself. An educator or a student/student group can book facilities that are in their authority to do so. This functionality could perform similarly to the way WeWork, a popular co-working space present throughout multiple metropolitan cities in the U.S, functions. Members of WeWork’s network can book a conference room for an allotted time which they must apply credits toward.
Office Hour Sign Up
All the grading and planning that educators have to do on a daily basis limits the time they have to personally meet with students. Many students might need extra assistance outside of the classroom or are unsure about if they’re going about an assignment correctly and would like verification.
Most teachers have office hours already but as it is often the case, students may have to wait in a queue till others that are ahead of them settle their matters with the educator. This is frustrating for the students and inefficient for the educator.
An app that allows students to reserve office time with the educator similarly to the way a student may book facility use, is the solution to inefficient queues. The popularity of mobile ordering to pick up at businesses such as Starbucks make it evident that society is heading toward a future that doesn’t tolerate waiting times.
Online:
“Online” pertains to functions that are not restricted to a place. The purpose of these features lies outside of the classroom.
Courses / Study Material
Students should have round the clock access to course materials. In the past this was impossible. Fortunately now, technology has made this possible. Educators should be able to share files with their students by simply uploading it to a particular platform.
Students will see the uploaded files on the course’s page and be able to download them.
Communicate with Classmates / Teachers / Parents
With the advent of email, classmate / teacher / parent communication may seem like something unnecessary to dump resources in but the reality is, email can get messy. Multiple email threads can make it difficult to revisit a topic brought up in the past. Accidental deletion, automatic filtering to spam, are just two of many problems associated with the age-old internet postal service (the first email was sent in 1971) system that is email. It may very well cause an involved party to actually go postal.
Developing a message system, something along the lines of the extremely successful messaging platform, Slack, but more tailored to scholastic education, is something that classmates, teachers, and parents alike would certainly praise you for.
Receive and Submit Assignments
Perhaps the class is a hybrid class and has an online component that requires students to submit the assignment online. Or a student may be out a long time but would still like the ability to submit and receive feedback for assignments. This functionality already exists but options are limited when it comes to affordable management systems. If you’re a private educator, these options may not be feasible. Build something more affordable (we can help you) and they will come.
Track Grades
Students are impatient and eager to see their results. The longer results take to view, the more anxious students get. The faster students obtain these results, the more time they have for improvement and questioning before the next exam.
With an app, students could see results as soon as the teacher grades the assignment/test regardless of the time or day.
Conclusion
Presented in this article are only examples of the components you can include in an educational app. We hope to either create a spark that ignites into a full-fledged idea or simply supplement your existing one.
The market is ready and education can certainly use an update.
Crud Operation In React.js and Mysql
I draw a fullstack overview Diagram Architecture from React.js Frontend to MySQL database through Nodejs RestAPI backend.
Develop Nodejs CRUD RestAPIs with the supporting of Sequelize ORM.
Implement Reactjs CRUD application with Ajax fetching APIs to do CRUD request (Post/Get/Put/Delete) to Nodejs Backend APIs.
I create a testsuite with a number of integrative testcases with CRUD RestAPI requests from Reactjs to do CRUD requests to Nodejs RestAPIs Server and save/retrieve data to MySQL database.
React Node.js Mysql CRUD Example – Step By Step React, Nodejs and Mysql simple full-stack Application
Overall Architecture System
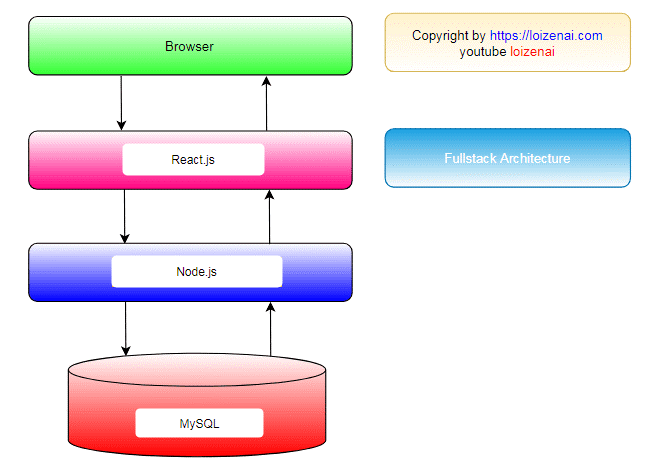
We build a backend: Nodejs CRUD Application with MySQL that provides RestAPIs for POST/GET/PUT/DELETE data entities and store them in MySQL database.
We implement React.js CRUD Application that use Ajax to interact (call/receive requests) with Nodejs CRUD application and display corresponding data in Reactjs Component.
Nodejs MySQL CRUD Design Application
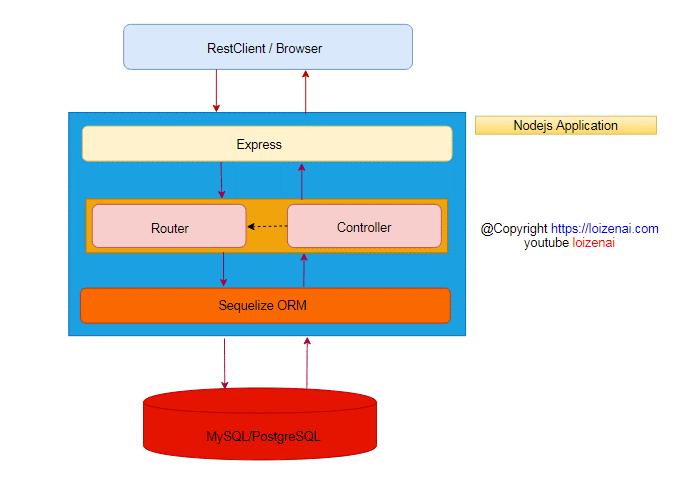
We have 4 main blocks for the application:
For building RestAPIs in Nodejs application, we use Express framework.
For interacting with database MySQL, we use Sequelize ORM.
We define APIs URL in router.js file
We implement how to process each API URL in controller.js file
We use Bootstrap and JQuery Ajax to implement frontend client.
Reactjs CRUD Application Design

Reactjs CRUD Application is designed with 2 main layers:
React.js components let you split the UI into independent, reusable pieces, and think about each piece in isolation.
Ajax is used by Reactjs component to fetch (post/put/get/delete) data from remote restapi by http request
Reactjs CRUD Application defines 5 components:
Home.js is used serve as the landing page for your app.
AppNavbar.js is used to establish a common UI feature between components.
CustomerList.js is used to show all customers in the web-page
CustomerEdit.js is used to modify the existed customer
App.js uses React Router to navigate between components.
Integrative Project Goal
Home page:
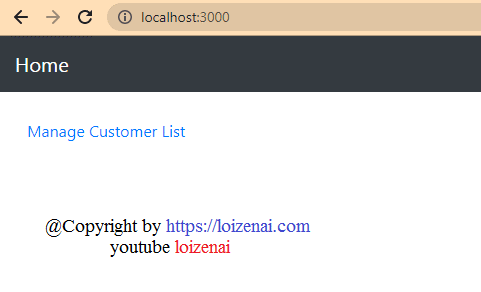
Reactjs List all data:
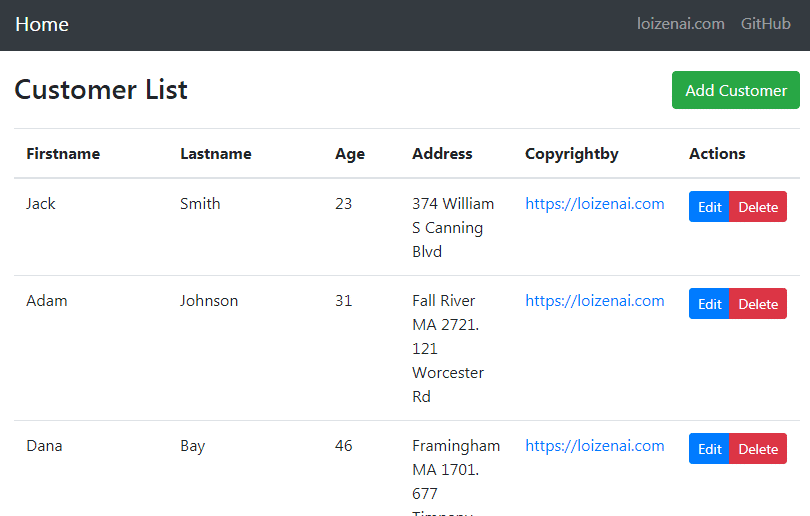
Reactjs add data:
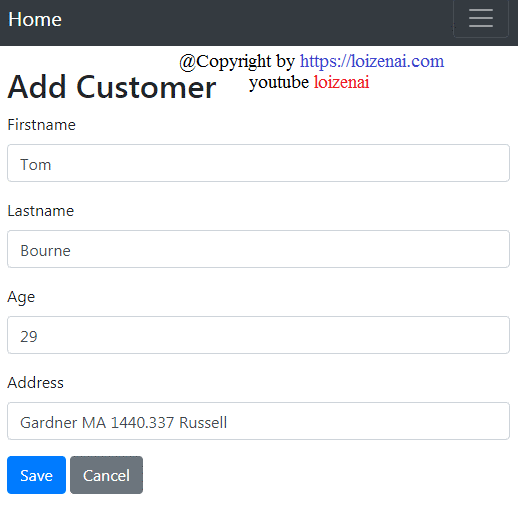
Reactjs update data:
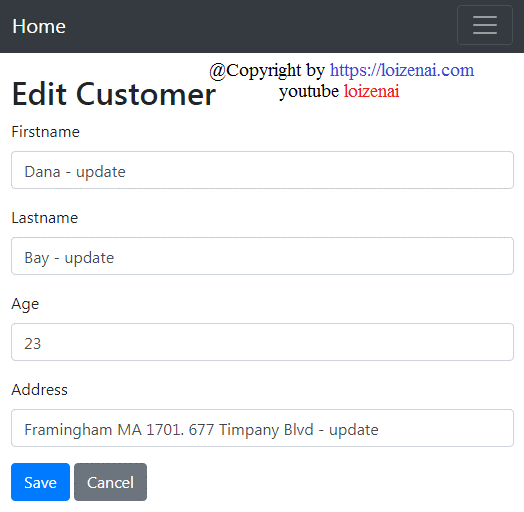
Reactjs delete data:
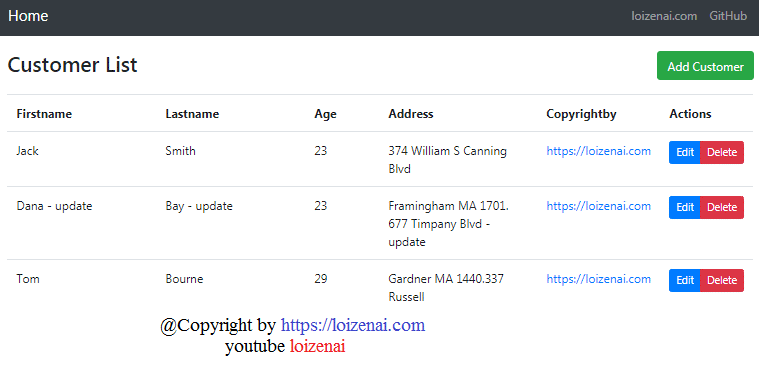
How To Make and Launch Housing App Like Zillow
Real estate is one of the most promising and lucrative sectors in the world, and having a Zillow clone app can help you maximize your profits. Housing Apps like Zillow, on the other hand, are real estate websites with a range of functions. One can make the best decision by using Real Estate Apps.
To begin with, housing apps such as Zillow are among the most popular real estate websites today. Zillow is more than a marketplace; it's a virtual social network with a user base that includes everyone involved in the real estate industry.
Digital App For Real Estate Market
You may also keep up with digital advancements in the real estate market and stay ahead of your competitors with the help of a mobile app. You can, for example:
Take advantage of big data technologies to allow your consumers to compare properties based on a variety of criteria and select the best choice. Big data algorithms can provide you with estimations for the properties your clients are looking for.
Incorporate a machine learning (ML) algorithm. You can save users' preferences, customize in-app alerts, and deliver targeted push notifications using AI-powered technologies.
Include virtual tours in 360 degrees. According to the NAR study, purchasers frequently take virtual tours of properties after researching on the internet. These tours give prospective homeowners a feel of what one of their most expensive purchases would entail.
The largest real estate markets, such as Zillow and Trulia, benefit from their applications only.
Building a real estate app may appear to be a challenging task, but it is rather simple if you follow these steps:
Idea Validation: Why You Should Create
The real estate market is one step closer to digitalization, with apps like Zillow and Trulia helping simplify the difficult house purchase process. Users may use these applications to seek property on the move if you create the correct app. There's no need for them to go to every possible property and location. They may use the app to look at the specifics of the house or apartment and see whether it meets their needs.
A customized app for buying and selling real estate will also help you stand out in the business and attract more clients. Now that it is proven that developing real estate applications is a realistic and good alternative, let's look at the two different sorts of apps that may be created.
Understanding The Types Of Real Estate Apps
When hiring a freelancer or a real estate app development company, you need to be aware of the many types of applications available. There are two types of apps based on how they operate when it comes to real estate mobile app development. The first is a third-party app, whereas the second is an app developed by an agency.
The Agency AppIt is specialized to certain real estate agencies, as the name indicates. Customers may easily access all of the properties under their listing and their agents using the agency app, which acts as the company's digital face. The agency app helps them keep track of their market development, such as how many consumers use the app and their demands. It's simply a more effective management and development tool for businesses.
Third-Party ModelIt acts as a go-between for clients and agents. The third-party approach differs from the agency app. Users can sign up to be buyers, sellers, or freelancing agents. Freelancers may use the app to post their listings and expand their network.
Once you've settled on an interface format, the next move is to consider what functionality you want in your real estate smartphone app.
Creating a List of Must-Have Features
After you've chosen an interface layout, think about the functionality you want in your real estate smartphone app. It's critical to understand what features your app or website will provide to users. Some of the characteristics are as follows:
Authorization and login option
View/Edit Profile
Property Listings Page
Robust Search and search engine with a range of filters
Map-view
Property View
Messaging facility
Reviews & Ratings
Interior Decoration for the App: The UI/UX Design
Following creating a list of top features, it is necessary to build a list of UI/UX design alternatives. The following are some of the possibilities:
User-Focused Approach
During the brainstorming stage, users' needs should be carefully examined. It will help you decide on the appropriate course of action. Examine the websites of your competitors to learn about their strengths and flaws. A good site design not only catches the eye of a consumer and helps them find what they're looking for, but it also increases the productivity of your online business.
Usability vs Aesthetics
A sophisticated website with a lot of "cool and fashionable" animations might occasionally fail when it comes to usability testing. Fantastic design techniques frequently attract customers without assisting a website in achieving its goal. The Non-friendly navigation bar, non-mobile-friendly UI, and high load time are just a few of the common errors made by real estate websites, which need to be avoided.
Intuitive navigation
When tenants, landlords, and property brokers visit a real estate website, they anticipate a pleasant user experience that is guided by navigation.
Powerful search tools
There are a variety of reasons why people utilize the real estate website—specifically, the real estate listings. The brilliant concept is to encourage people to search for things they're interested in based on certain special criteria, such as their lifestyle. Instead of seeing it as a property, they will regard it as an adventure.
The App-Building Technology Stack
After you've decided on all of the features and capabilities, you'll need to choose the right tech stack to put all of those cool features into your app. To get you started in building your tech stack to construct real estate sites like Zillow, below are a few tech stacks that can be utilized:
Property applications have a wide range of users, including people from all walks of life. As a result, it's critical to use a multi-platform strategy, in which case you'll require Java to create real estate apps for Android and Swift for iOS.
Database: Postgres and PostGIS SQL may be used to connect the system's databases. You may also take advantage of APIs like SimplyRETS, iHomeFinder, and others.
The Facebook SDK is required for social network sharing.
With the aid of Mapkit, you can design an interactive and customized map.
Firebase SDK and Apple Push Notification are two options for push notifications.
Best Way To Generate Money With A Real Estate Website
A real estate website can generate money by offering its visitors the following promotional programs:
Premier Services for Agents - Premier Services are real estate agents that pay the website to display adverts and gather leads.
Promos - A real estate website can target real estate firms by selling promotions. Sales campaigns are targeted towards real estate businesses.
Advertisement - Because lenders, mortgage providers, and other businesses have large marketing budgets, the website may generate a lot of money by selling advertising space to them. The platform might charge a fee based on how many leads are generated.
Subscriptions - The mortgage subscription model, in which the portal connects bespoke quote services to the administration platform. It may be sold to brokers and agents through a marketing campaign.
Summary:
A successful property website requires planning and experience. It's not as difficult as it appears. If you know your target demographic and have a clear concept of how to begin establishing your internet presence, it won't cost much. The websites of well-known real estate businesses stress their corporate design and brand image. The designs are appealing and well-organized.
How To Increase User Engagement for Your Mobile App

If your mobile application has a high download rate, it doesn’t mean that it will bring you money. Nowadays, brands spend vast sums on acquiring users, yet getting a user is only one part of tough work. Once users got interested in your products, you have to know how to engage and retain them. Yes, your app could be free, have a friendly interface, and positive reviews. However, it doesn’t mean that everyone who downloaded your app would become your user.
Top 7 Effective Methods to Engage Users to Your Mobile App
As I have already mentioned above, achieving mobile app engagement is a difficult task. In this part of the article, I am going to review five working methods that will help you to keep users engaged in your app regularly.
Create a quality app
Build a quality mobile application with proper functionality and interface. Test your product before launching it. If you want your product to work well and bring you profit, you have to work hard on it. Proper functionality is one of the primary keys to keeping your users interested in using the app. Poor features always annoy new customers. Therefore, they quickly leave, hoping to find a better solution. Invest money, time, and effort into creating a great design. Include easy-to-read lines, convincing headlines, and different calls-to-action.
Let Your Users “Try Before Buy”
A lot of people get pushed away by strict limitations you may want to include. Haven’t you been bored by “you can use these features after signing up” or “get premium or gold subscription to view those features” phrases? A significant percentage of people get rid of such an app after downloading it on their mobile devices. Why? People want to know what they get and even if you are not going to give them everything for free, try to offer them a trial. By showing the real value of your app, you will engage so many more people. Give new users a taste of your app to make them interested. This is how your app should work — you have to let your users try what you offer first.
Provide Instant Customer Support Within Your App
Offering a competent customer support service can also be a great way to make your new app users feel more comfortable. Live chat assistance within your mobile app can solve a lot of problems for your customers. If they can’t find the necessary features, they can ask professionals for help instead of leaving the app in frustration. Have you noticed how useful live chats are at online stores? It’s incredibly convenient when you can ask a particular person about a product or service that you can’t find or don’t have time to look for.
Make It Work Fast
Speed is what defines an excellent app, too. If you want a big audience to be engaged in your mobile app, then your software should work correctly. Every option and feature should work fast to bring the users the desired result. Why do people choose to use mobile apps? They suppose to solve their problems fast. Pizza delivery app is there to bring you food in just 30 minutes; a dating app helps you find a romantic partner within a certain distance in minutes, as well.
Use Push Notifications
Even though enabling push notifications is not something new, a lot of app developers do not consider this feature relevant. If you aim to increase user engagement, then you should keep your users updated about any new message or event. This communication will help you to interact with your users properly; it will also make a lot of users more active and interested. The statistics show that about 65% of users return to the app within a month in case push notifications are turned on.
Reward Your Customers
Discounts and special offers are very effective methods for engaging new customers, which is why you may consider offering discounts or rewards for using your app. Depending on what services or products you use, you can offer both refunds and rewards. For example, taxi services like Uber provide their customers with referral discounts. Think of the best way to keep your users happy and provide them with better deals than your competitors on the market.
Update Your App
If your users have to deal with constant crashes and bugs within your mobile app, they will begin searching for more accessible and convenient options. Trust me, the choice of new, more comfortable, and user-friendly apps is enormous. By updating your software regularly, you will demonstrate that you invest effort and care to make your UX better. Try to make at least one update per month to provide your users with new solutions. Your app should work properly on all devices. Explore and add new segments to keep your users interested in spending time and money within your mobile app.
Conclusion
All the strategies mentioned above will help the engagement rate be higher. Consequently, this will help your app to keep its users. Therefore, your users will be more likely to spend money and time within your app.
So yes, if you decided to create an app, you should remember that one-time investment is not enough since things change and evolve, and you have to keep up with trends. Otherwise, your competitors (and believe me, their number is enormous) won’t leave you any chance. Learn about your customers’ needs and wants to provide them with the product or service that they will love. Try all seven methods but not at once. Test each and wait for positive results. If your users come back, it means that you are on the right path!
This a guest post by Sandra Larson, who is the former academic editor at Essayontime and an assistant of application developer in one of the big IT companies. She regularly speaks about application design, development, and the future of technology. She studies and practices different methods that help to increase apps popularity. She shares effective methods for making mobile apps meet customers’ requirements.
How Mobile Apps can help you to Dominate Competitors
Smartphones have become an integral part of our lives. From startups to small businesses to the world dominating brands, they cannot be a part of the competition unless they offer a mobile app for the ease of the users.
This modern word is app-dependent regardless of the business. Reaching out to a more advanced customer base or just monetizing from it, the mobile apps have become a necessity for businesses to survive.
Mobile app development technologies bring X factor to your brand, expand your customer base, and retain your existing customers. It helps to foster customer loyalty and customer services. No matter how famous your brand is, you have to fight with other brands that hinder your growth.
According to the latest statistics, mobile apps will contribute 808.7 billion towards total revenues in 2022. Thus, creating a mobile app development strategy for businesses to accelerate your profits is one of the most lucrative options to excel in the cut-throat market.
Here are the few considerations for businesses to be kept in mind while creating a competitive mobile app:
1) Use a new-age algorithm
Mobile apps must act as innovative tools to solve human problems. You have to use a new algorithm to beat your competitors. For example, Tinder is one of the most famous online dating apps which uses machine learning technology algorithms. The use of the new algorithms keeps the Tinder app in the first position among all other dating apps.
Always come up with new and innovative ideas to impress the audience and to stand out in the market. AI and ML technology in mobile apps empower businesses to capture the vast amount of data that matches with customer search.
2) Create a Mobile app with privacy and security
One of the major factors that allows some mobile apps to beat the others are the highest security standards kept for the customer data. Since the biggest concern for businesses is to face cybersecurity challenges, taking necessary precautions to keep the data safe and secure is the one of the necessary measures to be kept in mind for the organizations building mobile apps. Existing Customers and other new customers use your mobile-only if it is safe and secure.
3) Bring uniqueness to your mobile app
Always come up with a unique value proposition to stand out from the crowd. You can dominate your competitor by mainly focusing on the customer's needs and clarifying their doubts. It is one of the perfect ways to make your brand stand out in the crowd of competitors.
4) Follow success strategy
Create a mobile app development strategy for businesses to accelerate your profit growth. Using mobile app technology and software is one of the platforms for many people to reach the brand easily. Here are some of the ways to accelerate your business growth:
One can reach a wide customer by promotion of sales and discounts in their channel and mobile apps. List out all the products in an impressive way to attract the audience. It is one of the methods to dominate your competitor with a mobile app.
More than 78% of people use the mobile app to solve their doubts and queries. To build an app in such a way so that customers can clear their queries more quickly.
Create a mobile app to embrace digital mobility and not to make money. It is one of the possible ways to achieve brand recognition.
Having a mobile app highlights all your multi-level offerings and services under one single umbrella.
5) Use the right keyword for identification purposes
Use the right keyword to identify your app from the Apple app store or google play store. A report says the google play store contains 3.48 million apps in that 3739 apps are used by people daily.
Your brand mobile app is one in 3.48 million apps. Use the right keyword to find your app in the app store. Provide an easy route to a customer so that they can discover your app easily. It is one of the easy ways to dominate your competitor with an app. Make use of the right keyword to promote your mobile app.
6) Provide wide accessibility to your audience.
Provide niche accessibility to the market audience. If your company's main motto is to provide privacy and security, keep the customer's information and purchase details leak-proof.
Suppose customers feel the confidence to use your app. They will also promote your mobile app to others. It is one of the easiest ways to dominate your competitor with an app.
7) Improve your customer service quality
Mobile apps have become a progressive channel to enhance customer problems. Promote a strong connection between the customer and you. It is one of the more realistic ways to promote your brand to the audience.
Mobile app development enables companies to solve customer problems, promote their sales, discounts, and create awareness about the launch of new products.
8) Provide a strong database for your valuable customers
When a customer downloads your app to know about particular information about your product, one needs to fill in all the basic information.
They have to get the user to allow permission to autodetect your confidential details such as name, address, phone number, and email id. Use a strong database to store customer information. It is one of the best opportunities to stay ahead of others.
When you announce that you are competing with other competitors, use some tricks and techniques to catch the first seat and better routes for your success.
SPECIAL FEATURES FOR YOUR MOBILE APP
Design some of the special features for mobile apps so that they will stand ahead of other companies. Simplicity is one of the major factors to gain a wide range of customers. If your mobile app is simple and easy to use, it will be able to attract many customers. Provide quick loading time to your app. If your app takes more time, then the customer will uninstall your app from their mobile. Provide integrated In-app payments such as google pay, phone pay, paypal for a secure and fast checkout process.
GraphQL Spring Boot starter with Java
Create a GraphQL API with Spring Boot Framework and JPA
GraphQL is both an API query language and a runtime for executing those queries using your current data. GraphQL allows clients the power to ask for exactly what they need and nothing more, makes it easier to evolve APIs over time, and enables powerful developer tools by providing a clear and intelligible description of the data in your API.
In this article, we will create a simple Airport location app.
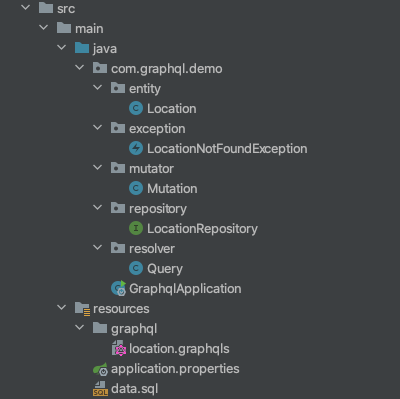
Generate the project
Go to https://start.spring.io/ and generate a project, don’t forget to add Spring Web, H2 Database, and Spring Data JPA dependencies.
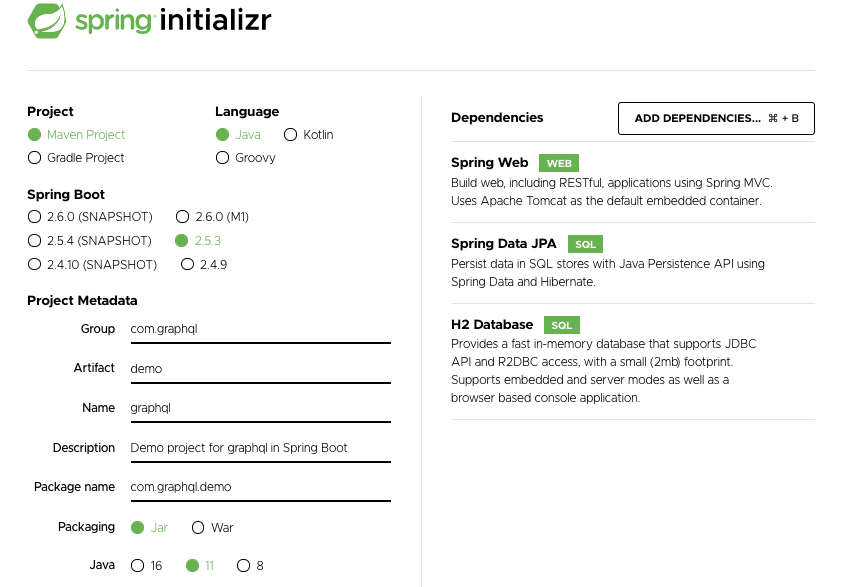
Add dependencies
To enable the use of GraphQL, add these two dependencies below.
Schema:
The GraphQL schema defines the data points available through an API. The schema describes the data types and their relationships, as well as the available operations, such as queries for retrieving data and mutations for creating, updating, and deleting data.
In the resources folder, create a file with “.graphqls“ extension, the whole name will be “location.graphqls”.
The “!” means the field is required.
Entity and Repository
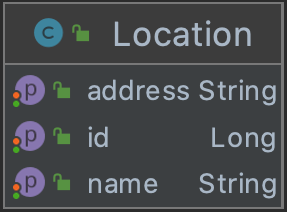
Now create an entity called Location. The Location should have three attributes: id, name, and address as already mentioned in the schema. And of course, generate Getters, Setters, and Constrictors.
Then a repository, for this example, uses just CrudRepository, and extends Location entity.
Queries & Exceptions:
1. Query:
A query allows us to retrieve data. Each query can have a specific object that it returns based exactly on the fields specified on the query, you can add or remove fields to match the exact data you need to fit your specific use case.
Create a resolver package, then add a new Query class that implements GraphQLQueryResolver and adds @Component annotation. We only need to add the queries that we previously entered into location.graphqls.
2. Mutator:
Mutations in GraphQL allow it to update the data stored on the server. Unlike a query, mutations like creating, updating, or deleting will change your data.
Now create a mutator package and then add a new classMutation that implements GraphQLMutationResolver and add @Component annotation. Also, add the mutations that we previously entered into location.graphqls.
3. Exceptions:
Create an exception package and then add a new classLocationNotFoundException that extends RuntimeExceptionand implements GraphQLError.
Types of Web Development
In this competitive era of web development, it is crucial to understand each web development type and its technology.
To help you understand about types of web development, we have comprehensively discussed the below points.
Types of web development
Technologies included each web development type
Factors to choose while choosing the web development language
What are the Different Types of Web Development?
Prior to understanding the web development process, it is crucial to understand the three main types of web development. Let us discuss the types and their related technologies. This will help you to understand how each web development type plays an essential role in building web solutions.
Front-End Web Development
Front-end web development is known as client-side web development. It is a procedure of designing the user interface of the website with front-end technologies like HTML, CSS, and JavaScript.
The aim of developing the front end of the website is to allow website visitors to read the web content effortlessly. To motivate you to build a clean and beautiful website interface, here is the list. Additionally, to build an interactive interface, front-end developers/web designers need to write efficient and clean code.
Which Are the Languages Used in the Front-End Development?
HTML
Based on research by Statista, the HTML/CSS and JavaScript are the most commonly used languages
Web designers use HTML to design the structure and layout of the website
Design highly interactive pages
Most of the static pages are designed using HTML
CSS
The web designer uses cascading style sheet that will enhance website layout and presentation
CSS helps to design a webpage using HTML code
CSS is widely used by designers and developers to style a website
JavaScript
To make your website interactive, for example, when searching a query on Google or clicking on a button to change the page, there is a JavaScript working behind
To enhance user engagement, implementing JavaScript on your website is crucial. For example, when you open Gmail and click on inbox, rather than loading the entire page, a smooth transition will happen and the page will load
Back-End Web Development
Back-end development is also known as server-side web development. The responsibilities of back-end developers are writing code and building the logical parts of the entire website. It mainly focuses on back-end logic, databases, servers, and APIs.
In the web project, the logical part relies on the backend, you may not see the technology used behind developing a website. However, back-end web development is a crucial part of a website.
Which Are the Languages Used in the Back-End Development?
PHP
Widely known language to manage dynamic content, session tracking, databases, eCommerce websites
Integrated with popular databases like MySQL, PostgreSQL, and Oracle
Java
Java is used to build websites, games, apps, and software
According to Oracle, Java is used by 6 million developers, and it is powering 5.5 billion devices
SQL
SQL database query language helps to compute large amounts of data
Helps to collect data from across databases and utilizes it accordingly to your target audience
Python
Developers find Python easier to learn and code
Ability to create a framework that is used by any website
Pinterest and Instagram are powered by Python
.Net
It is a framework, which is used for building software applications using various languages like C#, VB.Net, C++, and F#
Angular
It is a type script-based, open-source website development framework
Using Angular, you can easily develop web applications
Full-stack Web Development
Full-stack web development means the development of the front end and back end. The full-stack web developer should have knowledge of web design, web development, database, and website debugging.
A full-stack developer has the expertise to develop client and server-side web applications and should have database management skills also. Full-stack web developers are well versed in redesigning, building, and speeding up an entire website design and development phase.
Additionally, the responsibilities of full-stack web developers are to search for the web development trends like blockchain, deep learning, and multi-cloud depending upon the projects.
Which Are the Tech Stacks Used in Full-Stack Web Development?
HTML, CSS and JavaScript
Developers should have an understanding of HTML (Hypertext Markup Language) and CSS (Cascading Style Sheets). These programming languages are used to develop the front end of the web interface.
Git and GitHub
Git and GitHub If you get a job as a full stack web developer, you might need to work with version controls like Git and GitHub.
Browser DevTools
To edit HTML elements, edit CSS properties, and track the JavaScript error, you need to be comfortable using ChromeDevTools, FirefoxDevTools, or any other browser dev tools.
API
API allows developers to integrate different functionalities without sharing the code.
Programming languages
It is essential to have the basic knowledge of programming languages like PHP, Python depending upon the project.
What Are the Skills Required to Become a Full-Stack Web Developer?
Learning full-stack development does not limit understanding only front-end and back-end technologies.
The below-listed points will help you to understand all the stages to learn about full-stack development.
Basic Programming Skills to Design a website
HTML (Markup Language)
CSS (Styling Language)
JavaScript (Programming Language)
Backend Technologies
Choosing the right backend technologies makes your project scalable, helps you to instantly answer searcher’s queries, and enhances the speed of your website. To develop a backend interface, here are some of the languages to choose from.
PHP
Python
Ruby
Java
Repository
Git
GitHub
Database storage is an essential element of web development. It stores data that you can access whenever you log in or create a new account from the website. Experience in handling databases is one of the essential skills of full-stack developers.
A full-stack developer should know about relational databases and how database storage works out. From database designing to management, the developer should know how to access database queries effectively. Understanding JSON and XML is a plus for full-stack developers.
Full-stack developers should have knowledge of web architecture. Why? The perfectly designed web architecture loads and adapts to changing business requirements. This enhances the website’s performance.
Additionally, web architecture allows you to integrate the latest functionalities without making any changes to the entire structure.
The web application architecture is created of 2 essential components:
Client-side component:
It is known as the front end, where the code is written in HTML, CSS, and JavaScript. All the code will be stored in the server and whenever a user will try to access the website, the design will fetch from the server directly.
Server-side component:
It is known as the back-end side of the structure, where programming languages like Ruby, Python, PHP are used. Apart from that, the server-side includes different layers like the presentation layer, application layer, and persistent storage layer.
Each layer works independently from the others. Therefore, changes made in one component will not affect another component.
Whether you want to become a front-end, back-end, or full-stack web developer, it is essential to learn soft skills. Possessing a perfect balance of technical and soft skills will help you to get ahead in your career path. You should have the following soft skills.
Strong analytical mind
Time management skills
Attention to detail
Creative vision
To learn these soft skills, you can go to platforms like YouTube, Udemy, and Coursera. You will find experienced and highly knowledgeable faculty there to help you learn soft skills.
Above, you have learned about web development types and programming languages. Below, you will learn about 4 factors to consider while choosing the best web development language.
4 Factors to Consider While Choosing a Web Development Language
Along with web development trends, there are essential factors front-end developers and back-end developers should consider while choosing the web development language.
But, which one to choose?
To answer the question, here are the 4 important factors to consider prior to choosing the web development language.
Performance of the Language
Using the language performance benchmark, you get to know how fast the particular web development language will perform. The result might not be exact, but it will give an idea about whether to use a particular language or not.
The Deployment Time
The size of the code matters. Because when you plan to deploy your project in a web server/live environment, the optimized and less coded apps will take less time for deployment.
Targeted Platform
If you are planning to develop a program for Windows and Linux platforms, then you should develop a program using Java. Because by installing Java Virtual Machine (JVM), your Java program will run on any machine.
Easier to Develop and Maintain
The language you choose should be easier to develop and maintain. HTML, Python, Java, and PHP are likely to be easier to maintain. Additionally, web developers are likely to be open to learning these languages.
Let’s discuss the most asked questions about the types of web development.
Types of Web Development
Which are the most commonly used languages in web development? The following programming languages are most common for web development.
JavaScript
Python
PHP
Typescript
Ruby
All of these languages help to develop from small apps to enterprise-level applications. If you are looking to develop scalable and performance-centric web applications, then these languages will be helpful.
Basics to know about web development?
Understand how visual design works
Learn the basics about HTML
Learn the basics about CSS
Familiarize yourself with the basic concept of UI and UX
Build a basic website from scratch and improve it as you learn about new web technologies
Should you develop for both iOS & Android now or focus on one platform?

Many appreneur success stories have risen from focusing on one platform at the starting gate. Most start-ups typically jump the gun when they want to make some noise and usually go iOS first, Android second.
However, certain circumstances may make it wiser to develop for Android first, or in some cases both platforms at the same time. The factors listed below will shed some light on the reasons.
There are quite a few elements to consider when choosing between iOS, Android, or both
These elements include demographics, revenue models, development speed, building and designing UI, and Android tablet apps vs. iPad apps.
Demographics
Android has the largest global platform share pocketing 80% of the global smartphone market share, with its presence towering in lower-income areas and developing nations. On the other hand, iOS users are deemed more valuable. From in-app purchases to online retail to ads iOS users are known to historically convert at higher rates and have a higher average spend. And, in the U.S., Apple smartphones still hold a comfortable 42% market share. Looking solely at demographics, the Android platform seems like the obvious choice, but when you take in other factors that may not necessarily be the case.
Revenue models
Android typically has a greater number of ad-supported apps; on the other hand, paying for apps is still more common on the iOS platform (chart below). As a rule of thumb, iOS users are generally more valuable even when taking Android’s market share into account.
Development Speed
On average, Android apps take 2-3 times longer to build than iOS. This is primarily due to the operating system release cycles and Android fragmentation. However, the Android fragmentation problem has slowly been dying down. As of May 2016, 75.6% of Android users are on Android 4.4 or higher.
Release and approval times also hold significant weight. The biggest problem for app developers is to get their app approved on the iOS App store. The Apple review process can take several days. Sometimes apps are rejected for the slightest errors which can prove to be very frustrating for the developer who knows exactly how they want the app to perform. The app submission process for the Google Play store is much less tedious than the iOS app store. Unlike its iOS counterpart and Android app will usually get published within several hours. The app developer also enjoys more freedom as concerns the general editorial content of their apps. App updates on the iOS app store are also limited to 3-4 times a month while in theory, an app on the Android platform can be updated at any time, an unlimited number of times.
Building and designing UI
With things like Interface Builder built into XCode, iOS tends to be much more UI/UX friendly than Android. Due to the ease of working with the frameworks on iOS, developers can further immerse themselves in the process of making their users’ experience a great one.
Android Tablet Apps vs iOS iPad Apps
The clear winner in this battle is the iPad. With a greater number of fully optimized apps as well more supported popular apps, it takes the crown. It’s extremely common to see someone using an Android smartphone but keep an iPad at hand as their preferred tablet, which is saying a lot.
When iOS is the best choice
Generally, at the starting gate, it makes more sense to choose iOS. It remains significantly easier to write quality iOS apps than Android apps. Statistics show that iOS users spend 26 more minutes on their devices when compared to Android users as well as consume more data and spend more on mobile commerce
When Android is the best choice
If your target audience is Android, then launching on that platform is the obvious choice. This translates to an audience more concentrated in developing nations or certain segments of urban areas. 80% of the global market share is quite appealing if you’re trying to be heard across borders.
When both platforms are the way to go
If you want to charge into the market at full force, both platforms are the way to go. You’re going in guns blazing, confident in your app’s success. Well-established companies are generally the ones that will take this leap. They have the capital to dish out more freely so it would make sense and in turn, be beneficial. It’s also possible that an app will cause commotion on one platform but fail to get noticed on the other. So, if you can scrape up the capital, go for it. Wider availability in the market increases your chances of success. The more individuals that have access to the app, the more downloads it will get.
Conclusion
During the first stages of any app, the focus should be concentrated on determining what is working and what is not.
If you don’t have the resources to launch on both platforms off the bat, don’t worry. Instagram was initially launched on iOS in 2010 and did not launch on Android phones till 2012. The Android version was launched just a week before the company was acquired by Facebook for $1billion. Focusing on one platform and analysing the results from there is no anomaly, in fact, it happens quite often.
But if the time and resources are present, go for it. Tackling both platforms will prove beneficial in practically all app categories. An app may also sprout success where you least expect it. An app is your brainchild, why provide it with anything but the most opportunity? The more time and resources you can afford to spend, the higher the app’s chance of success will be.
Getting started with serverless for developers
Developers around the world are already running serverless applications in production without worrying about servers. This new getting started series is for developers who want to join them. Follow along with blog posts, code examples, and practical exercises to learn how to build serverless applications from your local integrated development environment (IDE).
In this post, you learn why developers need serverless technologies and which challenges serverless technologies help to solve. You deploy a small serverless application to your AWS account that connects Slack to GitHub and see first-hand why serverless technologies spark joy for developers.
What does serverless mean to developers?
Serverless is a broad term that encompasses many different things. For developers, it is a means of building applications that scale automatically, without maintaining, running, or patching infrastructure like servers, clusters, or load balancers.
Building applications with serverless technologies can seem like a significant change for some. It might involve adopting a functional programming model, moving from monoliths to microservices, or reducing code by using managed services.
However, building serverless applications does not have to be a binary choice. Serverless technologies can complement traditional application models. For many developers, their first serverless application augments, integrates with, or connects to a traditional application. This is why understanding what types of workloads are best suited to serverless is important.
Why do developers need serverless?
“I only want to write business logic”
A typical scenario many developers face is a need to do “something” to some data to produce a valuable output. That something can be referred to as business logic. It is at the core of every application.
With traditional (non-serverless) applications, the developer must prepare a number of things before they can start creating business logic. Many of these things are generic and repetitive tasks such as provisioning databases and servers, or setting up backup and restore systems. Using serverless technologies can abstract away many of these common repetitive tasks.
“I want my application to scale on its own”
As applications mature and grow, they may need to handle increasing levels of traffic. This is where scalability challenges can arise. Developers may need to invest in additional architecture or personnel to meet these challenges.
Serverless technologies help to solve this by scaling automatically to meet the increase in demand. They do this by applying a horizontal approach to scalability rather than a vertical approach.
A real life example of horizontal and vertical scalability can be seen in the following illustration:
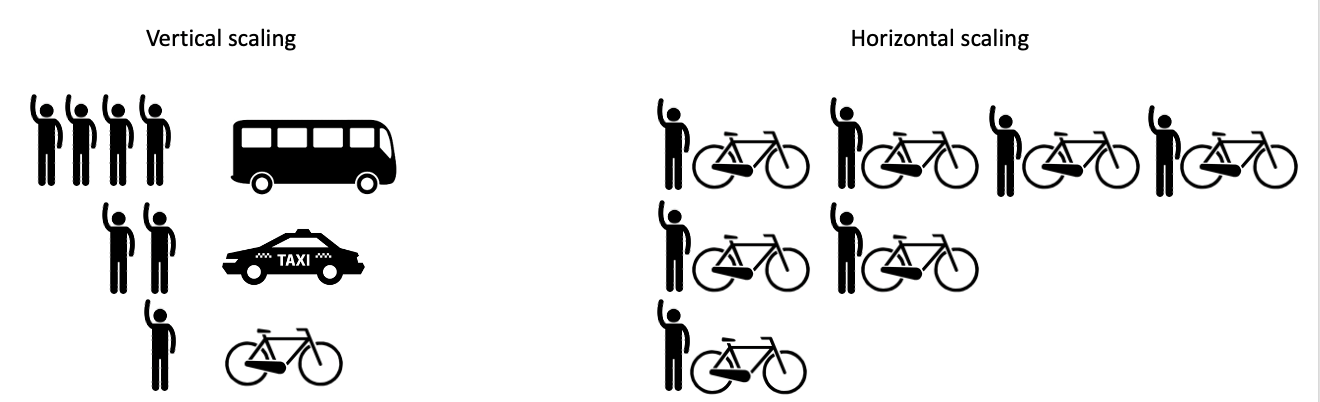
Imagine one person needs to travel from home to a birthday party. They use a bicycle as a sufficient mode of transport to carry one person. If two people need to travel together, then a bicycle would be too small and instead they need a taxi. If four people need to travel, then a bus is required, and so on.
This is an example of vertical scaling. Each increase in load requires the purchase of a larger transport mode to bear the load. Applying this same method to scaling an application means that each time a server starts to reach its capacity limits, an additional server is required to increase the load capacity.
Imagine the same four people each travel using a bicycle, the load is now spread evenly. This is far more flexible because as traffic grows you can add an additional capacity unit. This is known as horizontal scaling and it’s what allows serverless technologies to scale flexibly.
“When my code is not running, I don’t want to pay for it.”
With traditional applications, you often need to overprovision. This means having additional resource capacity to accommodate a spike in demand. This additional capacity remains largely unused. With serverless technologies, you pay only for the resources you consume. The horizontal scaling model means that resource consumption scales up and down with your application’s demand. This can make serverless a cost-effective model for applications with variable levels of traffic.
Serverless in practice
One common and effective use of serverless technologies is to connect features of two or more applications together. For example, developers can quickly create endpoints to handle inbound webhooks, run business logic on the webhook payload, and output the result to another service. The following serverless application uses GitHub’s webhook integration capability to notify users via Slack, when a repository has been starred.

The final result looks like this:

If this application is built using a traditional technology stack, the developer must provision a server to receive the inbound webhook, this may involve raising a ticket with the operations department. The server must always be available, ready to receive the inbound webhook. It must also be configured with enough spare capacity to handle spikes in traffic, or replicated and placed behind a load balancer to distribute traffic evenly. It needs to allow access to the public internet, with additional authorization for the inbound GitHub webhook. The application server operating system and runtime must be maintained with regular patching, and security updates. The list of preparation and maintenance tasks go on.
In contrast, a serverless implementation of the application means not having to think about as many of the traditional stack operations. Developers can start directly with the business logic, and deploy into their AWS account with a single command.
The following steps show how to deploy and test the final application from this GitHub repository. Subsequent posts in this series will show how to build this application from scratch, directly within your local integrated development environment (IDE). They will explain the various AWS services and concepts involved.
Prerequisites
To deploy this application, you need:
The AWS Serverless Application Model (AWS SAM CLI) installed with an AWS account set up.
A GitHub account, and a repository with admin permissions.
A Slack account with the ability to create apps.
Setting up your inbound Slack webhook
This application uses a Slack webhook URL to send a POST request to a Slack channel when a user stars a GitHub repository.
To create the Slack webhook:
Create a new channel in Slack where you want the messages to go.
In your new channel, choose Add apps
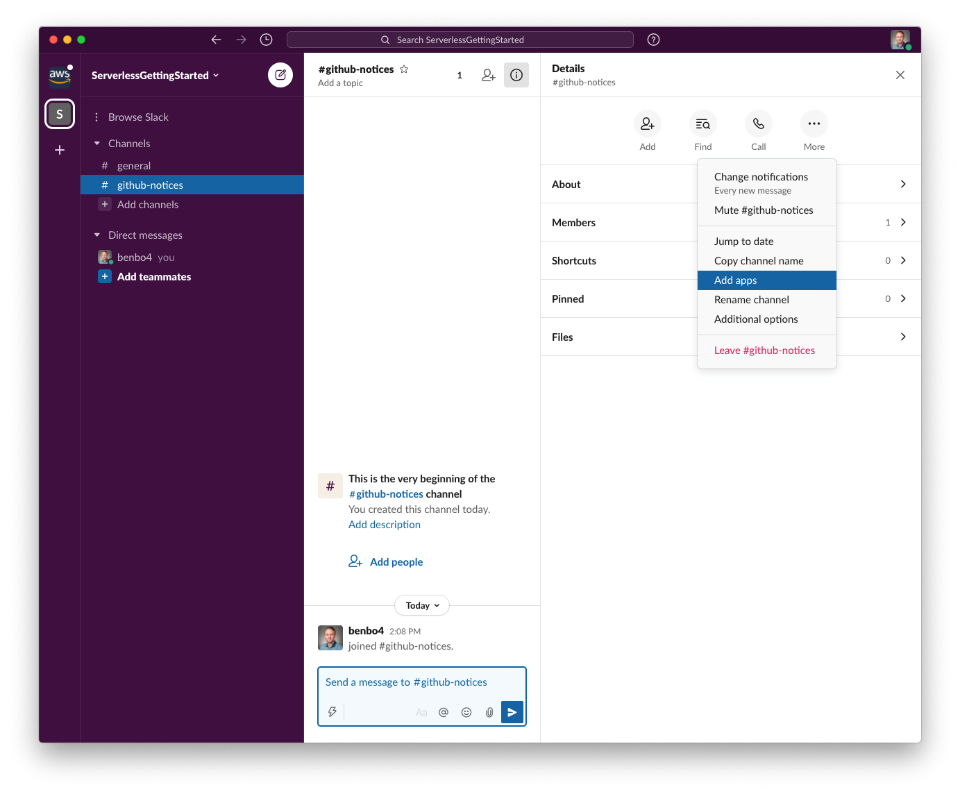
Search for the “Incoming Webhook” application, and create a new one for your channel.
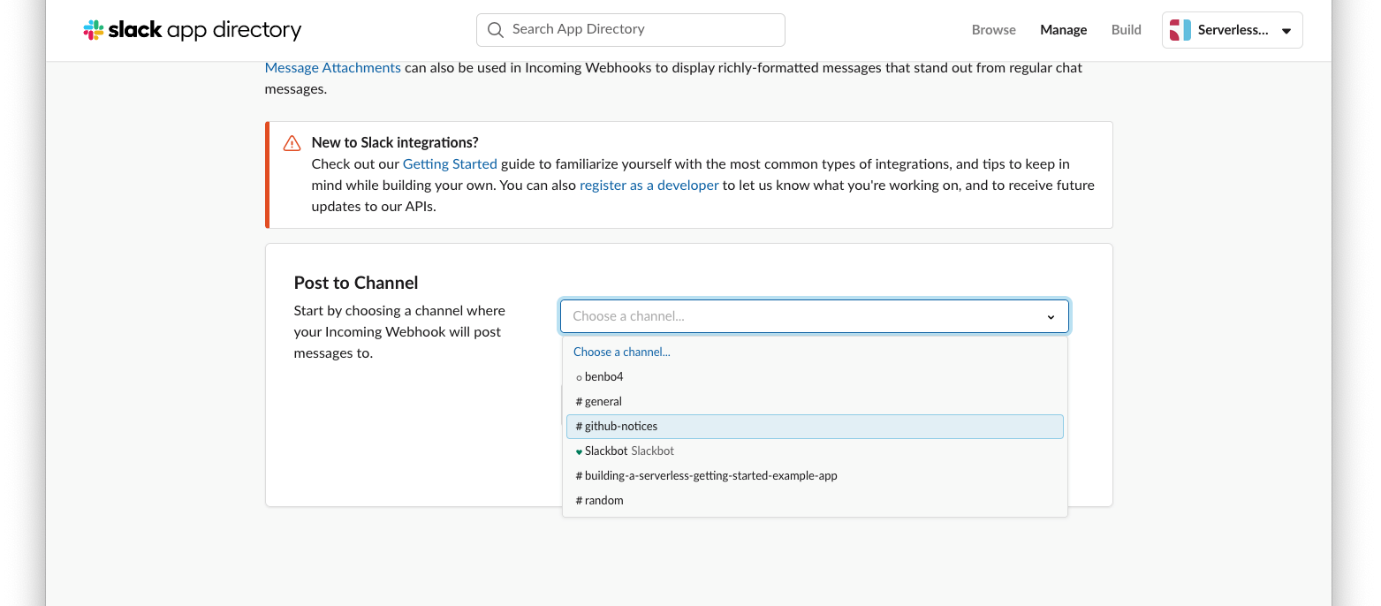
Once created, a Slack webhook URL is displayed. The serverless application uses this URL to post data to your Slack channel. Make a note of this URL as you will need it when you deploy the application.
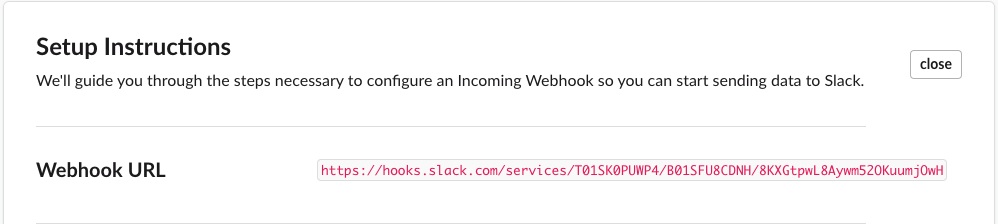
Deploying the serverless application
The serverless application code exists in this GitHub repository. First, clone the application code to your local machine, then deploy it to your AWS account:
Run the following command in a terminal window on your local machine
git clone https://github.com/aws-samples/getting-started-with-serverless
Change directory into the root of the application by running the following command:
cd part_1
AWS SAM is a framework for building and deploying serverless applications. Deploy the application to your AWS account using the following AWS SAM CLI command:
sam build
sam deploy --guided --config-file ../samconfig.toml
This command leads you through a guided deployment, which requires some input parameters. Enter a stack name such as“GitHubToSlackApp”. Enter the AWS Region to deploy to, Answer Y to answer “webhookHandler may not have authorization defined” and accept the remaining defaults. Make sure to replace the Parameter slackUrl prompt with the Slack URL you noted down previously:
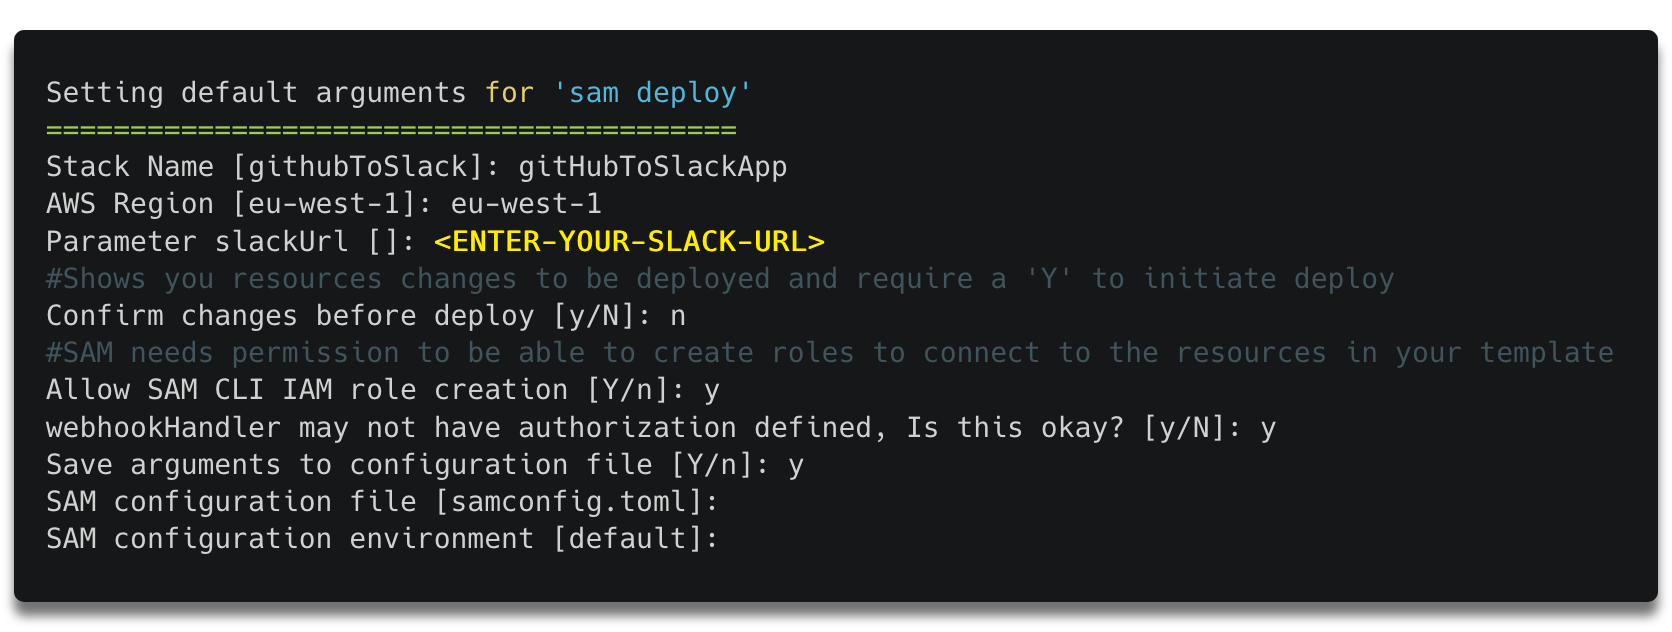
The deployment takes a moment to complete after which, the following output is provided:
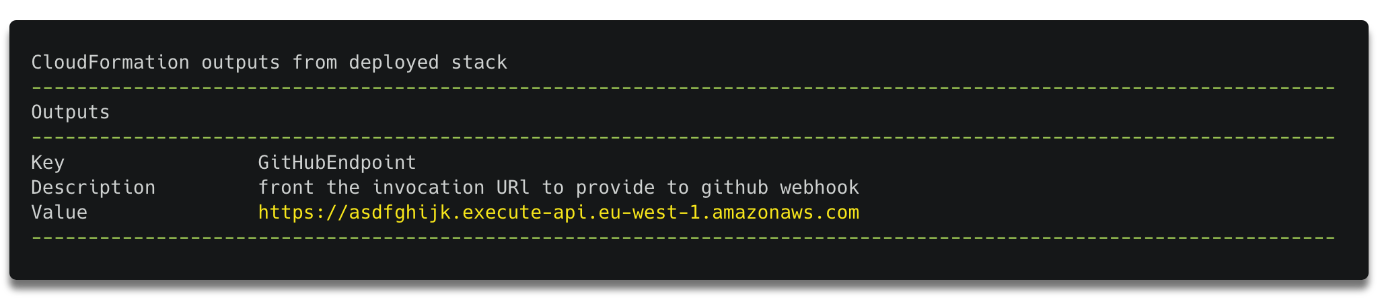
Make a note of the GitHubEndpoint value. This URL is the gateway to your serverless application. A POST request to this URL, along with the correctly formatted payload triggers the application to run, at which point it posts a message to the Slack webhook URL. The final task is to tell GitHub when to send a POST request to this URL:
Setting up your GitHub webhook
Go to the GitHub repository you want to track and choose Settings, then Webhooks.
Choose Add webhook.
In the Payload URL field, enter the GitHubEndpoint value noted down earlier:
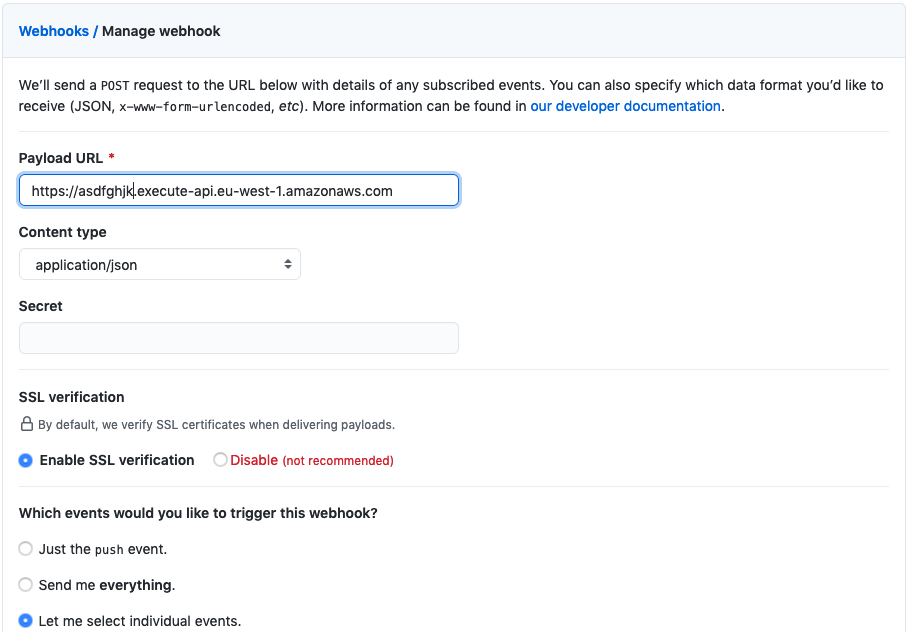
In the Content type field, select application/json.
In the Which events would you like to trigger this webhook? section, choose Let me select individual events, and choose Watches.
Choose Add webhook.
Running the serverless application
Congratulations! You have deployed a serverless application. To see the application working in your GitHub repository:
Choose the star icon. This sends the GitHub event to the serverless application, which processes and sends it to the Slack webhook URL. The message appears in the Slack channel showing who starred the repository and how many total stars the repository has.
A high-level representation of this serverless application can be shown as:
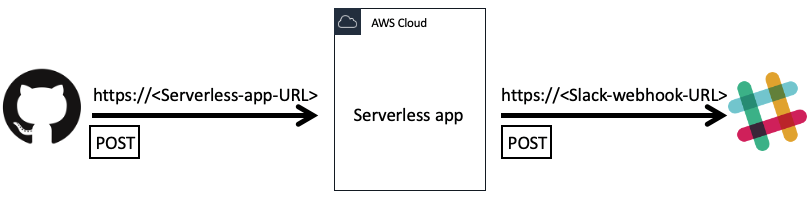
Summary
This blog post introduces the new Getting started with serverless series. This is a developer focused series consisting of blog posts, code examples, and exercises to help developers start building serverless applications from their local IDE. This post introduces the reasons why developers need serverless technologies. It explains how to clone and deploy an example serverless application from your local machine to your AWS account.
In a few steps, you see how serverless technologies can help build applications quickly, removing repetitive tasks and allowing you to focus on the business logic.
Future blog posts in the series will explore this serverless application in more detail. Readers will learn how to build and update the application from their local IDE. They will discover where the business logic is written, which AWS services are used to create this application, and how to test and extend it.
How to Hire a Mobile App Developer?

We are considered as one of the top app development companies in the United States. Hence, our advice would be to hire our company for your app development needs. However, we also know that choosing an app development company can be tough, especially if you have never done anything similar before. For that reason, we wanted to publish something that will help you make a decision.
When you find app developers, ask them nine questions we answered below. This information is crucial to choose the right company. Make sure to ask every potential app development company these questions. If you are satisfied with the answers, you might have found the ideal company.
1. Where can I find examples of mobile apps you’ve developed?
The best proof of an app development company’s skills is its portfolio. Before you hire an app development company pay close attention to both the design and the development difficulty of the app. Design paired with an exceptional user experience is what will make users fall in love with your app.
2. May I see any references from your previous clients?
It is important to know that previous clients were satisfied with the company. Ask the company for at least 2-3 reviews from previous clients. We have recently started collecting reviews from our clients here. Reviews on this website are verified by phone. This means that any person who left a review received a phone call from clutch.co confirming the authenticity of the review.
3. How will the communication go during the development process?
Communication is the key to a successful project. In Messapps, once we start the project, we connect you to our project management system. There you can talk to everyone on the team: project managers, designers, and developers. During the wireframes and design stages, you will receive updates with new screens almost daily. You can respond to our team in real-time and get the changes you want to be done as fast as possible. During the development stage, in addition to staying in contact with all team members, we will also connect your phone to our testing server. Through our server, you will be receiving new versions of the app that you’ll be able to test on your phone. In addition to communicating through our system, we are always open to calls and meetings in our office. To choose the right mobile app developer, make sure that they have a flawless communication process.
4. Will I own the code of the app?
Yes, you absolutely must. We are against the practices of some developers that make you pay extra for owning the source code. That simply does not make sense. It is your idea, your app, and your code.
5. How can my app make money?
This is perhaps the most important question you should ask yourself when starting an app, and an app development company should know the answer. Creating an app means starting a business. If you don’t know how you’re going to make a profit, then it’s a hobby. There are three main ways you can make money with your app.
First, charge a fee for downloading the app.
Advantage:
you get the money the moment a user downloads the app.
Disadvantage:
people are less willing to pay for an app before using it.
Second is the freemium model: the app is free to download, but you charge the user to unlock certain content or features.
Advantage:
you maximize the number of people who can download the app.
Disadvantage:
likely, only a small percentage of all users will end up paying for the app.
The third way is to show ads in the app.
Advantage:
you still get the maximum number of users, and all content is unlocked for them.
Disadvantage:
it takes away from the app experience; users may be annoyed by ads. If it is set up incorrectly, they even might leave bad reviews.
To know more about it, check our articles on app monetization strategies and mobile app networks and platforms.
6. How will you test my app?
Testing is an essential component of the app development process. Once we start the development, we constantly test your application. In fact, at the end of the development stage, we dedicate another week to testing alone. Throughout the development phase, you could download the app and take a look at the newest version yourself.
7. Will you submit my app to the app stores?
An app development company must help you to submit your app to app stores. Moreover, they have to make sure that it gets approved. Without submission, your app does not exist for anyone but you. It is invisible. We will, of course, submit the app for you. Whether it's Google Play or the Apple App Store, we'll submit your app and walk you through the approval process.
8. Do I need to pay the full amount upfront?
No way, Jose! In Messapps, the payment is divided into four milestones. For example, when we start the wireframes, you pay just for the wireframes. Only after you approve the wireframes, you pay for the design. Once the final design is done and approved, we start actual development. At this point, we ask you to pay for only 75% of the development price. The last 25% will be paid only after you approve the final app. With this payment schedule, you won’t have to spend the full amount upfront, and you will only release the final payment when you are happy with the final result.
9. Can I meet with you in your office to discuss the app?
Often the best way to explain your idea is to describe it in person. If you are in New York, you are more than welcome to come to our office at 1460 Broadway. Coffee is included. If you live outside of New York – that’s no problem too. In fact, about 90% of our clients are from other states.
Of course, the pandemic has left its mark on our lives. Digitalization of business processes allows us to build full-fledged communication being on opposite ends of the country.
We are happy to chat over email, talk over the phone, or via Skype. Once the project starts, we will connect you to our project management software, where you could talk with any team member on the project.
If you have any other questions you want to ask us, please, do not hesitate to contact us directly at team@messapps.com. We’ll be happy to help!
How to Make the Most Out of iOS App Analytics

Despite how essential analytics is to tracking an app’s success, the App Analytics service being offered for free by Apple is too often neglected by the majority of aspiring apprenuers.
NOTE: To access App Analytics, you’ll need entry to an Apple Developer Account with a Published app; learn how to upgrade your Apple ID into a Developer Account.
With App Analytics you can:
Gain insight on your app and users through factual and purely objective feedback
Learn how often potential users visit your app while browsing through the App Store
Discover the type of devices your app is being used on
Monitor the amount of time users spend on your app
Track both your app’s sales from the App Store as well as any in-app purchases
Filter data by version, date, region, website referrer and more
Create campaign links and measure which marketing campaigns are the most successful
App Analytics is available for individuals with both an Apple Developer ID and the delegated user permission role of either Admin, Finance, or Sales.
To access App Analytics:
- Sign-in to your Apple Developer Account
Once inside the iTunes Connect dashboard, click pp AnalyticsA. Find and click the App to be analyzed.
How to use App Analytics’s data
Once opened, App Analytics’s Overview tab breaks down your app’s data using 8 different Metrics:
Impressions:
The number of views your app received on the App Store for more than one second, including search results, Featured, Explore, Top Charts and app Product Pageviews.
Product Page Views:
The number of times your app’s App Store page has been viewed on an iOS device.
App Units:
The total amount of first-time app purchases made on the App Store;re-downloads from the same device and/or from the same Apple ID are not included.
In-app Purchases:
The total amount of first-time In-App purchases made from an iOS device.
Sales:
The total amount of revenue accumulated from your app; whether from In-App purchases, app bundles, or the initial price of the app itself.
Sessions:
A value that represents the number of times your app has been used for more than two seconds. This number will only increment upon usage based on whether a user agrees to share their data with you.
Active Devices:
The number of sessions that are running during a chosen period of time. This number is also based on app users who agree to share their data with you.
Crashes:
the total number of crashes that occur during a selected period of time. By clicking the small prompt at the upper-middle portion of this window, a new window with several different selectable.
TimeFilters should appear. Mine’s currently toggled to display all data collected between the app’s launch date (Apr 1) and today (Jul 20). Located at the bottom-most portion of the screen is an aggregation of data concerning user devices. You can focus on particular metrics and refine the data by toggling through different filters. First, click the Metrics tab at the upper-left-hand side of the UI. This tab essentially offers a more acute and refined look at each metric of data over time. You can also compare different Metrics and save them under Saved Views for ease of access in the future. A great saved view to consider is App Units compared to Impressions.
App Units/Impressions = Conversion Rate, or the total amount of Potential Users that bought or downloaded the app and converted into Actual Users. Feel free to explore and discover different combinations of metrics! Solve the mystery of where your installs are coming from and which marketing avenues are the most effective: start by clicking the Sources tab. Embedded within the Sources tab, the Top Websites sub-tab contains a list of websites that refer visitors back to your app’s page on the App Store. The websites can either be ordered based on their Names or by the amount of Impressions, App Units, Sales and Sessions that they’ve generated. This data is useful for tracking which websites are attracting the most users while also helping to identify those demographics.
NOTE: data pertaining to Session length may only be collected from those users who agree to share their usage information with developers; in this example, only 42% of users have agreed to do so
Located beside the Top Websites tab, Top Campaigns features a list of each Campaign Link that you’ve created.
Next, double-check that the proper app is selected and type in an alphanumeric Campaign ID that doesn’t exceed 40 characters. We suggest that you refrain from incorporating spaces to save room; it also helps to tailor the ID in a way that best reflects its function. For instance; if I wanted to generate a new link to incorporate into a Facebook post, a fitting ID might be “facebookJuly20”.
Simply copy the Campaign Link and paste it accordingly – nothing more needs to be done.
NOTE:Each link must be visited by at least 5 different users in order for it to be displayed under the Top Campaigns tab for analysis Retention is the last of the four main tabs in App Analytics.
How well your app retains the interest of its users
The longer users engage with your app, the more likely they are to make In-App purchases and to recommend the app to friends and family. To help analyze how well your app retains the interest of its users, the Retention tab is coded to organize an app’s data using Three main variables: Purchase Date, Devices and Retention Period.
First, select a date from which to analyze your data. This date represents the Purchase Date, drawing upon all users that purchased and installed your app on this date – I’ll pick April 11, 2020, and use that date as a reference point moving forwards. The left-most graph represents the percentage of users that purchased the app on April 11. The very first point on this line-graph indicates that percentage on April 12 or the day following the selected Purchase Date, and every proceeding point represents the day after that of the date preceding it. Notice the change in numbers over time. The percentages listed at each point reflects the ratio of users that still use the app over the total amount of users that installed the app on April 11. The bar graph displayed beside the line-graph and the tiled chart underneath projects the same data in different formats. The tiled chart is titled Daily Retention, but note that this data may not be an accurate representation of your userbase, given that it only represents those of your userbase who opted to allow Apple to collect user data from their devices. Each number extending outward above the tiled columns represents ‘x’ number of days after the date displayed on the left-hand side.
EXAMPLE: the number “1” represents the date April 12 for the “April 11” column. 75% of users that downloaded the app on April 11 used the app the following day, April 12
By clicking a tile, both the line graph and the bar graph will adjust to reflect the data for the tile’s corresponding Purchase Date. Additionally, all data can be refined even further via a Filter; the button is located just below the main upper left-hand pane.
Deleting a repository
You can delete any repository or fork if you're either an organization owner or have admin permissions for the repository or fork. Deleting a forked repository does not delete the upstream repository.
Only members with owner privileges for an organization or admin privileges for a repository can delete an organization repository. If Allow members to delete or transfer repositories for this organization has been disabled, only organization owners can delete organization repositories.
Process to delete unwanted Github repo. Follow bellow steps.
On GitHub.com, navigate to the main page of the repository.
Under your repository name, click Settings.

Under Danger Zone, click Delete this repository.
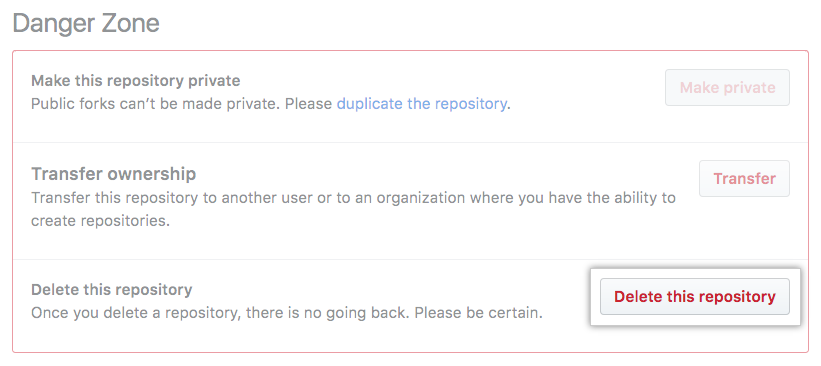
Read the warnings.
To verify that you're deleting the correct repository, type the name of the repository you want to delete.
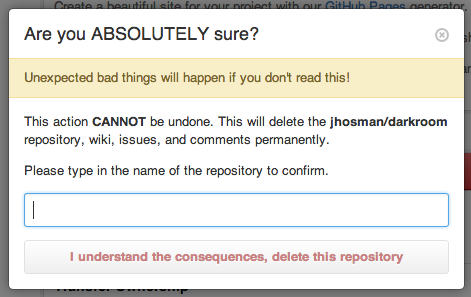
Click I understand the consequences, delete this repository. Deleting GitHub repositories one by one it takes a lot of time.
The Easiest Way to Delete Multiple GitHub Repositories at Once
GitHub only allows a user to erase one repository at a time, and it’s not a very user-friendly process. Deleting hundreds could easily exceed an hour.
Using RepoSweeper app we will easily remove GitHub Repositories and save time.
RepoSweeper. It’s super easy. It’s free to use, open source.
Deleting GitHub repositories via the GitHub interface is a hassle. That's why you're here.
RepoSweeper is a React.js SPA that allows you to sort, filter and manage which repositories you want to delete, and to do so at scale with one click of a button.
Built With
React.js GitHub API
Inputs to login
It takes just two inputs, your GitHub Username and an Authorization Token.
Follow these steps and you can’t get lost.
Go to RepoSweeper.com
Click on Start sweeping
Enter GitHub Username
Enter GitHub Token
Click “Generate Repo List”
Select repositories you want to delete
Double check on the confirmation page
Click “Confirm”
Done!
How To Solve Problems with Innovative Apps

Life is, unfortunately, full of problems. From the smallest annoyances to the most monumental time-wasting experiences, and from drops inefficiency to regular hiccups that slow down our day, there is no shortage of problems, issues, and complications that need to be fixed.
Thankfully, the world is also full of innovative, forward-thinking, and savvy app developers, too. Every day, app creatives and programmers are out there not only solving problems with mobile apps and platforms but also identifying and anticipating problems that can be easily dealt with via an app at some point in the future.
As we increasingly rely on our smartphones and other mobile devices in our working lives, our social lives, and when we’re alone, it comes as no real surprise that we’re also increasingly relying on apps to help us through our day to day tasks. Problem-solving is a key part of the app developer’s job, and it is in the resolution of everyday problems or workplace issues that the app industry truly shines.
In this article, we’re going to be taking a quick look at the world of problem-solving with apps, and how app developers can solve problems and fix issues more creatively, effectively, and efficiently with the apps they come up with. Read on to find out more!
Custom Apps: A Solution for Every Problem
Custom and tailor-made apps really are perfect for addressing and solving a vast array of problems. Almost every single industry out there is currently investing in new apps for speeding things up, improving morale, reaching out to customers, and encouraging engagement in ways hitherto unimagined. Members of the public, also, are using apps to solve a massive range of problems from the mundane – for example finding more efficient ways of staying in touch with friends – to the complex, highly specialized, or location-specific.
A considerable chunk of the app developer’s job is to focus on and identify these problems and to come up with elegant solutions which work for their users, customers, or clients. So long as our minds are focused, our perspectives are clear, and our goals clearly defined, it seems there’s no problem too big or too small to be solved with an app.
Why Are Apps Ideal for Problem Solving?
There are plenty of reasons why apps are making lives and jobs easier all across the globe. Never before in human history has mankind so literally had all the answers at their very fingertips – our mobile devices and smartphones give us the opportunity to access apps built for highly specific purposes wherever we may be. Need a solution for rota management at work while you’re on your morning commute? It can be done in an instant with an app. Need to research something prior to an interview, or find out where the nearest branch of your favorite coffee shop is, or order something in for fast delivery while on the go? Apps provide easy, accessible, and speedy solutions.

We’ve become incredibly accustomed to turning to apps for a whole load of different solutions to a massive array of problems, and there’s one key reason for this: the majority of apps out there in circulation have been constructed and designed with those very problems in mind. As app developers, it is our job to identify such problems and come up with nifty and effective answers to them in the form of custom apps. This level of focus, and this way of working, really does make mobile apps ideal for problem-solving in a hundred thousand different ways.
So, how can we as app developers improve our skills when it comes to solving problems via the apps we produce? Let’s take a look at a handful of steps that should lead to more effective and popular results.
Carefully Identify the Problem
In order to come up with a truly efficient and effective solution, we first need to understand and identify the problem with pinpoint accuracy. When creating an app designed to solve a specific problem, we absolutely have to understand that problem inside-out and figure out where it comes from, how it arises, and what the app user is looking for when it comes to the solution provided.
By deeply understanding the root cause of the problem, the likelihood of it occurring (or repeating), and the sorts of complications it brings, we can make ourselves more efficient and productive app developers. Whether the problem is a specific workplace conundrum, an issue with timeliness or time-wasting, or simply a problem of having too much time to kill (and let’s face it, a huge number of apps out there are designed to tackle boredom first and foremost), the problem itself should always be our starting point.
Research Other Solutions and See What They are Lacking
The chances are, your custom app isn’t going to be the only one tackling any given problem. Even if the issue you’re addressing is extremely niche and relatively unique, it’s likely that there will be similar apps out there doing comparable things and solving similar problems.
All good app developers will know the ins and outs of the apps they are competing against. Our job isn’t to imitate others, it is to figure out exactly what other solutions are lacking, and come up with ways of superseding them. Perhaps you can solve the problem more quickly with your app. Perhaps you can take a totally different route towards solving the problem, or you can try approaching it from a different angle which leaves the user more satisfied.

Essentially, there are two routes you can take from this point, which are:
To Improve Upon an Existing Solution
Essentially, this involves looking at the solutions which are currently out there on the App Store and finding ways to make those solutions faster, more efficient, and overall more effective. No app is absolutely perfect, but by gaining that deep understanding of the problem and identifying what the solution looks like, you can certainly figure out ways of making existing solutions considerably better for your clients.
Think Outside the Box to Come Up With a New Solution
Sometimes, the current solutions which exist to address the problems you’re trying to tackle simply don’t do the job properly. It’s likely that other app developers will have taken a different approach to you, or will see the solution in a different light. As such, it’s often a good idea to address the problem from a wholly new angle, instead of trying to improve a solution that already exists.
This approach will help your app stand out from the crowd, and show your users that your app has seen the issue they are wanting to address from a totally new perspective. Your insight and creativity, therefore, will provide an even more satisfying solution which users will jump at the chance to bring into their lives.
Focus on What The Solution Really Looks Like
Sometimes, solutions to a problem come in many shapes and sizes. However, not all solutions are created equal… and often, some solutions are mere gateways to further problems down the line.
Once you’ve identified and understood the problem you’re tackling with your app, you need to really focus on what the best possible solution could be. As with every step in the app development process, you need to either speak in depth with your client, or put yourself in the shoes of your app user, and think carefully about what the best possible outcome actually looks like. From there, plans can be drawn up in order to get to that destination with your custom app.
Test, Test, and Test Again
Once you’ve got your ideas sorted, and have your app underway as a new solution to a given situation, it’s time to test the app in a range of different environments, and with a wide range of different users.
Testing is one of the most important stages in any app creation process, as those outside the development of the app might be able to spot glaring mistakes or oversights you’ve simply been too close to see. Get on the forums, rope in colleagues, friends, family members or willing members of the public or particular industries, and get your app tested. And then tested again. And then again. You’ll be amazed at how much further your app will be improved after listening to the feedback you’ll receive!
How to Create a Chat App with React Native and Firebase

This tutorial will give you a comprehensive, step-by-step guide on building a secure and functional chat app with React Native and Firebase providing the backend service. The chat app will have a log-in and registration screen, allowing users to add chats in a real-time chat application.
What is React Native?
React Native (also known as RN) is an open-source mobile app development framework that enables users to buildmobile apps for Android and iOS with native UI elements. It was built based on React, which is a JavaScript library. React Native has been a global success for various reasons.
First, you can use code created on it to power Android and iOS apps, saving a lot of time and energy. Second, the framework can also be used by front-end developers, who previously could only do app development using web-based technologies.
What is Firebase?
Firebase is Google’s app development platform that offers developers the services and tools they need for the development of quality apps without needing to manage servers. It is categorized as a NoSQL database program. Firebase’s key features include hosting, authentication, notification, and a real-time database.
How to Create the Chat App
Here is an in-depth, step-by-step tutorial on how to create the chat app.
Step 1: Prerequisites
To develop the chat app, you should have a working understanding of React Native; the other stacks are easily understood.
The packages needed for developing the app are listed below:
Firebase
React Native
Node.js
React Native Media Query
Expo
Formic
Comet Chat
Yup

React Native is an open-source mobile app development framework that enables users to build mobile apps for Android and iOS with native UI elements.
Step 2: Installing Dependencies
First, you will need to download and install Node.js on your machine.
Second, you will need to install the Expo-CLI on your computer. You need to install it as a global npm package. To install and use Expo CLI, you should have installed the tools below on your machine.
Git
Node.js LTS release
Watchmen (Only for Linux and macOS users)
If the Expo CLI installation is successful, you will receive a ‘not logged in’ message. You do not need to be logged in to an account to proceed, and you can continue.
After installation, navigate to the terminal and create and name a new expo project. When prompted, choose the blank template.
Then start the expo project that you have just created. Running the command below will start a new react native project on the browser.
You can now launch the Web Interface, Android, or iOS by choosing the one you want. Afterward, use a simulator to spin up the development server on Android or iOS.
After you are done with that, you can install the other essential dependencies for the project, as shown below. Yarn is the default package manager for expo.
Install the Native React navigation libraries: yarn add @react-navigation/native-stack
Install the dependencies into an expo-managed project: expo install react-native-screens react-native-safe-area-context
Install Formik and Yup to validate your forms: yarn add formik yup
Now we can add Firebase for the project!
Step 3: Adding Firebase
The following steps give a comprehensive guide on how to add and set up Firebase.
Installation
To begin, run the command below on your terminal to install it properly.
Create a Firebase account and a new project
If you do not have an account, start by signing up for one. Then go to Firebase, create a new project, and activate the email and password authentication. Below the authentication tab in your project, click the ‘sign-in method,’ and you will be provided with a list of providers supported by Firebase. Choose the one you want to enable and save your choice.
Activate the Fire store service
You then need to activate the Fire store service. You will use this to store the posts coming from your application. To do this, go to the Fire store tab (on the sidebar) and click on ‘Create database .’ Navigate to Fire store rules, make the changes, and publish those changes.
Use the timestamp as an index to order your posts
To achieve this, start by creating an index for it. Go to the ‘indexes‘ tab, navigate to ‘single field‘and click on ‘add exemption.’Enter ‘Posts’ in the Collection ID space and ‘timestamp’ in the field path space. Then click ‘Next,’ enable the scopes (ascending, descending, array), and save.
If you complete the steps above correctly, you will notice that the loading indicators on the exception blocks will have disappeared.
Generate the SDK configuration keys for Firebase
Start by registering your application under your Firebase project. On the overview page, choose the add option, and select web as the platform. After finishing up the configuration, go back to the overview page, and click on settings so that you can copy the SDK configuration setups.
Step 4: Set Up the Project Structure

This project will have several directories, including the components folder. Starting with the components folder at the root of your project, create a folder named components at the root of the project. The components of the chat app are as shown below.
The header component:
Use the power of react-native-media-query to craft it, as seen in the prototype below.
The BottomTabs component:
These are usually seen at the bottom of the Home Screen. Create a ‘BottomTabs.js’ component and paste the codes into it. The image below shows a prototype of the code.
The card component:
Create a card.js component and paste the codes into it.
Step 5: Log-In and Registration Screen
Screens are analogous to website pages, and every screen represents a page. Let’s go into detail on the login and registration screens.
The log-in screen
The log-in screen is used to authenticate already registered users on your platform. When you use the correct details to log in, Firebase and the chat app authenticate you. If you supply the incorrect details, you will be kicked out.
The registration screen
This is the screen that is responsible for creating new users. It interfaces between the app’s authentication and that of Firebase. New users can sign up to the chat app and Firebase simultaneously.
Other screens include:
The Add Post screen is liable for making new posts. You use Yup and Formic to save collected data and save it in the Fire store database.
The Chat List screen that lists all registered users
The chat screen allows users to engage in chats.
Step 6: Test Chat App
You can now test the chat app to determine if it works as planned. Below are some system testing cases and their expected outcomes.
Signing up a new user:
A new user should be allowed to enter the chat panel
Check newly created user in the Firebase database:
A newly created user date and unique UID in Firebase
User messages with time:
The user writes a message, and the receiver views it with the time
Chat data for a logged-in user in Firebase:
User’s chat data available in Firebase’s real-time data
The logged-in user refreshes chat automatically:
Chat panel windows refreshes and is observed by the viewer.
Your chat app is ready!
Congratulations! You have now created a chat app with React Native and Firebase! Firebase is an excellent asset for React Native developers who want to build app prototypes without building a complete backend from scratch. You can now build your first app or app prototype with the steps highlighted above.
An Intro Into TestFlight: Internal Testing

TestFlight is completely optional, yet completely free for all iOS developers.
All data is invaluable to your app's success; hence, aggregating information about apps pre-release has become part of the norm. Two types of beta testing exists internal (closed) and external (open). Last time, we reviewed how to setup External Testing; now, let's focus on the Internal alternative. If you need any help deciding which method of testing to use, click here and decide first before proceeding.
Prerequisites to setting up Internal Testing:
An iTunes Connect Record;
Potential testers that are assigned with the Admin, Technical, App Manager, Developer, or Marketer role;
A pre-uploaded build of your app.
Few steps to set up Internal Testing
Login to your iTunes Connect page and select My Apps.
Open the Activity tab on the upper-most pane and scroll down to select the build to be tested; select the proper Version and Build.
Click Test Information and leave instructions for testers to follow in What to Test. Provide other information for testers such as Beta App Description, Feedback iail, and any other URLs.
You don’t need to provide Beta App Review Information for internal testing
An iTunes Connect user that’s eligible to be an internal tester must be part of your iTunes Connect team with either the Admin, Technical, App Manager, Developer, or Marketer role.
To add Internal testers:
Navigate back to your app in My Apps, select the TestFlight tab and click Internal Testing on the left-hand side;
Now click the (+) sign next to the header Internal Testers;
Check the box next to any eligible users who have not already been invited and click Add.
The current maximum capacity for testers is 25
Under the Internal Testing tab, click Select Version to Test.
Select the Build to be tested and click Start Testing.
Users you’ve previously selected for internal testing will automatically be iailed with both an attached invitation and a set of instructions for downloading the TestFlight app. And now, it’s all up to the recipients to either accept or decline your invite! Next, learn how to open up your app’s beta to users outside of your development team.
App Analytics – The Important Stuff

What are app analytics and why should I care?
App analytics is similar to web analytics in that both analyze the behavior of visitors or users to then improve marketing, traction and conversion. App analytics provide in depth data on a user’s location and traffic habits, including their ‘session’ times, duration of visit, screens visited, and information on the user’s mobile device. Importantly, according to a report by Flurry Analytics, 80% of a user’s time spent on a mobile device is on an app, not a browser! App analytics are essential to app developers and their clients for better understanding their users and ensuring their app’s long term success.
What app analytic tools exist and which are important?
A few notes on implementation of app analytic tools before discussion of the tools themselves. Firstly, one tool(s) may not fit all apps. Adjust your analytic tools according to each app’s unique needs and characteristics. Secondly, the sooner the better! Implementing analytic tools even for your beta testers is a good idea, not only will this provide more data but also provide great comparisons for later versions.
Your app’s analytic tools should help you better understand and improve the following user stages:
Acquisition;
Engagement or retention;
Monetization
There are both basic and more advanced tools to help app developers clearly understand the above user stages. Effective analytic tools will not only identify what is happening but also provide insights into why, which allows developers to leverage this knowledge into improving any of the above user stages.
Basic app analytic tools provide data on metrics such as:
User activity (times and lengths of sessions as well as new users vs drop-off rate)
User’s mobile device information (model and operating system)
Time on each screen
Geographic location
Advanced app analytics tools provide data on more complex metrics such as:
A/B testing (changing one element or feature for some users and keeping it unchanged for the others, then tracking the changes in relevant metrics)
Event testing (tracking user behavior triggered by an in app event)
Visualization of user recordings and touch heatmaps (showing where users have touched the various screens of your app and how frequently) for UI analysis
Cohort analysis (focusing on a specific group of users)
Push notifications to targeted users
Analyzing user’s engagement over time provides new insights into the app’s unused functions and favorite features. These insights can also inform mobile app marketing decisions through better understanding which marketing channels are most effective for user traffic and conversion. Frequently re-evaluating these insights to guide your marketing and development process will allow you to improve your user’s experience and better position your app for success!
What are the top five mobile app analytics companies and what do they offer?
Flurry
A free tool for both iOS and Android, Flurry provides basic data metrics on user activity through classic and customizable dashboards. Flurry leads the iOS app analytics tool space with over 35% of the market share according to a VentureBeats survey in December 2014. Flurry’s basic data metrics include:
Usage:
active users, session information, frequency and retention
Audience:
interest of users, personas (type of your users, defined by Flurry) and demographic
Technical:
devices, carriers, firmware versions and errors
Events:
define events, see user paths and create funnels
Flurry is a comprehensive solution and is free because it acts as a lead generator for its advertising business platform. In short, Flurry does the essentials very well and for free! A comprehensive list of their analytics feature overview
Google Analytics
Google Analytics is also a free tool for both iOS and Android but is a more web focused service due to it being a relative late comer to the mobile space, only launched in June 2012.
Unique to Google Analytics is the ability to know what your users searched in Google Play to locate your app, an extremely useful marketing insight! Additionally, it outshines Flury in analysis related to e-commerce and advanced segments (adding filters to your data to look at specific users). Unfortunately, Google Analytics heavily favors Android and the Google Play store, resulting in iOS developers having access to fewer features like the keyword function just described. Another downside of Google Analytics is it samples your data, which means it analyzes a subset of your data rather than all of it to save on processing time and you don’t own your data.
A survey by VentureBeat in 2014 found that Google Analytics’ market share for Android and iOS respectively were nearly 95% and nearly 30%. However, reflecting the effectiveness of using multiple analytics tools the survey found that, “fewer than a third of mobile developers consider Google Analytics their primary app analytics solution”. Google Analytics is a great free entry-level tool and a likely choice for Android exclusive developers but for iOS developers or those concerned about the use of their data, then Flury may be a better choice.
Mixpanel
Mixpanel provides the more advanced features that free tools do not provide, allowing for a more exhaustive analysis of your app. Also, for iOS and Android developers, Mixpanel allows for side by side comparison of an app’s traffic on both platforms. Mixpanel’s key features are:
Funnels:
to identify where you lose customers and how to fix these issues
Retention:
visualize customer traffic and engagement as well as tracking the effect of changes in your app’s design, functionality or marketing effect customer rentention
Segmentation:
enables answers to questions like, “How do my app’s users invite their friends?” and “Which Google Adwords Campaign gives us the most paying users?”
While Mixpanel offer extensive tools to gain a more in depth understanding of users, its weakness is the high cost associated with scaling. Mixpanel’s entry-level analytics package is $150 per month with limited free versions.
Localytics
Importantly, Localytics is designed and built specifically for apps. This is important because there are significant differences between app and web analytics, including session models, support for offline usage and access to device resources. Notable features of Localytics include:
Segment usage by cohort, device model, location, custom dimension (trial vs registered user) etc.
Incoming data are processed and outgoing analyses are provided in real-time
Integrated app marketing: Combine analytics with marketing automation to measure acquisition campaign performance, and then nurture customers with push and in-app messages triggered in real-time
However, Localytic’s features are more enterprise focused, unlike Mixpanel, which is more developer focused. Localytic’s entry-level analytics package is $200 per month with limited free versions.
Amplitude
Amplitude is more recent addition to the mobile app analytics space, positioning itself as offering similar services to Mixpanel’s and competing on price. While not having the extensive experience like Mixpanel and Localytics, Amplitude offers a much more competitive price point for those seeking an affordable and growing service. Mixpanel’s entry-level analytics package is only $49 per month with limited free versions.
What do I need to know about Apple’s new service ‘App Analytics’ and how does it compare?
App Analytics is too new to be compared to the existing tools in this space; Apple only just released the beta version on April 30 to developers. Importantly, Apple’s service will have exclusive access to App Store data related to user engagement and downloads. These will be similar features to Google Analytics’ priority data on the Google Play store. For example, Apple has announced the ability for developers to track their app’s page views in the App Store, allowing developers to better understand their user traffic and adjust their marketing campaigns. Apple will be able to offer many insights on user behavior through the App Store that third-party services can’t access. Another advantage is that it won’t require developers to download third party analytics or integrate SDKs. Apple Analytics will be an important tool in the mobile analytics space to watch moving forward once it comes out of its beta.
Best ReactJS Projects for Beginners
Some Useful Points For ReactJs Projects :
When you start creating simple apps with Reactjs, it will be a great idea to pay attention to Redux and React-Router as well.
Redux is an open-source application state manager. It will help you to keep your application clean while you have to keep a lot of data.
React-Router is a library used with React.js to create and manage routes in single-page applications.
When you start practicing this framework, revise and master all your HTML, CSS, and Javascript skills.
With ReactJS, you can also use Bootstrap or any other CSS frameworks you prefer.
For REST API, you can use the JavaScript fetch method or external axios library.
For starting a new React.js project, you can use create-react-app.
By now you must be clear on requirements for building React apps. Let’s start React Learning Path about a few of the best ReactJS projects for beginners list
ReactJS Projects for Beginners
E-Commerce Apps
E-commerce apps like Amazon, Flipkart, Nykaa, etc. have become an integral part of our lives. Every business owner is coming up with their own apps to survive the tough competition. So, if you have hands-on experience with building functional e-commerce react apps, it will make you more saleable in the development industry.

Keep in mind that we’re talking about developing a small e-commerce project that is focused more on a particular industry, you can choose any industry that interests you like- mobiles, TVs, laptops, etc. and develop your e-commerce app around that.
Your e-commerce app can ensure the delivery of products or services along with browsing products or services.
Also, customers can enjoy seamless customer service.
All-round customer support and good customer experience are two vital elements of any successful app, so make sure customers can enjoy seamless customer service with your ReactJS projects for beginners.
As far as features of the e-commerce app are concerned-
Keep the layout and interface neat and easy-to-navigate.
Include the location option for deliveries, add a shopping cart, and a wishlist.
Make sure the checkout process incorporates the necessary authentication options (as a guest or registered user).
Technologies for e-commerce react apps:
Create React App, or Gatsby are excellent for building the storefront that displays the products/services.
Algolia is suitable for creating a lightning-fast product search interface.
Netlify/AWS Lambda for handling the checkout process.
Stripe/react-stripe-elements for managing the payment process.
Snipcart allows you to create a cart and also manage the cart products.
Calculator
You can use the Create React App package to instantiate a directory to hold and run the calculator app.
The main idea behind this ReactJS projects for beginners is a calculator that can perform the essential functions of basic mathematical functions, including addition, subtraction, multiplication, division, and percentage.
To create even a simple calculator, you must create a setup for all the different components, establish a mutual interactive platform, and also create a support system for handling failures, crashes, and bugs.
Weather App
This is a perfect ReactJS project for beginners, where you can code it in a matter of a few hours! For this app, you can leverage fake, hard-coded data until you get all the features correct.
While developing this weather app, you will learn how to connect to an external API and display the appropriate results. This practical skill will come in very handy when you develop other kinds of single-page apps that are designed to fetch data from external sources and display the outcomes.
In this, you have to build a weather app that can display a 5-day weather forecast with all the basic functions, including city name, current weather icon, temperature, humidity, wind speed, etc. It must display the recording of high and low temperatures of each day, including images for sunny/ rainy/ cloudy/ snowy weather conditions.
It should have a responsive design and refresh every 5 minutes with exact temperature and weather conditions.
After getting key functionalities in place, you can expand the app in the following ways:
Include the functionality where the user can click on a particular day of the week to see the hourly forecast.
Add React Router to the app (npm install react-router). Check out the quickstart guide to add routes. For instance- routes that can display the 5-day forecast, along with the name-of-day and the hourly forecast for that day.
Sign up on the open weather map to obtain a free API key and to fetch a 5-day forecast, then feed this data in your app.
If you wish to make the app more attractive, you can add graphics library like VX.
Technologies
NodeJS and Bower are perfect for this app.
Gulp Task Runner and SASS CSS pre-processor can be used.
You can check Erik Flowers for weather icons, and for “require” modules, you can use Browserify.
Messaging App
Instant messaging is part of our social lives as much it is a part of every business associations or correspondences. Companies big or small use instant messaging to provide 24×7 customer support to their customers.
Messaging apps are hugely popular and a great option for ReactJS lovers to build their first ReactJS projects for beginners. Also, building a messaging app is one of the best ways to monetize your React skills.
Real-time is the essence of instant messaging. The first thing to consider in mobile-based messaging apps is that you have to facilitate smooth conversation between 2 or more people in real-time.
You can use tools like Firebase or Hasura that transport data via WebSockets to display messages immediately in a conversation.
React Native is an ideal choice for this project.
Technologies
React Native or React Native Web as both are excellent for developing mobile messaging apps and hybrid (web + mobile) messaging apps.
Firebase, AWS Amplify, or Hasura for sending and receiving messages in real-time.
Cloudinary or Firebase storage for sending/receiving messages with image or video content.
npm emoji-mart package for emojis.
Simple CRM
One of the easiest ReactJS projects for beginners using React.js is CRM. In this ReactJS project, you can list customers and the projects or meetings, add options for filtering and sorting by different values, add a new user, and a button to delete the user as well.
The amount of additional features depends on you. Using Bootstrap is an excellent idea for this project because you will have lots of ready elements to create components.
Social Media App
The roaring success of Social media apps like Facebook, Instagram, Snapchat, and Twitter is a great inspiration for budding programmers to try their hands on creating some useful ReactJS projects for beginners in the field of social media marketing.
These apps possess a number of advanced features to facilitate better service experience for the user. So, you can experiment with these features to get a better real-life project experience for yourself.
After adding the basic features, you can create additional features for customization that will allow end-users to tweak their profiles and accounts according to their requirements and preferences.
Some of the most common features of almost all social media apps are
User authentication
Notification and newsfeed
Easy integration with other platforms
Posting, sharing, and commenting
Technologies
Create React App or React Native for creating dynamic UI for posts, messages, and likes.
AWS Amplify, or Firebase, or Hasura (using GraphQL subscriptions) for real-time data.
AWS Lambda or Firebase Functions for app notifications.
Firebase or Cloudinary storage for uploading pictures and videos
ToDo App
Another important ReactJS project for beginners which everybody should do when practicing Reactjs is a simple Todo App. It can contain one or three cards or boxes, where you will display the planned tasks, in-progress tasks, and the done tasks.
Also, you can add different colors to indicate the status of a particular task. Another useful feature you can add would be a simple popup or modal to add a new task and delete button for unnecessary tasks.
Search & Filtering
Another useful ReactJS project in your portfolio is an application where the focus is mostly on creating advanced filtering and search.
The application should consist of a table with data like users, books, movies, etc. Besides, you need to create a box with filtering options and a search box where, after typing more than 3 characters, the elements on the list will change according to the searched phrase.
Blog
The next useful idea you can add to your ReactJS projects for beginners would be a blog. And for writing aspirant coders, this can be the stepping stone to your own blog one day.
You can start by creating the components to display the blog posts, one to display them as a grid and another to display the whole post with a title, image, and text.
Also, you can create a way to publish a new post, which means you need to create a form with title input, textarea, and image upload component. Later, you could add features like comments, voting, or editing the posts.
Productivity App
This is one of the easiest projects on the list with tremendous tutorials available to master the concepts and build your own ReactJS app.
As the name suggests, productivity apps help in enhancing your productivity. Some of the most commonly used productivity apps are note-taking apps, team management apps, task list apps, time management apps, and more.
With so many common productivity apps available and already built, you can try building an app with your own creativity that offers a detailed introduction to the app development process.
While developing this ReactJS projects for beginners, you must ask what features will simplify the daily schedule or learning schedule.
Start with a simple feature, like a text editor for writing formatted text with markdown, and gradually start expanding upon the elements like- the option to save the text as individual files on the computer, to export the text markdown as HTML for writing formatted emails.
Technologies
Create React App (for web) or React Native (for mobile platforms).
react-markdown npm package for displaying markdown in your app UI.
react-codemirror2 npm package for writing code in the notes.
react-draggable npm package for re-ordering list content through a click-and-drag option.
GitHub Issues Page
This project is to design a simplified version of Github’s Issues page.
Ignore the items in the header (search, filtering, stars, etc.) and only focus on implementing the list of issues. To begin the project, first, collect open issues from GitHub’s API and display them in a list.
After this, add a pagination control to facilitate navigation across a complete list of issues. If you add React Router, you can navigate directly to a particular page of your choice. You can increase the complexity of the page by including the issue detail page as well.
Features of Angular
Accessibility Applications:
Angular allows creating accessible applications using ARIA-enabled components, built-in a11y test infrastructure, and developer guides.
Angular CLI:
Angular provides support for command-line interface tools. These tools can be used for adding components, testing, and instant deploying, among other things.
Cross-Platform App Development:
Angular can be used for building desktop, native, and progressive web apps.It provides support for building native app development using Cordova, Ionic, or Native Script. It can also be used to build desktop apps for Linux, macOS, and Windows.
Code Generation:
Angular is able to convert templates into highly-optimized code for modern JavaScript virtual machines.
Code Splitting:
The Component Router offers automatic code-splitting so that only the code required to render the view that is requested by a user is loaded.
Templates:
Allows creating UI views with a simple and powerful template syntax.
Testing:
Angular lets you carry out frequent unit tests using Karma. The Protractor allows running scenario tests faster while being stable.
Features of Angular 6:
Angular Elements
Serice Worker Support
Bye, Bye Template Element
1i8n
Upgrading to RxJS 6.0.0
ng-add & ng-update
Ivy: New Rendering Engine
ngModelChange
ElementRef
Bazel Compiler
Features of Angular 7:
CLI prompts. In Angular 7
Drag & Drop
Virutal Scrolling
Application Performance Improvements
No Ivy
Documentation Updates
dependency Updates
Angular Material & Components Dev Kit(CDK)
Features of Angular 8:
Angular Ivy
Angular Router Backwards Compatability
Improved Web Worker Bundling
Bazel Support
Lazzy Loading
CLI Workflow Improvements
Builders API
Updated Typescript to 3.4.x
Angular Firebase
Features of Angular 9:
Smaller bundle sizes and augmented performance
Faster testing
Better debugging
Improved CSS class and style binding
Improved type checking
Improved build errors
Improved build times, enabling AOT on by default
Improved Internationalization
The default use of the Ivy compiler is the most important feature of Angular 9, Ivy is actually designed to solve the major problems of Angular i.e., the performance and large file size
Selector-less bindings support for Angular Ivy
Support for TypeScript Diagnostics Format
Support for more scopes in providedIn
A New Type-Safe TestBed.inject() Method Instead of TestBed.get()
Improvements to differential loading
AOT compilation everywhere
Bundle sizes
Globalization
Additional provider scopes
Improved developer experience
New debugging API in development mode
Strict mode
Improved component and directive class inheritance
Latest TypeScript versions
Improved server-side rendering with Angular Universal
Improved styling experience
Stabel Bazel release as opt-in option
Angular Components
Testing
Angular 9 makes it easy to use Google Maps and YouTube in your front-end apps. Angular 9 added support for TypeScript 3.7 and improved the IDE and language service extension which will increase the productivity of Angular developers and help them spot errors when developing apps.
Advantages of Angular:
Can add custom directives
Exceptional community support
Follows the MVC pattern architecture
Offers support for static template and Angular template
Support for two-way data binding
Supports dependency injection, RESTful services, and validations
Disadvantages of Angular:
Complex SPAs can be inconvenient and laggy to use due to their size
Dynamic applications do not always perform well
Learning Angular requires time and effort
Free vs Paid Apps

One of the most frequent questions we get is regarding one of the most important decisions an app owner must make – how to make money with your app. In this first post of our “App Monetization” series we will discuss the first decision you will have to make:
Should I make my app free or paid?
Let’s start with the obvious: if you have a paid app, you are guaranteed to earn money on every single user; if you have a free app, you will certainly get more downloads (sometimes 1,000 times more), but you will live with the hope of earning money on only some of the users. Is living with this hope of income worse than having guaranteed income? Turns out not at all!
According to a report by Distimo, the total App Store profit revenue from paid apps accounts for only 24%. The revenue from in-app purchases, made inside of paid apps, account for another 5%, and the revenue from in-app purchases from free apps account for 71% of profit revenue.
Besides immediate revenue, you should also consider several other things, including app reviews, user commitment and competition.
App reviews
If your app is free, users won’t lose anything by downloading it and users generally will have lower expectations. Hence, there is a greater chance of getting a good review for the quality of the app and a lesser chance of getting a bad review, simply because users didn’t lose any money on the app. The simple logic you need to remember is that the higher the price of the app, the more users will expect from the app. If the app doesn’t deliver, be prepared to receive harsh reviews.
User commitment
With the free app you will certainly get more downloads, however many of the users will download the app simply out of curiosity. These users may have no real interest in the app at all. Hence, if your goal is to retain users or get users that are actually interested in your app, then a paid app might be a better option.
Competition
Before you decide on the price of your app, make sure you research your competition. How do similar apps earn money? Besides your competition, you also need to understand user needs. For example, with one of the first apps we ever built, LSAT Triangle (helped students get into law school), we were able to set the price at $10. This is because ten bucks is considered nothing for a chance of getting into a better law school.
Seems like free app is the way to go
So you want great reviews, you want to get as many users as possible, and you see that all your competitors have free apps – does that mean you should make the app free? No. First, make sure you have a strategy for how to make money on ads or in-app purchases. If you don’t think users would be willing to buy anything inside the app or you don’t expect to have enough users to earn money on ads – don’t expect to earn money with a free app. Additionally, remember that higher priced apps allude to higher quality.
Fetching API Data with React.JS
If you’ve used fetch to retrieve data from an API using JavaScript, doing it with React will be pretty similar. Before we get too far into it, let’s go over a few definitions.
API
An API is basically a set of data, often in JSON format with specified endpoints. When we access data from an API, we want to access specific endpoints within that API framework. For example, if in the scenario we are using today, we are going to be using the random user API. Within this API, it has randomly generated user data, basically like Lorem Ipsum, but for imaginary users. It has data within the API like phone numbers, email addresses, names and pictures for each user. We don’t want all the data, but we’ll use certain endpoints to grab only the data we want.
Fetch
Since all the data we want is stored in an API, the fetch is how we request that data. We’re basically saying, “Hey API, here’s what I want, can you send me this data.” The server will then respond and be like, “Sure thing, I promise to send you the data.” We can also specify how we want the data to be returned. JSON data is often the easiest to use, so if the server returns anything other than JSON format, if that’s what we’ve requested, we may get an error.
Lifecycle Method
In React, there are several lifecycle methods. We’ll be using three of these lifecycle methods in this exercise, Constructor, componentWillMount and Render.
State:
If you’re new to React, State can be confusing. Think of state as water, ice and vapor. It’s the same object, but has different states depending on conditions. Objects in React are the same way. We can change their state depending on how we want to interact with them.
The background component contains all of the user photos that we’ll pull from the fetch. But I’ve made Background its own component, and then import it into Splash, so that the code remains cleaner and less cluttered. You can go ahead and set up the architecture of your app before you begin making the API if it’s easier for you to work that way. Now, let’s take a look at the Random User API, so we can see what data we want to grab.
Before you get too far into the project, it’s usually a good idea to go to the API, and read any documentation available. This will usually give you a good idea of how the API is structured and how to access the data. Often, bigger APIs will have you register for a key, or have specific ways you need to access the data. Random User API, is open source and easy to use, so we can avoid a lot of that hassle.
Once you’ve had time to look over the API documentation, usually like to pull the data up in a program called Postman. Postman is a great way to see the data, and target the specific data you want. If you haven’t downloaded it already, go ahead and take a second to do that.
Here, in postman, you will notice a couple of things. At the top, I’ve put the API address into the search bar. Since we’re retrieving data, I’ve set the request to a GET request. If this were an API that we had constructed, we could also do a POST, PUT or DELETE request, if we needed to.
After the api address I’ve added one line, “results=500”. I want to make sure the Thumbnail pictures we pull fill the entire background, so I’m asking the API to return 500 results.
Now, suppose we were pulling data from the API, and instead of a background, we were making a user profile site. We might only want 1 result, or 3, or whatever. You can filter the results in many different ways, but for now, this is as complicated as we are getting. If you scroll through the data, you can see there’s quite a lot there. I’ve highlighted the data that we want. We don’t want any text data, only pictures. And not just a picture. We only want the thumbnails, which are part of the picture object. Once we know what we want, and we can see in postman where that data is nested, it’s easier for us to target later.
Here we are in the background component. Like I mentioned earlier, to do a fetch in React, we’ll need to use 3 lifecycle methods. You can look at this as a 3-step process.
Constructor Method
In the constructor method, we only have to worry about two things. Once we call the constructor method, we use super to pass any props from the parent to the child component. Then we set the state. I mentioned state earlier. When you set the initial state, you want to set it as empty, or blank. If it’s going to be a string, it would be an empty string. If an array, an empty array, etc. In this scenario, we only have one thing that we need to set the state of, and that’s the pictures. Because we want our pictures in an array, we’re setting it now to an empty array. Then, once we use the fetch to retrieve the data, we’ll go in afterwards, and set the new state to the data that we’ve pulled.
ComponentWillMount
In React, lifecycle methods including “Will” are called before something happens. Lifecycle methods including “Did” are called after something happens. In this case, we want to call the method before, and then pull the data, which is why we are using componentWillMount instead of componentDidMount.
Fetch:
Once you’ve done one fetch, you’ve basically done a thousand. The format will be more or less the same for each one, with just minor differences on how you want to map over the data, etc. In this fetch, we’re calling the fetch, and if you’ll notice in the web address, I’ve included the “results=500” filter that I pointed out earlier. Once you have targeted the data the way you want in postman, you can just copy and paste that URL into your fetch.
Results:
Here, we’re just specifying how we want the data returned. Since JSON is easy to work with, and that’s how this data is formatted, that’s what we’re expecting here.
Map:
Here, we’re mapping over the data that we’ve pulled. This is basically the same thing as doing a for loop. If you’re more comfortable using a for loop, there’s probably no reason you can’t do that. However, sometimes the map function just seems to work better. Think of mapping like this, we’ve told the API we want to get 500 user data objects. If we go back to postman, we can see that each user data object contains a lot of information we don’t want, like numbers, address, etc. So, we need to map over it first. Then, we can tell the API, “Hey dude, all we really need are these pictures here. Let’s just discard everything else.”
Key and Return data:
There’s two parts to this step. First, we have to set the key, and then specify the data object. The key attribute is used by react to ensure that Dom elements correspond with data objects. Here, we’ve set the key topic. results. Then, we’ve created an image tag, with a source that’s set to the data we want to pull. Basically, what’s happening here is we’ve set a key inside the parent container. Then, inside the parent container, we’re saying, “Okay here’s an element…and whenever all the data is mapped over, we want it to populate this element with that data.
Set State
Now the last part of this Lifecyle method, and arguably the most important. We need to set the new state of our pictures empty array. Using ‘this.setState’, we’re basically saying, “Hey React, remember that empty array we defined as ‘pictures’ earlier? Well, now we want to change its state. So, we’re changing it to this array of pictures we pulled from the API. Is that okay with you?” React is usually pretty nice, so I don’t think it will mind.
render:
Finally, the last lifecycle method, which is the render. Here, we want to use the new state we defined in the componentWillMount lifecycle method. So, we’re setting up a structure here, and then using curly braces to bring in that state and we’re done! Now the only thing left to do, is import this background component into the main component, Splash JS.
How Apps are Improving the Finance Industry

The world of finance is, by its very nature, a fast moving and quickly evolving one. It wasn’t so long ago that banks and financial companies were utterly opaque and altogether rather mysterious organizations; they involved booming, marble-floored buildings, where quietly serious people sat behind grated windows, filling in papers and arranging cash transactions with a deadening air of solemnity.
With the rise of the internet and online banking, however, things changed beyond all recognition. Suddenly, banks and similar businesses were keen to be our friends – they sent out friendly emails, and adopted brightly-colored websites, which allowed us to keep on top of our finances without having to ever leave the house. Now, however, we are very much in the era of the smartphone app, and banks and other aspects of the finance industry and rushing over each other and themselves to stay on top of the latest trends in on-the-go financial tools, mobile device banking, and ease-of-use programs to ensure we can do what we want with our money, no matter where we might be.
This, of course, is only one side of the current finance industry. With the arrival of cryptocurrencies and a whole host of new investment apps, savings apps, and stock trading tools, the finance industry has sped up to a blistering pace. The app developers are naturally leading the field when it comes to financial innovation, and customers are becoming more and more demanding for user-friendly applications with which to handle, transfer, invest, withdraw, and share their money. These are exciting times indeed for both the banking and the app industry, and there’s little doubt about the fact that apps have blazed new trails in this sector, making our financial lives a whole lot simpler, and a whole lot more interesting.
This week, we’re taking a deeper look at some of the most fascinating developments in the world of financial industry apps, and looking at how a custom app for financial companies could help take your services to the next level.
Online Banking, App-Style
Online banking isn’t exactly new – it’s been around for more or less as long as high-speed internet has, and for many of us, it’s a basic part of our everyday lives. Thanks to huge leaps in data encryption and security, however, online banking apps have already started to become highly commonplace among the general public, and they appear to be getting better year by year.

With a custom app for your bank or financial company, online banking becomes simpler than ever. Not only can you keep track on your incomings and outgoings, and make simple transfers, set up direct debits, and check your balance all in one place, an online banking app also gives you the opportunity to stay updated with all the news relating to the bank and your financial life. On top of this, a custom banking app also opens a smooth channel of communication between the individual and the bank, meaning higher levels of customer satisfaction, and fewer missed opportunities to promote new services or to upsell features.
Another key benefit of mobile banking apps is the presence of push notifications. With notifications, a bank can easily remind its customers when money has entered their account, when payments are due, or when certain promotions come along that the bank deems appropriate or beneficial to tell the customer all about. Make no mistake, banking apps for smartphones are definitely here, and they’re not going to disappear any time soon!
Easier Access to Money and Payments
Today’s public demand faster, easier transactions than ever before. The rise of contactless payments upped the ante for banking and financial sector apps, and encouraged a flurry of activity in making everything more swift, more user-friendly, and more efficient from a technological point of view.
Over the past few years, we’ve seen how apps have made access to one’s funds far simpler, and payments at shops, cafes, and elsewhere via smartphone app have become considerably more commonplace. With such easy access to money, the process of spending and carrying out financial transactions has had the stress completely removed, resulting in happier individuals, and a greater level of trust in financial institutions.
Peer to Peer Payments
Back in the day, we used to have to carry cash pretty much everywhere with us. If you were meeting a friend for a drink in a pub, we had to do all we could to avoid the embarrassment of running out of physical funds by the end of the evening, and relying on our mates to buy us that final drink (which we would, of course, pay back the next time).
Today, things have become so much simpler thanks to the arrival of peer-to-peer payment apps, allowing us to quickly and easily send funds over to our friends, colleagues, or clients in the flash of an eye. Whether you actually use these app functions after a drinking session at the bar with your friends or not is incidental – the number of possibilities that these apps present is, simply, endless.
Borrowing, lending, sharing, paying, spending, and helping with money has been transformed completely by peer-to-peer payment apps, and the world is most probably a happier place as a result. It’s a genius idea, once again facilitated by better protection schemes and data encryption, and it’s one which the millennials and generation Z users have leapt upon wholeheartedly. Stress-free, super fast, and lacking any awkwardness or complications, peer to peer payment systems have changed the way we see and use our money forever.
Trading Stocks and Cryptocurrency
No article about banking apps in the 21st century would be complete without some mention of cryptocurrencies. Whether they’re a flash in the pan or a whole new way of thinking about money and investments, cryptocurrencies couldn’t have arisen in the bombastic way that they did without the existence of apps facilitating their use. Market traders, blockchain enthusiasts, digital prospectors, and hopeful investors alike have leapt on board the cryptocurrency bandwagon, and a wealth of apps specifically designed to facilitate their investment and use sprung up overnight.

On the more familiar side of the scale, we’ve also seen a huge rise in new apps designed to encourage millennials to start investing and trading on the stock exchange. Thanks to some seriously clever bits of design and masterful uses of user-friendly platforming, the new generation of investment and stock trading apps have made themselves do the impossible: make market trading look incredibly simple and appealing. It’s expected that such apps are set to become a major trend in the coming years, and could inject some much needed youthful vitality into the stock exchange world… which, until now, was dominated by mountains of dull paperwork, and men in suits doing indecipherable things with some seriously outdated-looking kit.
In all of these areas, and many more besides, it’s clear that smartphone apps and custom banking apps are driving significant changes in a complex and fast-moving industry. As customers and members of the public become more and more accustomed to doing things “on the go”, we can expect this trend to grow and grow, no doubt revealing new advances and developments which continue to change banking forever. The future’s bright, indeed.
Amazon QuickSight
What is Amazon QuickSight?
Amazon QuickSight is a machine learning-powered business intelligence service built for the cloud under the Amazon Web Services umbrella. It enables firms to make smarter data-driven decisions.
The Amazon QuickSight BI utility enables businesses to create and analyze data visualizations and extract easy-to-understand insights to inform business decision-making. These interactive dashboards can be seamlessly embedded into many applications, portals and websites.
Amazon QuickSight is scalable, so it can support thousands of users without additional infrastructure management or capacity planning. It is also device-agnostic.
Start analyzing data by defining the data set and calculated fields for analysis in the Amazon QuickSight dashboard.
What is Amazon QuickSight used for?
Amazon QuickSight enables companies to access and explore deeper insights in an interactive visual environment. It includes natural language query capability -- dubbed QuickSight Q -- so users can ask questions of their data in plain English.
BI teams won't have to pre-build data models on specific data sets. The more users use Q, the better it gets thanks to its built-in dictionary and feedback mechanism.
The BI platform describes these insights in simple language to whoever needs them, even if they lack data science experience. Users can also make predictions about outcomes through features such as anomaly detection or forecasting.
How to visualize data with Amazon QuickSight
Amazon QuickSight delivers interactive dashboards and insights in the following few steps:
1. Collect and load data
Amazon QuickSight pulls and reads data from many Amazon utilities including Aurora, Athena, Redshift, Simple Storage Service (S3) And Elasticsearch Service 7.7. It also integrates with on-premises databases, file uploads and API-based data sources like Salesforce.
Click streams, sales orders, IoT devices and financial data are also supported. Amazon QuickSight allows end users to upload incremental data in a file or an AWS S3 bucket.
2. Connect to data
Amazon QuickSight connects to data, regardless of location: AWS cloud, corporate data center, SaaS, third-party applications, CSV/XLSX/JSON files, etc. Before analysis, Amazon prepares data by filtering it, renaming fields for easier readability, changing data types (if required), adding calculated fields and creating SQL queries.
3. Analyze data
The BI platform examines the data and uses its Super-fast, Parallel, In-memory Calculation Engine (SPICE) to perform calculations and create graphs quickly. The engine's storage and processing capacity eliminates the need to retrieve data every time an analysis is changed or visually updated.
4. Create visualizations
QuickSight creates visualizations users can arrange and customize. Moreover, it eliminates the need for users to perform manual extract, transform and load operations. The tool shares interactive dashboards, email reports and embedded analytics that business users' access to derive insights and take necessary actions. The QuickSight workspace also provides interactive graphs, charts, tables, stories, sheets and many other types of visuals. With embedded analytics, users can both view and author dashboards within their enterprise applications.
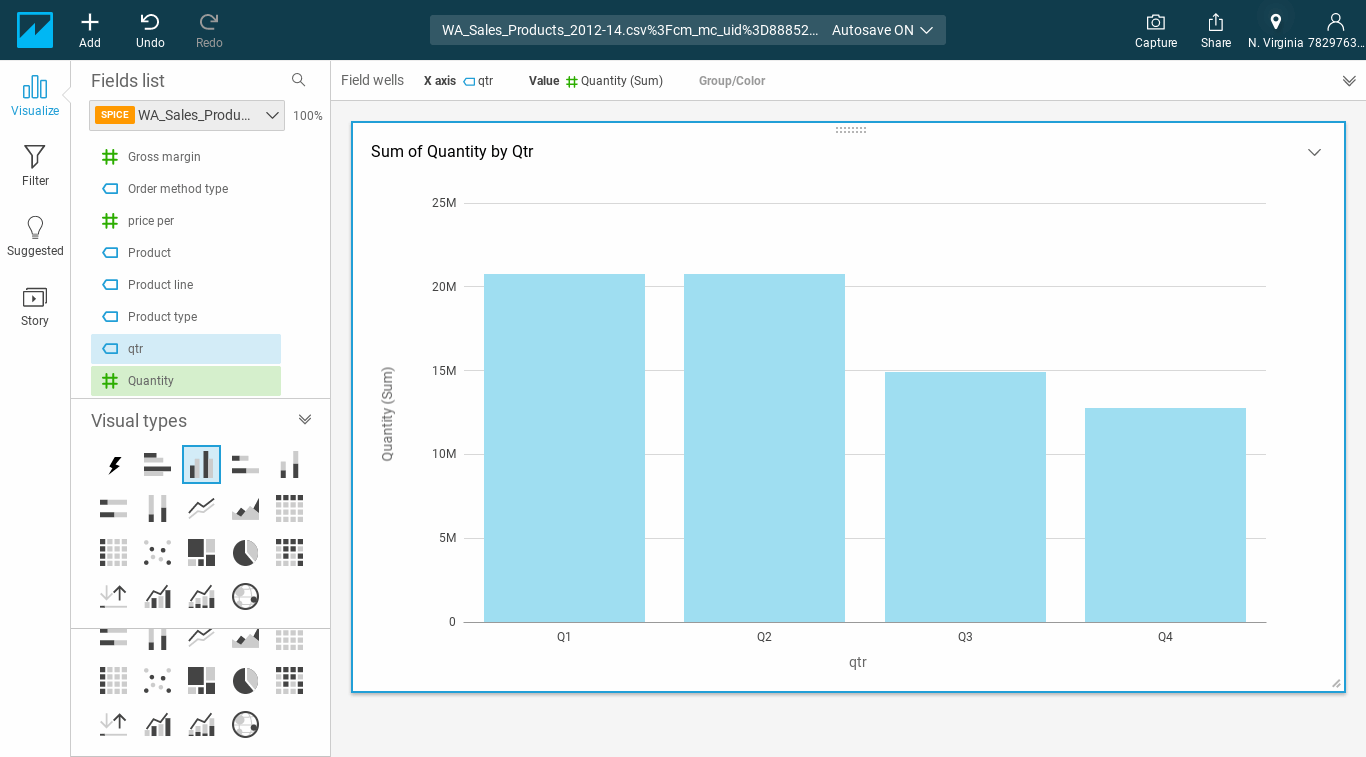
Amazon QuickSight provides users with many options to visualize data, such as using graphs like a bar chart and pivot tables.
The top 5 things to know about Amazon QuickSight
1. QuickSight's
platform is secure and incorporates multiple-region availability and built-in redundancy so, users can distribute dashboards and insights to multiple users.
2. The workspace
where users create and interact with visuals is called an analysis. Here, they can view, arrange and calibrate various graphical data presentations, such as interactive graphs, charts and stories.
3. The SPICE
engine automatically replicates data while shielding underlying data infrastructure, so multiple users can simultaneously perform fast, interactive analyses.
4. ML and natural language
With ML and natural language capabilities, users can:
discover hidden trends
identify outliers and key business drivers
perform what-if analysis and forecasting, even if they lack technical expertise or ML experience.
machine learning
Use the machine learning models built in Amazon SageMaker to build predictive dashboards -- without writing any code.
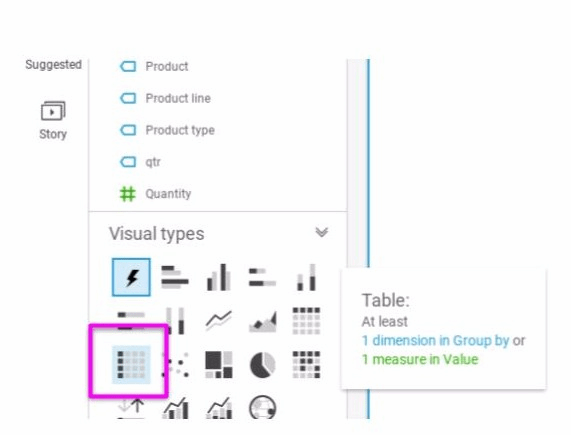
major benefits of Amazon QuickSight
Amazon QuickSight is fully managed cloud-based service that can combine data from many different sources accessible in a single dashboard. It offers the following advantages.
Easy to set up and use
QuickSight requires no complex server setups, data models or capacity planning, so users can get going quickly. Roll out new ML-powered BI dashboards at scale for fast insights and improved decision-making.
Fast performance
SPICE, QuickSight's in-memory calculation engine, automatically replicates data for high availability while saving time, money and resources.
Low total cost of ownership
With a pay-per-session model for dashboard readers (consumers), users won't incur any upfront costs for licenses.
Ability to create embedded dashboards and APIs
Using single sign-on (SSO) and APIs, users can create interactive visualizations and dashboards and embed them into applications and web portals without writing any code.
Compatible with multiple data sources
QuickSight is compatible with many sources, so users can get insights from SaaS applications, third-party databases, native AWS services, private Amazon virtual private cloud (Amazon VPC) subnets and more.
Security, multi-region availability, built-in redundancy
Distribute dashboards and insights securely to multiple users, and manage users and content with role-based access control and SSO. QuickSight is also compliant with many industry standards including HIPAA, FedRAMP and security operations centers.
Anytime, anywhere access to dashboards and visualizations
With QuickSight Mobile, users can get insights from their data on any device from any location. The mobile-optimized experience includes capabilities like drill-downs, filters, forecasting, email alerts and collaborative viewing and sharing.
How much does Amazon QuickSight cost?
Amazon QuickSight is the first BI service with pay-per-session pricing. Organizations only pay when their users access dashboards or reports. This makes it very cost-effective for large-scale deployments.
QuickSight comes in two flavors:
Standard Edition
Personal data analysis and exploration
o Available only for authors at $9 per user per month with an annual subscription ($12 per user per month for month-to-month payments)
Enterprise Edition
Delivers insights at scale
Available for both authors (dashboard publishers) and readers
Readers per user pricing: $5 per user per month
Readers session capacity pricing: $250 per month for 500 sessions
Authors per user pricing: $18 per user per month with an annual subscription ($24 per user per month for month-to-month payments)
How much does Amazon QuickSight cost?
Amazon QuickSight is the first BI service with pay-per-session pricing. Organizations only pay when their users access dashboards or reports. This makes it very cost-effective for large-scale deployments.
QuickSight comes in two flavors:
Standard Edition
Personal data analysis and exploration
Available only for authors at $9 per user per month with an annual subscription ($12 per user per month for month-to-month payments)
Enterprise Edition
Delivers insights at scale
Available for both authors (dashboard publishers) and readers
Readers per user pricing: $5 per user per month
Readers session capacity pricing: $250 per month for 500 sessions
Authors per user pricing: $18 per user per month with an annual subscription ($24 per user per month for month-to-month payments)
Principal product manager for Amazon QuickSight talked up the benefits of the BI platform's serverless architecture during AWS re:Invent in December 2020.
QuickSight also supports alerts and anomaly detection (threshold-based or automatic). The price for this add-on is transparent and based on metrics evaluated.
Your First Mobile App Wireframe
A wireframe is a visual representation of the individual elements homed by an application or website. Wireframes are typically created in black and white but are not limited to. They can be both hand-drawn and created using software programs as well as online tools.
Why is a wireframe important?
Wireframes are important as a means of function and communication. The wireframe directly translates to the blueprint of the app. It represents the naked body of the app while the design can be considered clothes. Wireframes also help communicate your vision of a mobile app or website that you’re attempting to create clearly to the designer or developer you are working with.
The wireframing stage is done at the very beginning of the design process and takes much less time than the bulk of the design work. Wireframes are used to point the designer in the right direction when turning your idea into a fully functional product.
The Role of Paper Prototyping
The terms “paper prototyping” and “wireframing” can be used interchangeably even though form and function vary between the two. Paper prototyping should commence directly after you establish the who, why, and how of the app.
Today, many people will question the significance of paper prototyping. There are some who claim paper is dead and swear by the benefits of digital prototyping. But still, others argue that pencil and paper strengthen design.
Regardless of your approach, the importance of the wireframing stage cannot be stressed enough. Wireframing significantly lessens the chances of misunderstandings with third-party developers. After all, your app is your brainchild, why wouldn’t raise it by any other visions than your own?
Here are some steps to get you started:
1. Treat it like a blueprint, include descriptions
Take an office building, for example, without a blueprint, builders don’t have any idea of how many floors to add, where to build various offices, where to place electrical outlets, plumbing, doorways, etc. If the only resources you throw at them include a few images of other offices you find appealing, the probability that it will fall in place with your vision is one in a million.
The same thinking applies to app designers. Without a detailed wireframe, your designers won’t know how to structure navigation menus and how to layout the imagery in popular design platforms such as Sketch or Photoshop.
The more descriptive you are, the greater the chance of your vision being mirrored. The descriptions should include detailed information about functions within the screen, how they are carried out and what they lead to
Remember The more descriptive you are, the better. A solid foundation is what can make or break the final product. The greater the detail in the wireframes, the clearer your vision will resonate with the designer and then ultimately to the developer.
2. Hi-Fi is the way to go
Hi-Fi or high-fidelity wireframing translates not only the structure of the app but also the color and tone you want the app to embody. This, in turn, leaves less to imagine in comparison to a simple hand-drawn sketch or a lo-fi wireframe. Now, this can be either viewed as a pitfall or a positive. On one hand, time can be wasted and the creativity of the designers can be subdued. On the other, since your designer has to rely less on their imagination, they can create a product that better aligns with your vision.
3. Check the flow, interactive prototyping
Go over the wireframes and make sure all functions land at their intended screens. Make sure you’ve highlighted all the possible error messages found on a particular screen. For example, “Incorrect password.”
This is where interactive prototyping comes in. Transforming your static designs into fully interactive prototypes is extremely beneficial. There are great tools available to everyone that enable you to create a clickable mockup of the app. Here at Messapp’s our personal favorite tools to use are Invision and Figma.
It is true that if your wireframes are already very detailed, a clickable mockup may seem a bit redundant. But truthfully, it’s not. Since you get a close feel for how the app will work at such a young stage in the development process, you can make more edits to truly perfect your app.
4. Cite your inspirations
If you have a particular app or maybe even a few that you took inspiration from, let your designer know. App elements such as design, user experience, and emotional feel are things you can pick apart and home in your own app. Your designer can use these references to better understand your intended outcome.
Conclusion
Translating your dream to the designer and developer is vital. The wireframing stage is the app before its glamour, a body without flesh. If you point the ship in the right direction its destination is almost promised.
Why Your Website Needs an App
Over the past decade, we’ve witnessed a fascinating shift in the way in which we all communicate with each other, and the ways in which digital data is transmitted, shared and received. The rise of the smartphone app has completely shaken up so many aspects of so many people’s lives and livelihoods, and for many of us, apps have become central to our daily existence and the way we go about our personal lives, our relationships, and our business.
If you currently run a website that deals directly with members of the public, or people within your industry, there’s no getting away from the fact that you’re in need of an app. With so much of our internet-based activity now happening on the move (we’ve all seen how people, whether on public transport, sitting in cafes, or simply walking down the street use their mobile devices to stay connected), a well-designed and functional app opens the doors of so many different possibilities.
Apps allow us to stay in contact with our site visitors, customers, friends, or content readers. They give us the chance to deliver updates, issue marketing material, or provide special offers and speedier services. They facilitate ease of use and allow for round-the-clock accessibility.
Apps aren’t just the future; they’re very much the right here, right now; and if your website doesn’t yet have an app, you’re missing out on a wealth of possibilities that could take your site’s purpose to the next level.

For this week’s blog, we’re going to look at a trio of different website types, and consider how a custom mobile app can take its usability to the next level of efficiency, convenience, and user-friendliness. While this blog isn’t going to be exhaustive (after all, there are more types of websites than we would ever have space to write about here!), it should give a clear idea of the versatility of the apps available today, and might spark some inspiration in you if you’ve been considering adding an app to your website’s arsenal. Read on to find out more!
Bloggers and News Sites
If you’re a blogger, you’ll be more than aware of the importance of staying up-to-date on the latest developments in your area of expertise. Whether you blog about cosmetics, wine, finance, healthcare, parenting, or anything else, staying on top of news and new trends is going to be a key part of what you do.
You know what? The exact same thing is true of your blog readers and visitors. People come to your blog because they want to be updated, and they’re keen to come across fresh content which keeps them ahead of the curve. In this sense, apps become overwhelmingly important, and your readers and visitors will most likely jump at the chance to download an app that allows them to read your blog on the go.
Furthermore, an app allows a whole host of other benefits for bloggers. You’ll be able to send push notifications to your readership whenever a new post is uploaded – something which is bound to be appreciated by your followers.
You’ll also have the opportunity to run promotions via your app, and keep all of your social media updates in one handy place. You can even consider setting up payments for specialist or secret content via an app, and connect it to a payment service for swift, an easy, and accessible collection of funds. Blog apps are increasingly popular on the App Store, and this new trend for bloggers is only set to rise and rise.
E-commerce
Your e-commerce site is a place where your customers go in order to purchase your goods and your services, and the chances are that for a long time, your website was perfectly sufficient in allowing you to run your business. However, in today’s app-driven world, an e-commerce site without a mobile app is one that is likely to hit something of a brick wall in the future, as customers increasingly demand on-the-go access with a higher rate of usability and ease.

Having a custom app made for your e-commerce site has the potential to see your sales figures go through the roof. Why? Because today’s customers love the ease of use that e-commerce apps bring. The faster the pace of life becomes, the more we want to be able to flick through an online store’s goods or services while on the go. What’s more, a custom app tends to be more user-friendly than a traditional e-commerce website, meaning buyer’s interest can more rapidly be converted into a sale.
Apps also allow you to send reminders, push notifications, and updates to your customers far more easily than with traditional marketing techniques. If you’ve got a discount sale coming up, or you’re offering some kind of special promotion on your e-commerce store, you no longer have to worry about sending out mass email marketing messages you can achieve a much higher turnaround and ROI with a push notification.
On top of this, an app allows you to link your social media feeds, blogs, and physical store finders into one convenient place, meaning your customers can get everything they need to know quickly, efficiently, and in a highly satisfying manner.
Software Tools
There are a massive number of websites offering software tools out there on the internet. However, more and more web apps managers dealing with software tools are looking to have custom native apps made for the app stores, in order to give their site visitors a new way of using their services, based on quicker, more user-friendly solutions.
Native apps for software tools have proven to be highly successful over the past few years, as the sense of “on the go” utility has become more and more important. As our smart devices and phones have gradually emulated – and in some cases, replaced – our laptop computers, people looking to catch up on work, read documents, or anything else while on the go need more and more software tools apps in order to achieve a wider range of tasks.
Apps for software tools give your users the freedom to make use of your services no matter where they are, and in a world where working remotely is gradually becoming more of a norm, this is likely to be a major feature of the app market in the coming years.
Your Website Taken to New Heights with a Custom App
As we’ve seen, there are many key areas in which apps are becoming more and more vital, and mobile device users are increasingly relying on apps to improve the quality of their lives, their shopping experiences, the way that they work, and the way that they stay on top of the news and events which matter most to them.

By getting a custom app as an extension to your website, you’re inviting a world of new opportunities into your business or your site’s primary purpose. You’ll free your visitors from their desks, and allow them to benefit from what you do best no matter where they might be, and that can only be a positive thing.
There is an important moment we would like to add to this article – Messapps is recognized as a top New York Mobile App Development Company on DesignRush!
Why Developers Need a VPN

Whether they build their own or purchase an existing VPN server, this cybersecurity measure is essential for developers. Customers will feel safer, and you can rest assured that data and intellectual property is protected.
How Does a VPN Work?
A Virtual Private Network, otherwise known as a VPN, works by routing your device through a third-party server, not your internet service provider (ISP). This means that as your data is transmitted through the internet, it all comes from the VPN, instead of your own computer.
In layman’s terms, this keeps your computer or mobile device safe from hackers and malware and protects your data and communication. When you use one, your transactions will remain anonymous.
Advantage of Using VPN Service for App Developers
With this added security, developers can ensure that they’re protecting client data and intellectual property. They can also research competitors and test websites from other countries. VPNs help to prevent data leaks and improve overall online privacy.
Data breaches are unfortunate, but they happen because of poor cybersecurity practices. Sophisticated hackers may be able to access sensitive client data, which can be detrimental for app developers.
A VPN encrypts all of the data that comes from the app developer’s computer and device, which will render data useless for hackers. This sort of encryption is similar to what banks use to protect customers.
Most app developers have custom designs, apps, and other work that’s valuable intellectual property. Some people may want to steal that information.
That said when you’re a developer, you need to research competitors to optimize your product. If you want to do this discreetly, you should use a VPN. It’ll especially come in handy when you need to test websites or web applications from other countries.
What Is a Good VPN for App Designers and Developers
There are many VPN solutions that you can find, but not all are ideal for developers. If you need to put a VPN to work, you should pay attention to a few characteristics. On the plus side, you can sign up for trials to test them out.
You want to find a VPN that has a fast connection, unlimited data and devices, a broad server network, and a kill switch. A slow connection and a low amount of data will be frustrating.
Some services that offer reliable security, speed, and efficacy are:
NordVPN
ProtonVPN
SurfShark
Express VPN
These networks have good server coverage, a no-logs policy, and fast and secure protocols. Before you sign up for a service, it’s best to check out popular VPN reviews. This way, you can make an informed decision.
Build Your Own VPN or Buy?
If you’re a developer, you’re probably wondering if you can set up your own VPN server. While this may sound like a daunting task, it’s not as hard as it may seem.
By building your virtual private network, you’ll be in charge of your own data. Instead of relying on a third party to protect your private information, DIY may be a better option. It may also be a good route if you want a local network for your company, If you set up your own server, you won’t be able to unblock web content from around the world. Your access to global competitors will be limited, compared to if you buy a VPN.
You’ll also have to deal with the hassle of having to tailor your server to all devices. By buying one, you know you’ll experience a decent UI and quick connections.
Importance of Security and Privacy for App Development
Security and privacy are essential to app development. The industry is one that depends on these characteristics. If an app doesn’t include these protections, it can be detrimental to cash flow and customer retention.
Why Apps Get Rejected
The App Store is every iOS developer’s best friend until your app is rejected, and then it quickly becomes your enemy. Ensuring your app will be accepted by the App Store review process before submission is essential for every app developer. A rejected app can not only be a bad finish to a smooth development process but it can also cause unnecessary delays. Apple clearly outlines in its App Store Review Guidelines a total of twenty eight areas for consideration to ensure your app is accepted and not rejected.
For developers new to iOS or unfamiliar with the App Store Review Guidelines, this will provide an introduction to common reasons for rejection and how to ensure your app is accepted. The key areas every app is reviewed on are:
The user interface (UI)
The user experience (UX)
All the application features
The functionality of the app
The reasons for an app’s rejection are varying and represented across the four key areas listed above, however the following detailed reasons are the most common culprits.
More information needed

According to Apple, the most common reason for rejection, accounting for 14%, was “more information needed”. This occurs when an app is submitted to the App Store for review and the developer does not provide enough information or materials for the app to be tested by the App Store review team. For instance, not providing any additionally needed hardware that pairs with the app like an accessory will result in a failed submission. Additionally, if the app requires a special environment, it is necessary to send a video demo showing the app’s functionality in this unique environment. The App Store team will not seek out a beautiful mountain range to test your panorama landscape app, it’s your role as a developer to show them your app in action!
Exhibit bugs

An astonishing 8% of apps are rejected because they still “exhibit bugs”. These problems must be addressed, tested, and solved before you submit your app to the App Store. Any issues related to long load times or crashes will be grounds for rejection. It is important that you extensively test every feature and each screen in a comprehensive manner amongst your dedicated team of developers. An effective method for testing any bugs is also through a beta version released to a limited audience. These users/testers can either be friends and family of the client or ideally potential early adopters of the app.
Not complying with Apple’s Developer Program License Agreement

Developer’s failing to comply with Apple’s ‘Developer Program License Agreement’ account for 6% of total app rejections. This agreement is a legal document between the developer and Apple with the purpose of detailing the allowable channels of distribution, which are outlined as: “ (1) through the App Store, if selected by Apple, (2) through the VPP/B2B Program Site, if selected by Apple, (3) on a limited basis for use on Registered Devices (as defined below), and (4) for beta testing through Apple’s TestFlight Program.”
Poor UI

Also accounting for 6% of rejections is an inability to meet Guideline 10.6 in the UI section outlined in the App Store Review Guidelines. The guideline says, “If your user interface is complex or less than very good, it may be rejected”. This is a challenging reason for rejection because developers are unsure exactly what needs to be fixed or changed. Developer’s first test should be ensuring their app’s UI reflects Apple’s resource on ‘Designing Great Apps’, which it says allows you to, “build the polished, engaging, and intuitive apps that Apple customers expect”. Additionally, Apple clearly outlines the user interface specifications in their iOS Human Interface Guidelines to ensure consistency and ease of use.
Metadata issues

Lastly, 5% of apps are rejected for not complying with Guideline 3.3 under the ‘Metadata’ section. The guideline says, “Apps with names, descriptions, screenshots, or previews not relevant to the content and functionality of the App will be rejected”. This can take the form of misleading information or inconsistencies between the description and the functionality of the app.
Other reasons

Importantly, in total 42% of apps are rejected for what Apple described as “Other Reasons”, each reason accounting for less than 2% of that total. While there are some recurring reasons that apps are rejected, the vast majority of rejections are from unique reasons often specific to that app or that developer. 10 of the most popular additional reasons for rejection are outlined below:
Use of the word “beta”, “test” or “demo” , indicating an unfinished app.
If the .ipa file for app submission is larger than 4GB.
Mentioning or advertising rival platforms such as Windows or Android. It doesn’t have to be a direct advertisement, but be careful with app icons too.
Misuse of trademarks or logos, especially Apple’s.
Linking to outside payment schemes, must instead be done through the user’s In-App Purchase (IAP), more information here.
Saving your app’s data to the user’s iCloud rather than locally, the iOS Data Storage Guidelines helps developers ensure their app’s data is saved in the right place and efficiently.
Repeating an already saturated function in the App Store but apps that are too niche and serving an extremely limited audience can also be rejected.
Absence of privacy policy.
Using of harsh language.
Privacy violation, such as sharing users’ names, photos, etc.
Why an App Is Crucial for E-Commerce Business and How to Promote It in the Right Way

In the following lines, we will talk about the significance of mobile applications for companies or businesses, mainly due to the boom of smart mobile devices and how users reach the network to execute purchases.
Mobile applications are already an indispensable element for every effective online marketing strategy. Users have changed our consumption habits. The smartphone is the device through which we access the Internet the most. That has influenced the creation and development of various mobile applications created by business owners to ensure their market position.
For any company, it is essential to define a strategy and digital identity, which goes through having a presence on the Internet through a web page and opening up to the virtual world with social networks. However, this is not enough.
Here at Play Media we think that companies have to adapt to the present and obvious future of eCommerce nature in order to maintain the formidable market position and invest in the development of a custom mobile application for their business.
With that being said, it’s clear that mobile marketing has become one of the most important marketing strategies and everlasting members of business investments.
A Mobile Application Is Essential for an Effective Market Presence

It would be very difficult for any of us to imagine one day without the mobile phone. From that conclusion the important question for all business owners arises: Do you think that it is good for your brand to be present on someone’s smartphone 24/7?
Undoubtedly, some mobile applications have become indispensable in our lives. We use apps for everything that has to do with the work environment and numerous applications are integrated so deeply in business processes that it is unimaginable to think about finishing tasks without them. Whether you are an owner of a small or large company, this interest or behavior that users have shouldn’t go unnoticed by your brand. In short, having a personalized mobile application and being present on the user’s smartphone means occupying a privileged place. Experience from successful business models has shown us that mobile apps have become a great support for customer care and an indispensable tool, both for the relationship and contact with employees and customers, as well as for their commercial and business development.
Every contemporary company bets and invests in the development of a mobile application since they only present an added value and make a big difference in a great battle with the competition.
Direct Contact with Customers
Having your mobile application allows you to stay in touch with your employees and customers anytime, anywhere. In this way, it ensures you effective, safe and fast communication. For employees, it is a way to manage and organize time better, which means both cost savings, collaboration, and greater productivity.
Still, the situation is simply not the same when we talk about potential customers. Having direct and personal interaction with them positions you in a point of their trust and interests. This means that not only will you need to meet their requirements or solve problems, but you can open or access new markets and potential customers. Having the opportunity of examining and observing products or services clearly, quickly and easily influences the purchase decision like anything else. The custom mobile application is available for the instant execution of the customer’s desires and that is exactly what is the most beneficial fact about them. Users prefer to access your companies services through a mobile application (simply by touching a few icons) that will take them directly to the services or products for which they are interested without opening a browser, writing web addresses or using search engines.
It requires less time and effort, and next to the low price that is exactly what every customer wants the most regardless of the type of business.
It Influences the Minds of Customers
It is an advertising tool above all. The image of your company will be visible at all times with the icon that identifies you. In this way, you can influence the minds of consumers, as you remind the user of your existence, both when using the mobile application and when performing other actions in the terminal.
A mobile application improves the status of your business. It allows you to be always updated and at the moment. Moreover, it’s becoming the most effective tool through which you can offer users a bonus on the products, services, special discounts or present reward and loyalty programs for faithful users.
Customize Your Brand
The mobile app effectively enhances the expansion of your business. For this, your application must be intuitive and practical as well as manageable and above all accessible to consumers. It’s about creating a mobile marketing strategy based on the type of business you manage.
It also presents an easy way to customize your brand and business image. You can establish how and what is the best way to interact with your customers. Figuring out the most successful form of a business mobile app is a harder challenge then it maybe seems. You will need to slowly go over numerous facts before figuring out that definite questions and answers that you need to show off the customers daily. Think of the ultimate goal that must translate into purchases and satisfaction. In addition, you can obtain real data about your situation and your target audience.
With your mobile application, you can create specific strategies for consumers. This means that you can get hold of user data with their permission to later send much more personalized offers and notes.
Improve Positioning
Of course, it’s clear by now that changes and technological advances go hand in hand, so your business or business mobile application must always be up to date. Not only in content but in code and development. You must adapt the app to the latest versions of the operating systems, as well as take into account suggestions, correct errors, review efficiency and improve usability for our customers and users.
Finally, having a mobile app for your business will improve SEO positioning, since the presence in mobile application stores, such as App Store, Google Play and Windows Phone Store, creates an increase in the number of organic searches from mobile phones.
In Conclusion
Users and consumers use mobile devices to access the Internet and make purchases more than ever. Keep in mind that mobile marketing and investment in the development of mobile applications for businesses or businesses are now a reality.
If you manage marketing within your company, you shouldn’t ignore the investment in the development of the mobile application as it will prove to be an effective corporate strategy for the development of your business.
PENETRATION TESTING
Penetration testing, sometimes known as "white hat hacking" or "ethical hacking", is the process of permitting security experts to attack your network and/or infrastructure in the same way that a hostile hacker would.

No one is immune from the risk of being a target of cybercrime, not major organizations, small businesses, government agencies, or even presidential candidates, as demonstrated by the daily news stories about security problems.
A proactive company can save money and brand reputation by testing its security before someone else does. Moreover, there are obvious advantages to having paid professionals penetrate your network as opposed to external attackers:
Paid professionals will not leave ransomware on your sensitive file server
Paid professionals will assist you in remediating identified vulnerabilities
Paid professionals will not publish any captured data on the Internet
Paid professionals can stop, or pause, the engagement if it is impacting critical assets
Different levels of penetration tests are offered by many security companies. A vulnerability scan or vulnerability assessment is typically the first step. To find known vulnerabilities in services and hosts, experts will use automated tools and scripts that undertake a variety of enumeration tasks. This kind of test is typically quick and reasonably priced, but it can only find vulnerabilities that fit well-established patterns.
A focused penetration test, such as one conducted on a network or web application, is the next stage. This type of testing has limitations according to the engagement's breadth even if it is more thorough and rigorous than a scan.
The final step is what is referred to as a "Red Team Penetration Test" at the highest level. With Red Team testing, the entire scope of the engagement includes every aspect of the business, and the testing process can go for several months.
It is a security outrage that more businesses do not implement all of these testing options into their security programs. Penetration testing should preferably be carried out annually, or at the very least semi-annually, given that corporate environments change frequently and new vulnerabilities and exploits are discovered daily.
Additionally, organizations should conduct routine vulnerability scans and incorporate the findings into a vulnerability management program to guarantee that critical vulnerabilities are fixed as soon as possible.
The first step in preventing security issues is determining where a company's security is lacking. A business can locate and secure such weak places and maintain its advantage over hackers by regularly conducting penetration tests and implementing a vulnerability management program, which includes regular scanning and remediation operations.
Targeted penetration testing should be carried out on security-sensitive assets, such as any externally facing service or host, business-critical assets like databases or mail servers, and even workers, if the expense of a Red Team exercise is prohibitive.
What is JVM (Java Virtual Machine): Architecture Explained
What is JVM?
Java Virtual Machine (JVM) is an engine that provides a runtime environment to drive the Java Code or applications. It converts Java bytecode into machines language. JVM is a part of Java Runtime Environment (JRE). In other programming languages, the compiler produces machine code for a particular system. However, Java compiler produces code for a Virtual Machine known as Java Virtual Machine.
How JVM Works?
First, Java code is compiled into bytecode. This bytecode gets interpreted on different machines Between the host system and Java source, Bytecode is an intermediary language.
JVM in Java is responsible for allocating memory space.

JVM Architecture
Now in this JVM tutorial, let’s understand the Architecture of JVM. JVM architecture in Java contains classloader, memory area, execution engine etc.
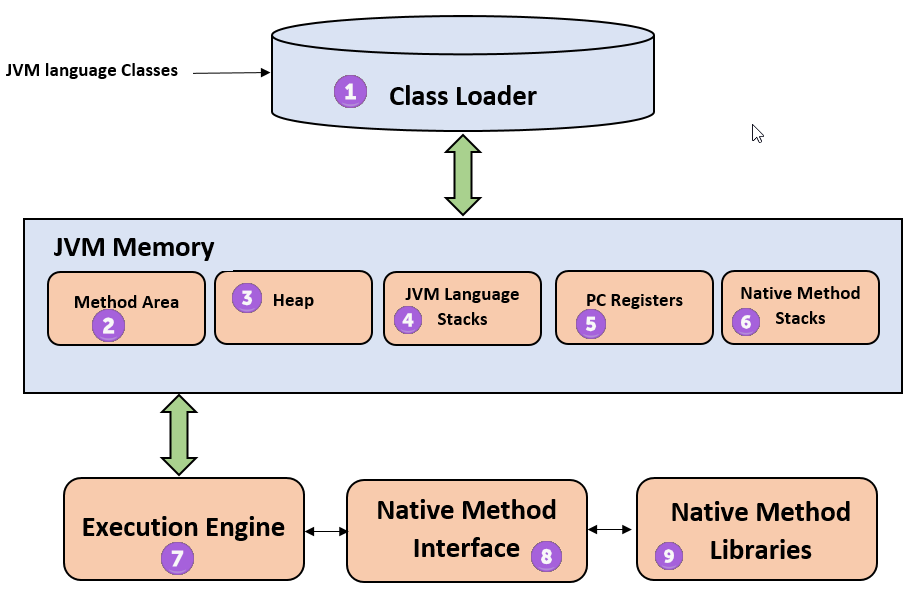
ClassLoader
The class loader is a subsystem used for loading class files. It performs three major functions viz. Loading, Linking, and Initialization.
Method Area
JVM Method Area stores class structures like metadata, the constant runtime pool, and the code for methods.
Heap
All the Objects, their related instance variables, and arrays are stored in the heap. This memory is common and shared across multiple threads.
JVM language Stacks
Java language Stacks stores local variables, and its partial results. Each thread has its own JVM stack, created simultaneously as the thread is created. A new frame is created whenever a method is invoked, and it is deleted when the method invocation process is complete.
PC Registers
PC register stores the address of the Java virtual machine instruction which is currently executing. In Java, each thread has its separate PC register.
Native Method Stacks
Native method stacks hold the instruction of native code depending on the native library. It is written in another language instead of Java.
Execution Engine
It is a type of software used to test hardware, software, or complete systems. The test execution engine never carries any information about the tested product.
Native Method interface
The Native Method Interface is a programming framework. It allows Java code which is running in a JVM to call by libraries and native applications.
Native Method Libraries
Native Libraries is a collection of the Native Libraries (C, C++) which are needed by the Execution Engine.
Software Code Compilation & Execution process
In order to write and execute a software program, you need the following
Editor –
To type your program into, a notepad could be used for this
Compiler –
To convert your high language program into native machine code
Linker –
To combine different program files reference in your main program together.
Loader –
To load the files from your secondary storage device like Hard Disk, Flash Drive, CD into RAM for execution. The loading is automatically done when you execute your code.
Execution –
Actual execution of the code which is handled by your OS & processor. With this background, refer to the following video & learn the JVM internal working and architecture of JVM (Java Virtual Machine).
code Compilation and Execution process
To understand the Java compiling process in Java. Let’s first take a quick look at the compiling and linking process in C.
Suppose in the main, you have called two function f1 and f2. The main function is stored in file a1.c.
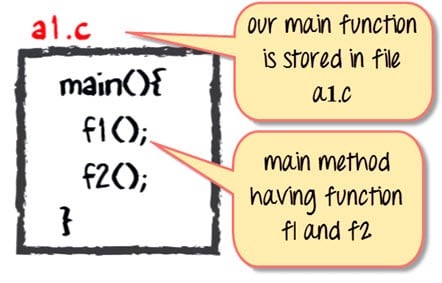


All these files, i.e., a1.c, a2.c, and a3.c, are fed to the compiler. The output is the corresponding object files which are the machine code.
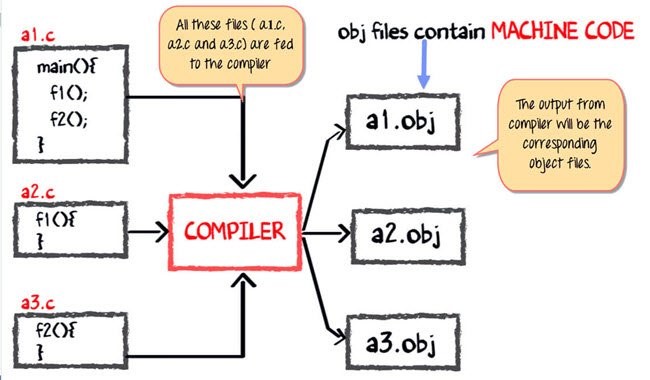
The next step is integrating all these object files into a single .exe file with the help of a linker. The linker will club all these files together and produce the .exe file.
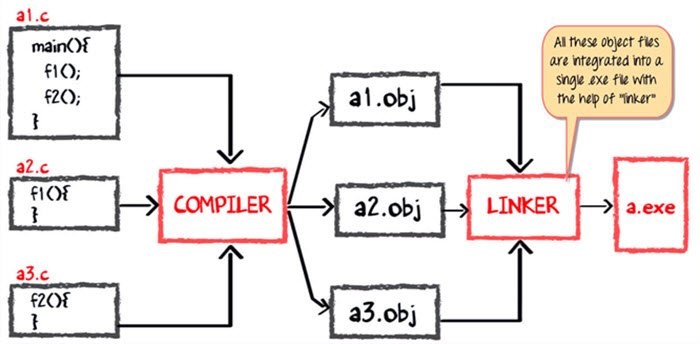
During program run, a loader program will load a.exe into the RAM for the execution.
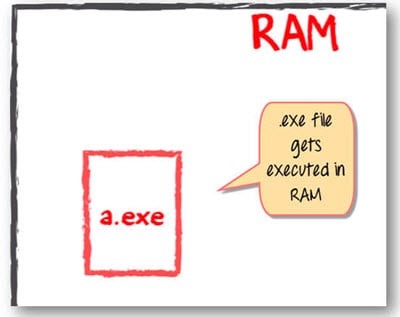
Java code Compilation and Execution in Java VM
Now in this JVM tutorial, let’s look at the process for JAVA. In your main, you have two methods f1 and f2.
The main method is stored in file a1.java
f1 is stored in a file as a2.java
f2 is stored in a file as a3.java
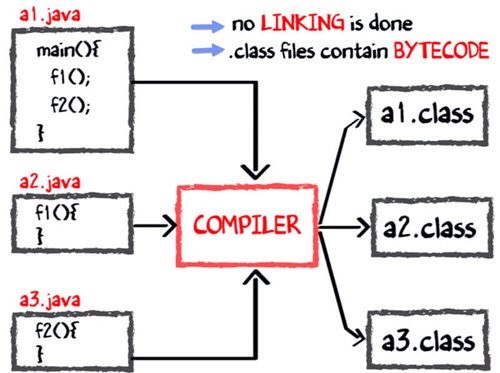
The compiler will compile the three files and produce 3 corresponding .class files which consist of BYTE code. Unlike C, no linking is done.
The Java VM or Java Virtual Machine resides on the RAM. During execution, using the class loader the class files are brought on the RAM. The BYTE code is verified for any security breaches.
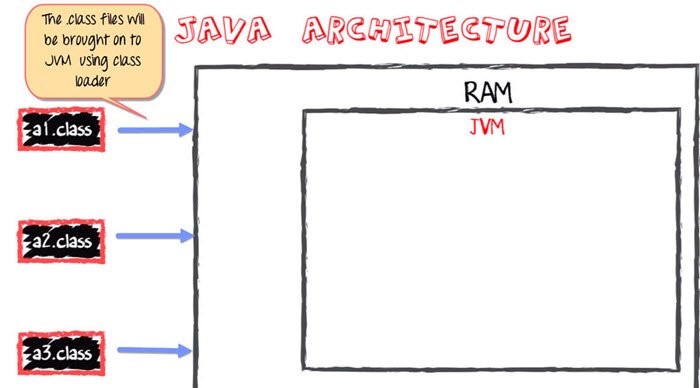
Next, the execution engine will convert the Bytecode into Native machine code. This is just in time compiling. It is one of the main reasons why Java is comparatively slow.
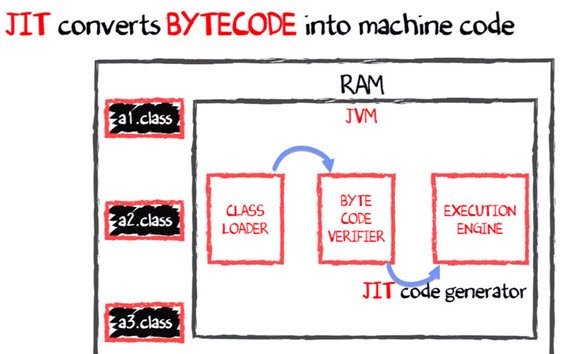
NOTE:JIT or Just-in-time compiler is a part of the Java Virtual Machine (JVM). It interprets part of the Byte Code that has similar functionality at the same time.
Why is Java both Interpreted and Compiled Language?
Programming languages are classified as
Higher Level Language Ex. C++, Java
Middle-Level Languages Ex. C
Low-Level Language Ex Assembly
Finally, the lowest level is Machine Language.
A compiler is a program which converts a program from one level of language to another. Example conversion of C++ program into machine code.
The java compiler converts high-level java code into bytecode (which is also a type of machine code).
An interpreter is a program which converts a program at one level to another programming language at the same level. Example conversion of Java program into C++
In Java, the Just in Time Code generator converts the bytecode into the native machine code which is at the same programming levels.
Hence, Java is both compiled as well as interpreted language.
Why is Java slow?
The two main reasons behind the slowness of Java are
Dynamic Linking:
Unlike C, linking is done at run-time, every time the program is run in Java.
Run-time Interpreter:
The conversion of byte code into native machine code is done at run-time in Java which further slows down the speed However, the latest version of Java has addressed the performance bottlenecks to a great extent.
Summary:
The full form of JVM is Java Virtual Machine. JVM in Java is the engine that drives the Java Code. It converts Java bytecode into machines language.
JVM architecture in Java contains classloader, memory area, execution engine etc.
In JVM, Java code is compiled to bytecode. This bytecode gets interpreted on different machines
JIT stands for Just-in-time compiler. JIT is part of the Java Virtual Machine (JVM). It is used to speed up the execution time
In comparison to other compiler machines, JVM in Java may be slow in execution.
What is human capital management (HCM)?
Human capital management (HCM) is the process of hiring the right people, managing workforces effectively and optimizing productivity. It has evolved from a mostly administrative function to a critical enabler of business value.
What are the elements of human capital management?
Human capital management is made up of a series of administrative and strategic applications that include:
Recruitment
Onboarding
Payroll
Time and attendance
Benefits and retirement services
Talent management
Training
Reporting and analytics
Compliance
Benefits of human capital management
Human capital management can improve workforce productivity and help HR managers hire, engage, and retain employees. In an integrated HCM solution where HR services are unified, you may also be able to eliminate costly redundancies and synchronize data into a trusted source of decision-making
Human capital management (HCM) challenges
If you’re like most business owners, you might be concerned about overcoming today’s obstacles and anticipating tomorrow’s needs. Here are some common challenges that human capital management can help you address:
Talent strategy
There are many opportunities throughout the employee lifecycle to engage your people and align their performance with your business goals.
User experience
Technology that’s intuitive and easy to use can increase workforce productivity and improve morale.
Big data
From optimized schedules to competitive compensation packages, data can power better decisions.
Administrative burdens
Tools and resources that save time allow you to focus more attention on business strategy.
Systems integration
Integrated systems may save you time, resources and money. They also help maintain visibility across borders.
Compliance
Sound data and proactive approaches to changing regulations can help you maintain compliance.
Data security and privacy
Gold-standard protections and assured response measures are critical to data security.
Why human capital management (HCM) is important
Human capital management strategy is critical to your success because payroll and HR cross every functional area of your organization and affect every employee. Evolving market forces also make HCM increasingly important. These trends include:
Changing workforce demographics and the ability to get work done in remote environments
An expanded availability of contract-based and freelance employees
Increasing compliance regulations in both the United States and other countries
Tightening labour markets and the need for specialized skills
The prevalence of team-based work structures
An explosion of available workforce data
How human capital management technology can help your organization HCM technology presents an opportunity to deliver strategic workforce optimization for your business. It can help you:
Make data-driven decisions
Predictive analytics and forecasting may lead to better decisions about compensation packages, work schedules and more.
Encourage business growth
Cloud-based solutions that are adaptable and expandable allow for the management of more employees, transactions and data.
Increase profitability
Automated workflows that replace manual tasks may reduce direct labor costs and administrative expenses.
Optimize talent strategies
Chatbot-assisted applicant screenings, multimedia-based training and mobile self-service options are just a few of the ways technology can improve how you attract and retain talent.
Secure data
Multi-layered protection and public-facing security alerts can help prevent data breaches and fraud.
Improve regulatory compliance
Global and local monitoring capabilities may allow you to stay current with changing regulations.
What is human capital management software?
HCM software is an aggregate of multiple HR systems that use mobile and cloud-based technology to process data, run reports and create a smooth end-user experience. There are generally two types of service models – best of breed and unified.
With a best of breed approach, you purchase the applications you need from different vendors. This gives you greater depth of functionality, but also more complexity because you’ll have multiple vendors, contracts and user experiences. A unified solution, on the other hand, means working with just one vendor for all your HCM needs. Although this model may be simpler to maintain, the features are often not as robust as best of breed systems.
How to choose a human capital management system
Choosing the right HCM partner for your organization is sometimes a daunting task, but it can be achieved with a focused, organized and strategic buying process.
Build a requirements checklist that outlines the business goals dependent on HCM and how not achieving them will impact your organization. This can help you evaluate HCM solutions that best fit your needs.
Create a plan of action that includes project scope, necessary resources, budget and team leaders.
Identify the internal stakeholders who will be most affected by the project and keep them informed at all times.
Familiarize yourself with your organization’s approval process for transformative projects and outsourced solutions.
Secure stakeholder approval by presenting the solution and highlighting the business, financial and end user benefits. An HCM business case template can help you make your point effectively.
Human capital management FAQs
See what other HR professionals are asking about human capital management:
How do you build human capital?
Building human capital requires that you invest in your workforce. You can do this by:
Hiring talented individuals for open positions
Monitoring their performance regularly
Enhancing their skills with on-going training and education
Retaining them with competitive pay, benefits and other incentives
What's the difference between HCM and HRMS?
Although similar in many aspects, the difference between human capital management and human resources management systems is the size and breadth of their service packages. HRMS often provide core HR functions for small to mid-sized businesses, while HCM offers comprehensive applications across the entire employee lifecycle and can accommodate enterprise-level organizations. Detailed analytics and reporting are also typically included with HCM.
Does HCM include payroll?
Most fully-integrated HCM solutions automate payroll, which saves time and reduces error-prone data entry. Some also can accommodate flexible pay options, including early access to wages, pay cards and choice of pay frequency.
What are the functions of human capital management?
HCM covers the basic functions of HR – payroll, time and attendance, and benefits administration – as well as aspects of workforce management, such as employee training, engagement and retention, and compliance.
What are the objectives of human capital management?
The objectives of HCM are to enable strategic growth, empower employees and connect people and workflows in ways that support daily operations. To help achieve these goals, some solutions provide experiences that are personalized by function, location, team and individual.
KUBERNETES API VERSION
When we create Kubernetes resource manifests, one of the first important things that we need to specify for the resource is the apiVersion. For many of the common resources, you might be able to “guess” accurately, but it’s a good skill to be able to figure this out in your cluster. The format of the apiVersion is api_group/version.
An object definition in Kubernetes requires a apiVersion field. When Kubernetes has a release that updates what is available for you to use—changes something in its API—a new apiVersion is created.
| Kind | Version |
|---|---|
| Component Status | V1 |
| Endpoints | V1 |
| Event | V1 |
| LimitRange | V1 |
| Namespace | V1 |
| Node | V1 |
| PersistentVolumeClaim | V1 |
| PersistentVolume | V1 |
| Pod | V1 |
| PodTemplate | V1 |
| ReplicationController | V1 |
| ResourceQuota | V1 |
| Secret | V1 |
| ServiceAccount | V1 |
| Service | V1 |
| ControllerRevision | apps/v1 |
| StatefulSet | apps/v1 |
| CronJob | batch/v1beta1 |
| DaemonSet | extensions/v1beta1 |
| Deployment | extensions/v1beta1 |
| HorizontalPodAutoscaler | autoscaling/v1 |
| Ingress | extensions/v1beta1 |
| Job | batch/v1 |
| NetworkPolicy | extensions/v1beta1 |
| CertificateSigningRequest | certificates.k8s.io/v1beta1 |
| ClusterRole | rbac.authorization.k8s.io/v1 |
| ClusterRoleBinding | rbac.authorization.k8s.io/v1 |
| Role | rbac.authorization.k8s.io/v1 |
| RoleBinding | rbac.authorization.k8s.io/v1 |
| ReplicaSet | extensions/v1beta1 |
| PodSecurityPolicy | extensions/v1beta1 |
| PodDisruptionBudget | policy/v1beta1 |
What does each apiVersion mean?
alpha
API versions with ‘alpha’ in their name are early candidates for new functionality coming into Kubernetes. This is not stable for use. These may contain bugs.
beta
‘beta’ in the API version name means that testing has progressed past alpha level and that the feature will eventually be included in Kubernetes. Although the way it works might change, and the way objects are defined may change completely, the feature itself is highly likely to make it into Kubernetes in some form.
stable
They are safe to use. These do not contain ‘alpha’ or ‘beta’ in their name.
v1
v1 version was the first stable version release of the Kubernetes API. It contains many core objects in Kubernetes.
apps/v1
apps is the most common API group in Kubernetes, with many core objects. It includes various functions like running applications on Kubernetes, like Deployments, RollingUpdates, and ReplicaSets.
autoscaling/v1
This API version autoscaling/v1 allows pods to be autoscaled based on different resource usage metrics. Kubernetes autoscaling helps optimize resource usage and costs by automatically scaling a cluster up and down. Autoscaling is totally dependent on demand.
This stable version includes support for only CPU scaling, but future alpha and beta versions will allow you to scale based on memory usage and custom metrics.
batch/v1
The batch API group contains objects related to batch processing and job-like tasks. This apiVersion is the first stable release of these API objects.
batch/v1beta1
A beta version release with new functionality for batch objects in Kubernetes, including CronJobs that like you can set a specific time and the job will execute at that time or periodicity.
certificates.k8s.io/v1beta1
This API version plays an important role for validate network certificates for secure communication in your cluster.
extensions/v1beta1
This version of the API includes many new and commonly used features of Kubernetes. Deployments, DaemonSets, ReplicaSets, and Ingresses all received significant changes in this release. Using extensions/v1beta1 is becoming deprecated—try to use the specific API group where possible, depending on your Kubernetes cluster version.
policy/v1beta1
Basically, this apiVersion is used to add the new rules around pod security and the ability to set a pod disruption budget.
rbac.authorization.k8s.io/v1
This apiVersion is used for access control. It plays an important role to secure our cluster. It includes more functionality for Kubernetes role-based access control.
Mobile App Beta Testing Breaking Down the Basics
Wise developers seldom neglect to test their app’s quality both before and after launch day. Here’s what you’ll need to know.
For Android
In 2013, Google announced both open and closed beta support for all apps via Google’s Developer Console services. If you’re testing an app to discern the stress levels that your servers can handle, an open beta would be ideal. Why? Open betas allow any and all users to find and access your beta – no invite required. Of course, thinking ahead, Google set optional user restrictions so that developers can limit the allowed capacity of their beta tests, preventing floods of users from bursting over a server’s limits. Conversely, google permits developers to invite up to 40,000 Google+ users into their closed betas – only those users with granted permission can find and access the app’s page on the Play Store.
For iOS
The following year, Apple acquired and released Burstly’s beta testing services to the public. Newly named, TestFlight acts as a way for iOS development teams to test their apps through an invitation-only closed (with a modest cap of 25 internal participants per app) and open beta service (with a more generous cap of 200 external users per app). To perform a closed beta, you’ll need to acquire trustworthy testers first. We suggest that our clients:
Post on forums and blogs whose audience might find your app appealing
Ask friends and family through social media outlets for assistance
Pay for or inquire about services that specialize in aggregating competent testers
Interacting with professional-grade testers ensures that feedback will be both precise and constructive. Also, due to the tedious nature of assessment, it’s possible to burn out a small set of testers. If you’re having trouble finding newer and fresher candidates, one of the many benefits of beta testing services is their wealth of available testers. For any sort of testing, consistency in feedback is key, so having access to a bigger set of testers – such as those from an organization of professionals – is an invaluable asset to have while assessing an app.
Promoting your app’s beta through its landing page and requiring all interested testers to apply via signup forums
Use Google Docs or perhaps a dedicated launching page as a forum to identify:
The tester’s device
Their reasons for signing up or their interest in the app
Their emails that can be reached for when the launch date approaches
Signup forums act as a checkpoint of communication between the developer and potential testers, granting the opportunity to ask questions, inform them about feedback expectations, and to collect general user information before launch.
Other things to consider
Which of your app's features are the least compelling? Remember – the more cluttered the UI, the more likely you'll overlook and never encounter an error.
The time and resources that are delegated into testing should be proportional to the number of resources you've invested into your app. A single experience-shattering error will be enough to dissuade a sizable fraction of your user base from wrestling with your unresponsive app.
Gaming apps and difficulty testing: is your app intellectually stimulating on higher difficulties? Do testers feel a sense of fulfilment after completing difficult challenges? Are the easier levels too easy?
Design and Build Your Own Restful API with Swagger
Though APIs have been used for decades, they are turning into the Micro level to fit more frequent changes and decoupling requirements. In recent years, one thing that we have been seeing is a transition from monolithic applications to microservice oriented architecture. Out of several API designing and building tools, we would talk about one of the popular tools/frameworks, which is Swagger.
There are microservice oriented architecture advantages, such as the following:
The business problem was separated into a couple of domains and can be resolved by different teams, despite the technology being used to utilize the service.
Reduce the coupling among the business, each service can be deployed independently.
Isolate the resources of DB and computation. It is better for damage control and reduce the risk.
Swagger is the largest framework of API developer tools for the OpenAPI Specification(OAS). It is widely used in many organizations and teams. The tool sets include Swagger Editor, Swagger UI, Swagger Code Generator and Swagger Inspector. We will focus on Swagger Editor and Swagger UI in this post
OpenAPI
OpenAPI was originally from Swagger specification and now on GitHub. You can access this link to view the detailed specification: https://github.com/OAI/OpenAPI-Specification/blob/master/versions/2.0.md
It supports for both JSON and YAML format, and this specification introduces you with format, file structure, data type, schema and a bunch of parameters of Info, Path, Path Item (get, put, post, delete etc). By looking at the sample object and code, you should be able to quickly assemble the file format for your case.
Swagger Editor
Since it is an open source, you can download the whole project source code from github https://github.com/swagger-api/swagger-editor and do the build. It would require installing Node 6.0+ and npm 3.0+ on your machine.
Enter your swagger editor folder and run ‘npm start’
It will start up the service listening on port of 3001 and just enter http://localhost:3001/#
Now the editor is up and you can make your own API specification file. Actually, there is a sample created for you by default, which should be convenient for the user to tail or customize it. On the right panel you can instantly preview the service operation, resource path, description and body response.
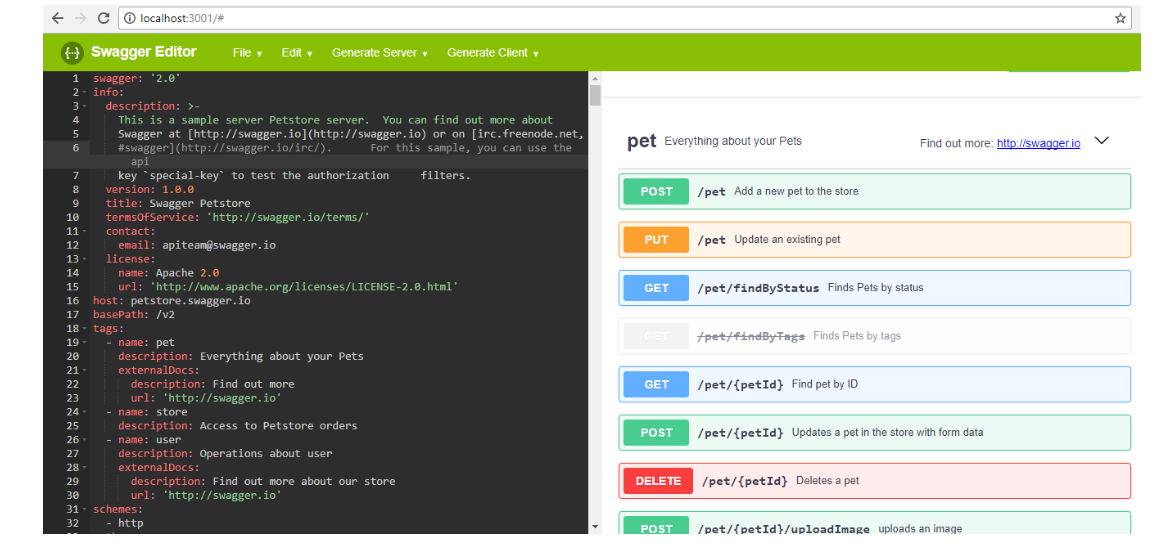
As the developer, you may care more about how to make use of this swagger specification in the real project. The editor can export this source file to more than 20 types of programming language like .net, java, go, scala etc.
The below picture shows the project structure for Spring Boot type, but need to note the dependency in the pom.xml.

Swagger Integration
If you are not going to use Swagger Editor, there is also the way to integrate with that, in the Java project you will still have to specify the dependency as above in your Maven file. And you will need to mention some annotation in your controller.
@Api is to narrate the description about what in general is the responsibility of the controller.
@ApiOperation is to Narrates the responsibility of the specific method.
@ApiParam Narrates the parameter the method is expecting and also tells whether it is mandatory or not. The following are part of the code snippet.
Difference between State and props in ReactJs
What is State?
The status of a react class component instance can be described as an object of a collection of observed features that control the component’s behavior. In other words, the component’s state is an entity with some details that can alter during the component’s lifetime.
This data is kept inside a component. This particular aspect is local or owned. The component itself uses the setStatus function to update the state.
The state is an updated structure that is used to contain and can modify data or information about the component over time. The state change may occur as a user activity or device event response. It decides the actions of the component and how it is to be done by the core of the React component.
As easily as possible, a state should be held. It is the local state or details of the part. Only in the component or by the component directly can it be accessed or changed.
Components of react have a built-in state object. The state object is where the property values belonging to the item are stored. The component is restored when the state object changes.
What are Props?
React is a library focused on components that separate the user interface into reusable little bits. These components have to transmit (send data to each other) in some cases, and the way to transmit data among components is through props.
“Props” is a special React keyword for proprietary purposes, used for data transmission from component to component.
But the key part of this is the transmission of data with props in a uniform flow. (Parent-to-child route) In addition, props data are read-only, meaning that parent data cannot be modified by child elements.
Difference between State and Props
React is an opensource JavaScript library that offers a visual overview of the JavaScript architecture for conventional MVC. React promises programmers a model in which substrates cannot directly influence enclosing components—data are downstream, data changes in HTML are efficiently modified, and the DOM is abstracted to boost performance using Virtual DOM.
How can we access data from the previous component if the data is just being flowed from component to component? The answer is props. React uses data transmission props that we need to transfer to various components.
The difference comes in which component the data is owned. State is owned locally and the component itself updates it. Props are owned and read only by a parent. Props can be changed only if an upstream shift is caused by a callback function passed on to the child.
A prop can be passed on to the child in the state of a parent. They apply to the same value but can only be updated by the parent variable.
How are props passed into the component?
We can pass props to any component by declaring HTML tag attributes.

We transfer a sampleProp in the above code snippet to the DemoComponent part. This prop has the ‘HelloProp’ value. See how we can access this advice now.
In the class components to which the props are transferred, we can access any props by calling propName
We can use the above syntax to access any prop from within a component class. The “this.props” is a type of total object that stores all props from an item. The propname, which is the propName, is the key.
Passing information from one component to other:
This is one of React’s coolest characteristics. We should make it possible for components to communicate. To understand this, we will look at two components Parent and Child. We will pass information to the Child component as advice from our parent component. We can offer a part as much advice as we want.
The content of a prop is not permitted to be changed. No matter what kind of component it is, nobody is allowed to change their advice, whether functional or class-based.
The difference comes in which component the data are owned. State is owned locally and the component itself updates it. Props are owned and read-only by a parent. Props can be changed only if an upstream shift is caused by a callback function passed on to the child.
A prop can be passed on to the child in the state of a parent. They apply to the same value but can only be updated by the parent variable.
How do you update a component’s state?
Although a react component can have an initial state, the actual power is in updating the state — the component should not be in either state if we don’t have to update the state. State is reserved only for data that changes our part and can be seen in the user interface.
We use this.setState() instead of changing the state directly using this.state (). This is a feature for all components that use state, and allows us to inform React that the state of the component has changed. This way the component knows that it can return because its status has changed and the user interface will probably change as well. It is very efficient to use a setter function like that.
React intentionally waits until all components in their event handlers call setState() before they start returning. This increases efficiency by preventing excessive re-renders.
You may also ask why React does not update this, however.
Two major reasons exist:
The consistency of props and the state is broken, which causes problems that are very difficult to debug.
This will make it difficult to introduce such new features.
React will load several setState() calls for performance into a single update.
Due to the asynchronous of this.props and this.state, you cannot depend on their values for the next state to be calculated.
To fix it, use a second setState() form, which accepts a function instead of an object. This function is the first argument for the previous state, and the props are the second argument when the update is applied
Is state changeable?
A state change takes place on the basis of the user input, which triggers an occurrence. React (with status) components are often made on the basis of state data. The initial knowledge is held by the State.
Thus when the state changes, React will be notified and the DOM will be re-rendered immediately; not the whole DOM but only the modified portion. This is one of the reasons for the fast reaction.
And how do you notify React? You thought: with setState ( ). The setState() method triggers the mechanism for rendering the modified components. React is notified, knows which part(s) to alter, and does so quickly without restoring the entire DOM.
Component types
Stateless component
Just props, no state. Besides the render() function, there’s not much going on and all its logic is about the props that they get. This makes it easy to track them (and test for that matter).
The stately component
state as well as props. These are also called state managers. They are responsible for communication between clients and their servers (XHR, Web sockets, etc.), data processing, and user events.
What happens when state changes?
React Components allow you to break the UI into separate, reusable components so that you can look into every single item on an isolated basis.
Components are conceptually like functions in JavaScript. They accept arbitrary inputs and return elements of react that describe what should be shown on the screen. If you have to allow the user to enter something or to alter the variables that the component is supported by, you would have to setState.
State allows React components in response to user behavior, network responses, and everything else to adjust their performance over time, without violating this rule. Class-defined components provide additional functionality. Local status is the only class component function available.
Can I use state in every component?
In the early days, only class components, and not functional components, were included. That’s why stateless components are known for their functional components. However, state can now be used in both class and functional components following the implementation of React Hooks. You can only use status in class components if your project does not use React Hooks.
The component State and Props share some common similarities
Props and states both provide details about the item, but they are used differently and must be kept separate.
Difference Between Oracle HCM Cloud and Oracle HRMS
HR support applications go by various names, including workforce management systems, HR information systems (HRISs), HR management systems (HRMSs), and human capital management (HCM) systems. In this article, we explore two HR support applications from Oracle: Oracle HCM Cloud and Oracle HRMS.
First, let’s have a look at each product’s features and functions, then we’ll look at the differences between them.
What is Oracle HCM Cloud?
The Oracle HCM cloud service is Oracle’s cloud application for human capital management. HCM systems, according to Oracle, transform “the traditional administrative functions of human resources (HR) departments…into opportunities to drive engagement, productivity, and business value.” Oracle Cloud HCM is a key component of the Oracle Fusion application suite and integrates with other Oracle cloud solutions.
The Oracle HCM Cloud modules include the following:
Human Resources, including core HR functions, benefits management, and strategic workforce planning
Talent Management, including recruiting, onboarding, compensation, career development, and succession planning
Workforce Management, including health and safety, absence management, and time and labour
Payroll, including country-specific payroll management solutions
HCM Analytics, including pre-built and customizable key performance indicators and dashboards, as well as collaboration tools
Oracle HCM Cloud also features the Oracle HCM Cloud app for employee self-service, which uses mobile responsive technology to provide a consistent experience across device types.
Oracle HRMS
Unlike the Oracle Fusion HCM Cloud product, Oracle HRMS is part of Oracle’s E-Business Suite and is intended as an on-premise solution. The Oracle HRMS modules include the following products:
Oracle Human Resources: Basic employee data management
Oracle Payroll: Payroll, tax withholding, and more
Oracle Self-Service Human Resources: Employee self-service interface
Oracle Performance Management: An application to support performance evaluations
Oracle iRecruitment: Talent recruiting tool
Oracle Time & Labor: Time recording application for hourly employees
Oracle Learning Management: Training event management and recordkeeping
Oracle Advanced Benefits: Benefits administration and enrolment
Oracle HRMS Intelligence: Data analysis and reporting
As you can see, there is a good deal of functional overlap between the two products. From a feature perspective, the only difference between these products is that Oracle Cloud HCM includes the self-service app to enhance the employee experience. So why would you choose one over the other?
The Choice
Both offerings have their unique advantages and approaches to HCM. Oracle Cloud, as the name suggests, is a software-a-service (SaaS) HCM solution that requires no local hardware installation or maintenance.
As an on-premise product, the Oracle HRMS maintenance is somewhat more complex, requiring coordination with local IT resources. An easy-to-follow Oracle HRMS implementation questionnaire makes the planning process easier.
From a usability perspective, both products are easy to learn. For Oracle HRMS training, in particular, there are numerous resources, including:
Oracle HRMS Functional Guide: Complete description of all Oracle HRMS functions
Oracle HRMS functional tutorials: User guides for individual modules and functions
Oracle HRMS workflow guides: Guides for setting up and using approval workflows
Oracle HRMS tutorials for beginners: “Getting started” tutorials for new users
Oracle HRMS online training: Online training resources for all aspects of Oracle HRMS
Oracle HCM Cloud has a similar set of learning resources. Other important considerations include:
Pricing:
It is difficult to derive an apples-to-apples pricing comparison of these products. Oracle HCM Cloud pricing is a subscription, whereas Oracle HRMS pricing involves licensing and maintenance. The price of each also depends on what modules are deployed. Typically, the total cost of ownership (TCO) of Oracle HCM Cloud is less than Oracle HRMS since the IT Department does not need to maintain and update servers, network and software.
Security
The security of HCM applications is critical because of the sensitivity of the personal information stored and accessed. Oracle HCM Cloud security is managed by Oracle, whereas security for Oracle HRMS is the customer’s responsibility.
Data Visualization with AWS QuickSight
QuickSight is Amazon’s tool for Data Analytics and is basically Amazon’s version of Tableau. This article will get you jump-started with AWS QuickSight.
Setting Up QuickSight
Head to the AWS homepage and open your AWS management console from the My Account section
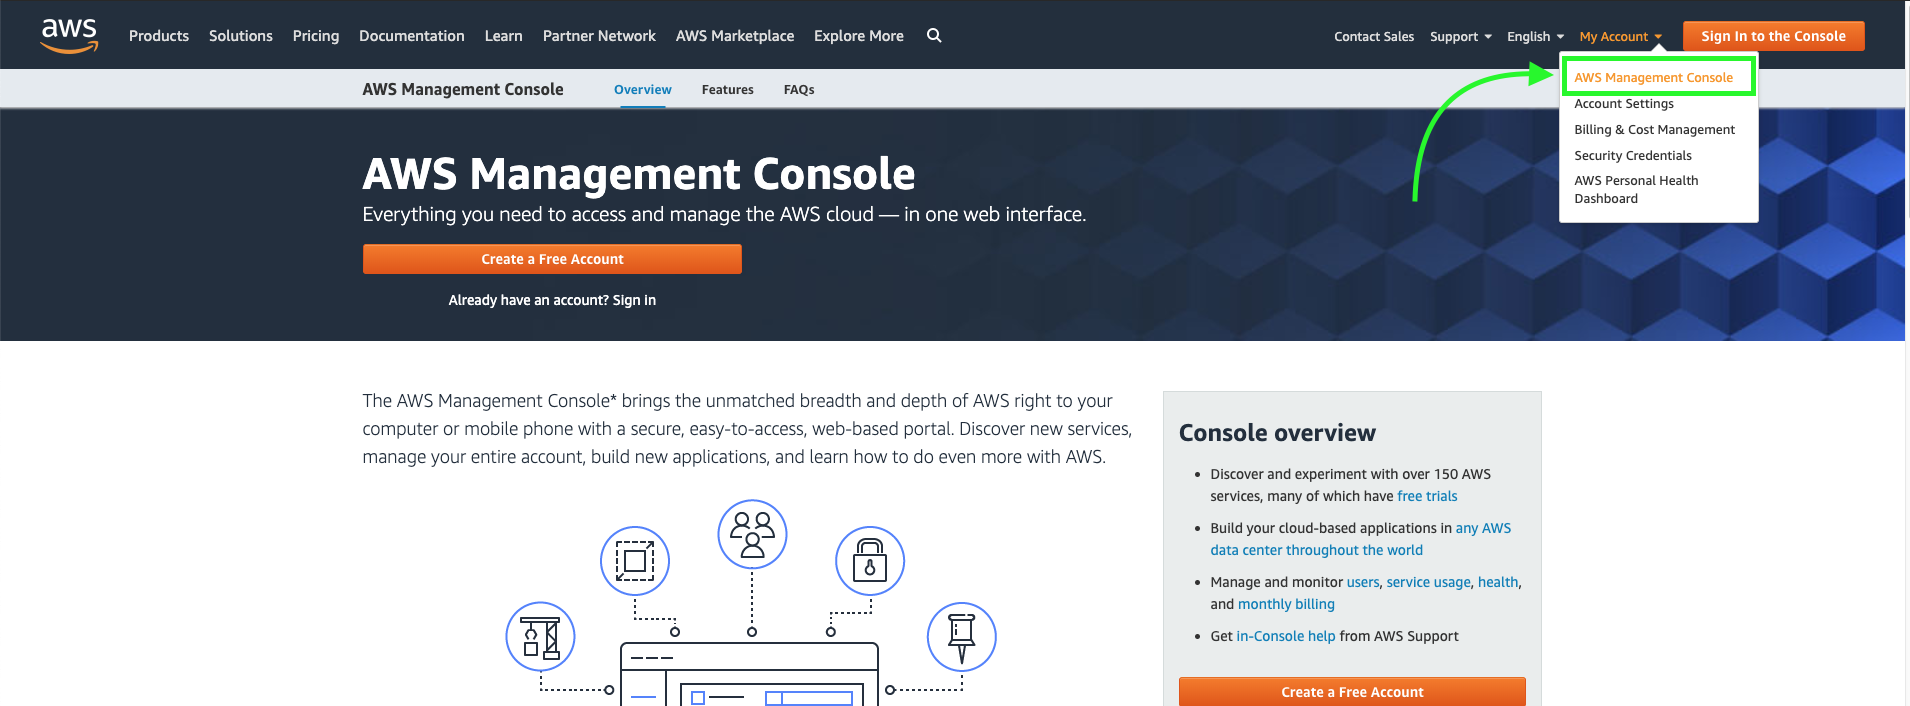
Sign in to your AWS account with your credentials
Go to AWS services to list down all available services. Select QuickSight from the Analytics Section
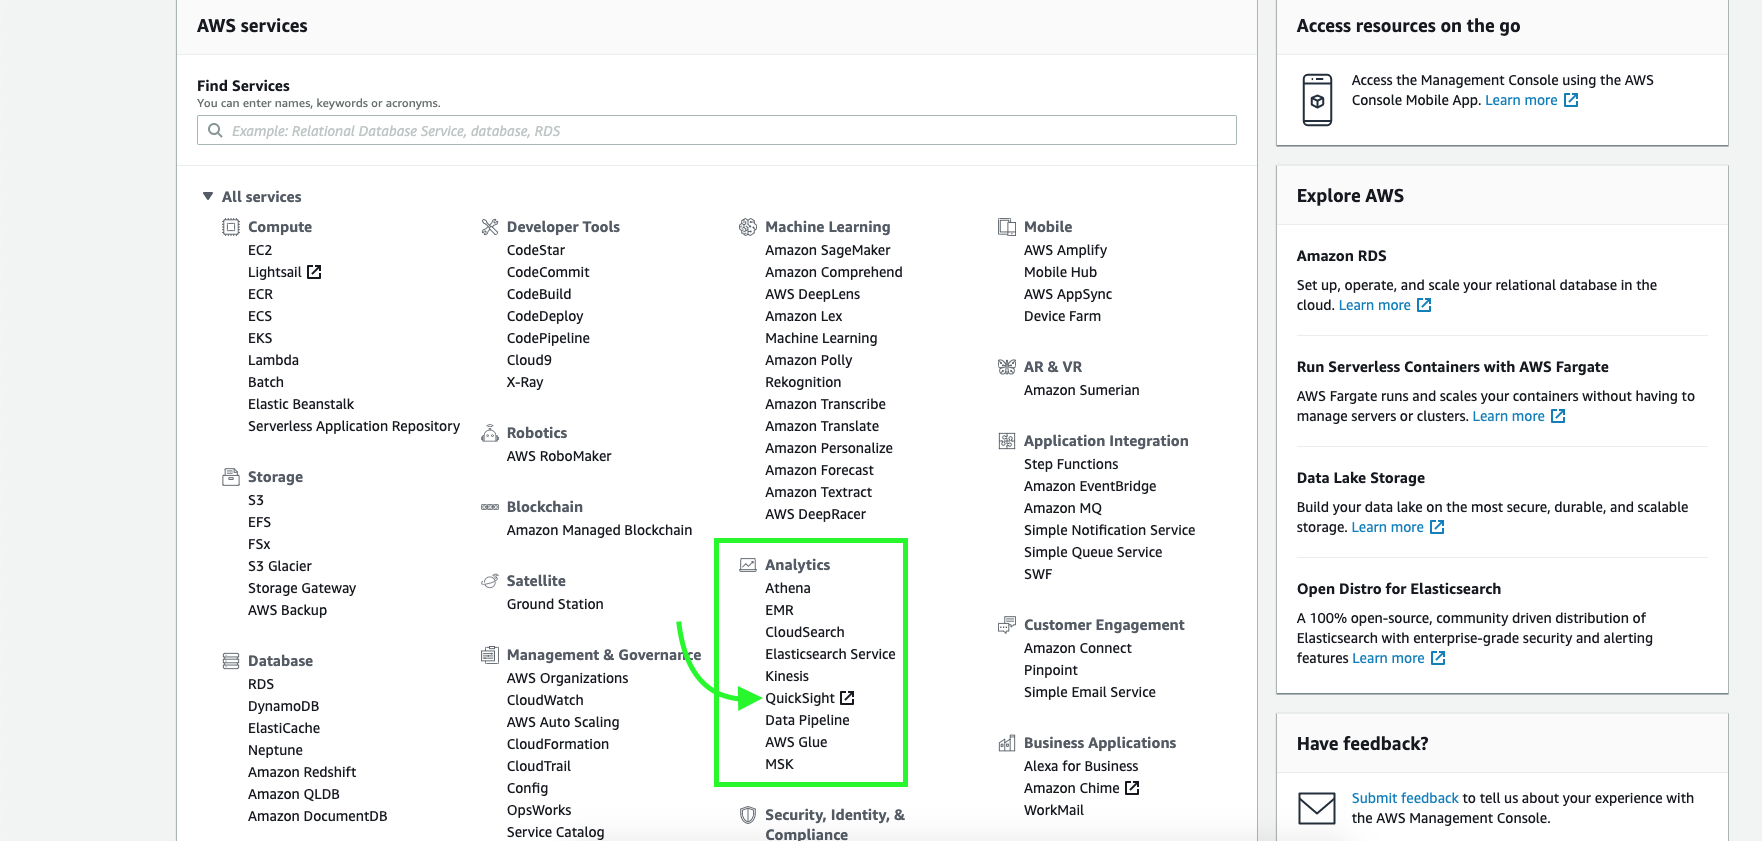
If you have not used the service before you will be asked to Sign Up for the QuickSight service. Click the ‘Sign UP for QuickSight’ option to proceed.
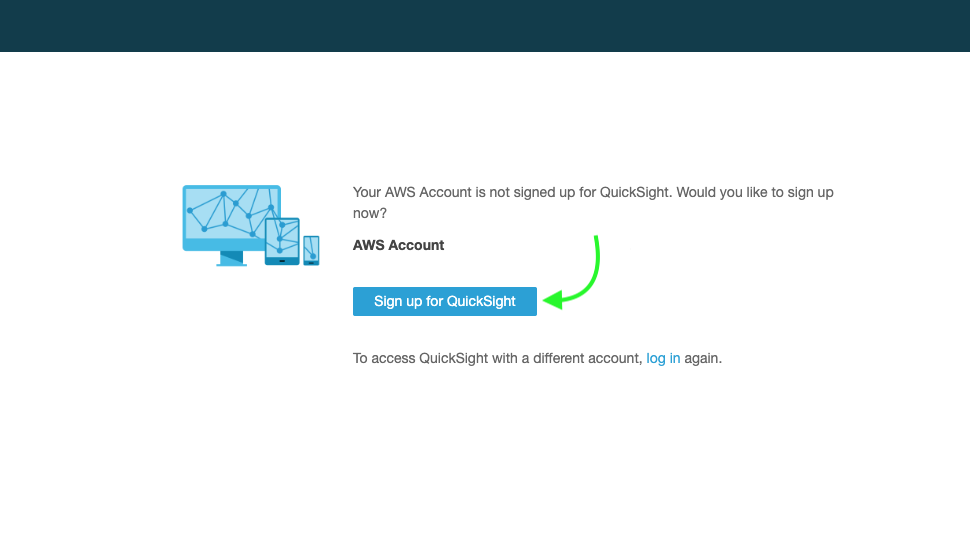
elect the Standard version of QuickSight which comes free of cost and click continue.
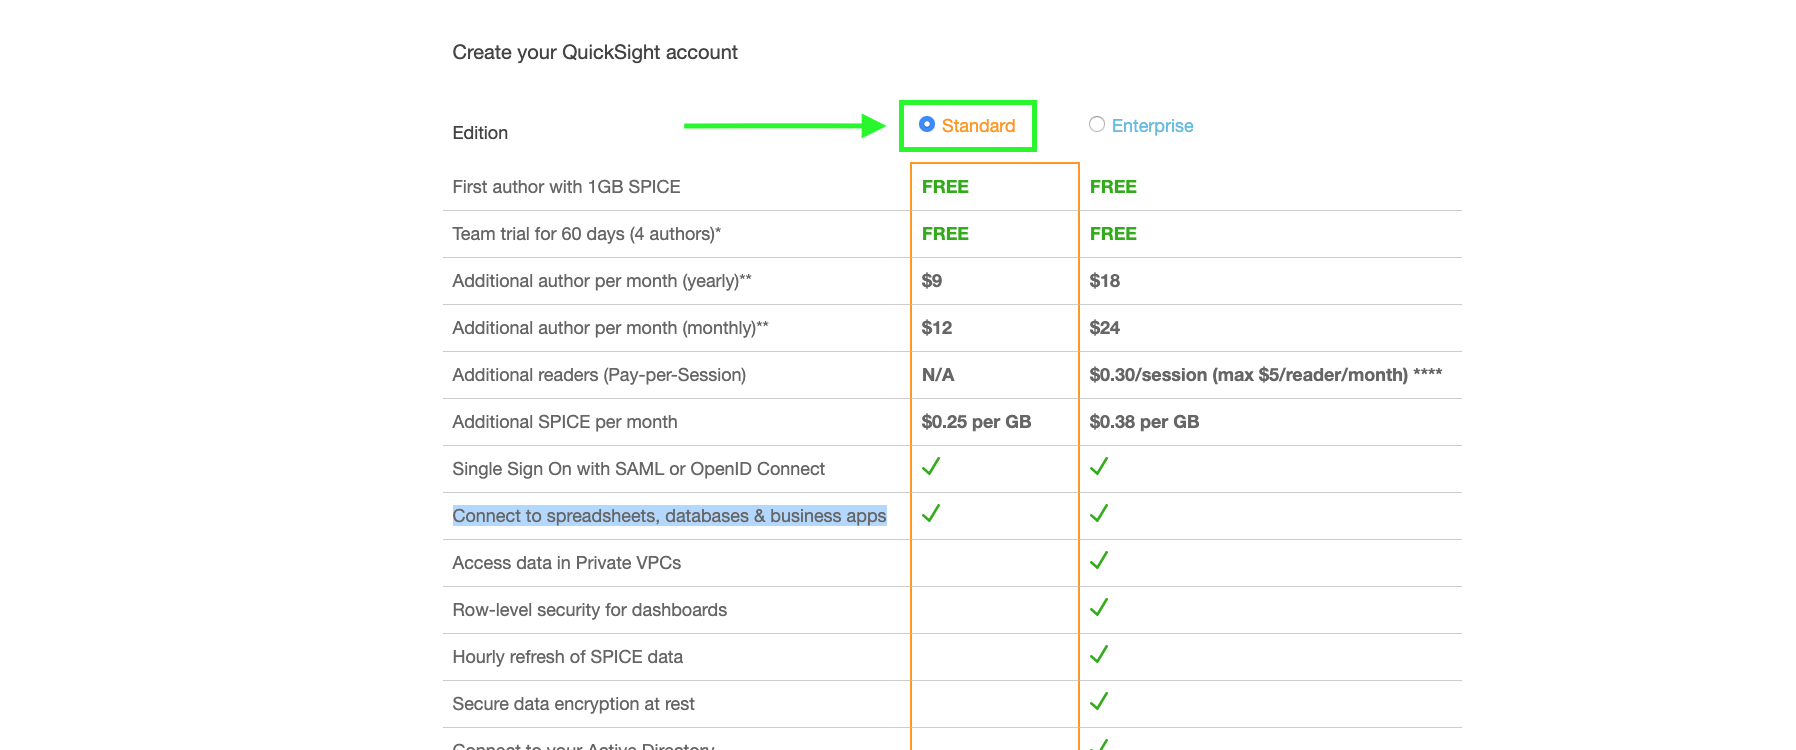
On the upcoming page, you will be asked to set an account name and a notification email. Stick to the default values for the rest of the options. Fill in the details and click finish
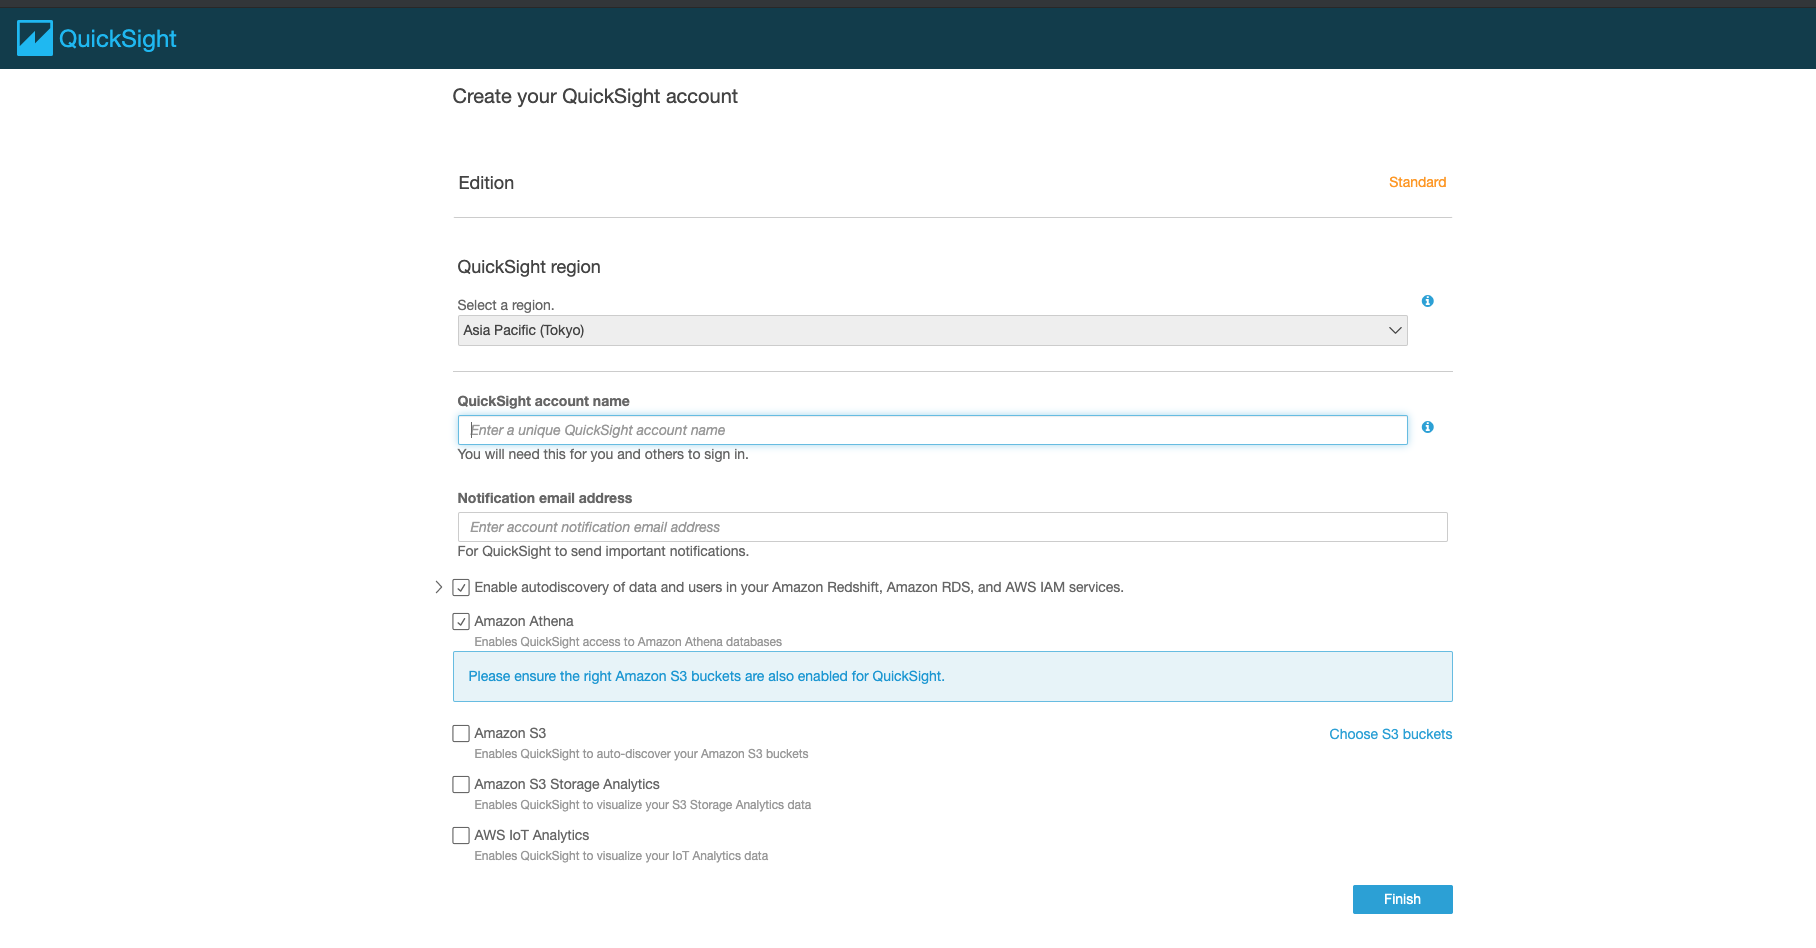
We will now be taken to QuickSights’s home page
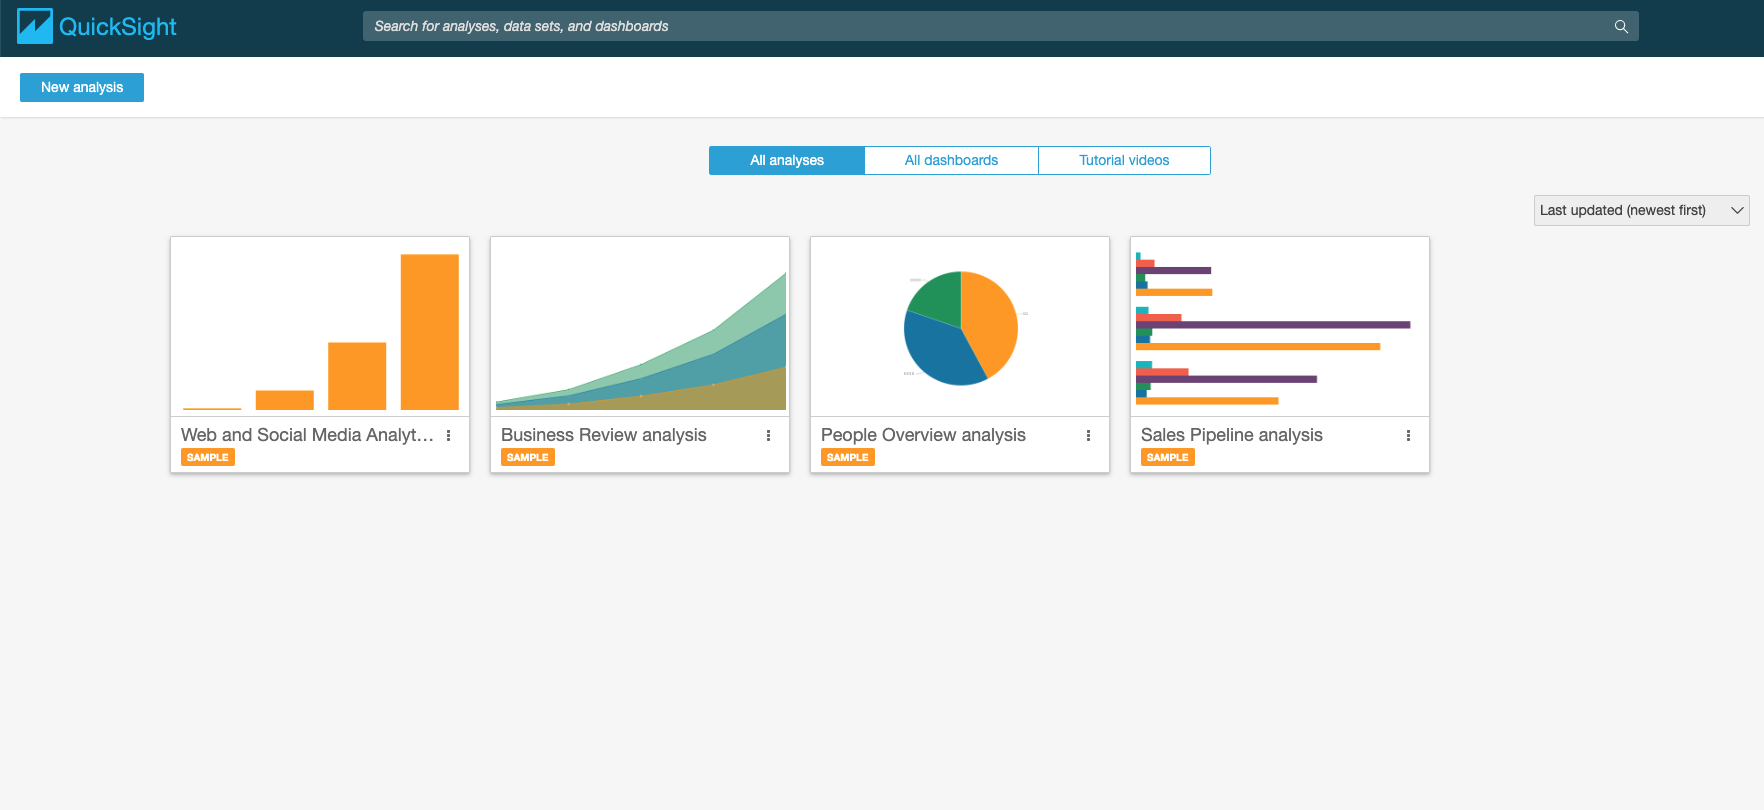
Data Visualization with QuickSight
Importing the dataset
To import a new dataset, click on the ‘New Analysis’ button on the top left corner of QuickSight’s homepage.
We will see a list of example datasets that can be imported from AWS S3. But here we will upload a new file from our local machine.
We will use the India State-wise Crimes 1987 dataset. Click here to download the dataset.
Click on the ‘New Dataset’ and on the upcoming menu select ‘Upload a new file’ option. Browse to the data file and select it to upload.
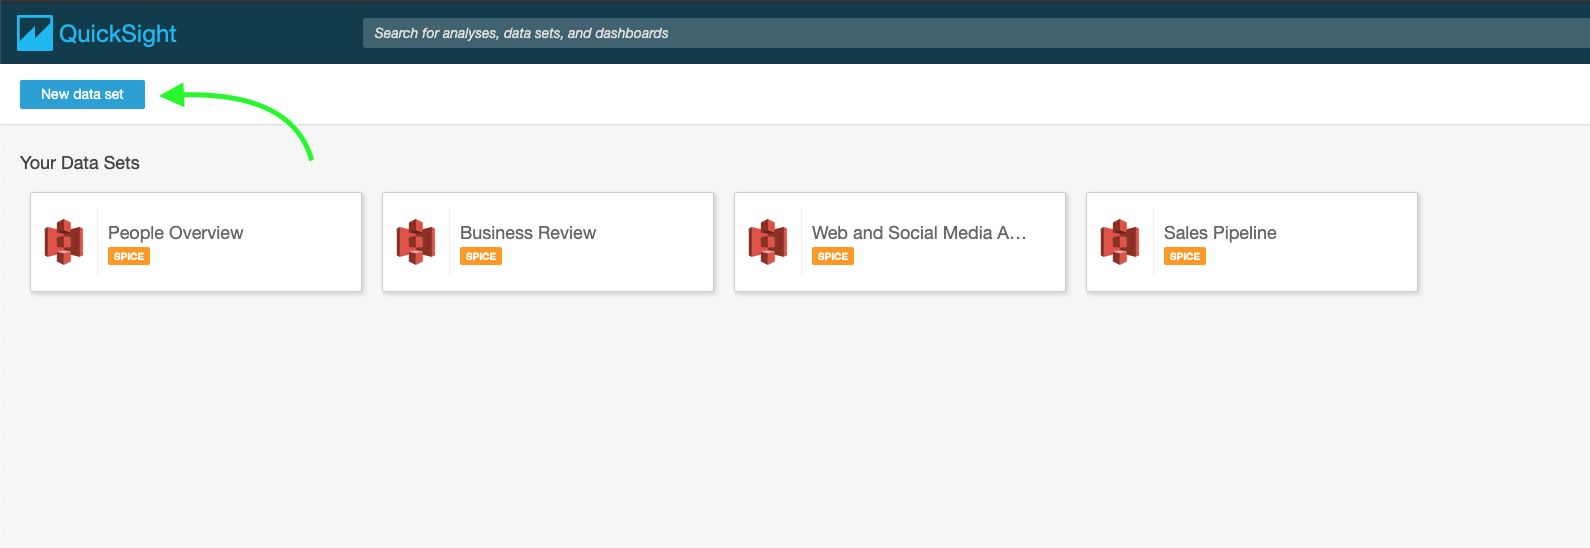
Once fully uploaded, we will see a short preview of the dataset with an option to edit or proceed to the visualization sheet. Click on the ‘Edit settings and prepare data’ button.
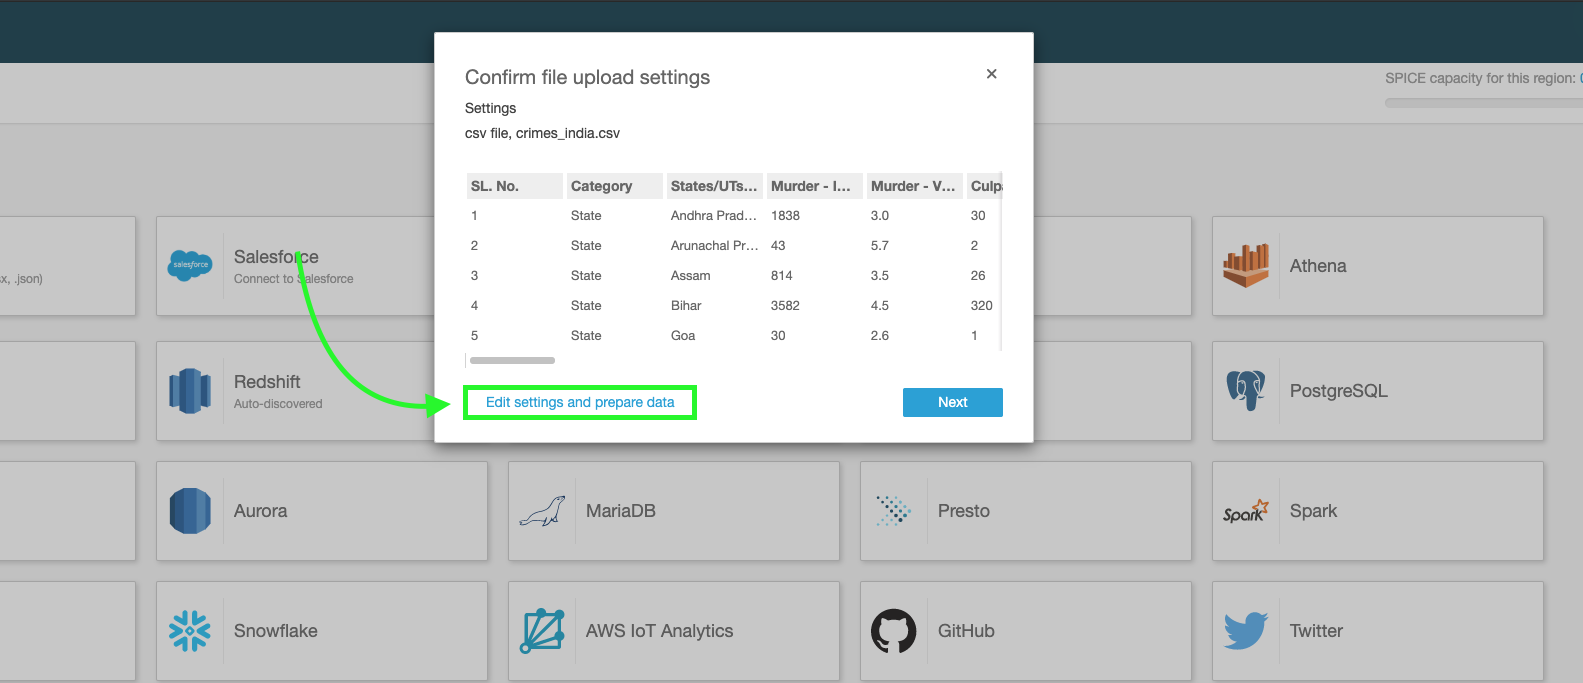
The dataset is now successfully imported and we will see a larger preview of the dataset.
Note: what we see will be just a preview and we will not be able to see the entire dataset.
Now let’s focus on some important parts of the page. See the highlighted portions in the given image.

On the left side of the page, we’ll see 3 tabs namely – Tables, Fields and Filters.
Tables:
Lets you see the list of connected tables.
Fields:
List of features in the current dataset. The tab offers options to filter out specific columns from the dataset and also lets us create calculated or derived fields.
Filters:
Lets you add filters to the dataset based on specific conditions.
Along with the column headers, we will see the datatype of the features that QuickSight automatically assigned. This can be edited by clicking on the data type and selecting from a list of available data types. QuickSight also allows us to rename the columns by clicking on the column name.
Data Preparation
Selecting Specific Columns
Click on the Fields tab and tick the checkboxes of the fields you wish to select for visualization.
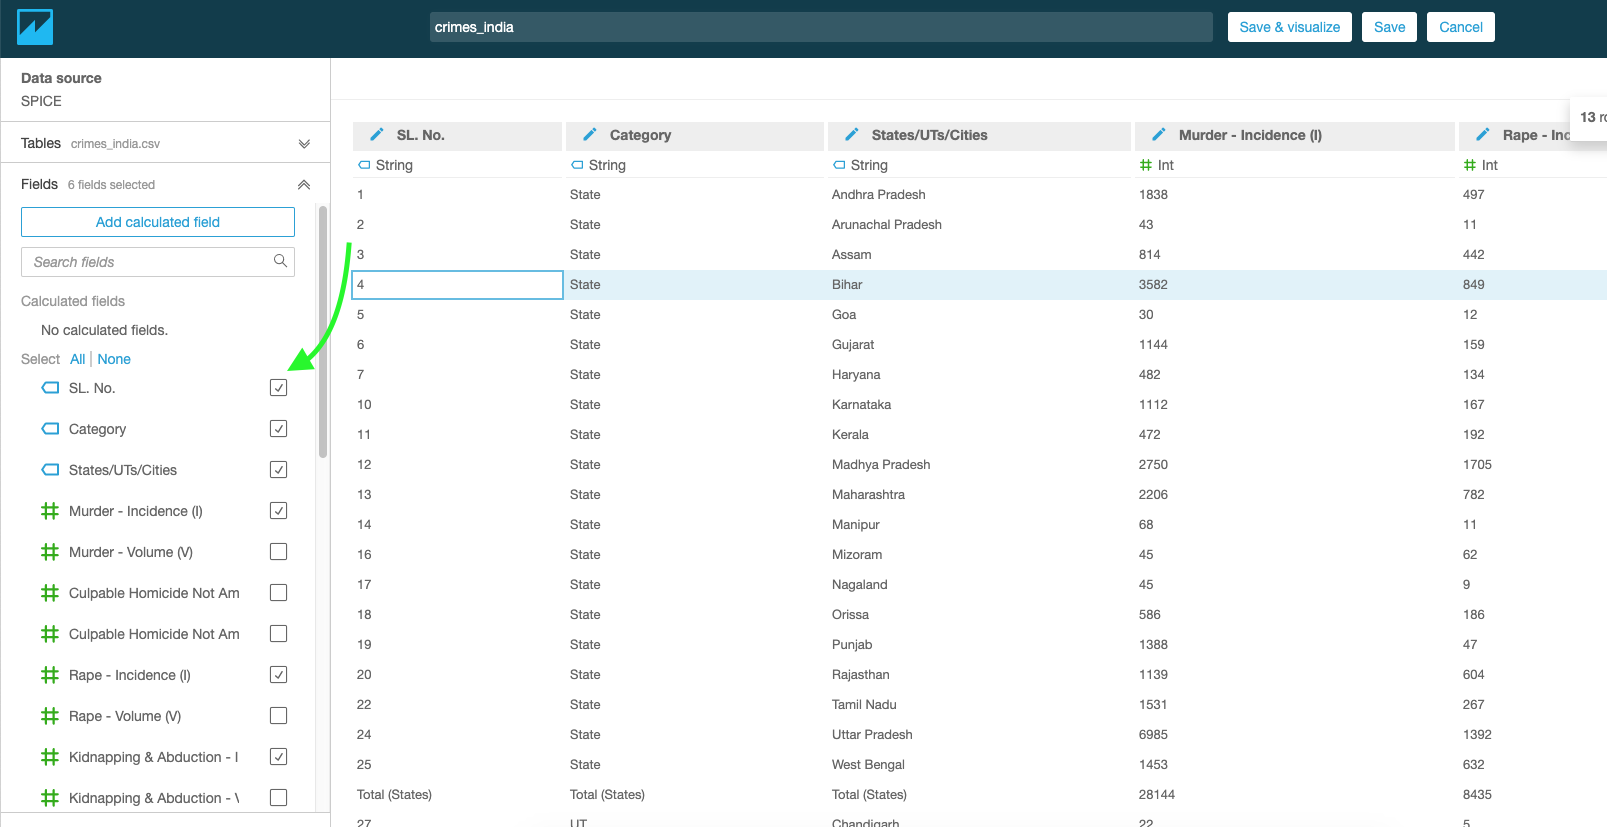
Changing the data type of a column
Change the data type of States/UTs/Cities column from String to State.
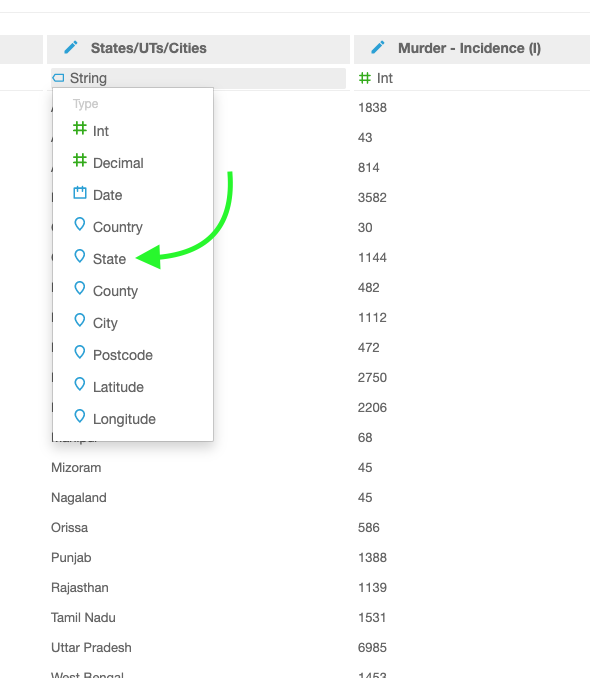
Adding a filter
Add a filter to remove the aggregated values (State-wise/UT-Wise/City-wise/All_india Sum) from the dataset. Select the Filter tab and click on the Add Filter option. Select a column to apply the filter to. In this case, select SL.No. Click on the added filter to edit it.
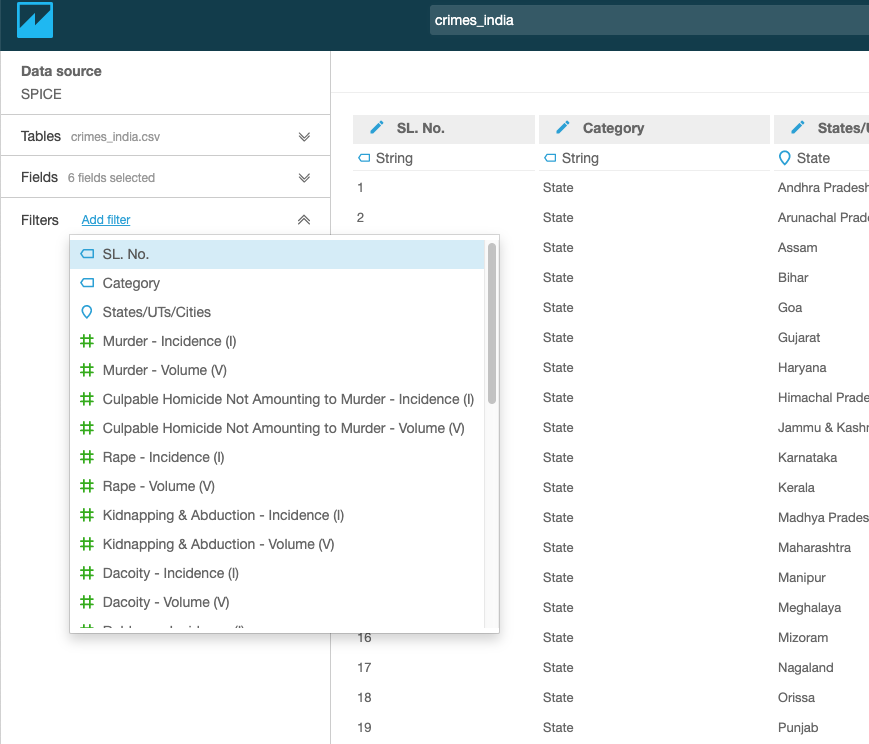
Edit the filter to add a custom filter that shows all rows except the ones that contain the word ‘Total’ in the SL.No column. See the below image.
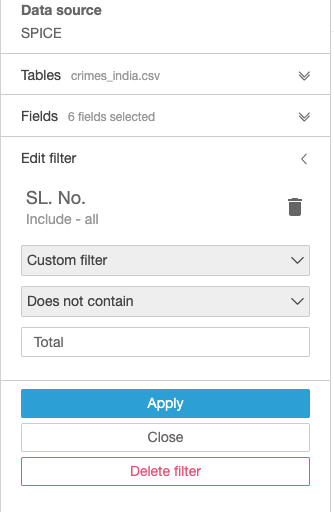
Click on apply and the dataset will be refreshed. We will see that all the cells with the word Total have been removed.
Now we are ready to visualize the data.
Data Visualization
Click on the save and visualize button on top to move to the visualization worksheet.
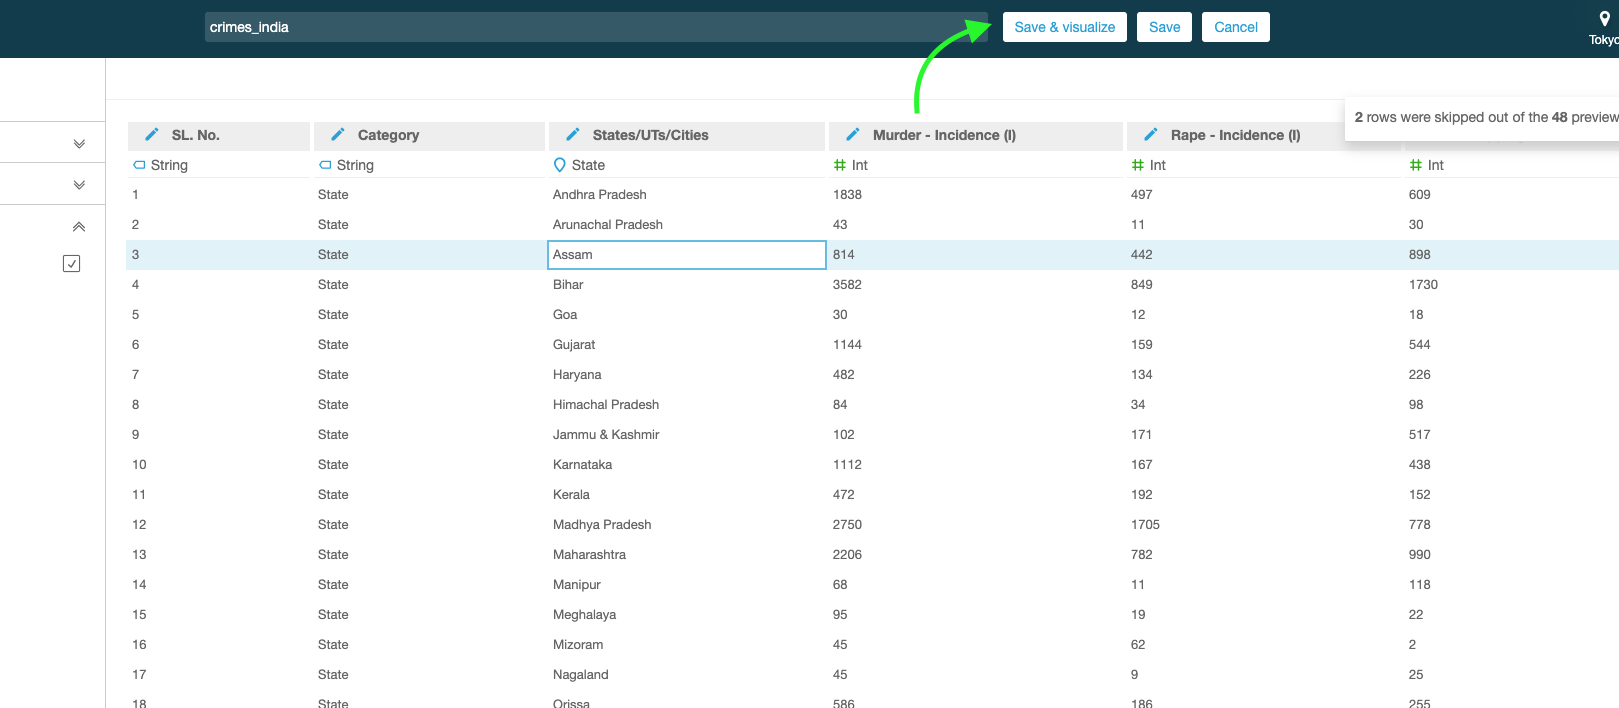
Let’s do some simple visualizations with the selected fields of the data.
Bar Chart
Plotting State/UT/City – Wise Murder Incidence count
Click on the horizontal bar chart from the Visual Types tab. Click on the ‘Field Wells’ tab to expand the axis and color options for the plot.
Drag and drop the States/UTs/Cities column into the X-axis box.
Drag the murder incidence column into the value box.
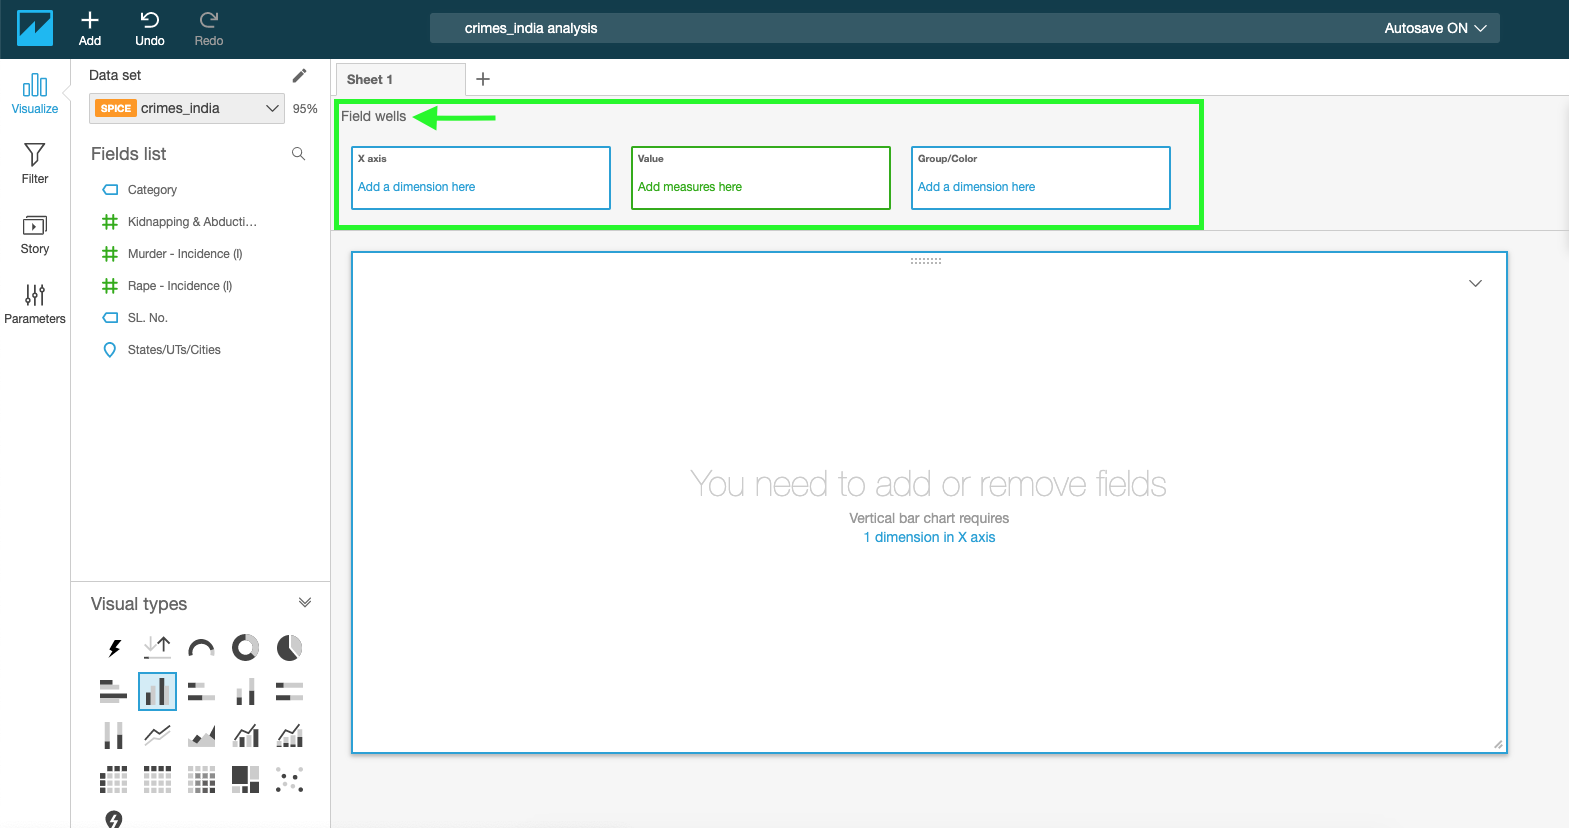
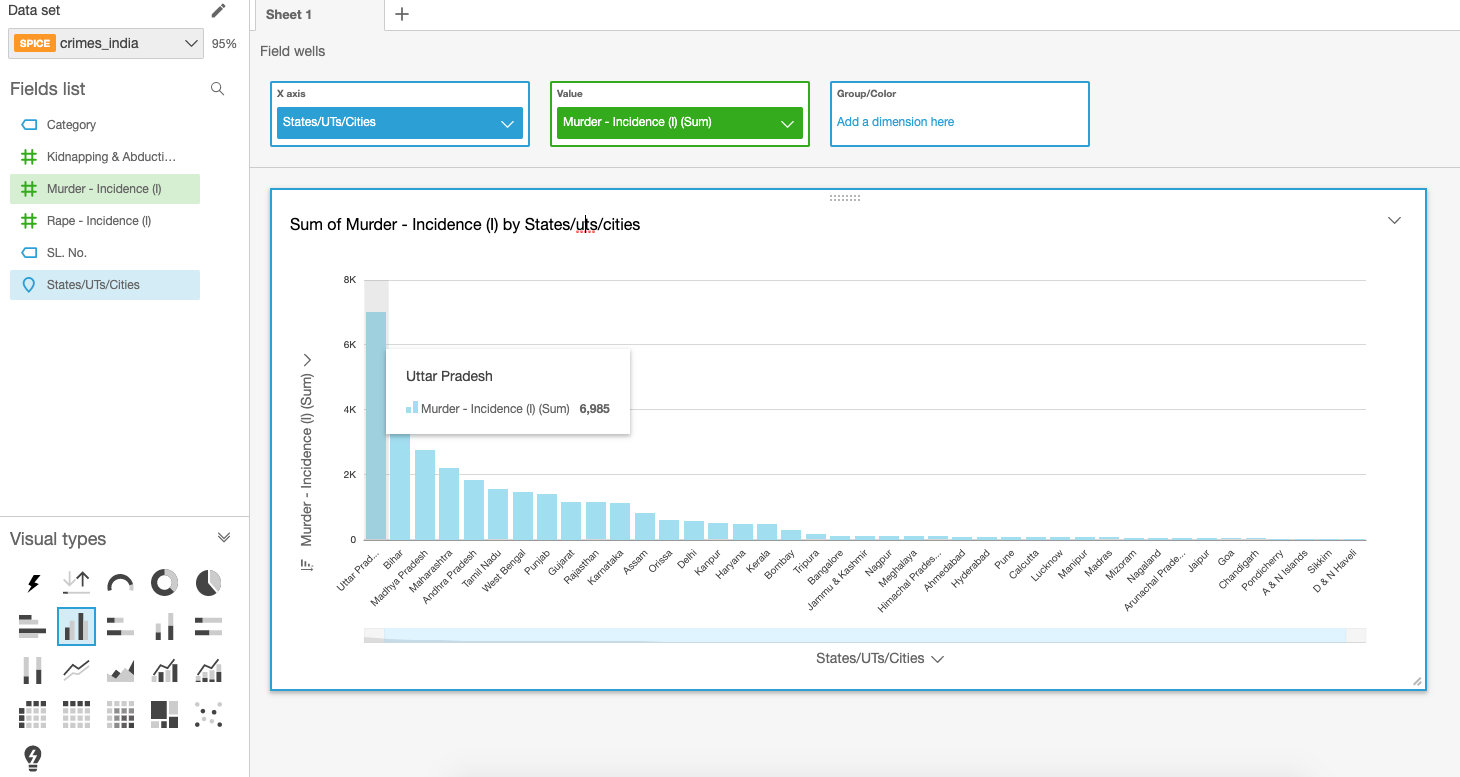
Note:
To change the aggregation method for a measure, click on the drop-down and change the aggregate from the sum to any of the listed methods. See the image below.
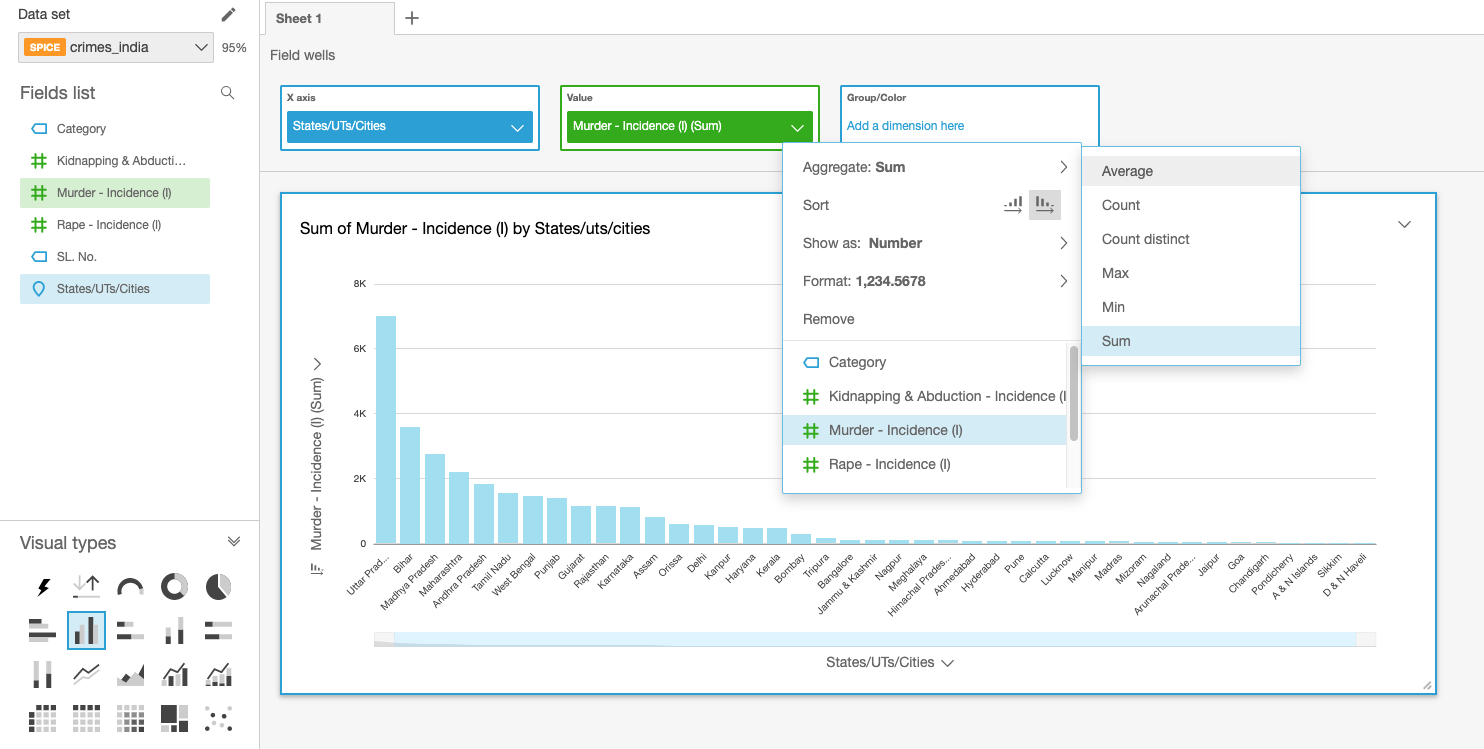
TreeMap:
Plotting State Wise Kidnapping & Abduction Incidence count
Add a filter to include only States from the category feature
Select the TreeMap plot from the Visual Types tab.
Drag and drop the States/UTs/Cities column into the ‘Group by’ box.
Drag the Kidnapping and Abduction Incidence column into the ‘Size’ box.
Note:
We can also add colour by dragging a feature into the ‘Color’ box.
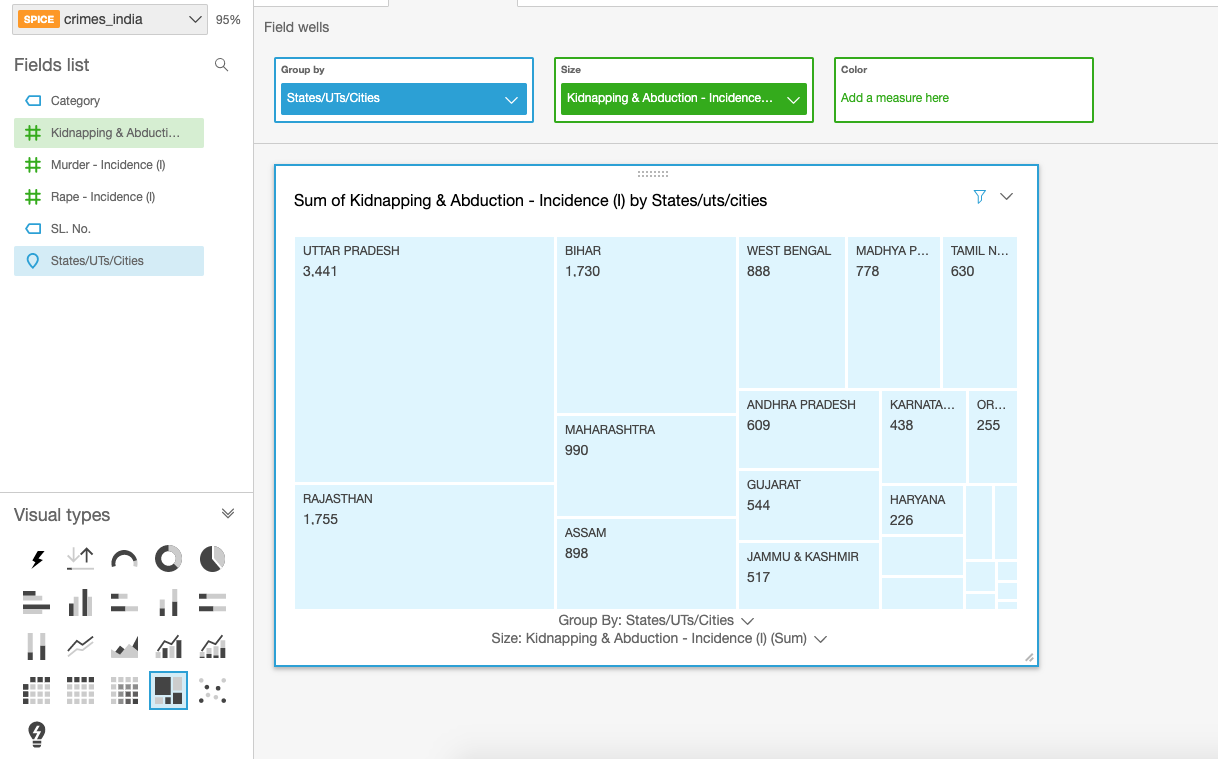
Try and experiment with different types of plots until you find one that is both beautiful and insightful.
All the visualizations you create will be saved automatically in the QuickSite workspace.
Closing Note
QuickSight lets us visualize data with a variety of plots. Although some of the features may not be on par with what Tableau has to offer, QuickSight’s popularity comes from its affordable pricing. QuickSight is very cheaper compared to Tableau and also comes with an option to pay per usage.
Addressing IPv4 address exhaustion in Amazon EKS clusters using private NAT gateways
Introduction
The Amazon VPC Container Network Interface (CNI) plugin creates many advantages for pod networking when deployed on an Amazon Elastic Kubernetes Service (Amazon EKS) cluster. First, it lets us reuse proven, battle-tested Amazon Virtual Private Cloud (Amazon VPC) networking and security best practices for building Kubernetes clusters on AWS. This allows us to use VPC flow logs for troubleshooting and compliance auditing, apply VPC routing policies for traffic engineering, and apply security groups to enforce isolation and meet regulatory requirements. You get the raw performance of Amazon EC2 networking, with no additional overlay.
By default, Amazon VPC CNI plugin assigns each pod a routable IPv4 address from the VPC CIDR block so that each pod is treated as a first-class citizen in a VPC. This enables network communication between resources in the following scenarios: pod to pod on a single host, pod to pod on different hosts, pod to other AWS services, pod to an on-premises data center, and pod to the internet.
Customers typically use RFC1918 private IPv4 address ranges to set up Amazon VPCs, into which the workloads are deployed. In a large organization, it’s common for operations teams within a business unit to set up a separate, dedicated VPC to meet the needs of that business unit. If these private networks have to communicate with other such networks, either on-premises or in other VPCs, then they must ensure that these networks don’t have overlapping CIDR ranges. As a result, teams are often forced to use relatively smaller CIDR ranges for their VPCs to avoid potential overlaps. When such teams use container orchestration platforms like Amazon EKS to deploy microservices architecture, they frequently launch hundreds or thousands of workloads (pods) in their clusters.
When pods are assigned IPv4 addresses from the VPC CIDR range, this often leads to exhaustion of the limited number of IPv4 addresses available in their VPCs.
Exploring IPV4 address exhaustion solutions
Custom pod networking is one approach to alleviate IPv4 address exhaustion when deploying large-scale workloads to an Amazon EKS cluster. It lets us expand our VPCs by adding secondary IPv4 address ranges and then using these address ranges to assign IPv4 addresses to pods. Amazon recommends using CIDRs from the carrier grade-network address translation (CG-NAT) space (i.e., 100.64.0.0/10 or 198.19.0.0/16) because those are less likely to be used in a corporate setting than other RFC1918 ranges. However, this approach adds some complexity to the cluster configuration. There is still no guarantee that the use of CG-NAT address space will completely eliminate the likelihood of overlapping networks. If the custom networking option is not viable either, then we may have to use a different CNI plugin that uses a non-routable overlay network to assign IPv4 addresses to pods. We may to have to forgo all the advantages of using Amazon VPC networking for the pods in their cluster. The best long-term solution for the IPv4 exhaustion issue is to use IPv6. However, the decision to adopt IPv6 is typically done at the organization level as opposed to operations teams within individual business units.
The private NAT gateway solution
Amazon VPC now supports a private NAT Gateway, which was designed to allow instances in private subnets of a VPC to connect to other VPCs and on-premises networks with overlapping CIDR ranges without the use of an internet gateway. This functionality can be extended to work with Amazon EKS to solve the IP exhaustion problem. Private NAT gateways also address networking challenges that arise when workloads deployed to Amazon EKS clusters across multiple VPCs with overlapping CIDRs have to communicate with each other.
This post highlights the advantages of implementing a network architecture with a private NAT Gateway to deploy an Amazon EKS cluster. We demonstrate a use case where workloads deployed in an Amazon EKS cluster provisioned in a VPC (VPC-A) are made to communicate, using a private NAT gateway, with workloads deployed to another Amazon EKS cluster in a different VPC (VPC-B) with overlapping CIDR ranges.
Network architecture
The network architecture used in this implementation follows the recommendations under Enable communication between overlapping networks in Amazon VPC documentation. The routable address range (address ranges that cannot overlap) chosen here is 192.168.0.0/16 and the non-routable address range (address ranges that can overlap) is 100.64.0.0/16.
Let’s assume that an IP Address Management (IPAM) team has granted the routable address range 192.168.16.0/20 for setting up a VPC. The address range 100.64.0.0/16 is added as the secondary CIDR for this VPC. Subnets are set up across two Availability Zones (AZs). The following network diagram details various subnets in VPC-A, which is set up using the CloudFormation template from the Git repository. Here are the salient aspects of this network architecture:
Two private subnets, each with 16 IP addresses (/28 block) are set up in the non-routable range. Per the recommendations under Subnet requirements and considerations, these subnets are used when creating an Amazon EKS cluster. The cross-account elastic network interfaces (ENIs) created by Amazon EKS to manage the communications between the Amazon EKS control plane and data plane are placed in these subnets
Two private subnets, each with 16 IP addresses (/28 block) are set up in the non-routable range. Per the recommendations under Subnet requirements and considerations, these subnets are used when creating an Amazon EKS cluster. The cross-account elastic network interfaces (ENIs) created by Amazon EKS to manage the communications between the Amazon EKS control plane and data plane are placed in these subnets.
Two private subnets and two public subnets, each with 256 IP addresses (/24) are set up in the routable range. Again, the size of these subnets (/24) was picked as a representative example.
A private NAT gateway is placed in the /24 routable private subnet in each AZ. These gateways route traffic from Amazon EKS resources (worker nodes and pods) in the respective AZ and is destined for other routable private networks, either on-premises or in other VPCs. Each private NAT gateway first performs source NAT on the requests originating from these resources before routing them to their destination.
A public NAT gateway is placed in the /24 routable public subnet in each AZ and is associated with an internet gateway to enable resources in the Amazon EKS cluster to access resources on the internet.
To enable traffic routing as described previously, the route tables for the subnets are set up as shown in the following tables (the presence of a Transit gateway in the route table entries will be discussed shortly). Note that the /28 subnets don’t have any routes to communicate with resources outside the VPC. These subnets are used to place only the Amazon EKS-managed cross-account ENI, which enables communication between the control plane and the kubelet on a worker node. Hence, just the local routes for communication within the VPC will suffice.
The route table for the /20 private subnets in the non-routable range shows that traffic destined for the address range 192.168.32.0/20 is forwarded to a private NAT gateway. This address range corresponds to that of a second VPC (discussed in the following section) used in this implementation. In general, any traffic originating from these subnets that is destined for a private routable address range that does not belong to VPC-A, will be handled by the private NAT gateway in the respective AZ.

Cluster provisioning
Using the previous network architecture, we are now ready to provision an Amazon EKS cluster in the non-routable subnets of the VPC. This step is no different from provisioning an Amazon EKS cluster in a VPC that comprises a single routable address range with outbound access to the internet. This may be done using any one of the approaches outlined under Creating an Amazon EKS cluster.
The two non-routable /28 subnets are used for cluster creation. Subsequently, worker nodes are provisioned in the two non-routable /20 subnets. The current implementation uses AWS CloudFormation templates from the Git repository for both cluster creation and provisioning of a managed node group. The cluster has the default behavior where the API server endpoint is accessible from the internet. In this mode, Kubernetes API requests that originate from within the VPC (such as node to control plane communication) leave the VPC but not Amazon’s network. Per the route tables above, the /20 non-routable subnets (and hence the worker nodes deployed to them) have outbound access to the internet via a public NAT Gateway and thus have access to the cluster API server endpoint. The network architecture presented here works for clusters with private endpoint as well.
Next, let’s see how to allow communication between the above VPC (VPC-A) and another VPC (VPC-B) with the routable address range 192.168.32.0/20 and the non-routable address range 100.64.0.0/16. In VPC-B, we create an additional Amazon EKS cluster using the same network architecture as VPC-A. VPC peering connection can’t be used between VPCs with overlapping CIDRs. Hence, a transit gateway is deployed to enable communication between the two VPCs. The transit gateway is set up with transit gateway attachments to the two VPCs. The attachments are each assigned the /24 private routable subnets in the respective VPC.
Please refer to the Transit Gateway Guide for details about how to work with transit gateways.
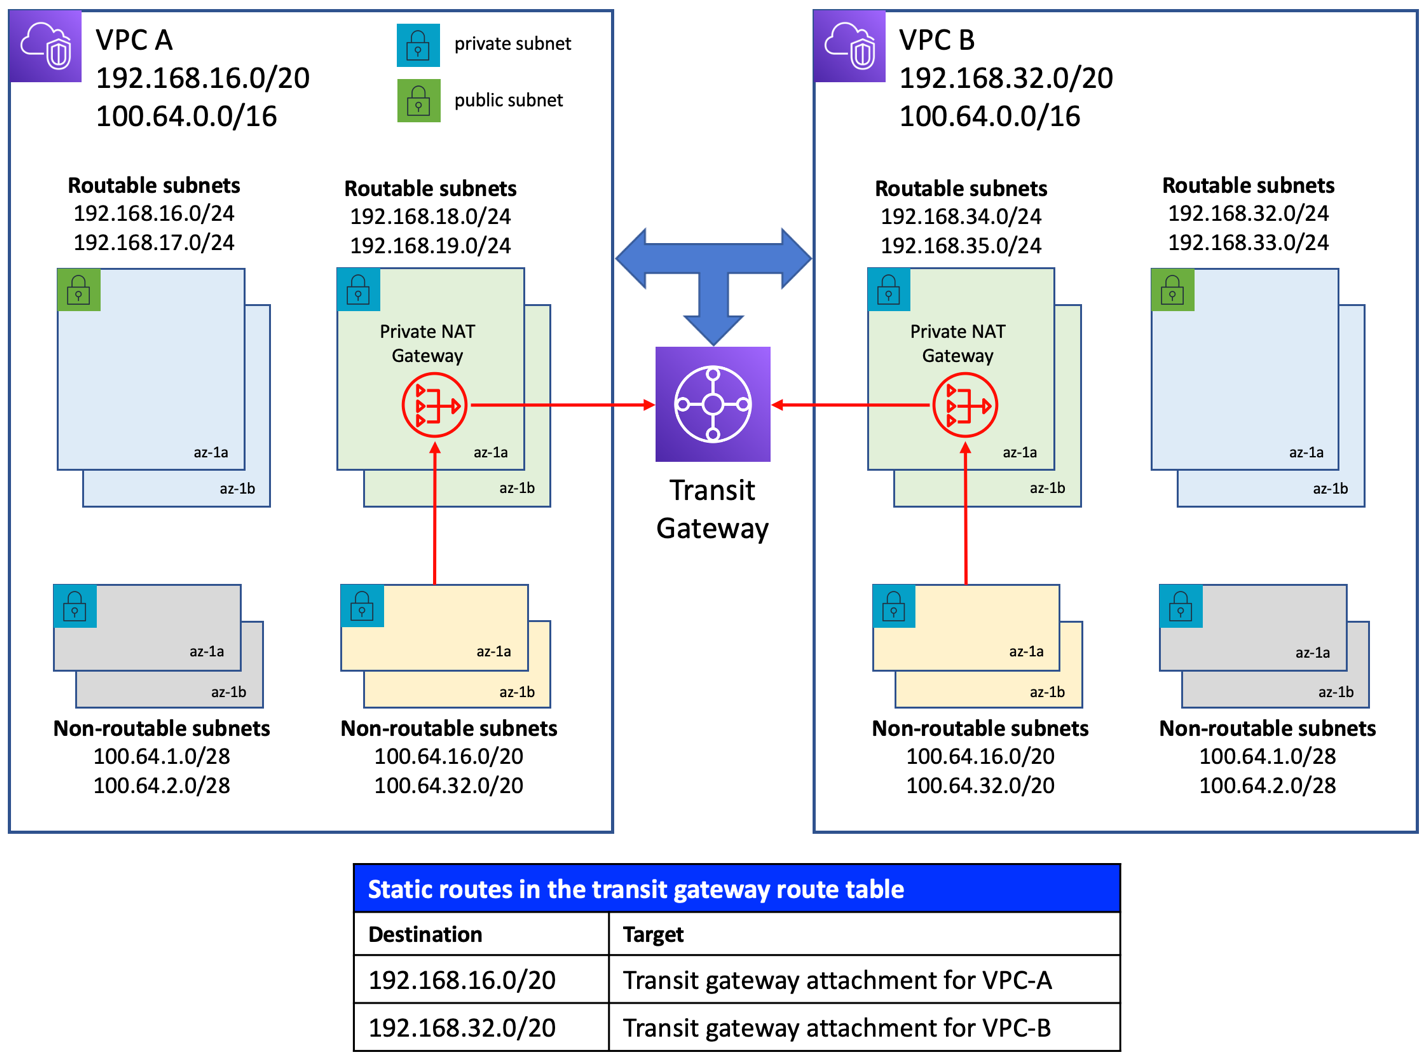
When creating a VPC attachment for a transit gateway, the CIDR blocks of the VPC are propagated to the transit gateway route table by default. This includes the non-routable address ranges as well. To avoid this, default route propagation is turned off when creating the transit gateway. Static routes are added to the route table, as shown in Figure 2, after creating the gateway. The routes in the transit gateway route table, in conjunction with those in the route tables for both non-routable and routable private subnets in each VPC, allow resources in non-routable private subnets to access resources in the other VPC.
For a detailed walkthrough of network packet flow across VPCs using this type of network architecture, please refer to this post: How to solve Private IP exhaustion with Private NAT Solution.
Solution overview
We use the previous network architecture and demonstrate a real-world use case, which comprises the following components:
An Amazon EKS cluster is deployed to the non-routable subnets in VPC-A.
An HTTP web service is deployed to this cluster as a Kubernetes Deployment resource and is exposed to the internet over HTTP using an Application Load Balancer which is managed by an AWS Load Balancer Controller. To ensure that the load balancer is placed in the routable public subnets in VPC-A, those subnets have been assigned the tag kubernetes.io/role/elb=1. Alternatively, the subnets may be explicitly specified using the annotation alb.ingress.kubernetes.io/subnets set on the Ingress resource deployed in conjunction with the web service.
An Amazon EKS cluster is deployed to the non-routable subnets in VPC-B.
A TCP web service is deployed to the cluster in VPC-B as a Kubernetes Deployment and is exposed internally to other routable private networks over TCP/IP using a Network Load Balancer which is managed by an AWS Load Balancer Controller. This is done by setting the annotation beta.kubernetes.io/aws-load-balancer-type=external on the Service resource deployed. The AWS Load balancer controller provisions an internal NLB by default. The private routable subnets in the VPC have been assigned the tag kubernetes.io/role/internal-elb=1 and therefore, the internal load balancer is placed on those subnets.
An Amazon Aurora PostgreSQL database is deployed to the private routable subnets in VPC-B.
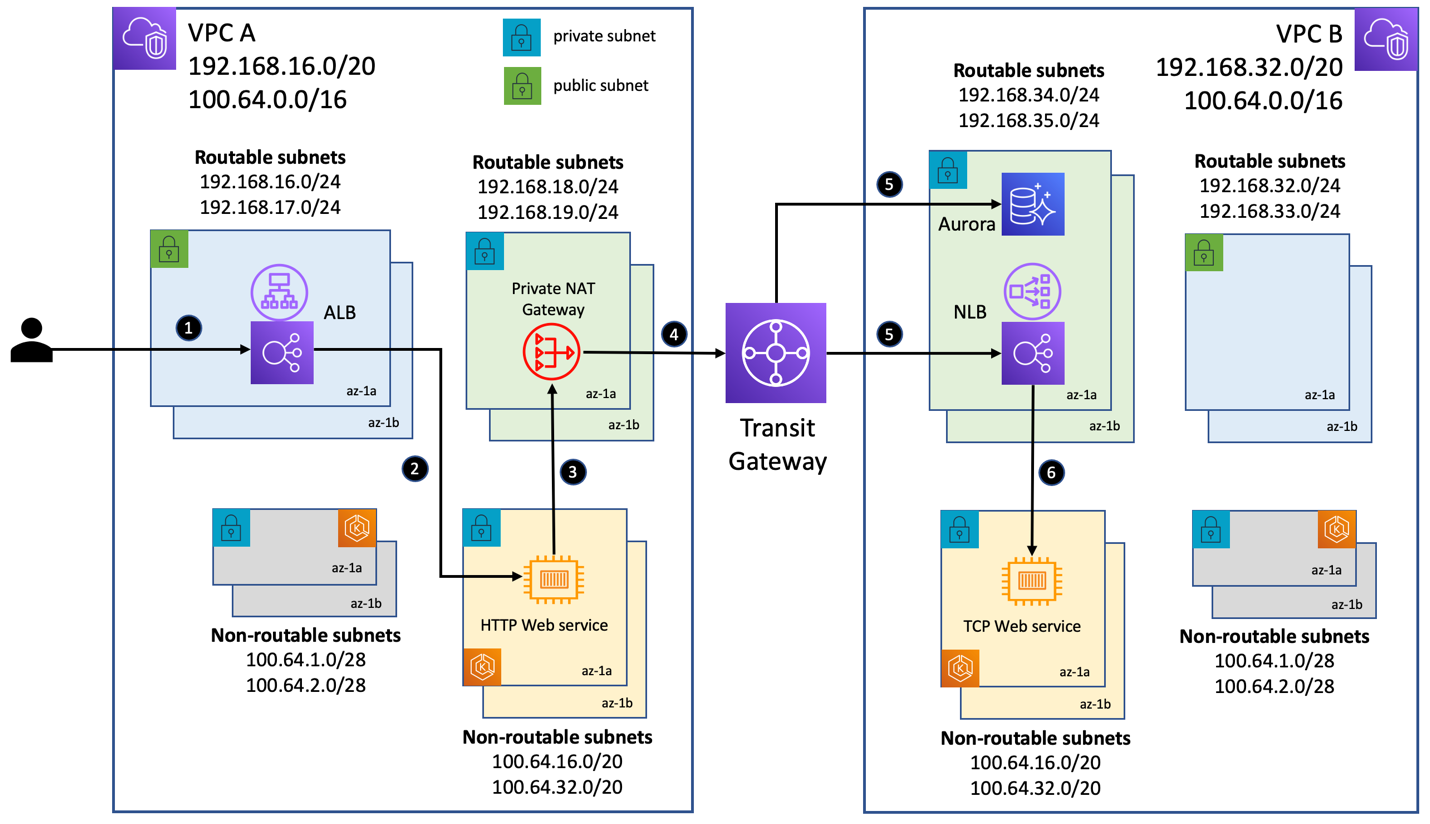
The request-response scenario for the use case demonstrated here is as follows (referring to the numbered steps in Figure 3 above):
Client makes a request to the API end points /data and /time exposed by the HTTP web service. Request is first sent to the internet-facing Application Load Balancer in VPC-A.
The load balancer routes the request to one of the pods deployed in the non-routable subnets in VPC-A.
Invoking the /data endpoint triggers a call from the web service in VPC-A to the Amazon Aurora database in VPC-B. Invoking the /time endpoint triggers a call to the internal Network Load Balancer in VPC-B. Both these components have a routable private IP address from an address range different from that of VPC-A. Hence, per the routes in the route table associated with the non-routable private subnets in VPC-A (refer to the table in Figure 1), the request from a pod is forwarded to the private NAT gateway in the corresponding AZ.
The private NAT gateway sources NAT the requests, setting their source IP address to its own routable IP address. Subsequently, the routes in the route table associated with the routable private subnets in VPC-A (refer to the table in Figure 1) dictates the next hop. In this use case, the requests are sent to the transit gateway.
Depending on the destination IP, the transit gateway sends the request to the Amazon Aurora database instance or to the Network Load Balancer.
The load balancer routes the request to one of the pods deployed in the non-routable subnets in VPC-B.
The following diagram shows the output of invoking the end points of the HTTP web service using a custom Domain Name System (DNS) name for the internet-facing Application Load Balancer. Calls to the /data endpoint returns a JSON object retrieved from the Amazon Aurora database. Calls to the /time endpoint returns the current data/time returned by the TCP web service.
Source code
We have provided the complete set of deployment artifacts in the Git repository. In addition, the repository includes instructions for implementing the network architecture described in this post, as well as steps to deploy Amazon EKS clusters and sample workloads. Please review the network architecture and Amazon EKS cluster design with your internal security team before deploying to production. An Amazon Aurora PostgreSQL instance has been used in this implementation merely as a sample database workload to demonstrate connectivity to an AWS managed service from Amazon EKS workloads when using this network architecture. Please follow the Amazon RDS best practices guide for using the managed databases in production and follow the database user and access model as defined by your company.
Conclusion
In this post, we showed you a network design that enabled communication across Amazon EKS clusters deployed to VPCs with overlapping CIDRs. This architecture was enabled by private NAT gateways that allowed compute resources with private IP addresses from a non-routable address range to interact with resources with private IP addresses from a routable address range.
We also addressed the IPv4 address exhaustion issue for Amazon EKS customers using the Amazon VPC CNI plugin for pod networking and deploying thousands of pods. When VPCs have overlapping address ranges, we need to use a transit gateway. You should perform a thorough cost analysis based on AWS Transit Gateway pricing and assess whether the scale of your operations justifies the additional cost of using a transit gateway.
For use cases in which Amazon EKS resources in a VPC’s non-routable address range need to communicate with other VPCs that do not have overlapping address ranges, you have the option of using VPC Peering to interconnect such VPCs. This method could provide potential cost savings, because all data transit within an AZ via a VPC peering connection is now free.
How to create scalable and maintainable front-end architecture
Modern front-end frameworks and libraries make it easy to create reusable UI components. This is a step in a good direction to create maintainable front-end applications. Yet, in many projects over the years I have found that making reusable components is often not enough. My projects became unmaintainable, as requirements changed or new requirements came up. It took longer and longer to find the correct file or debug something across many files.
Change needed to happen. I can improve my search skills, or be more proficient in using Visual Studio Code. But, I often not the only one working on the front-end. So, we need to the setup of our front-end projects. We need to make them maintainable and scalable. This means that we can apply changes in the current features, but also add new features quicker.
High-level architecture
In back-end development, we have many architectural patterns we can follow. Two concepts currently used are domain-driven development (DDD) and separation of concerns (SoC). These two concepts add great value to front-end development. In DDD you try to groups of similar features and decouple them as much as possible from other groups (e.g. modules). While with SoC we, for instance, separate logic, views, and data-models (e.g. using the MVC or MVVM design pattern).
We expect modern front-end applications to do more and more of the heavy lifting. With this added complexity, bugs are becoming more frequent. Because users interact with the front-end, we need a reliable architecture, that is both maintainable and scalable. My preferred architecture at this is modular and domain-driven. Note that my vision might change, but this is my preferred approach at this moment.
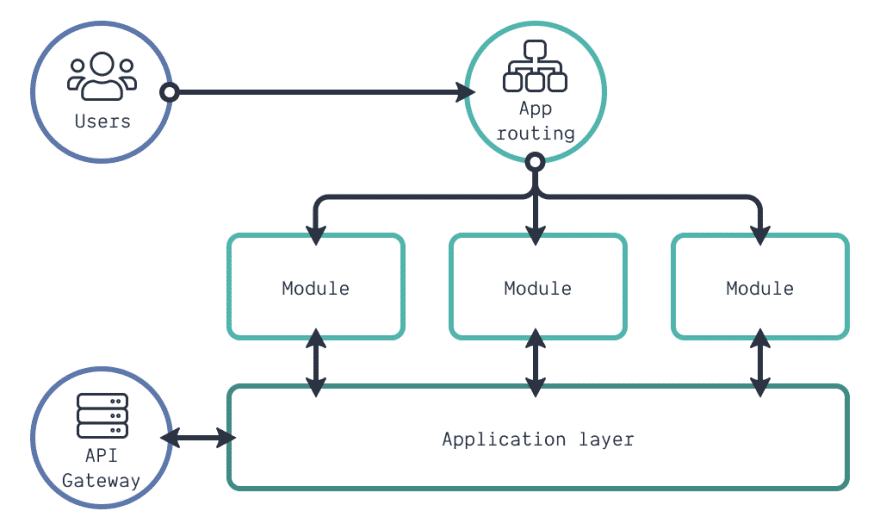
When a user interacts with our application, he or she is directed to the correct module by the app routing. Every module is completely contained. But, as a user expect to use one application, not a few small ones, some coupling will exist. This coupling exists on specific features or business logic. We can share several features between modules. You can put this logic into the application layer. This means that each module has the option to interact with the application layer. A good example is a setup requiring to connect to our back-end, or API gateway, through the client-side API.
When looking at a project structure, we can follow something like shown below. All code for the application layer is in the app directory. While all modules have a directory in the modules directory. Reusable UI components (e.g. tables) that do not rely on business logic are in the components directory.
app/
assets/
Components/
lib/
modules/
styles/
The remaining directories hold our static assets (e.g. images) or helper functions in lib. Helpers functions can be very simple. They can convert something to a certain format, or help to work with objects. But more complex code can be present in the lib directory. Working with schemas or graphs (e.g. algorithms to check for loops in directed graphs) are no exception.
Many use something like CSS-in-JS or styled-components, but I prefer plain-old (S)CSS. Why? We can solve many UI problems using CSS and HTML and no JavaScript. For me, this becomes easier to do when we apply the concept of SoC. Also, maintaining CSS in one place makes it more maintainable, as you duplicate less. This requires a solid CSS architecture. Although I will discuss this in a different blog post, my CSS architecture is based on Harry Roberts' ITCSS.
Filling in the application details
With the high-level and project structure, we have made a good start. But, we need more details on various aspects to implement this front-end architecture. First, let's look at a more detailed architectural diagram, as shown below. In this diagram, I have zoomed in on the application layer but also zoomed in on a module. The application layer is the core of our front-end application, so let's discuss this first.
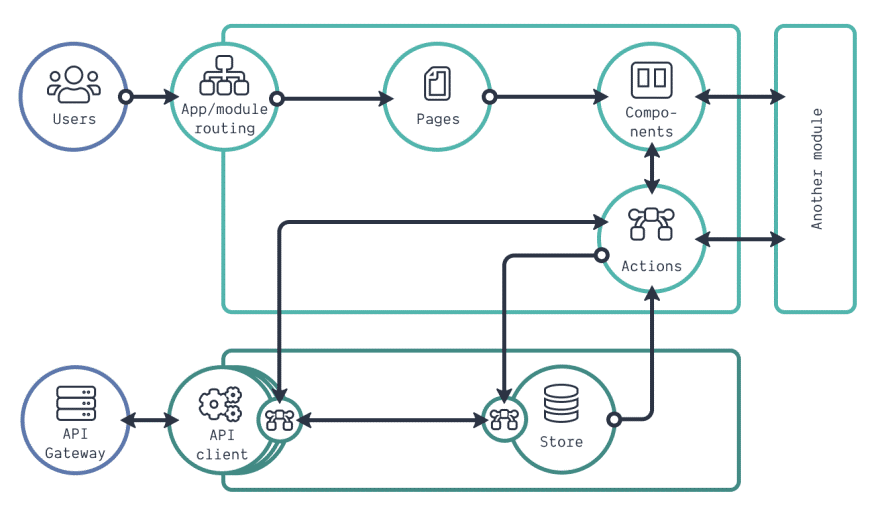
The application layer comprises two parts: a store and a client-side API. The store is our global application state. This state holds data accessible by different modules at the same time. Even when the data is not needed on the screen, it will persist in the store. As you can see, every update request that goes towards the store can go through a chain of logic. This is what we call middleware. This is a pattern used in for instance Redux. An easy example of middleware is the logging of incoming requests of the store.
Sometimes, the incoming request for the store needs to be enhanced with data from an external service. With Redux, we use a Promise to handle this call. This can be our back-end service, but it can also be a public third-party API. Something it suffices to only use the browsers fetch API for a single purpose REST-calls. When you want to use the same API for various calls, it might be a good idea to create an API client definition.
A basic API client handles external requests, responses, and errors. You can even make it such that it can provide you information about the request state (e.g. loading). More complex API clients handle a lot more though. Some APIs connect through a web-socket or even connect to a GraphQL API. In such a case, you have a lot more configuration options, as illustrated below.
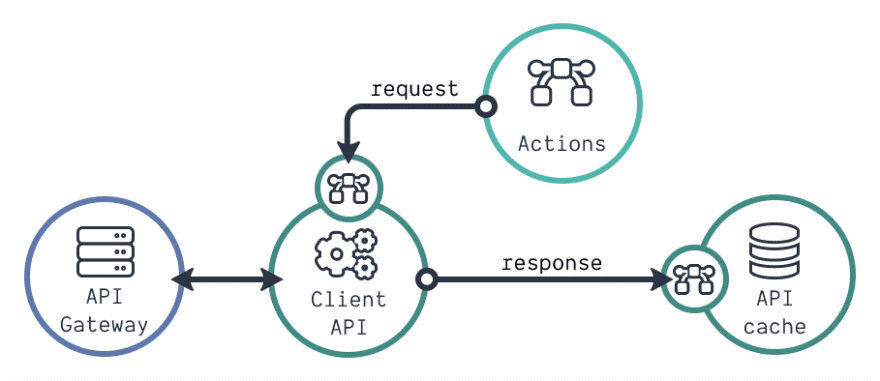
In more complex API clients we get the possibility to alter all outgoing requests through middleware (e.g. add authentication headers). The response can be altered using afterware (e.g. changing the data-structure). After altering the response, we store it in the client's cache, which is like our application store. The difference? The cache only handles incoming API data, while we can put any data in your application store.
Many front-end applications will have a dedicated back-end service to talk to. Be it an API gateway on top of a Kubernetes cluster with many micro-services, or a single monolith back-end. But sometimes we need to connect to different external services. With this architecture, we can create many API clients. Each of the API clients can have a cache, middleware, and afterware. Different parts of our application should be able to interact with each of these API clients.
A corresponding project structure for the app directory can be something like:
app/
api/
config/
store/
pubsub/
schemas/
index.js
Two of the directories inside app should sound familiar by now: api and store. These hold all the related to the use-cases described already. The config holds static definitions and configurations (e.g. constants) used throughout the entire application. A schema describes a specific data structure for JavaScript objects. This can be used both when using TypeScript or JavaScript. All generic schemas for the application are stored within the schemas directory.
The pubsub is a great example of a feature that can expand the basic architecture of our front-end. We can use the pubsub for module communication or for managing scheduled jobs. As it can be critical for the core of the application, it lives within the app directory. Last, we have the index.js file. Within this file, we can add all functions and constants from within the app directory. This means that the functions of this file as our entry-point towards the application logic.
Architecture of a module
With our application layer described, we only have the modules left. The detailed architecture diagram already shows the internals of a module. When the application routing points towards a specific module, the module determines how the routing should continue. The module routing determines which page should be shown. A page comprises a lot of UI components, which is what the user will get to see on the screen.
A page in this context does not differ from a UI component. It is a big UI component. But, other modules can interact with components (and actions), but not with pages. The only way how pages from different modules can interact with each other is with nested routing. This means you put the module routing inside a page from a different module.
Components interact with the application layer through actions. These actions can come in different formats. They can be plain JavaScript functions, Redux related functions or React Hooks. Sometimes you have small utility functions specific for a module. In that case, you can put them in the actions directory, or you create a dedicated utils directory for a module. The module structure for a project is shown below.
users/
actions/
components/
config/
constants.js
routes.js
tables.js
forms.js
pages/
gql/
schemas/
index
Like the application layer, we can have static code (e.g. constants or schema definitions) that is only relevant for our module. In that case, we put that code in the config or schema directories. When working with GraphQL, we can have query and mutation definitions. These should be in the gql directory (or a directory with a similar purpose). While working with an application store for this module, add an interfaces.js file. This file describes how to access data in the store.
The index.js acts as the index.js of the app directory. Here we describe all the components, actions and constants accessible for others.
Module communication
Not every module needs to have all the directories and files as described. Some modules, for instance, do not need pages, as they only comprise components and actions. A great example is a 'files' module. This module can combine components and actions for viewing and uploading files. An example is a drag-and-drop area for files that uploads the result to a blob storage. This could be a reusable component. Yet, the actual uploading of files depends on the service we can use for it. By combining the UI component and the actual action to upload a file, we create a small contained module. The moment we combine components with business logic, we convert them into modules.
But how can other modules use the components or actions from the files module? The index.js file of a module describes which components, actions, and constants are accessible for other components. So we could use the file drop-zone or the upload action from the files module. But, sometimes we have to choose what we are exposing to other modules. Will it be an action, or are we combine the action into a component?
Let's look at the example of a user drop-down. We can create an action that provides us all the users we can select from different modules. But, we now need to create a specific drop-down in all other modules. This might not need much effort to have a generic drop-down component. But this component might not work in a form. It might be worth the investment to create one UserDropdown component that we can use. When something changes around users, we now change only one component. So sometimes we need to choose what to expose: actions or components.
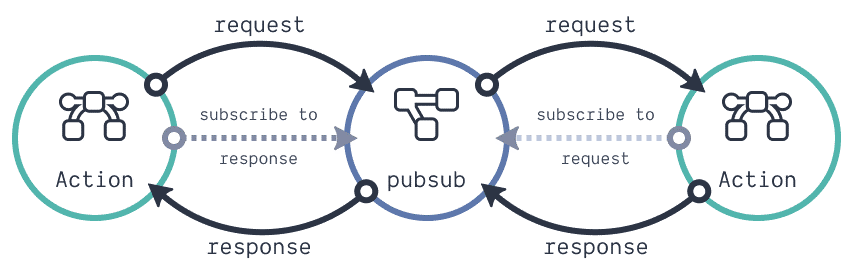
One advanced pattern that we can use between components is the use of the pubsub. With this pattern, it is not possible to share components, but we can share data. The diagram above shows how it works. Again, this is an advanced pattern and only use it if you want to go a micro front-end route, or when you need it.
UI component anatomy
One last detail level is missing still, and that is the architecture of a UI component. In a previous blog post I described this already. When you look at this anatomy, you will see some concepts back that we apply on a bigger scale.

The front-end is the first point of entry for our users. With our front-end projects growing in features, we will also introduce more bugs. But our users expect no bugs, and new features fast. This is impossible. Yet, by using a good architecture we can only try to achieve this as much as possible.
How to Successfully Pitch Your App to Investors

The app startup industry is full of daunting challenges, but the big one for most of involves scoring that first investment. We live in a world where we’re constantly hearing news about startups receiving vast amounts of money in funding, which leads many to the impression that cash is being chucked at pretty much anybody with a good idea. Needless to say, this isn’t always the case.
Here at Messapps, a big part of my job involves helping potential clients get the funding they require. When it comes to companies not getting the investment they’re after, there’s usually one of two reasons behind it. These are:
Not being prepared with financial estimates
Not understanding the essentials of pitching an app idea
As such, it’s important we go through what we all need to include in our pitches, in order to boost our chances of getting that app investment.
Prepare Your Prototype
Want someone to invest in your app? The first step is always to have a fully designed and workable prototype. Bear in mind that the app market is barely a decade old, and this means that many leading investors still struggle to comprehend how an app might function unless they see it with their own eyes.
What’s more, making a prototype shows that you’re more than just an ideas person – you’re serious about making this app available. Execution and dedication trump ideas every time and if you’re not willing to put the effort and money into creating a real prototype, how can you expect anyone else to put up their cash to help you take it to the world?
Creating a prototype is easier than you might think:
First, select 1-3 main user stories (or the sequence of screens seen by the user before achieving their aim) and design them.
If you have access to funds, hire an app design and development company to help with the design. Low on funds? Use UI kits, which let you swiftly design a user story with simple drag and drop elements.
Use InVision to run a prototype, and you’re all good to go!
Just a day of work putting in that time and effort to make a prototype can make a dramatic difference. It could even make the difference between a $1 million contract and struggling to do the grocery shopping for the week.

Next, think about how you’re going to make your pitch. We’ve all seen how they do it on Shark Tank and Dragon’s Den, but it doesn’t often go like that in real life at least, you rarely get to stand up in front of investors and show off your pre-prepared slides!
In reality, most pitches happen in an office somewhere, or over a coffee at a central cafe. If you think that your laptop and print-outs are going to fit comfortably between your pot of tea and slice of cake, then think again. Keep things simple, straightforward, and elegant by pulling up a prototype on your smartphone, and taking them through your app that way.
Prepare a Development Plan
Let’s assume at this point that the investors are keen on your idea. If so, they’ll want to know what it takes to execute it and bring it into fruition. App development can happen one of three ways:
You can develop it yourself
You can hire full-time developers
You can involve an app development company
The choice you make will come down to the scope of your work, your budget for the project, and the skills you currently possess. For example, if you’re a top-notch developer, and have the skills and experience to polish up the app by yourself in under two months, then go ahead: do exactly that. However, that’s a rare thing in our industry, due to the fact that both back-end and front-end coding will be required and when was the last time you met a developer highly skilled in both?

If you’ve got access to a great budget, and know where to find great developers, set about assembling a full-time development team. There are some downsides here: you’ll need to pay decent salaries, and people can be unreliable (as I’m sure we all already know).
The other alternative is to hire an app development company. This option allows you to keep all your equity, steer clear of long-term commitments, and have access to a range of developers and designers with the skills you need. The only big drawback here comes down to the rates: as you probably know, app development company rates vary massively, from the relatively affordable, to the eye-wateringly expensive.
Whichever option you go for, be sure to create a milestone based on milestones and associated costs. Check out the average salaries, and speak with a number of app development companies to gather a range of quotes and further understand your options.
Having an app means running a business… so market it!
The app market features many differences which set it apart from other businesses. For example, once you’re ready to launch, you’ll already be set up with a distributor prepared to show off your app to the public. However, if you’re a breakfast cereal producer (for example), you’ll need to jump through various hoops and pay various fees in order to get shelf space in the stores. If you’re a business selling car parts, you need to pay for the real estate in which your business is placed, etc.
Apps are considerably different. With your launch, you already have your ‘real estate’ and shelf space, and incomes in the form of the App Store.
This actually causes some confusion in the way people think about apps. Many assume that merely because your app is visible on the app store, the developer just sits back and rakes in the money. How wrong could they be!
Having an app means running a business. If nobody knows about your app, nobody is going to use it and to acquire users, a marketing plan needs to be put in place.
There are loads of acquisition strategies out there. Here are a few of the most important:
Undertake App Store optimization to ensure you rank highly for important keywords
Launch a website with email signup, to notify users when your launch takes place
Establish a budget for “cost per install” ads. These will allow you to pay only for users who install your app on their phone.
Consider public beta tests that may help you obtain early loyal users
Utilize general PR methods, and reach out to blogs, magazines, and influencers to get them to write about your product
Remember to take the time to study your competitors, and see how they market their product. By doing so, you’ll get an idea of your expenses and potential users. What’s more, you should always have those numbers to hand, should an investor ask about them!
Keep the pitching rules in mind
Despite the differences mentioned previously, apps still follow the primary pitching rules. Prepare your pitch deck clearly by conveying the problem(s) you’re solving, and lay out how you’re going to solve it, and what financial benefits you expect from your success.
Be both a salesperson and a storyteller. Make sure you know your numbers (but be sure to avoid slipping into boring accountant mode). Put across your passion – and remember, often it’s not the idea that’s being invested in, it’s you as a creative, a developer, an individual. If you’re enthusiastic and passionate, and you’re serious about the figures and the execution, the rest of the pieces should all fall into place.
It’s not always easy, and it sometimes takes far longer than we’d want in order to get the right investment. However, it’s important to not give up. Keep getting out there, reaching out to new investors, and making the connections you need to make. It’s just a matter of time before an investor gives you the funds you need to make your ideas fly.
Web Development
Web development, also known as website development, refers to the tasks associated with creating, building, and maintaining websites and web applications that run online on a browser. It may, however, also include web design, web programming, and database management.
Web development is closely related to the job of designing the features and functionality of apps (web design). The term development is usually reserved for the actual construction of these things (that is to say, the programming of sites).
The basic tools involved in web development are programming languages called HTML (Hypertext Markup Language), CSS (Cascading Style Sheets), and JavaScript. There are, however, a number of other programs used to “manage” or facilitate the construction of sites that would otherwise have to be done “from scratch” by writing code. A number of content management systems (CMS) fall into this category, including WordPress, Joomla! Drupal, TYPO3, and Adobe Experience Manager, among others.
What Exactly is Web Development?
Web development is closely related to the job of designing the features and functionality of websites and apps (often called “web design”), but the “web development” term is usually reserved for the actual construction and programming of websites and apps.
Think of all the web pages you have used over the years – Web Developers built those sites, making sure they functioned properly and performed in ways that allowed for a great user experience. Web Developers do this by writing lines of code, using a variety of programming languages, which vary depending on the tasks they are performing and the platforms they are working on.
Web Development vs. Web Design
Though there is overlap, there are also key differences between web development and web design. Let’s take a closer look:
Web Designers:
Create everything a user sees on a website or software product, including all visual, colour, typography, and usability elements
Work directly with a client to create designs or work as part of a team to develop client vision
May need knowledge of a programming language or some coding skills, or at least some level of familiarity with widely used languages such as HTML, CSS, PHP, and JavaScript
Create wireframes and prototypes to test design ideas, offer input on design logos, branding, company style guides
Web Developers:
Write the code that makes a website function, whether they work on the front end or back end (server-side)
Create or implement designs demanded by a client or created by a design team
Need expert-level knowledge of a variety of programming languages, including HTML (Hypertext Markup Language), CSS, PHP, and JavaScript but also extending to other languages (Ruby, C/C++, Python), frameworks, and libraries
Rarely create mock-ups, select typography, or pick color palettesNeed expert-level knowledge of a variety of programming languages, including HTML (Hypertext Markup Language), CSS, PHP, and JavaScript but also extending to other languages (Ruby, C/C++, Python), frameworks, and libraries
What Are the Most Common Programming Languages?
The most common programming languages involved in web development are:
HTML (Hypertext Markup Language)
CSS (Cascading Style Sheets)
JavaScript
Types of Web Development
There are three main types of web development: front-end development, back-end development, and full-stack development.
What Is Front-End Development?
Front-end development involves the “client-facing” side of web development. That is to say usually, front-end web development refers to the portion of the site, app, or digital product that users will see and interact with. A Front-End Developer, therefore, is responsible for the way a digital product looks and “feels,” which is why they are often also referred to as Web Designers.
Front-End Web Developers focus on translating website design and visual ideas into code. A front-end Software Developer takes the design ideas created by others on web development teams and programs them into reality, acting as a bridge between design and technology.
Front-End Developers will usually need to possess a solid understanding of programming languages, including HTML, CSS, and JavaScript, as well as frameworks like React, Bootstrap, Backbone, AngularJS, and EmberJS. Responsibilities of a Front-End Developer would include creating responsive websites (that look and function well on any device), conducting website testing and fixing any bugs detected along the web development process, and ensuring site structure follows SEO best practices.
Front-End Development Jobs
Unlike back-end development, there are a number of job titles that cover different skill sets and experience levels within front-end development, including:
Front-End Developer
Front-End Engineer
CSS/HTML Web Developer
Front-End Web Designer (this usually denotes a role that involves more visual and interaction design requirements)
Front-End User Interface Developer (covering interaction design skills)
Mobile Front-End Web Developer
Front-End SEO Expert (usually denoting a Developer with experience incorporating SEO strategy)
Front-End Accessibility Expert
Front-End Dev Ops
Front-End QA (involving unit testing, functional testing, user testing, and A/B testing)
What Is Back-End Development?
If Front-End Developers are responsible for how a digital product looks, Back-End Developers are focused on how it works. A Back-End Developer creates the basic framework of a website before maintaining it and ensuring it performs the way it should, including database interactions, user authentication, server, network and hosting configuration, and business logic. Working behind the scenes – or server-side – Back End Developers are concerned with the systems and structures that allow computer applications to perform as desired.
The primary responsibility of Back-End Developers is to ensure the functionality of the site, including its responsiveness and speed. To do that, Back-End Developers have to know how to build servers with modern frameworks (while developing custom APIs and serving static websites and files), and how to manage databases and data on a web server.
Typically, Back-End Developers use server-side programming languages, including PHP, Ruby, and Python, as well as tools including MySQL, Oracle, and Git.
What Is a Full-Stack Developer?
A Full-Stack Developer is someone familiar with both front- and back-end development. Full Stack Developers usually understand a wide variety of programming languages and because of their versatility, they might be given more of a leadership role on projects than developers who specialize. They are generalists, adept at wearing both hats, and familiar with every layer of development. Obviously, employers want to hire Full-Stack Developers – according to an Indeed study, they are the fourth-most in-demand job in tech.
While that perception persists, there still is an increasing number of tech professionals who consider themselves Full-Stack Developers. What’s unclear is whether Developers are now expected to possess a broader skillset, or if Developers are taking it upon themselves to understand functions at both the front-end and back-end. Either way, it’s becoming increasingly important for aspiring Developers to have a foundation in both.
UNDERSTANDING DEPLOYMENT SLOTS IN AZURE APP SERVICE
In Conventional web hosting, we deploy or publish an application to hosting and soon after publishing, user can access the application via an endpoint or a domain (say myapplication.com). Consider a scenario of releasing next version of same application, we again need to release the solution into another staging environment which need to have environment settings which is a manual and time-consuming job. In other words, another staging environment need to prepare with same setting manually and release the application. Once the new release passes the testing then again, we need to deploy this into production hosting manually. There are several others background tasks are involved during the release management like taking backup and setting environments likewise.
Another hassle is rollback. If our latest release is having any issues, then we will again need to rollback to previous version manually which is time consuming and error prompt task. Again, reverting settings, environments and all are painful job as well. The major issue is user impact, which means during the release, update and rollback, there will be downtime and end user cannot use the application.
Azure App service gives another remarkable feature to overcome the above mentioned problems which is deployment slots.
Lets explore about deployment slots, one of the remarkable features of Azure App service which is quite useful for developers and DevOps engineers to over the problems of managing releases and rollback. I will cover following topics in this article.
Azure App service introduction
What is deployment slot in azure app service?
Some facts about deployment slots
Swapping in Deployment slots
Rollback
Setting that are/are not swapped
Azure App service
Azure app service is one of the services of azure for hosting websites, and APIs. It is a cloud-based platform created and managed by Microsoft. Azure App service is PaaS, platform as a Service where we can quickly build, deploy, and scale web apps and APIs based on your requirements. It works perfectly with .NET, .NET core, Node.js, java, Python or PHP, and other programming languages.
Azure App services are much flexible to developers or DevOps engineer. It has several useful features like scaling or auto scaling in a click, easy authentication and secured with standard security compliance, offline sync (Mobile Apps), hybrid connections, easy sharing, monitoring, and insights, many more configuration and extensive features. It is highly scalable, secured, trusted, and fully managed platform.
Deployment slots in azure app service
This is also called as slotting in azure app service which is one of the amazing features. Let me elaborate with one example.
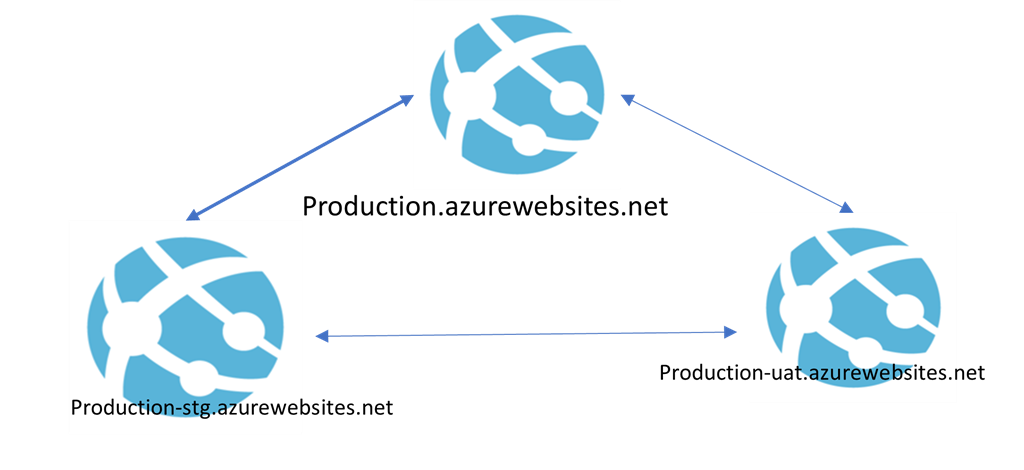
Suppose we have one azure app service with endpoint production.azurewebsites.net where we have deployed an application and is in production. With the deployment slots feature, we can add another slot which is a full-fledged app service with different end point URL like production-stg.azurewebsites.net. Now, we can copy the configurations and settings of production environments into the newly added slot (called as deployment slot) and can deploy the new release of the application. The new release into this deployment slot will not do any impact on production environments. Therefore, user will continue to access our live application and same time we can deploy next version where we can carry-out full testing and verification.
Swapping is another advantageous feature about deployment slots. Instead of deploying again new release of application into production environment, we can simply swap staging slot (newly added deployment slot) with our production within same app service. The magic of deployment slots: we can do swapping with zero downtime which means, end users will notice nothing and experience no downtime.
Yes, users will experience no downtime. Therefore, this is one of the awesome features of Azure app services. Some important points about deployment slots
Slots are different environments exposed via a publicly available endpoint. (can accessible via another URL)
Default app instance is always mapped to the production slot.
Can copy the configuration (app settings and connection strings)
Swap option: we can swap between slots
Use same app service plan therefore, scaling (up or down) will be applied to every slots.
Deployment slots are free to use.
Comes with standard pricing tier or higher
If you have installed any site extensions, you need to do that again in a deployment slot, as it is a new App Service instance
Swapping
We can do swapping between slots without any downtime within same app service.

Traffic redirection is seamless; no requests are dropped because of a swap.
If a function is running during a swap, execution continues, and the next triggers are routed to the swapped app instance.
Yes, users will experience no downtime
What is a swap does?
Warmed-up source slots by firing couple of requests into root slots. (Custom warm-up rules)
Swaps virtual IP address between source and destination, thereby swapping the URLs of those slots
Continuous deployments and Authentication settings, if enabled
Rollback
Another advantageous feature with deployment slots is rollback.
In case, if we are unhappy with latest release in production or having issues then we can easily rollback to reverse the effect with deployment slots without any downtime or user impact. In order to do reverse back, again we can do swap with the deployment slot.
Swapping Options
There are following options for swapping
Manual swapping
Auto swap
Swap with preview
Swap and VSTS
Manual swap
By name, it is clear that we can do swapping from azure portal manually. We can choose source and destination slots and swap it.
Auto Swap
You can choose to swap automatically to a slot when there is a new version of your app in a deployment slot – this is called Auto Swap.
Swap with Preview
It performs the swap in stages.
It applies the configuration elements of the destination slot to the source slot, so you can test if everything works as expected before the actual swap happens.
If you complete the swap, it does the same as in a manual swap, warm-up the slot and performs the swap.
Swap and VSTS
We can take advantage of deployment slots and swapping with Visual studio team services. You can deploy a new version of your app to a deployment slot and then swap it using steps in a release definition.
Setting that are/are not swapped
Settings that are swapped,
All the General settings, like framework version, 32/64-bit, web sockets, OS (window or Linux)
App settings based on demand
Connection strings based on demand
Service endpoints
Handler mappings
Azure Content Delivery Network
Public certificates
WebJobs content
Hybrid connections
Settings that are not swapped,
URL or Publishing endpoints
Custom domain names
Scale settings
WebJobs schedulers
IP restrictions
Non-public certificates and TLS/SSL settings
Cross-origin resource sharing (CORS)
Virtual network integration
Always On
Diagnostic settings
Understanding Malware and its Types
What is Malware?
Malware, or malicious software, is any program or file that harms a computer or its user. Malware includes a wide range of software that has malicious intent. Malware is not software that you would knowingly purchase or download and install. Instead, it is installed onto your system through devious means. Infected systems give various symptoms, such as running slower, starting unknown processes, sending out email without user action, random reboots, and more. Cybercriminals use a variety of physical and virtual means to infect devices and networks with malware. Sophisticated malware attacks use a command & control server to allow attackers to communicate with the infected computer system, steal sensitive information from the hard drive or gain remote access to the device.

Emerging strains of malware cyber-attacks include evasion and obfuscation techniques designed to fool users, security administrators and anti-malware products. Evasion techniques can be simple tactics to hide the source IP address and include polymorphic malware, which changes its code to avoid detection from signature-based detection tools. Another example is fileless malware that only exists in a system's RAM to avoid being detected. You might hear people use the term virus to describe all types of malware, but that isn’t accurate. A virus is a specific type of malware, and malware includes many other types of malicious software, including worms, logic bombs, Trojans, ransomware, rootkits, spyware, and more.
Viruses
Worms
Logic Bombs
Backdoors
Trojans
Botnets
Rootkits
Spyware
Adware
Ransomware
Keylogger
Grayware
Fileless Malware
Browser Hijacker
Crimeware
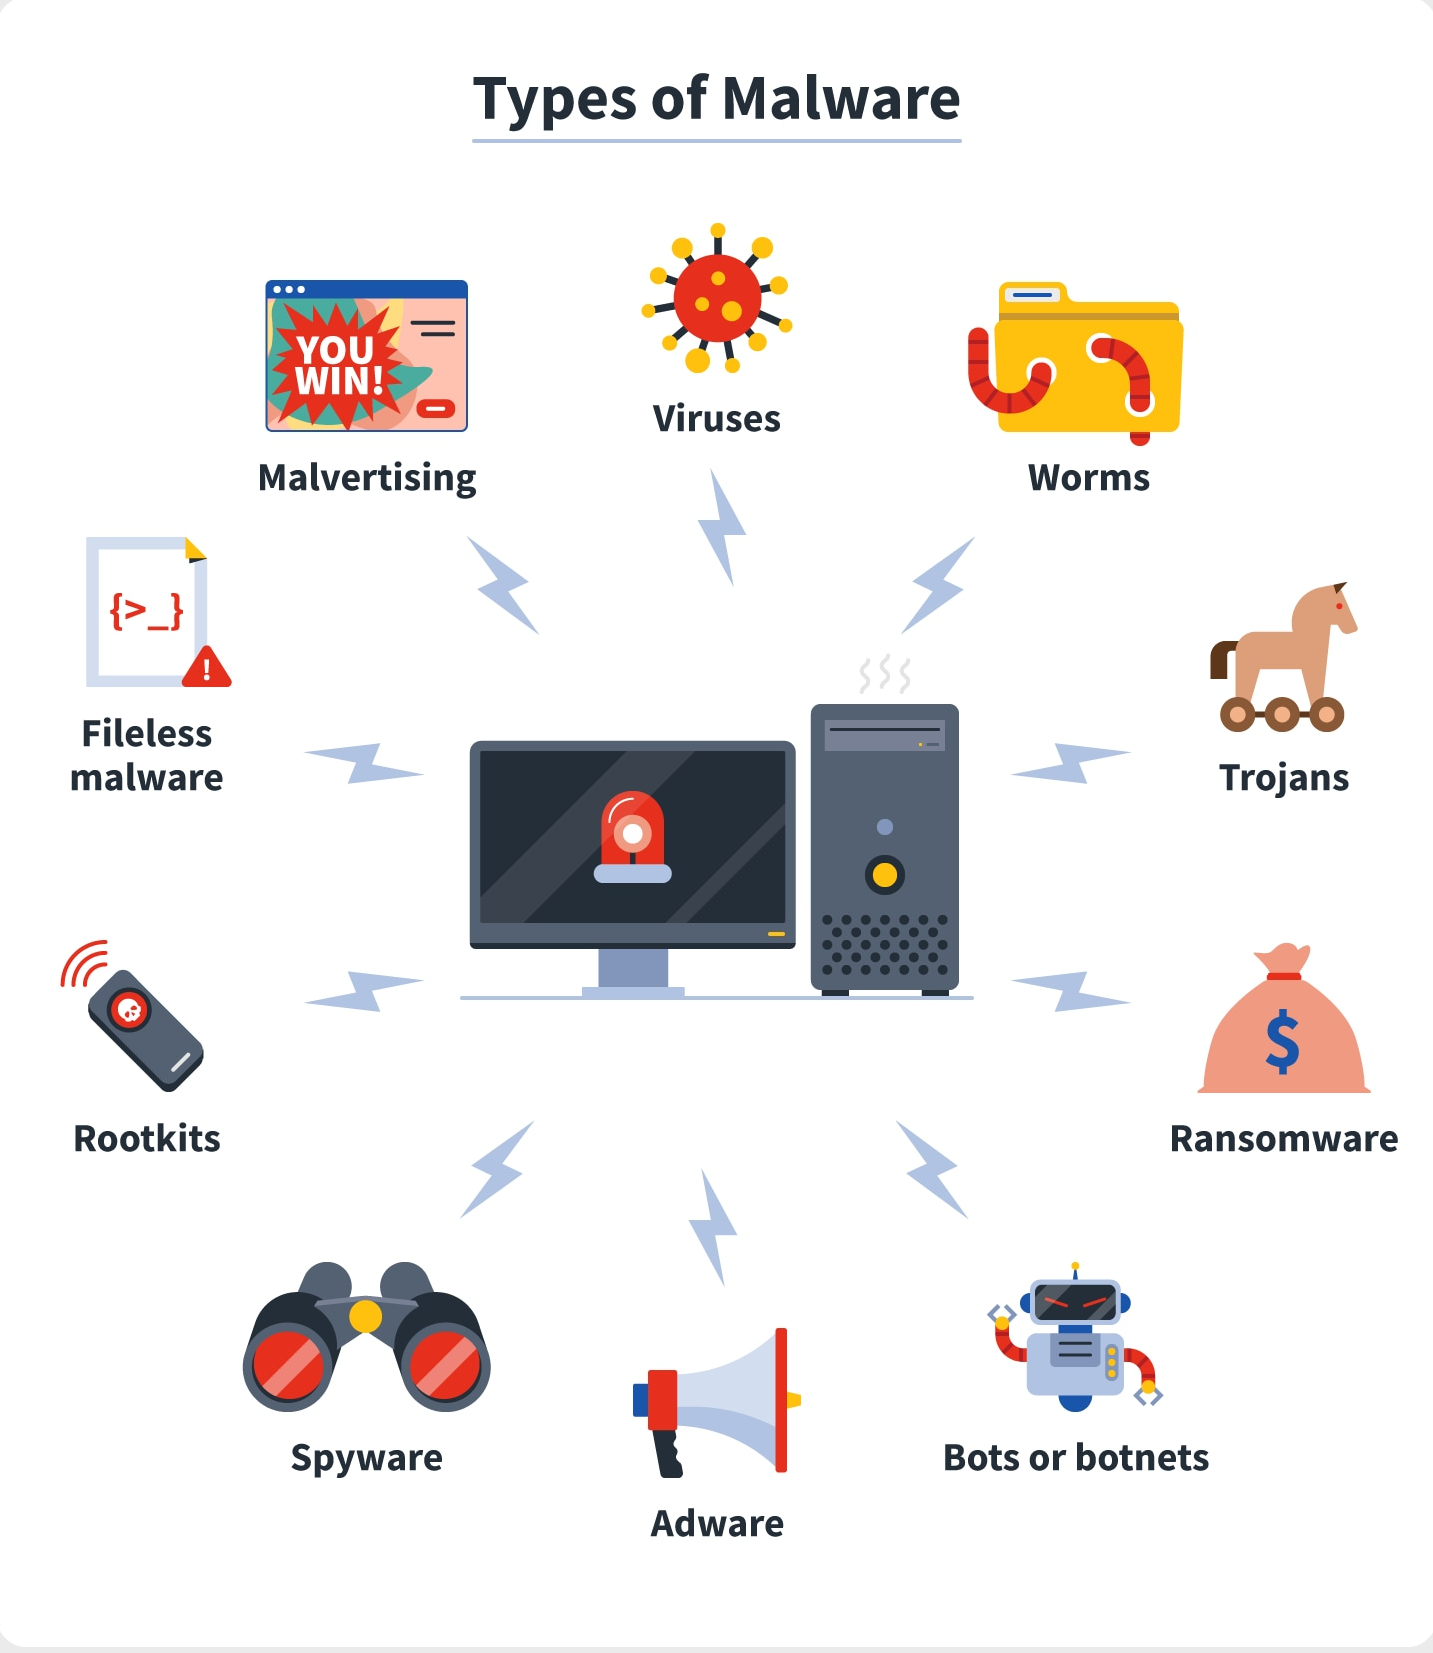
Viruses
A virus is a set of malicious code that attaches itself to a host application. The host application must be executed to run, and the malicious code executes when the host application is executed. The virus tries to replicate by finding other host applications to infect with the malicious code. At some point, the virus activates and delivers its payload. Typically, the payload of a virus is damaging. It may delete files, cause random reboots, join the computer to a botnet, or enable backdoors that attackers can use to access systems remotely.
Worms
A worm is self-replicating malware that travels throughout a network without the assistance of a host application or user interaction. A worm resides in memory and is able to use different transport protocols to travel over the network. One of the significant problems caused by worms is that they consume network bandwidth. Worms can replicate themselves hundreds of times and spread to all the systems in the network. Each infected system tries to locate and infect other systems on the network, and network performance can slow to a crawl.
Logic Bombs
A logic bomb is a string of code embedded into an application or script that will execute in response to an event. The event may be a specific date or time, when a user launches a specific program, or any event the programmer decides on.
A logic bomb executes in response to an event, such as when a specific application is executed or a specific time arrives.
Backdoors
A backdoor provides another way of accessing a system, similar to how a backdoor in a house provides another method of entry. Malware such as Trojans often installs backdoors on systems to bypass normal authentication methods. Application developers often code backdoors into applications, but this practice is not recommended. For example, an application developer might create a backdoor within an application intended for maintenance purposes. However, if attackers discover the backdoor, they can use it to access the application.
Trojan
A Trojan appears to be something useful but includes a malicious component, such as installing a backdoor on a user’s system. Many Trojans are delivered via drive-by downloads. They can also infect systems from rogueware, pirated software, games, or infected USB drives.
Botnets
A botnet combines the words robot and network. It includes multiple computers that act as software robots and function together in a network (such as the Internet), often for malicious purposes. The computers in a botnet are called zombies and they will do the bidding of whoever controls the botnet.
Bot herders are criminals who manage botnets. They attempt to infect as many computers as possible and control them through one or more servers running command-and-control software. The infected computers periodically check in with the command-and-control servers, receive direction, and then go to work. The user is often unaware of the activity.
Most computers join a botnet through malware infection. For example, a user could download pirated software with a Trojan or click a malicious link, resulting in a drive-by download. The malware then joins the system to a botnet.
Some of the instructions sent by the command-and-control servers include:
Send spam.
Launch a distributed denial-of-service attack.
Download additional malware, adware, or spyware such as keyloggers.
Rootkits
A rootkit is a group of programs (or, in rare instances, a single program) that hides the fact that the system has been infected or compromised by malicious code. A user may suspect something is wrong, but antivirus scans and other checks may indicate everything is fine because the rootkit hides its running processes to avoid detection.
In addition to modifying the internal operating system processes, rootkits often modify system files such as the Registry. In some cases, the rootkit modifies system access, such as removing users’ administrative access.
Rootkits have system-level access to systems. This is sometimes called root-level access, or kernel-level access, indicating that they have the same level of access as the operating system.
Spyware
Spyware is software installed on users’ systems without their awareness or consent. Its purpose is often to monitor the user’s computer and the user’s activity. Spyware takes some level of control over the user’s computer to learn information and sends this information to a third party. If spyware can access a user’s private data, it results in a loss of confidentiality.
Some examples of spyware activity are changing a user’s home page, redirecting web browsers, and installing additional software, such as search engines. In some situations, these changes can slow a system down, resulting in poorer performance.
Adware
When adware first emerged, its intent was usually to learn a user’s habits for the purpose of targeted advertising. As the practice of gathering information on users became more malicious, more people began to call it spyware. However, some traditional adware still exists.
A common type of adware is pop-ups. For example, while you are visiting a site, another browser window appears, or pops up, with an advertisement. These pop-up windows aren’t malicious, but they are annoying.
Sometimes pop-ups can be helpful. As a legitimate example, my online bank has interest-rate information that I can view. When I click on this link, it pops up another window showing the interest rate information without taking me away from the current page I’m viewing.
Ransomware
Ransomware is a type of malware that prevents or limits users from accessing their system, either by locking the system's screen or by locking the users' files unless a ransom is paid. More modern ransomware families, collectively categorized as crypto-ransomware, encrypt certain file types on infected systems and forces users to pay the ransom through certain online payment methods to get a decrypt key.
keylogger
A keylogger, sometimes called a keystroke logger or keyboard capture, is a type of surveillance technology used to monitor and record each keystroke on a specific computer. Keylogger software is also available for use on smartphones, such as the Apple iPhone and Android devices.
Keyloggers are often used as a spyware tool by cybercriminals to steal personally identifiable information (PII), login credentials and sensitive enterprise data.
Some uses of keyloggers could be considered ethical or appropriate in varying degrees. Keylogger recorders may also be used by:
employers to observe employees' computer activities;
parents to supervise their children's internet usage;
device owners to track possible unauthorized activity on their devices
law enforcement agencies to analyze incidents involving computer use.
Grayware
As its name suggests, Grayware is a software type that comes between malicious(black) and non-malicious(white) software categories. Grayware programs can be used for both legal and illegal activities. For example, Spyware and Keyloggers can be categorized under Grayware. They can be legally used by organizations to track the activities of their employees. Similarly, they can also be used by hackers to illegally spy on users.
Fileless Malware
Fileless malware is a type of malicious activity that uses native, legitimate tools built into a system to execute a cyber-attack. Unlike traditional malware, fileless malware does not require an attacker to install any code on a target’s system, making it hard to detect.
Browser hijacking
Browser hijacking is a form of unwanted software that modifies a web browser’s settings without a user's permission, to inject unwanted advertising into the user's browser. A browser hijacker may replace the existing home page, error page, or search engine with its own. These are generally used to force hits to a particular website, increasing its advertising revenue.
Crimeware
Crimeware is a class of malware designed specifically to automate cybercrime. Crimeware (as distinct from spyware and adware) is designed to perpetrate identity theft through social engineering or technical stealth in order to access a computer user's financial and retail accounts for the purpose of taking funds from those accounts or completing unauthorized transactions on behalf of the cyberthief. Alternatively, crimeware may steal confidential or sensitive corporate information. Crimeware represents a growing problem in network security as many malicious code threats seek to pilfer valuable, confidential information.
Visualization with Amazon QuickSight
Quicksight
Amazon Quicksight is a fully managed, serverless, cloud business intelligence system.
Quicksight Overview
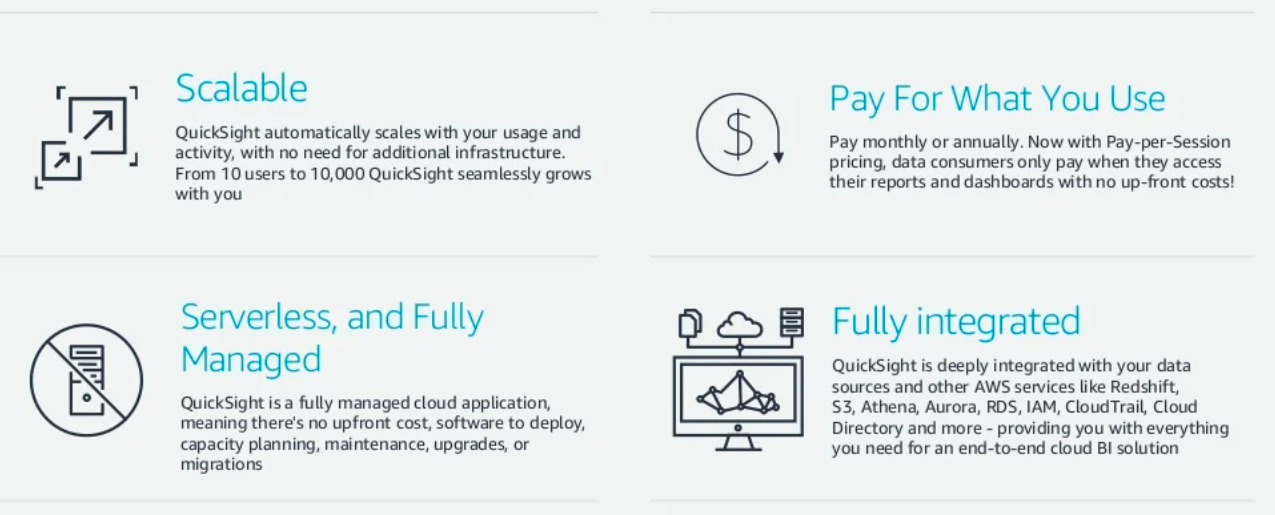
One product for all types of users
Quicksight covers all of our users from casual data consumers, to dashboard creators, to power users and analysts that need self-serve analytics.
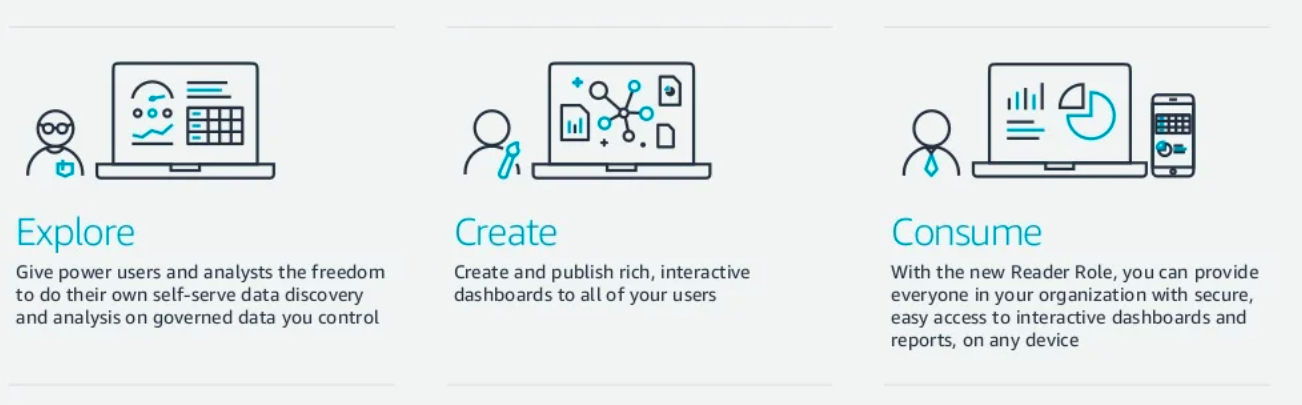
Introducing Pay – per Session pricing for Readers
Pay–per-Session pricing for Readers starts at $0.30 per session up to a max of $5/user/month for unlimited sessions for data consumers that interact with published dashboards and reports.
Enterprise Edition
For Deploying insights at scale, across our organization.
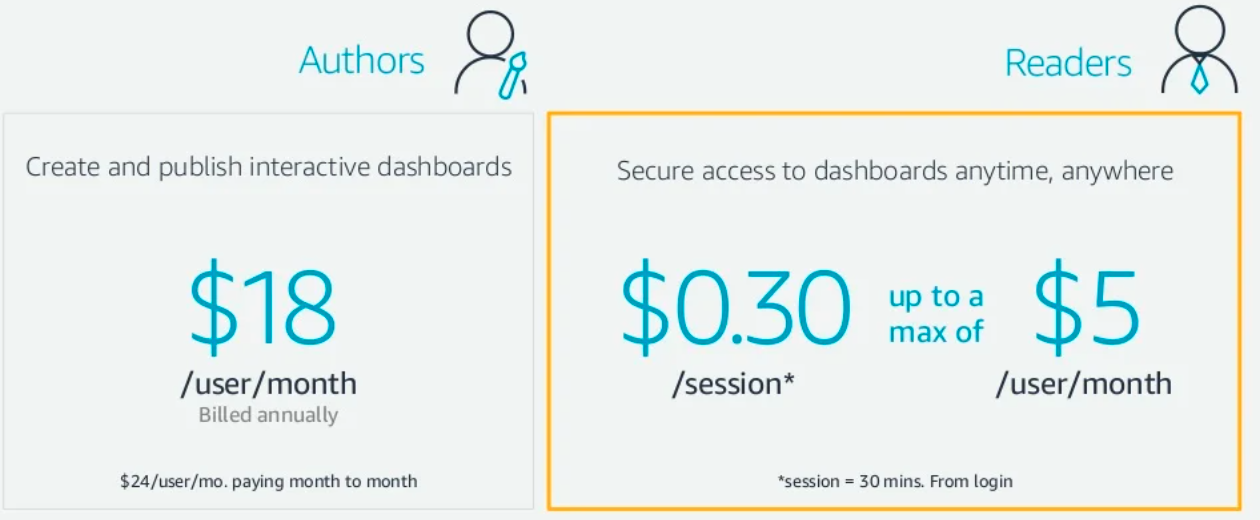
Standard Edition
Ideal for small teams that need to explore and analyze their data
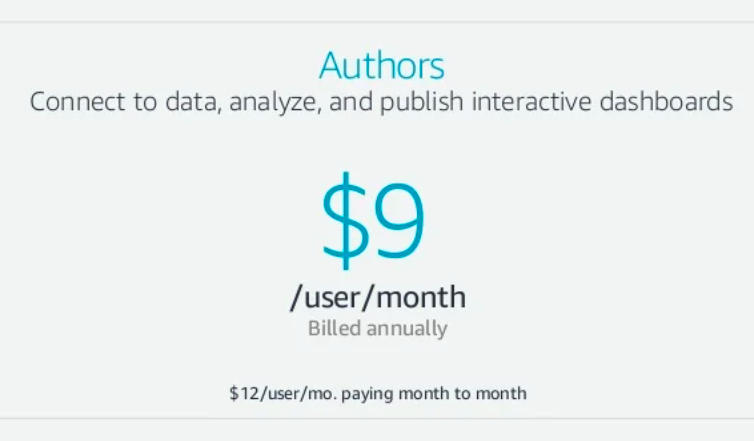
How Quicksight works
Connect to our data, wherever it is
Quicksight is natively integrated with AWS data sources, as well as on-premise and hosted databases and third party business applications
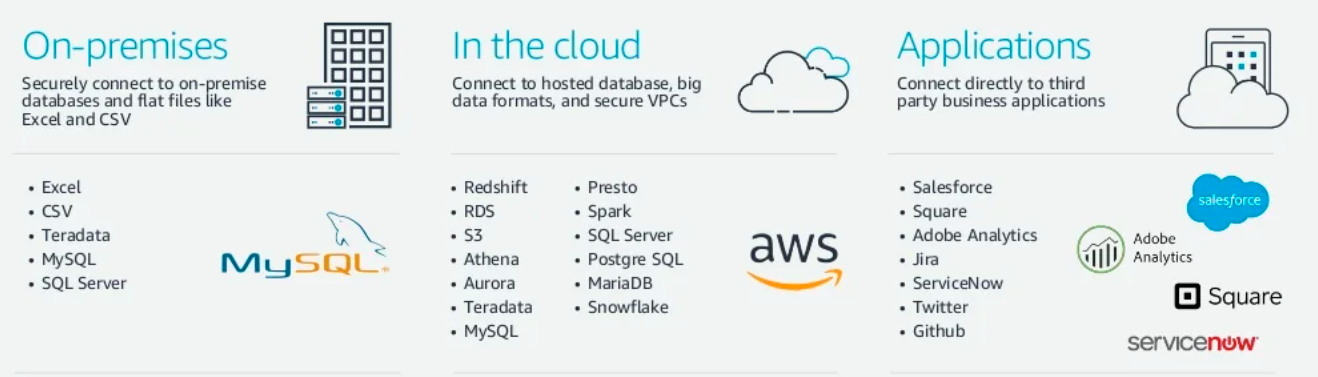
Serverless data lake & analytics with AWS
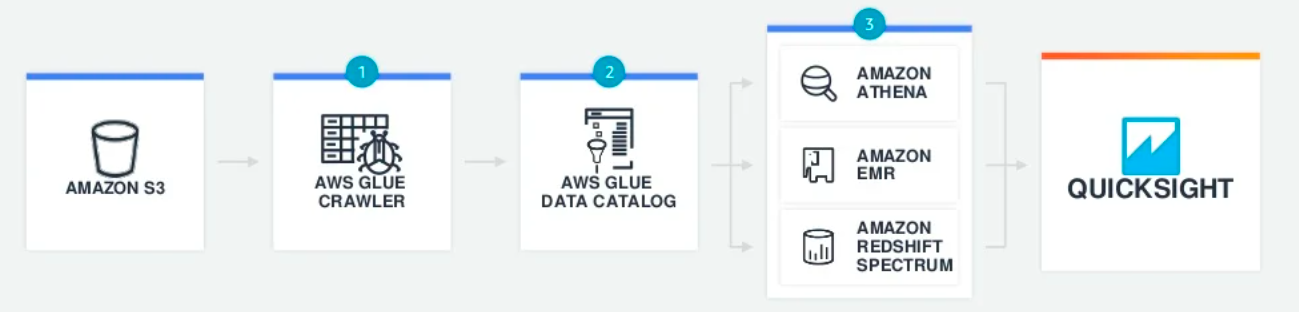
Crawlers scan our data sets and populate the Glue Data Catalog
The Glue Data Catalog serves as a central metadata repository
Once catalogued in Glue, our data is immediately available for analytics
Create and publish interactive dashboards
QuickSight makes it fast and easy to create rich, interactive dashboards and reports, and securely publish them to everyone in our organization with a click.
Rich interactivity for end users like filters, drill downs, zooming and more
Blazing fast navigation with SPICE
Accessible on any device
Keep everyone up-to date with data refresh
Publish to everyone with a click
Explore, visualize, collaborate
Give power users and analysts fast, easy-to-use self-serve analytics with the Author role.
Connect to data sources, and create/edit Datasets
Create visual analyses, filters, drill downs and more
Invite co-workers to collaborate on our analysis
Publish dashboards and reports
Deploying governance
Create managed datasets that give power users and authors the flexibility to perform self-serve analytics on data that we control.
Create datasets:
Can be shared with any user
Automatically refresh
Have row level security
Users cannot modify
Dynamically update with changes
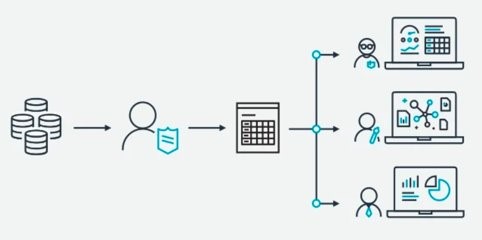
Secure Content Management
As a hosted application, everything we create in Quicksight is always connected, and always under control.
Modify, delete, refresh, and manage user access to everything.
Named user access with security permissions
Track and manage all of our content, and easily see who has access to what
SPICE
SPICE provides our users with rapid response times and automatically scales with user activity, protecting our underlying data sources saving us time and money.
Millisecond response time
Fault-tolerant, self-healing
Support for high concurrency
Backed up in S3 (Write Ahead Log)
Instant failover with zero impact
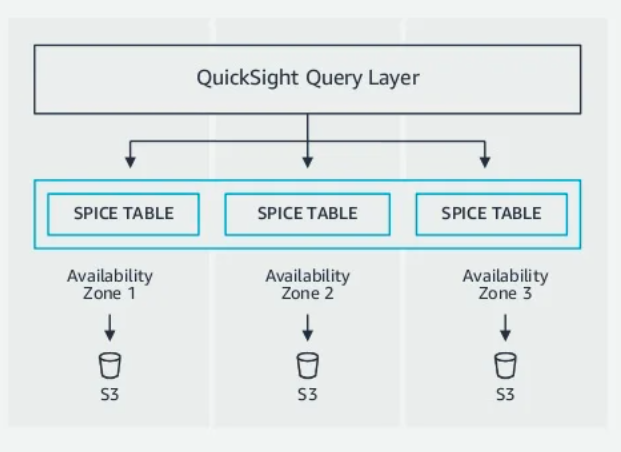
User management and AD Integration
Quicksight Enterprise Edition can integrate with our Active Directory to dynamically manage users and groups

Federated Single Sign-On (SSO)
Allow users to sign in to their Identity Provider portals with existing credentials and then access Quicksight using SAML 2.0

Serverless data lake & analytics with AWS
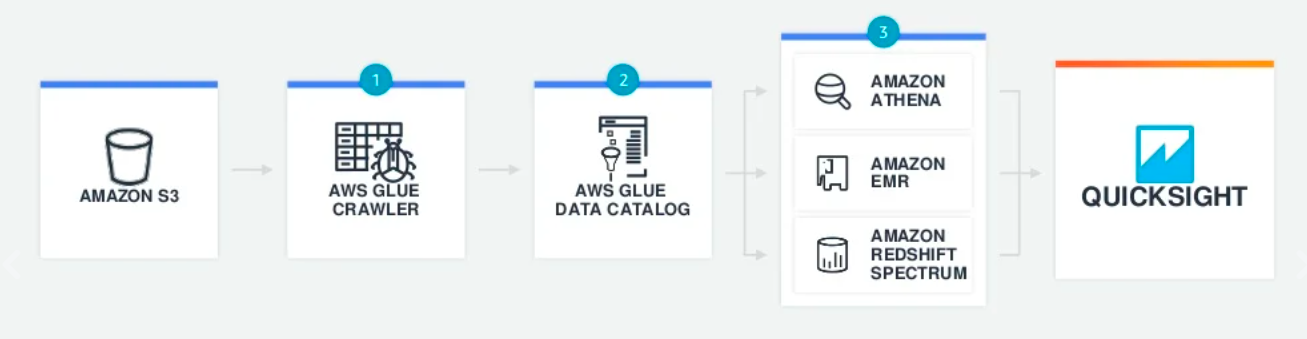
Crawlers scan our data sets and populate the Glue Data Catalog
The Glue Data Catalog serves as a central metadata repository
Once catalogued in Glue, our data is immediately available for analytics.
ETL, Data Warehousing and Analytics with AWS
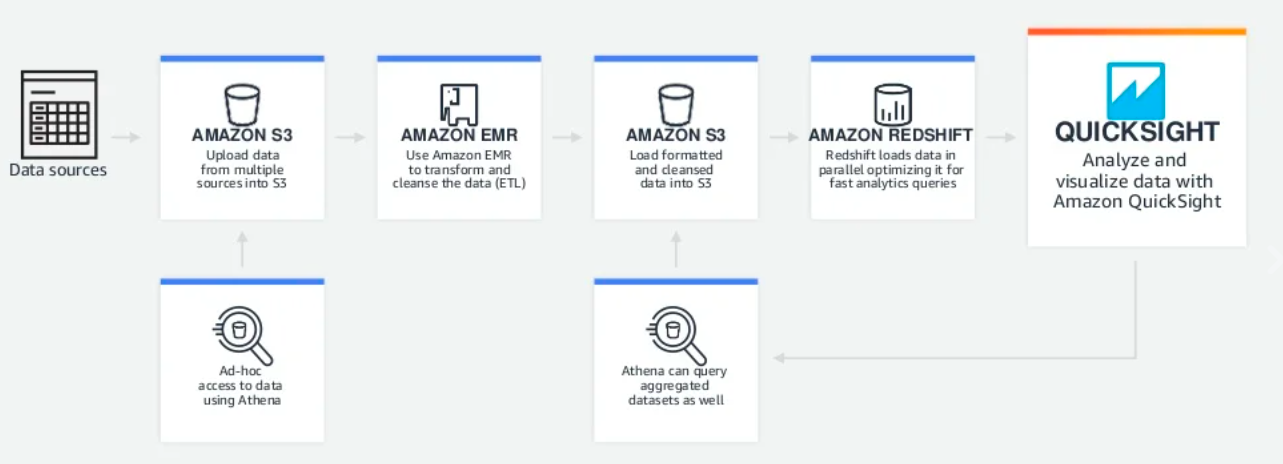
Securely connect to on-premises data
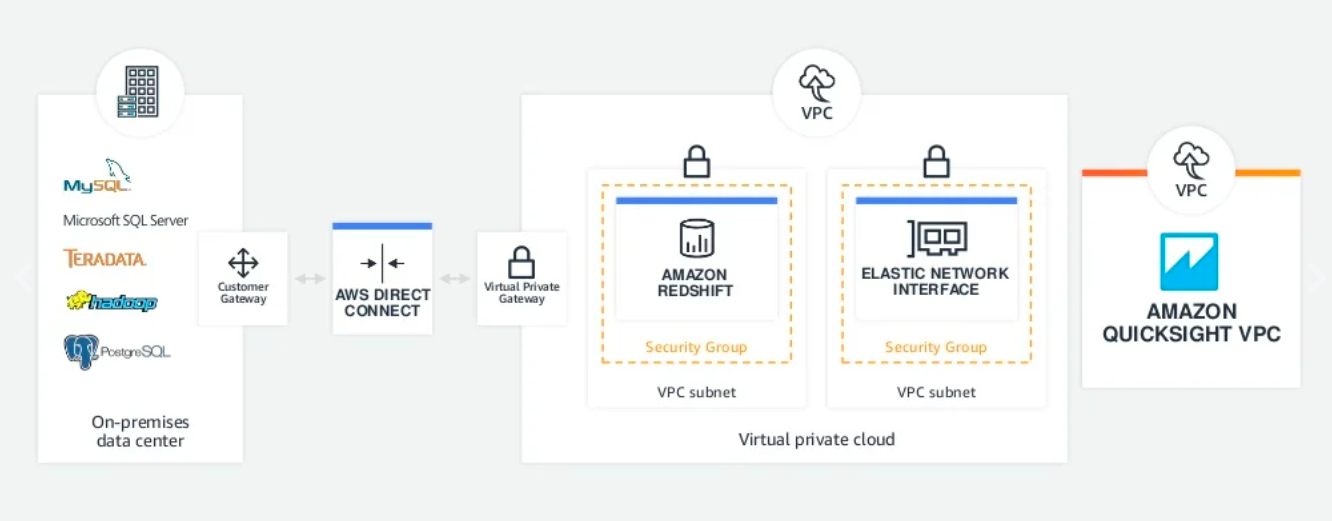
Oracle Analytics Cloud
Introduction
Analytics refers to the techniques used to analyse data to enhance productivity and business gain. It also enables applying data patterns towards effective decision making. Analytics is applied to business data to describe, predict, and improve business performance and allow for effective decision making. Oracle Analytics is technically the modern version of Oracle Business Intelligence Enterprise Edition (OBIEE). The change is primarily driven by the absence of self-service data visualization capabilities in OBIEE.
Oracle Analytics comes with extensive self-service features, and advanced AI/ML capabilities. It is an adaptable and secure Oracle Cloud service that provides a full set of abilities to explore and perform collaborative analytics for an individual, for a workgroup, or for an enterprise.
Oracle Analytics Cloud Architecture
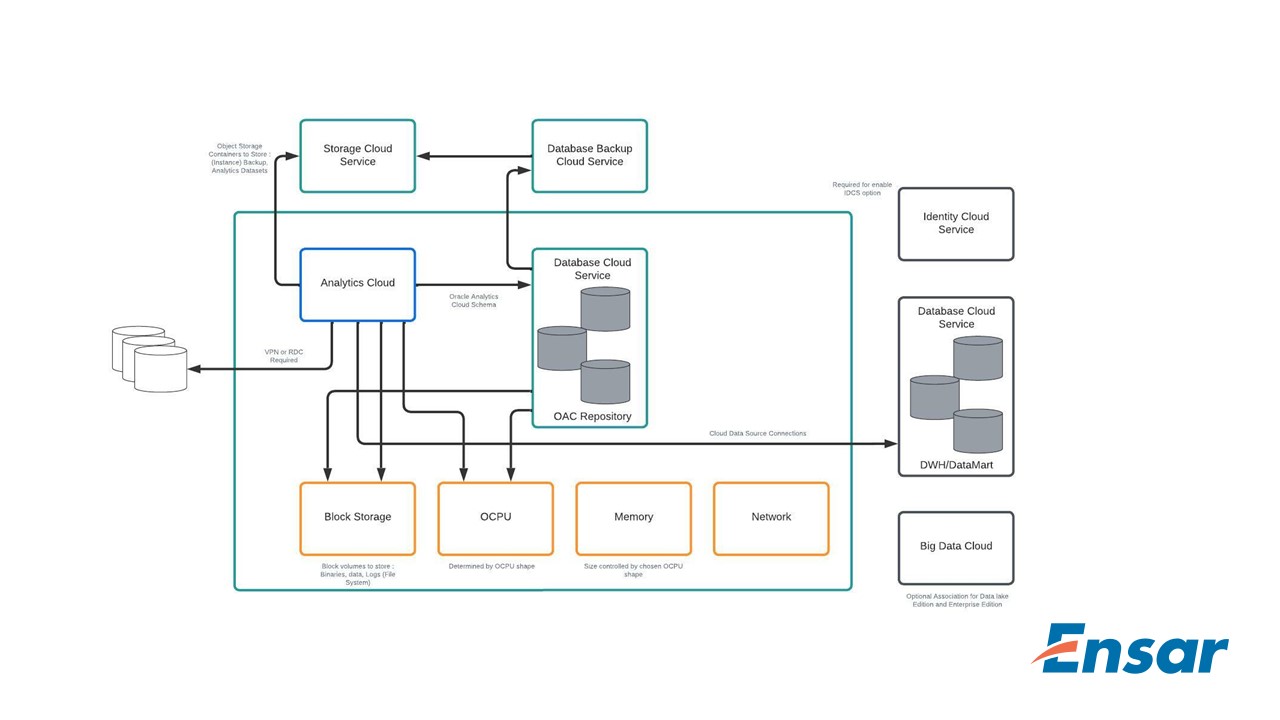
Oracle Analytics Cloud Features:
Data Preparation
The Data Preparation part involves the selection of the different data points from various data sources for ingestion, identifying duplicates and removing redundant columns, cleaning up the spell errors ingested from your different data sources, etc. A quick example of data preparation is removing the rows with blank values for certain fields or replacing them with a standard value.
Data Flow
The data transformation and standardization, aggregations come under the Data Flow feature. For example, we might want to analyze data from your CRM and HRMS. In the CRM, the state Punjab is stored as PB, whereas in HRMS, it is stored as Punjab. If we want to combine the data from CRM and HRMS for our analysis, we’ll have to standardize the State field for successful data integration.
Data Visualization
The Data Visualization feature in Oracle Analytics Cloud helps users to analyse data visually and uncover insights from them. The data visualization feature is a major difference between OBIEE and OAC. OBIEE has limitations in terms of self-service data visualization, which is successfully addressed in OAC. Another exciting part of this data visualization feature is that Oracle Analytics Cloud automatically shows the insights that you’re interested in, based on AI.
Data Collaboration
Data Collaboration is a feature required by enterprise customers. Oracle Analytics Cloud helps users in organizations collaborate and share data for insights. A report that we use could be useful for another user as well for making decisions. In that case, we can directly share the report with that user in Oracle Analytics Cloud. However, this is possible only if the other user also has access to the data we created in our report.
Embeddability
Oracle Analytics Cloud also provides app developers to customize and embed OAC reports and analytics into their applications. This feature saves time for app users, as they don’t have to create a separate account or log in to OAC to see their report.
Components of Oracle Analytics Cloud:
Oracle Data Visualization Cloud Service (DVCS) and Oracle Business Intelligence Cloud
Service (BICS)
These are Data Visualization Systems that are available as Software-as-a-Service (SaaS). It allows us to maintain control over the domain while migrating to the cloud. Instead of copying the Data Models, the Business Intelligence Cloud will help us to reuse this component to develop visualizations in OAC.
Oracle Smart View
Using this tool we can explore and integrate Oracle Analytics Cloud BI content with Microsoft Office applications. Users may examine, import, alter and share data in Microsoft Office Excel, Word and PowerPoint.
Oracle Day by Day
This Analytics tool uses Artificial Intelligence (AI) to evaluate what we examine in OAC and automatically display reports and insights. Whatever the user searches for business data in the app, and then accordingly it generates the Data Insights in ready-to-use analytical chart cards.
Oracle Essbase
This tool is designed primarily for Business Users and Data Analytics (BI) Professionals as it covers a variety of functions, including what-if analysis, budget analysis, forecasting, root cause analysis, and scenario planning. It also allows for Data Backup and Migration, as well as the distribution of application templates across any businesses.
OBIEE to OAC Migration:
Steps to Migrate From OBIEE 11g to OAC
Start with downloading the Oracle Analytics Cloud migration tool JAR file.
Copy the JAR file into your OBIEE 11g environment.
Now run the migration-tool.jar file in the OBIEE environment. The tool exports all content from your OBIEE to a .jar file.
Deploy the bundle into your Oracle Analytics Cloud environment.
Log in to your OACS and verify the migration.
Benefits of Migrating to OAC
Proven interactive dashboard & analysis platform with rich visualizations.
Easy interface for creating reports.
Cost is reduced and implementation is faster.
Scalability is fast and easy
Oracle Cloud HCM-Approval Management
What is Approval Management?
Oracle HCM Cloud Approval management is based on human workflow to automate tasks from one user or an application to another user for actions. Fusion HCM Workflows are routed in a predefined sequence to achieve a result based on the initial configuration of the human workflow.
It Controls approval workflows for business objects such as Hire an Employee, Promotions, Salary Changes, Grade Changes etc.
It enables you to define complex, multistage task routing rules.
It integrates with the setup in HCM to derive approvers based on the supervisory hierarchy.
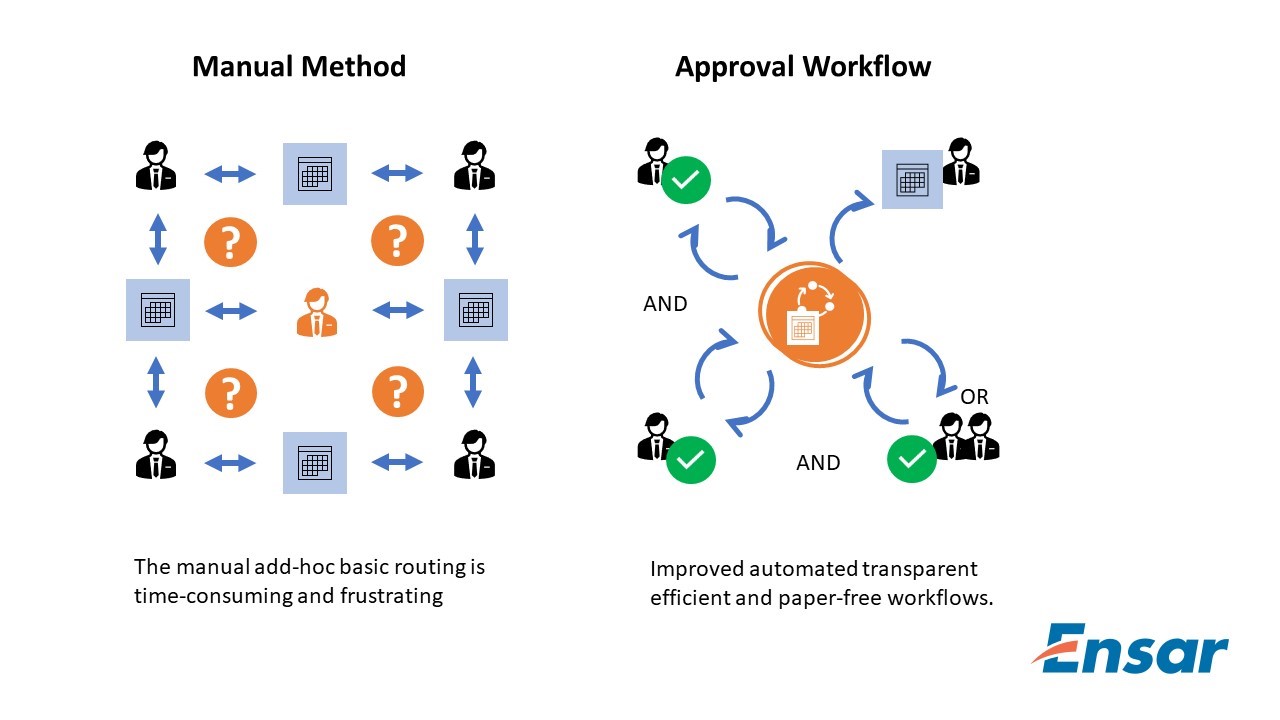
Approval management falls under 3 points:
Controls workflows for business processes such as hiring an employee or managing promotions.
Enables you to define task routing policies that can be as simple or as complex as needed.
It is fully integrated with HCM to derive approvers based on the supervisory hierarchy, areas of responsibility (such as HR or Benefit Representatives), and other criteria, such as job levels.
Approval Workflow:
Workflows are processes in which transactions are routed automatically among users for their review or action.
Workflow human task is any workflow component that requires attention or action from managers.
In Oracle Fusion HCM the tasks for the users come up in the worklist notifications and approval region.
This is the high level diagram of what happens when a task submitter submits the tasks, it goes to the first approver then goes to the final approver, there is also a possibility that the first approver could itself be the final approver and when that happens, the task can be approved. This is a very high level generic flow, diagram of a workflow.
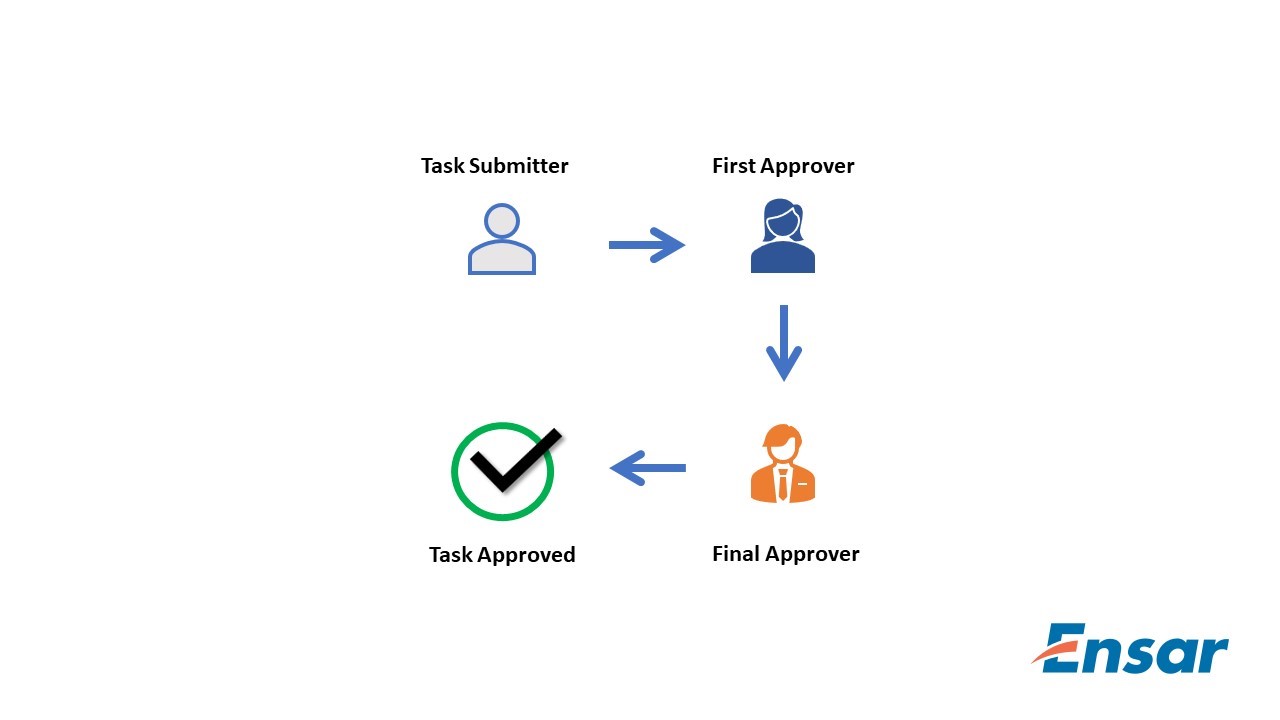
Transactional Flow:
This is a typical fusion HCM approval workflow,

When the transaction is submitted; the information is routed automatically to the work list of the 1st level manager.
If the submitter’s 1st level manager approves the transaction, the information is then routed automatically to the work-list of the 2nd level manager.
If the 2nd level manager approves the transaction, then the information is committed to the database tables.
Depending on the access granted, either of the respective approvers may edit the transaction at any time.
Approver Types:
An approver type is any Workflow Directory Services originating system that defines entities, which can receive Workflow notifications requesting an approval. For example, the HR application defines its set of employees as a Directory Services originating system, so an HR employee can be an approver.
There are various types of approvers available in Approver types, where we can include any number of approvers in the approver sequence by dragging and dropping them into the approval flow. This topic explains each of the approver types.
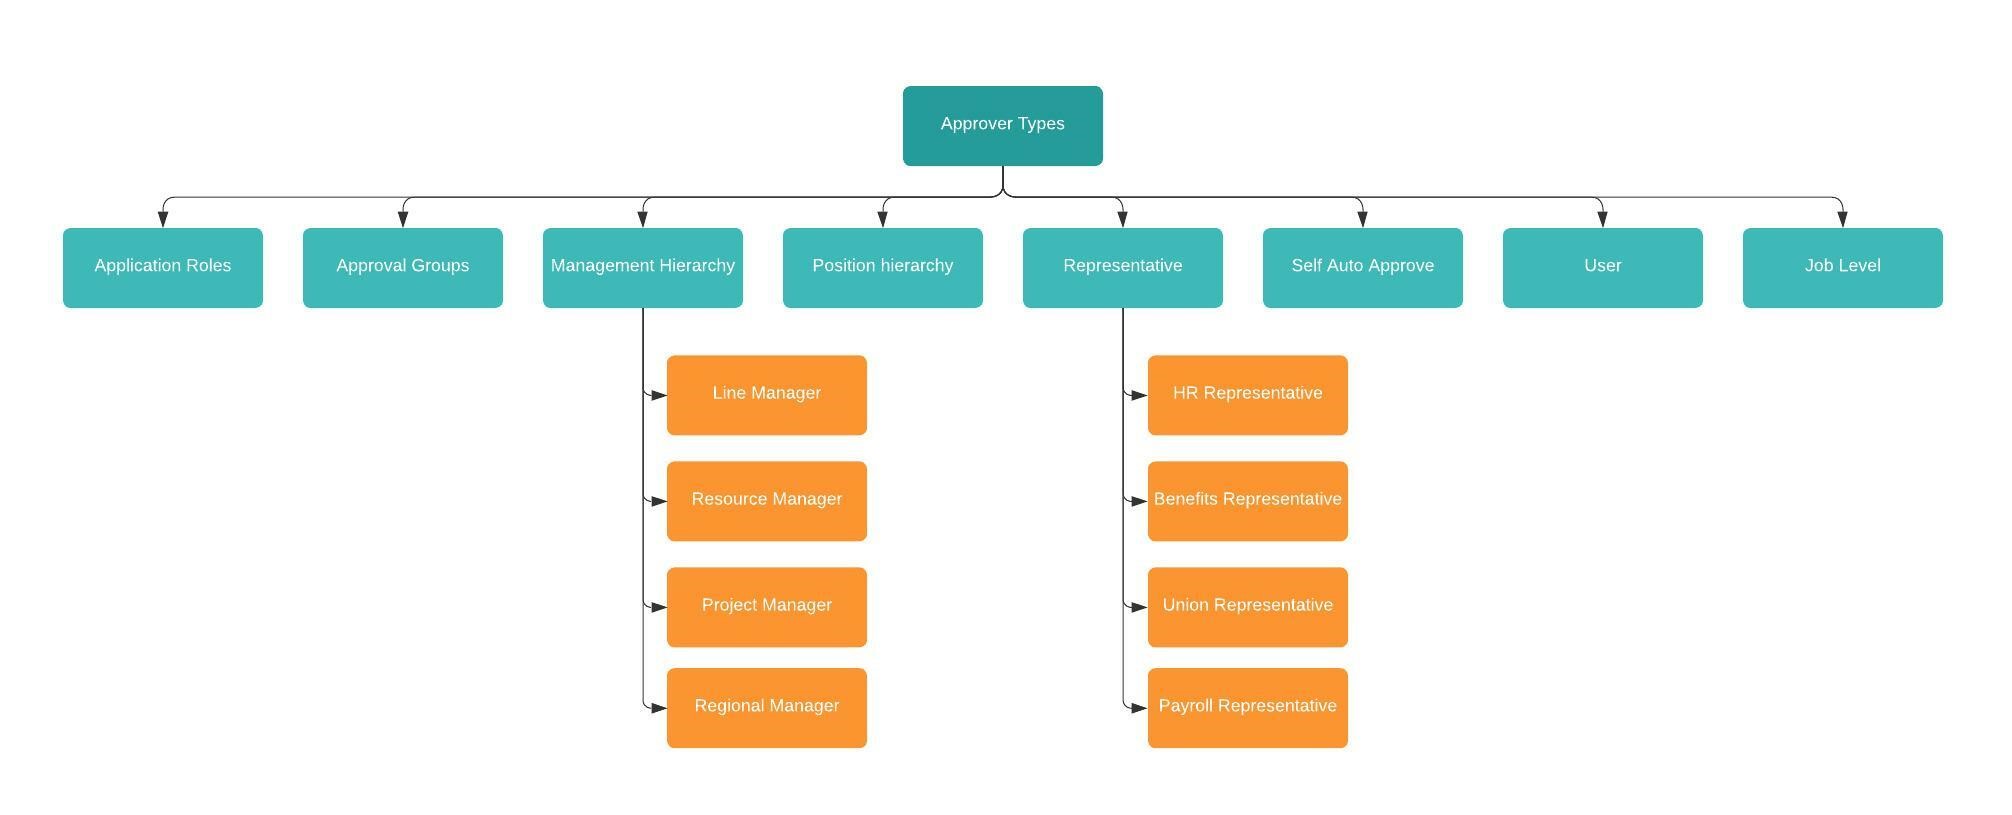
Application Role
If your enterprise defines duty roles for security purposes, you can enter the duty role to include it in the approval sequence. A duty role is assigned to several users.
Approval Groups:
It is nothing but a group of employees, when we require the approval from multiple people then we are going to use an approval group. All approval group members are notified at the same time. We can create approval groups using the BPM Work-list. When defining an approval sequence, we can enter the names of one or more existing approval groups.
Management Hierarchy
In Management Hierarchy, we can setup approvals using the employee supervisor hierarchy. We can set up employee with appropriate job and supervisor such as
Line manager
Resource manager
Project manager
Regional manager
If your enterprise defines additional types of managers, then they appear automatically in the Approvers section of the Manage Approval Rules page. You can include them in the approval sequence
Position Hierarchy:
Position hierarchy defines positions’ relationships. In HCM position hierarchy is built based on these relationships. We enable the HCM position hierarchy on the Manage Enterprise HCM Information page in the Setup and Maintenance work area.
If you include a position hierarchy in your approval sequence, then position holders are invited to approve the transaction. For positions with more than one position holder, the transaction is approved by the first position holder to approve.
Benefits of Approval Workflows
How to Correct Payroll Errors
Overview
Oracle HCM Cloud is an industry-leading product that enables organizations to manage all their HR functions. During different HR activities, errors might happen that need to be fixed. For example, there might be a scenario that Payroll run has been processed for the company and payroll for few employees have processed with incorrect calculation resulting in incorrect pay stubs. This article explains how to revert the payroll run process for few employees in Oracle Fusion HCM application instead of rolling back the whole payroll process. This could be used in any scenario where payroll is not processed correctly for employee and needs to be rolled back.
Common payroll errors could be:
Time card flag is not set while hiring an employee and time entries are processed with 3rd Party interface. Payroll run will process the hours with default schedule hours as well as the hours entered through the third-party interface. This will result in over payment to employees.
Any scenarios (like tax calculation amount, Standard earnings/Supplemental earnings not processed as expected and costing issue with elements) are NOT processed which is needed to revert the payroll for employee.
There are couple of processes to generate the pay stubs for employees. Reversing the payroll run for affected employees are like rolling back each process.
The steps should be:
GL entries should be corrected for accounting correction.
Roll back of Processes like (Payslip, EFT, Check)
Create object group for affected employee.
Run process “Reverse Payroll Calculation” With the object group.
Run Calculate Payroll with object group
Run Prepayment with same date. (Normally it is process date)
Run Archive payroll result with same date
Run Check payment process
Run EFT process
Run Generate payslip with object group
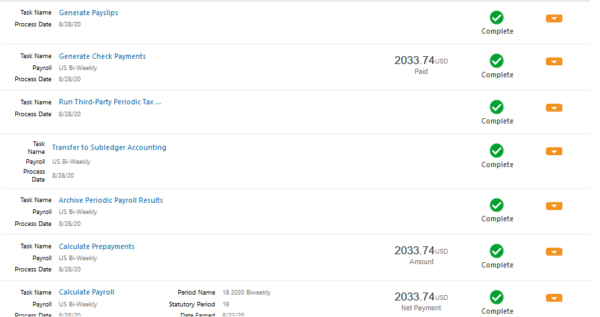
It is found that the pay stub is NOT correct for this employee. Need correction.
Reverse Payroll Process
Below are steps to accomplish this
Roll back Payslip, Check

Run “Reverse Payroll Calculation”

Run the payroll run for this employee using the object group. Make sure to run the prepayment and Archive Periodic Result with the same date (e.g., Process Date).
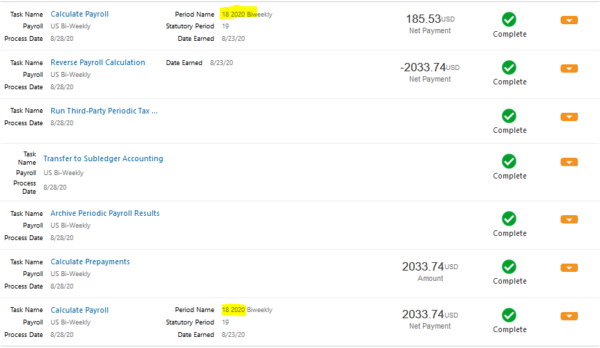
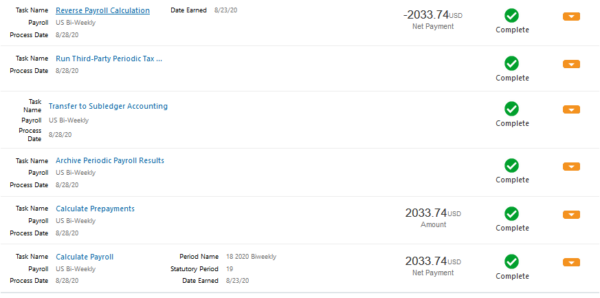
In the end, Payroll is corrected for the affected employee. If there are more than one employee then include them in object group and follow the above steps.
Top Augmented Reality Tools for App Development
What is AR SDK?
SDK is a kind of augmented reality software and it stands for Software Developer Kit and is essentially a bundle of programs and software used to develop other software.
The main advantage of SDKs is that they allow developers to apply typical and time-tested solutions and shortcuts in development, instead of solving all generic and typical problems individually and spending time on them.Below are the tools for AR creation that are popular
Augmented Reality Development Tools
1. Vuforia
Vuforia is an augmented reality SDK that offers a range of products for developing AR experiences, including Vuforia Engine, Studio, and Chalk. The software supports the creation of both marker-based and markerless AR and has several key features that make it one of the best for object recognition and 3D modeling. These features include Ground Plane (for adding content to horizontal surfaces), Visual Camera (expands supported visual sources beyond mobile phones and tablets), and VuMarks (custom markers that can be used in Vuforia face recognition and also encode data).
2. Wikitude
Wikitude is another great choice for AR software development. It is a relative newcomer to the market, with the company being founded in 2008, but has already earned a solid reputation. Wikitude is suitable for developing AR apps for iOS, Android, and Smart Glasses devices. Like most top AR development programs, Wikitude supports a variety of tracking methods and technologies, but also incorporates geolocation, cloud recognition, and distance-based scaling features.
3. ARKit
ARKit is the go-to application for the development of AR software developed by Apple, so it is not possible to use ARKit on android phones. The software relies on camera sensor data and additional data (e.g. from a gyroscope and accelerometer) to detect and analyze users’ surroundings for AR visualization. ARKit also supports fast motion tracking, face tracking, Quick Look (displaying models and scenes that can be moved and scaled easily), and various rendering effects. Apple has worked hard to keep AR easy and understandable for developers, releasing ARKit tutorial materials and updates (ARKit 1.5 , ARKit 2 , ARKit 3) with every new version of iOS.
4. ARCore
ARCore is in many ways an analog of ARKit – another application developed by the creators of a platform for devices using this platform. In this case, the company is Google, and the platform is Android. ARCore comes with the standard bundle of AR features (motion tracking, surface detection, light estimation), as well as several advanced features, such as augmented images (custom responses to specific types of 2D shapes and objects) and multiplayer (rendering of the same 3D objects on different devices simultaneously. It is also worth mentioning that ARCore is compatible with Vuforia, which allows users to make the best of functionality offered by the 2 types of software at once. Additionally, an ARCore Unity pairing is often applied to create efficient Android apps. Google has certain restrictions on which devices can run apps built on the software, and you can check whether a phone/tablet is compatible by looking at the list of ARCore Supported Devices on the Google website.
5. ARToolKit
ARToolKit is an open-source and free-to-use SDK available for AR development for devices on different platforms. Apart from Android and iOS, ARToolKit is used for AR apps on Windows, Linux, and OS X. Initially released in 1999, ARToolKit has undergone various updates. Some of the features included in the latest build are tracking of planar images and simple black squares, natural feature marker generation, real-time speed support, and easy camera calibration. ARToolKit also comes with several optional plugins for development with Unity and OpenSceneGraph.
Supply Chain Management Software, Operations, Processes, and Roles
What is operations and supply chain management?
The term “supply chain management” was coined by Keith Oliver, a leading British logistician who first mentioned this concept in an interview with Financial Times in 1982.
According to Oliver, "Supply chain management (SCM) is the process of planning, implementing, and controlling the operations of a supply chain with the purpose to satisfy customer requirements as efficiently as possible. Supply chain management spans all movement and storage of raw materials, work-in-process inventory, and finished goods from point-of-origin to point of consumption.”
Since then, multiple experts have offered their own definitions of SCM. But in a nutshell, it can be described as supervising the whole flow of goods and services, from raw materials to final products, “from farm to fork.”
SCM is tightly interwoven with operations management (OM), that focuses on coordinating and optimizing the internal processes, whether it be designing and manufacturing goods or developing services. To put it simply, both SCM and OM take care of the same product, but at different stages of its lifecycle.
There are several areas where SCM and OM functions can overlap. But basically, SCM is in charge of outside interactions — with suppliers, warehouses, distributors, and end-customers, while OM supervises everything that happens inside the company.
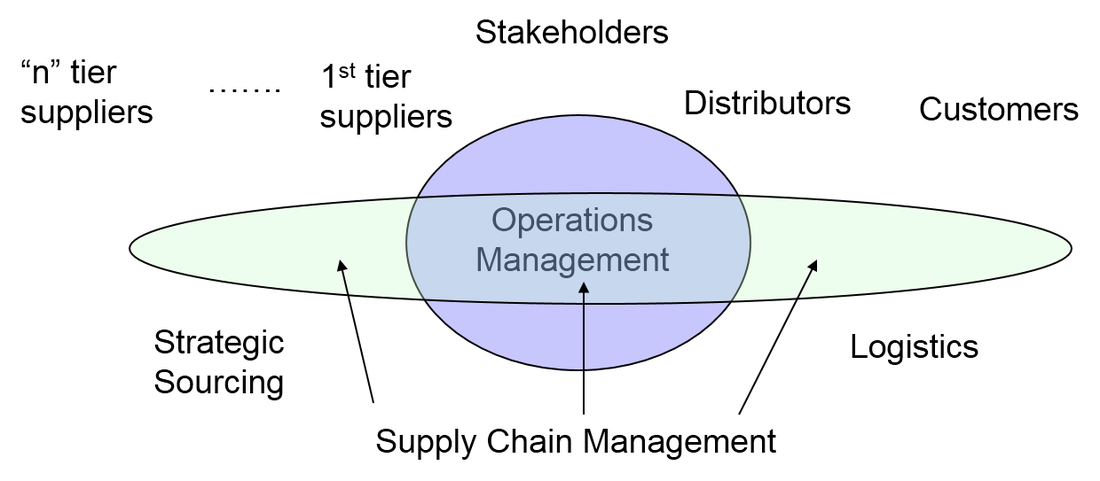
Small companies often don’t separate the external and internal parts of product flow, so that the same specialist or department controls all phases goods and services pass through enroute to the end customer. Large organizations usually split responsibilities between two executives — a supply chain manager and an operations manager.
What are the roles of a supply chain manager and operations manager?
The top objective of both experts is to save expenses and boost efficiency of production without compromising on quality. But while a supply chain manager focuses on external processes, an operations manager solves pressing internal tasks. The former negotiates terms with third-party contractors (suppliers, logistics teams, distributors) and optimizes movement of materials and goods from one point to another outside the organization. The latter communicates with stakeholders and implements policies to boost manufacturing and get things working well inside the company.
Given that both pursue the same global goal and work on the same product, they have some overlapping responsibilities. For example, both are involved in:
forecasting prices, overseeing budgeting, planning and auditing;
cost management (estimating, controlling, optimizing, and reducing operating costs)
inventory control to ensure effective stock utilization and reduce warehousing costs; and
demand forecasting, crucial for preventing overproduction and oversupply
Supply chain and operations managers constantly exchange knowledge and information. Together, they reveal new opportunities for the company and address them. Within this ambitious aim, they take part in choosing innovative technologies that will reduce manual operations and automate stages of product flow.
Innovating supply chain management operations
An important question to ask about business process automation is “How many steps can be delegated to technologies?” In the case of a supply chain network, the answer will depend on its length and the number of operations involved.
The Institute for Supply Management (ISM), the world’s oldest and largest association in the field, differentiates 14 essential components of the supply chain that can vary depending on product complexity as well as business size and type (manufacturer, distributor, retailer). We’ll focus on the most common components and on how software solutions can transform and streamline crucial SCM processes.
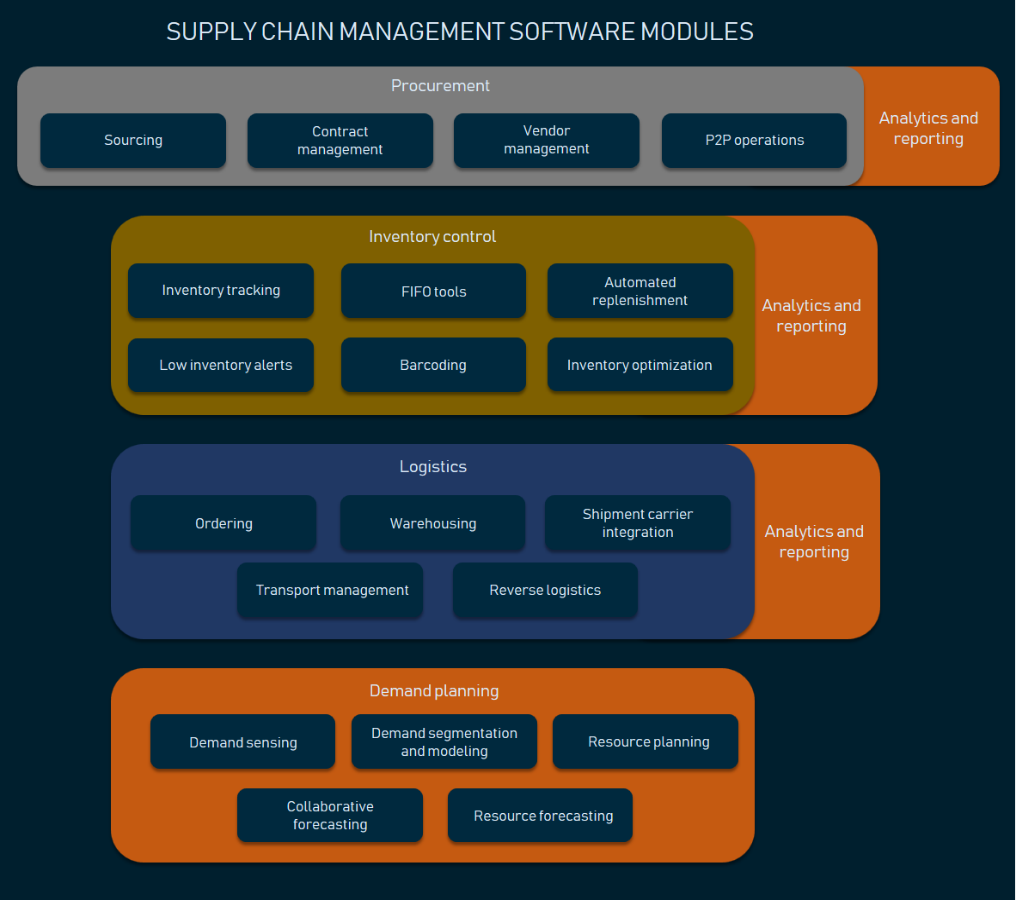
Procurement
Procurement, or obtaining materials, goods, and services you need to run your business is the very first element of a supply chain.
The procurement cycle involves multiple steps — analysing and selecting vendors, negotiating terms, ordering, and invoicing, to name a few. The significant part of these procedures can be delegated to procurement management software. This will speed up the workflow, enhance transparency, save time, and, finally, reduce costs, a key priority for 78 percent of procurement leaders.
The core functionality of procurement software covers the following areas.
E-sourcing Before buying materials or goods to run your business, it’s vital to collect, check, and compare information about different vendors to choose the best one. E-sourcing automates several steps of the traditional sourcing routine.
Preliminary data collection The system sends a standard electronic pre-purchase questionnaire (PPQ) and request for quotation (RFQ) to each potential vendor. After filling in the forms, vendors upload their answers into software, giving procurement managers instant access to all the information.
Automated evaluation At all stages of procurement, e-sourcing solutions use analytical tools to sort through documents sent by suppliers, draw and process essential information, verify compliance of a vendor with business requirements, compare prices and other metrics, and highlight unsuitable proposals. The results can be displayed on the dashboard as informative Data Visualizations.
Invitation to tender (ITT) Vendors sorted out for the next stage of sourcing automatically receive invitations to tender forms that specify requirements of organization and details of the evaluation process.
E-auction Vendors invited to tender and submit their bids to the shared platform. All parties involved have access to all bids and compare offers, which prompts suppliers to reduce prices.
Contract management Among other things, the digital “administrator” helps you create and standardize contract templates, boosts approval processes, and captures electronic signatures.
Procure-to-pay (P2P) operations P2P is a subdivision of procurement that covers financial transactions. The set of P2P features differs from product to product. But the core functionality usually boils down to managing a purchase requisition process, generating and tracking purchase orders (POs), and invoice matching. The system compares invoices to the corresponding POs to eliminate mistakes and duplications. If there are any deviations, the invoices are sent back to the supplier for corrections. Otherwise, payment is authorized.
Vendor (supplier) management An app aggregates all data about your vendors, updates it, and alerts about expired qualifications and assessments. The performance of suppliers is measured against critical metrics such as speed, accuracy, quality, and price.
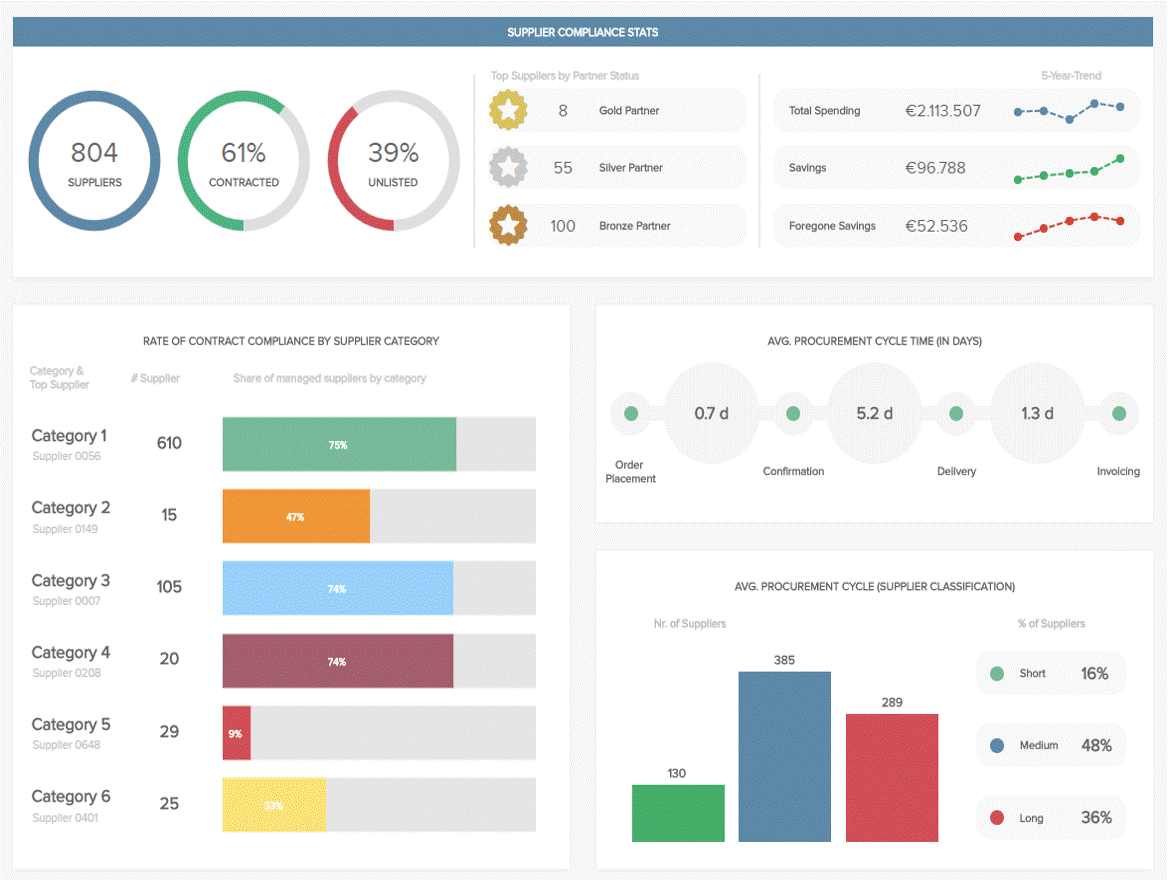
Spend analytics The automated collecting, classifying, and analyzing of expenditure data brings visibility to the complex procurement process and allows businesses to discover savings opportunities. You can read more about Procurement Analytics in our dedicated post.
Inventory control
Inventory can be defined as all goods and materials a company keeps on hand to meet customer demand. There are four major categories of inventory:
Raw materials
Work-in-process (WIP), or components, assemblies, and partially finished goods waiting for completion
Finished/packaged goods
Maintenance, repair, and operating (MRO) items, necessary to support and maintain a production process. This category spans all goods that keep business operations running, from industrial equipment and computers to uniforms and office supplies.
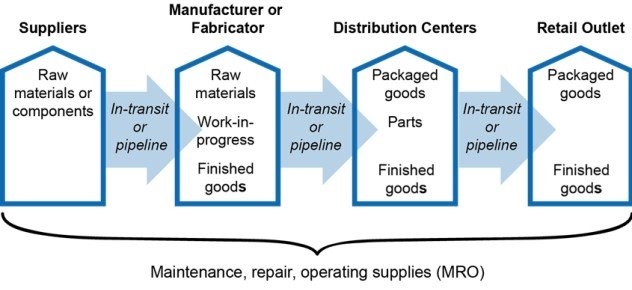
In an ideal world, the first three categories of items would move through the supply chain without stops and bottlenecks, ensuring a rapid investment payback. In reality, supply is rarely (or rather never) equal to demand, with inventory expenses amounting to a substantial 45-90 percent of the company’s total budget. The costs of excess stock can be huge, tying up company funds and reducing cash flow.
Inventory control aims at finding and maintaining the perfect balance between holding too much stock and running out of it across all supply chain nodes. This complex task requires the coordinated effort of different departments. As the business grows, it becomes harder to manage multiple separate subdivisions manually.
The adoption of specialized systems can help you integrate numerous inventory points under one umbrella for more effective, centralized administration. While the choice of available solutions is wide, the common set of must-have features for inventory management software looks like this.
Multi-location inventory tracking Software allows for organizing and tracking inventory items by suppliers, serial numbers, tags, barcodes, SKUs (stock keeping units, or a number assigned to a product to track inventory) or other IDs at different location levels (bins, shelves, racks, aisles) across multiple warehouses. You can easily find a specific part or product, monitor locations, trace item transitions, view overstocks and stockouts.
Low inventory alerts They appear in your dashboard when the quantity of certain items reach the preset low limit.
Automated replenishment In case of frequent reorders, a replenishment tool can automatically create purchase orders and send them to vendors.
Digital FIFO tools FIFO stands for first-in, first-out and describes the principle that the oldest inventory should be used or sold first. This approach leads to timely identification of the obsolete or slow-moving stock.
Barcoding It involves both software and hardware (scanners and label printers) for assigning, scanning, and managing barcodes. Barcoding solutions bring ease, speed, and accuracy to your inventory operations such as stock-taking and verification.
Inventory optimization and performance analysis The system automatically analyses inventory data (such as sales history) and makes suggestions on replenishment dates and quantities. It also identifies the best performing products as well as ones with low profitability indicating where you make the most profit and which products face zero demand.
Real-time reporting High-end solutions constantly process different metrics and generate visual reports on current inventory levels and turnovers, strengths and weak points.
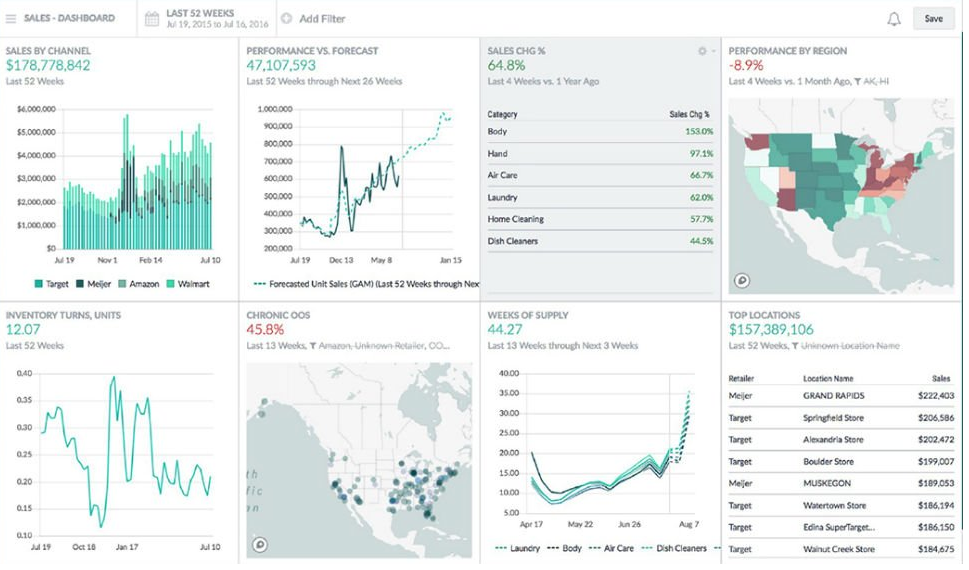
Logistics
Logistics is a huge part of SCM that bridges production and marketing, as well as supply and demand. It covers all processes that refer to the movement of products and information between a manufacturer and a customer — namely
Ordering
Warehousing
Integration with shipment carriers
Transport planning and management
Reverse logistics
Logistics analytics
The primary goal for logistics efforts is to meet customer needs in the shortest time and at the lowest cost possible. And that’s where smart technologies play a crucial role. To learn more about digital transformations in the field, read our in-depth overview of Logistics Management Systems (LMS) and their main modules.
Demand planning and forecasting
Demand planning initiates and drives operations in all segments of a supply chain, from purchasing raw materials to product distribution. In many organizations, the forecasting process still relies on tricky and rigid spreadsheets, which are hard to adapt to demand volatility. Thus, the implementation of modern demand-sensing software can give you a huge competitive advantage, bringing transparency and reliability into predictions.
Accurate, timely forecasting of customer requirements helps businesses achieve the following goals:
timely procurement planning and negotiating better purchase terms
improved capacity utilization
elimination of production delays
enhanced customer satisfaction
minimizing the so-called bullwhip effect — a situation when a small rise in product demand leads to excess inventory across the whole supply chain, with gradual enlargement as the information about sales growth travels back from a consumer to a raw materials vendor.
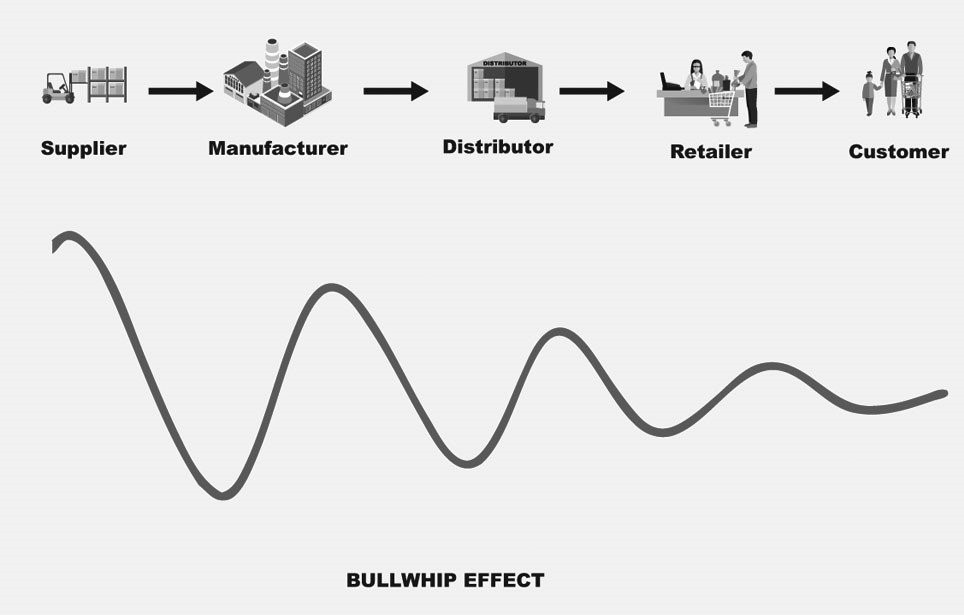
Demand sensing A demand planning system aggregates large volumes of real-time data from multiple sources to identify demand trends and generate accurate short-term forecasts. This enables you to react quickly when unexpected changes occur.
Demand segmentation and modelling AI-powered software can optimize forecasts for different channels, products, customers, and more. Moreover, you can simulate multiple demand scenarios and analyse consumer buying patterns to make more informed decisions.
Resource planning Based on demand forecasting, the software makes suggestions on the volumes of resources required to meet customer needs.
Collaborative forecasting Suppliers, partners, and stakeholders can be brought into planning to develop forecasting in collaboration.
New product forecasting The system analyses sales history of similar products, considers different factors (like season, launch time, or region) and applies complex models to predict demand for new goods or services.
This list can be continued and extended as new technologies are emerging all the time, penetrating deeper into the complex processes and simplifying them. In our future posts we will keep you informed about innovations in the sector. And now, it’s time to move on to integrated SCM suites encompassing all mentioned-above solutions.
Supply Chain Management Systems: whether they fit your business needs
In contrast to SCM software products that focus on one particular task or niche, supply chain management systems (SCMS) are designed to coordinate the entire flow of products or, at least, a substantial part.
Sometimes SCM systems include functions of Enterprise Resource Planning (ERP) software that optimizes internal tasks and processes, relevant to the operations management field. Vice versa, ERP suites often contain SCM tools and their functionality can be expanded by implementing compatible SCM add-ons.
To be more specific, let’s take a quick look at offerings from top SCM software vendors that lead the pack in terms of revenue and market share.
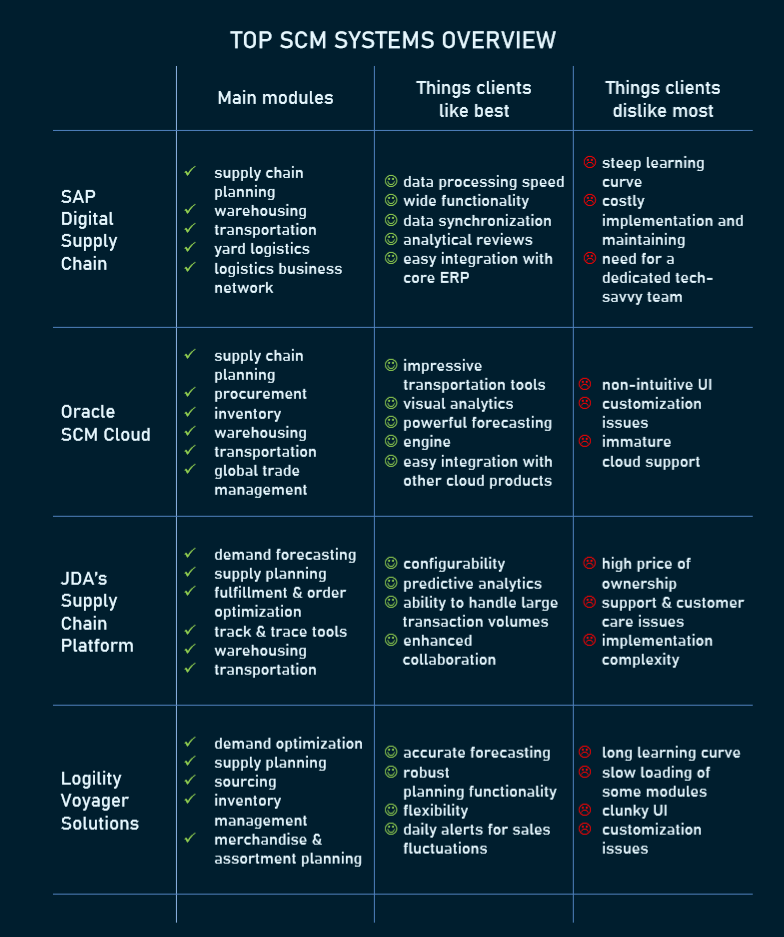
How to choose SCM software for your business
Sure thing, there is no single SCM technology that fits everybody. A complex and pricey package can be a money pit for a small business as it pays for plenty of unnecessary features. By contrast, an enterprise adopting a software solution with limited capabilities will hardly reach ambitious business goals. Here are some practical tips to help you choose the right option and avoid costly mistakes.
Estimate the true total cost of ownership Dive deeper into financial details and add up costs of support, customization, and upgrades. The final number can be impressively larger than the initial purchase price you are ready to pay.
Rather than investing in a large, stand-alone SCM system, you can start with implementing a few modules addressing major problems and bottlenecks across your supply chain.
Consider your existing software and learn how you can complement it with new SMC components and adds-on. Chances are developing a custom solution tailored for your unique case will be cheaper (at least in terms of time and effort) and bring more value than ready-to-use, but hard-to-integrate software with functionality that exceeds your needs.
Domain focus is something you shouldn’t ignore. If SCM software is initially designed for a different industry, modification can be a tricky and money-consuming task.
If there is no proper solution for your niche, explore portfolios of software development teams with relevant expertise. If they launched business process management projects for a company similar to yours, you can count on them solving your task quickly and for less money.
Keep your supply chain well-oiled
Supply chain optimization is a demanding and time-consuming task, but it’s worth the effort. Amazon and Walmart, the world’s largest retailers, owe much of their success to tech-driven, customer-centric SCM. Innovative supply chains have been supporting the impressive growth of billion-dollar startups like mattress-maker Casper and eyewear retailer Warby Parker. The ability to deliver products just in time and satisfy your consumers before competitors seize the initiative becomes a game-changing factor you can’t ignore.
Your car engine needs oil and fuel to keep it operating smoothly. Likewise, your supply chain mechanism calls for care and improvements to drive your company’s growth. Oil it today — and your business won’t come to a sudden halt tomorrow.
Steps of Application Development
1. Planning and Research
The planning stage should occur immediately after you have imagined your idea for an app. "Planning" here does not refer to deciding how your app will look or how you will program it; rather, the planning stage should aim to answer several high-level questions about the feasibility of your idea in the current market space.
Planning generally includes market research and running a feasibility study. Questions such as "are there other apps that do what mine will do?", "is there a need for my app?", and "what is my app's value proposition?" must be answered. It is very important to understand whether there is a niche in the market for your app idea before you spend considerable resources in building the app and marketing it.
You also want to decide what platforms your app will be available for (iOS, Android, Web, etc.). If you are developing for more than one platform, you will want to decide if you'll take a hybrid approach or develop natively for each platform. When deciding which platform(s) make sense for your app, be sure to consider what competition already exists there and where the majority of your audience is. These last two questions can help you decide not only the feasibility of the app as a whole, but also where you might want to concentrate initial development efforts to make a proof-of-concept.
In planning, it is important to invest a large amount of time upfront to make sure that your app at least has a chance at success. Ask the questions 1) are there people willing to use your app and 2) there are people willing to pay for your app. Before you move on to the design phase you should be able confidently answer "yes" to these questions. Better to be confident in the marketability of your app than to publish it and realize you should've geared your app toward a different audience, or not wasted your time on even developing it at all.
2. Prototyping
Prototyping is the stage where you start rapidly producing wireframes and iterating on user feedback. A wireframe can be thought of as a low-fidelity guide to the UI and UX of your app and offers a general sense of the app's functionality and flow without getting into the smaller details of colour or style. Your wireframes do not need to be fully featured - just focus on representing core functionalities (essentially, the minimal viable product, or MVP) of your app and receiving feedback on that.
There are tools out there that can help you collect feedback on your app wireframes, such as InVision. Obtaining feedback from a large number of people in your target audience is absolutely critical. Without it, you might design an app that doesn't quite hit the mark for usability for your audience. For example, you could develop a flight booking app that requires two hands to comfortably operate the interface, only to discover when you release that your audience of business people won't bother to use it. It is important to have an iterative approach at this stage so you can present as many mock-ups to your users as possible, letting your plan for the app's functionality adapt and evolve. Don't be afraid to spend time here, because you want to make sure you are making an app that will indeed meet your audience's needs! It's better to start heading in the right direction than to have to return to this stage halfway through development.
After iterating over the critiques, you've received from your audience and verifying that your users are positively receiving your prototype, it is time to move on to the design phase.
3. Design
There are many components to the design phase of app development, so we will only briefly cover some of the most important ones. Firstly, it is up to your UX and UI designers to further refine the approved wireframes. This means placing and crafting UI elements, defining user flow, understanding the importance of the element hierarchy, etc. At this point, you should produce high-fidelity mock-ups that your developers can then turn into a working app, along with details on what happens when elements are tapped, swiped, dragged, etc.
A brand guideline must be established as well (if you don't already have one), so that your app's branding is consistent and well-understood by both your designers and developers. To design a cohesive app, it's important that each screen respect your guidelines.
Designing a marketing strategy should also occur at this stage. This generally means figuring out how you will tell people about your app (social media, creating a blog, etc). It may also involve making a website to collect emails from users who may be interested in your product, a newsletter, or a social media following.
4. Development
The development stage is where you actually begin to write the code for the "final" version of app. This is where you use the feedback you have received from the wireframes and make some final, potentially large, decisions.
This is where methodologies such as waterfall or agile can be implemented. Generally, an agile approach is more desirable for developing a mobile application. These methods of developing a software product will be discussed further in a later article.
Also, integrating an analytics engine into your app during this phase is critical. Create events for all possible user interactions so you can see how your app is being used and the general flow of users. This information will become very useful to learn about your users and further iterate on your app's design once it is released to the world so you can make the best product possible.
5. Testing
Ideally, testing occurs in parallel to the development stage. It is important to continually test to keep post-release costs low. Unit tests, UI tests, and integration testing are necessary to ensure that you work out any major bugs or oversights as early as possible. Test cases can increase time spent in the development stage, but in the long run they can dramatically reduce both time and monetary costs of maintenance and support.
Testing will also pay off later in the maintenance stage of your app. When you make a minor change, you can run all your test cases and identify where your changes may have broken other parts of the app without having to have a human manually walk through each test case.
6. Release
This is where you will submit your app to the App Store of Play Store for approval. Learning this process is important since you will be doing this every time you release a new version of the app. At this point in the development process, you should have worked out most of the major bugs your testers found and you should have a quality app that will pass the guidelines for the store where you will be uploading it to.
After releasing your app, you essentially return to the prototyping stage. You will be reviewing feedback from your users, potentially adding new features, and then re-releasing again. These 5 steps will be looped, further refining your product to your audience over time.
This is also the stage where you begin marketing your product. The marketing strategies and social media efforts planned and developed prior to this stage should give your app a chance of being seen out there in the wild.
7. Maintenance
This stage really begins at the same time as release and should progress in parallel. Maintenance is where you monitor the status of your app, fix any bugs that may be present, and make sure the app continues to work as expected. Updating your app for new versions of the OS, or to support new devices, is also a part of maintenance.
Ongoing maintenance of your app never ends. Until you decide to discontinue support for your app (potentially abandoning your users), you will be maintaining your app indefinitely.
Mobile App Development Trends
1. Artificial intelligence and Machine Learning
Automated face recognition to simplify portrait-making is no more a feature – it becomes a standard. Automatic filters and funny stickers were one of Snapchat’s success drivers. As machines are able to recognize images and process the natural language (with greater or lesser success) putting the AI-powered features in apps will be a more and more growing trend.
AI applications vary depending on the context. It may be a speech recognition feature, smart filters applied in the camera, or even an automated assistant that is setting up the camera before taking a shot. Apple’s Siri and Google Assistant are among the most-known examples of AI-powered mobile apps, but the possibilities for application of AI in custom mobile app development are countless. It is possible to use the smartphone to analyze the sound of a working industrial machine to spot the signs of upcoming failure – sometimes the machine’s sound changes only slightly, in the way the human ear cannot spot, but the machine is. It’s not a surprise that AI remains one of the hottest tech trends.
2. Blockchain and decentralized apps
Blockchain technology is most renowned for being the technology powering cryptocurrencies, with bitcoin being the most renowned one. The main idea behind it is creating a decentralized database, that is hijacking-resistant and fraud-proof.
Blockchain technology may be used in securing payments or access to the network by generating the tokens used in the authentication. With the decentralization of the database, no one would be able to modify the database records to gain unauthorized access.
The technology is commonly seen only in a cryptocurrency context, but it is changing with the interest of tech giants. Even Microsoft has launched its blockchain-based framework called Coco, which is aimed at increasing the blockchain adoption in the enterprise sector and may become a kickstart for blockchain-based custom mobile app development.
3. IoT and connectivity
The Internet of Things is a new buzzword and old technology. The idea of connected machines that are exchanging information to cooperate effectively was seen in production and heavy machinery but recently the technology came into the consumer market with smartwatches, smartphones, smart home devices, and evensmart fridges. By combining the Internet of Things with smartphones it is possible to provide users with sophisticated tools to control their machinery. An interesting example comes from agriculture, where smartphone apps are used to control the systems of machines like tractors and combine harvesters. Keeping control over pressure in tires is a great example, as various types of soil require different pressure to keep the grip off the machine.
Smartphones and apps are currently the intelligent hubs of smart devices, and so it will be in the nearest future. Moreover, introducing a myriad of new devices into the mobile world will force the cross-platform mobile development paradigm on many software development agencies.
4. Augmented and virtual reality
Augmented and virtual reality transforms the user experience in the app, making it much more interactive. From AR apps to social media or business apps, AR and VR have revolutionized how apps work. This year we will see further development of this technology through application development.
If you ever had a problem imagining how the new piece of furniture will fit the interior, Ikea’s augmented reality (AR) app is the perfect tool for you. This app enables the user to use the smartphone camera and screen to virtually place the digital armchair or bookshelf in a room.
Contrary to virtual reality, augmented reality aims to enhance the experience of our own world rather than enabling the user to enter the new one. AR has a great potential to be used in various industries, from beauty and fashion to furniture to utilities.
Augmented reality is expected to revolutionize app development trends in various fields such as healthcare, engineering, real estate, retail and others. For example, an interior designer might launch their own mobile app. It will ask the potential client to upload images and videos of the property. Using augmented reality, the application can provide the buyer with an idea of the property in accordance with the specified characteristics.
This is a win-win situation for both the designer and the buyer. Here, the designer is relieved of pain, convincing the client of the appropriateness of their choice. At the same time, the client can also see whether his choices will or will not match what he wanted.
Virtual reality is another mobile app trend. The term virtual reality is commonly used to describe scenario simulations that are difficult as well as expensive to create. Examples of these simulations include space simulations for astronauts, human body anatomy simulations for medical students, and other similar examples.
The VR app has also spread to businesses. It can help them recreate what a particular product will look like to their customers. An example would be some apps that can show you how a dress or jewelry like earrings or shoes will look on you before you actually get it. Since people prefer to connect to the Internet using their mobile phones, companies need to have their own mobile apps integrated with VR technology to provide this experience to their customers.
5. The 5G
5G is the next standard in mobile technology that is to supersede the latest technology of 4G/LTE. Due to the transfer speed up to 100 GB/s, the standard is predicted to power up the Internet of Things. Mobile app developers need to take count of the upcoming rise in transfer speed and be ready to effectively upscale their offerings.
6. Beacons
Bluetooth-powered beacons are not new technology itself, but they gain increasing attention, as they enable the connection between the online and offline worlds. Beacons are used in Leroy-Merlin mobile app to gain a better understanding of user’s behaviour in brick-and-mortar stores. Knowing the patterns of their movement, the retailer is able to optimize the placement and merchandising.
And that’s only one of the possible applications in the custom mobile app development world.
7. Instant apps
An instant app is an option to test and launch the Android app without installing it on the device. It may be a great opportunity for users who would like to test a few apps and choose just one. In such a case it is not required to have enough memory for it. The idea behind the instant app is to provide the user with the experience behind the product without the need to download it fully.
Due to instant apps, the emphasis put on creating an amazing first experience may pay off. Building the app that won’t enchant the user at first glance will backfire.
8. Mobile wallets
Mobile payments are an interesting trend not only from retailer’s and payments processors points of view. It is also about making users convenient with making payments by mobile devices. The levels of mobile payment adoption differ. The mobile wallet is not only about payments done offline – it may be used also for powering the loyalty programs. Starbucks app is one of the best examples, being the most frequently used loyalty coupon app. The app not only allows users to store and collect the loyalty points but also to order the coffee and pay on the go.
9. Chatbots on the rise
Although modern chatbots are far from being perfect, they are already popular. By processing the natural language, they automate many tedious and repetitive actions like answering users’ most common questions (“is the store open today?”) or automating the ordering process.
10. Omnichannel and cross-platform
With various channels competing for the user and at least two mobile standards, with customers used to switch between, it is crucial to provide the best experience possible in all of them. That comes with the need to unify the experiences to keep consistency – no matter the device or channel.
That’s why Responsive Web Apps, that work within the browser as an effective way as native ones are on the rise. Companies are looking for easy-deployable tools to build omnichannel solutions.
11. Wearables
The development of wearable smart devices is a hot trend, especially considering the growing interest in healthcare. It's worth noting that many watch manufacturers include smartwatches in their portfolio. Tag Heuer, Fossil, Skagen, or Breitling all sell their smartwatches.
Other ways to use the potential of wearable devices with mobile applications are yet to be found. However, we already know how useful they are for medical and fitness purposes. Let's don't forget that this type of smart device is used for AR as well. Smart glasses that incorporate Android and can work with Alexa are already available on the market (e.g. Vuzix). AR-supporting glasses may be useful for navigation, mechanical problem solving, or drone piloting. There’s no wonder, wearables are among the top mobile app development trends.
12. EMM & APM
The master goal of Enterprise Mobility Management (EMM) is to maximize productivity. If your staff uses mobile devices, let's make it as efficient as possible.
EMM is about the management and security of mobile devices used by employees in a company. It is more than just providing people with remote access (e.g. with VPN). EMM consists of MDM (Mobile Device Management), MAM (Mobile Application Management), MIM (Mobile Identity Management), and MCM (Mobile Content Management).
All these processes are multi-purpose. The aim is to keep all devices updated and make sure everyone has access to needed applications. Another goal is to prevent data breaches and unauthorized access. Moreover, there's a need to coordinate back-ups and synchronization with cloud-storages.
In order to keep everything running smoothly, you also need APM (Application Performance Management). When more employees use remote access points the infrastructure strives to serve all users. Performance monitoring and management enables convenient and hassle-free work.
On the one hand you may want to implement EMM processes and solutions within your company. On the other hand, it might be an interesting and profitable niche to create even better business solutions for EMM.
13. Predictive analytics in UX design
Although we've heard of the User Experience for many years, it gets real recognition only recently. Features provided by various applications are often similar. The way to stand from the crowd, lure more users, and increase their loyalty is an outstanding experience. Therefore, not only UI design but a broader UX design is the mobile app development trend you want to keep an eye on.
Predictive analytics makes use of data gathered from your users to (who would've thought it?) predict future events. With this knowledge you can try to influence customers' decisions. Additionally, the process of UX design and improvement will be easier, quicker, and evidence-based.
14. M-commerce
M-commerce is buying and selling products and services via mobile devices. Until recently, it happened mainly through mobile web pages. However, it is more and more popular to shop in applications.
Interestingly, since smartphones grew and became more convenient, customers prefer to purchase on them, instead of tablets.
M-commerce is also a great place to combine the influence of all the other trends you find in this article.
15. Cloud-based applications
Cloud-based mobile applications use cloud computing technology instead of the device's hardware. You're no longer limited by the operating system. It may be easier to create a cross-platform application this way. Thanks to cloud storage and processing capabilities, your mobile device doesn't need to devote too much performance. Everything is stored and processed in the cloud.
The profits are much smoother UX, e.g. you can exchange devices and migrate all data and settings right away. Cloud-based applications have another advantage too. It's security. Cloud services usually have better protections than private mobile devices. Also, it's easier to make a cross-platform application this way.
To fully benefit from cloud-based applications, we need better connectivity. However, with the spread of 5G Internet, cloud-based mobile applications will outperform traditional applications.
16. VUI
Voice User Interfaces (VUI) are getting more popular together with the development of assistants like Siri or Alexa. As people steadily get used to this way of interaction, they will be prone to use VUI in other applications.
17. Safety is a major concern
Mobile app security remains a top priority this year. We've already seen the rise of encrypted messaging, the user data protection industries, mobile browsers that protect user privacy, Google's efforts to improve app permissions, and more.
These are clear indicators of the need for application security. Improvements in mobile security will occur, especially for applications that use payment methods, privacy protection, and data encryption.
Some important questions that come to mind of users when installing applications on their smartphones:
Can the app keep sensitive data safe?
Can anyone hack the data stored in the app?
How much data does the application need?
Will these apps drain resources and slow down your phone?
Can these persons be misused?
Mobile app companies must address these challenges if they are to succeed.
18. "Timewasters"
These are so-called mini-games for no other reason other than wasting time. The need for fast games that you can plunge into in a couple of minutes while, for example, waiting for your bus, is always relevant.
What makes them even more popular is that you don't even need to spend a lot of resources to create such games. And sometimes such an application can bring you big profits.
Summary of current trends in mobile app development
The trends above show that the traditional way of doing business is constantly challenged by modern mobile technologies. Mobile devices transform the way we do shopping, pay bills, or search for information. With better mobile applications and more efficient technologies, people will be more comfortable with new solutions opportunities.
Mounting Amazon S3 to an Amazon EC2 instance using a private connection to S3 File Gateway
In this blog we demonstrate how to mount Amazon S3 as an NFS volume to an EC2 instance using private connections to AWS Storage Gateway and S3 using VPC endpoints. For EC2 Windows instances, you also have the option of mounting S3 as an SMB volume. However, our focus in this blog is on mounting NFS volumes. The key benefit of this solution is that it provides a cost-effective alternative of using object storage for applications dealing with large files, as compared to expensive file or block storage. At the same time it provides more performant, scalable and highly available storage for these applications.
Prerequisites
The deployment steps assume that:
You have deployed the Amazon EC2 instance where you will mount Amazon S3 as an NFS volume. Note the security group ID of the instance as it will be required for permitting access to the NFS file share.
You can connect to this instance. Options for connecting are explained here. This is required for mounting the EC2 instance, as well as activating the File Gateway.
You have created the S3 bucket that you will mount as an NFS volume in the same account and Region as the instance. The bucket and objects should not be public. We recommend enabling server-side encryption.
Solution overview
The figure below illustrates the solution architecture for mounting the Amazon S3 bucket to the Amazon EC2 instance as an NFS volume with private connections.
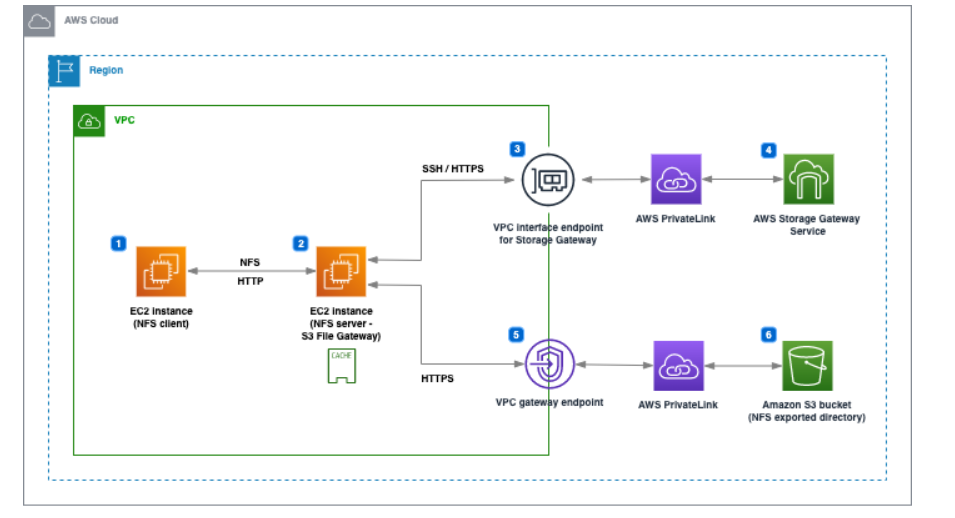
This EC2 instance is the NFS client where the NFS file share is mounted, connecting the client to the S3 bucket. You would have set up this EC2 instance as a part of the prerequisites.
This EC2 instance hosts the S3 File Gateway. You will create this instance by installing the S3 File Gateway Amazon Machine Image (AMI) and create the required NFS file share here to connect it directly to your desired S3 bucket.
This VPC interface endpoint provides private connectivity using SSH and HTTPS from your VPC to the AWS Storage Gateway service using AWS PrivateLink.
The S3 File Gateway uses AWS PrivateLink to privately access AWS Storage Gateway, which is an AWS Regional service.
This VPC gateway endpoint for S3 provides private access using HTTPS to the Amazon S3 AWS Regional service using AWS PrivateLink.
The S3 File Gateway uses the VPC gateway endpoint to connect privately to the S3 service and your S3 bucket mounted to your EC2 instance.
Deploying the solution
You will be deploying the solution in six steps:
Create the Amazon S3 File Gateway on the EC2 instance.
Create the VPC endpoints.
Generate the S3 File Gateway activation key.
Deploy S3 File Gateway.
Create the NFS file share.
Mount your NFS file share.
Let us look into the details of each step. After reviewing these steps, we will discuss validating the solution
1. Create the Amazon S3 File Gateway on the EC2 instance
First, we create the Amazon S3 File Gateway using Amazon EC2 as the host:
Open the AWS Storage Gateway console, and choose the AWS Region where you want to create your gateway.
Choose Create gateway. On the Set up gateway page, in Gateway name, enter Gateway name, and choose the Gateway time zone.
In Gateway options, choose Amazon S3 File Gateway as the Gateway type. In Platform options, choose Amazon EC2 as the Host platform.
Choose Launch instance to launch a storage gateway EC2 AMI.
You will be redirected to a new browser page to the Amazon EC2 console, where you can choose an instance type. The AMI for S3 File Gateway is automatically assigned
Launching your instance
Choose an Instance Type page, choose the hardware configuration of your instance. For information about supported instance types, see Requirements for Amazon EC2 instance types. We recommend choosing at least the xlarge instance type, which meets the minimum requirements. (You can resize your instance after you launch, if necessary. Refer to Resizing your instance in the Amazon EC2 User Guide for Linux Instances). Then choose Next: Configure Instance Details.
Configure Instance Details page, select your VPC and subnet, and set the value for Auto-assign Public IP to Disable (since the S3 File Gateway should only be accessed privately within your network). Then chose Next: Add Storage.
Add Storage page, choose Add New Volume to add storage to your instance. You need at least one Amazon EBS volume to configure for cache storage. Specify the required volume size (refer to the link here for the recommended size for local disk storage).
Add Tags page, you can add any tags. Then choose Next Configure Security GroupOn.: Configure Security Group page, add the required firewall rules:
An inbound rule for NFS, specifying the security group of the EC2 instance on which the NFS volume is to be mounted as the source.
An inbound rule for HTTP rule, specifying the security group of this EC2 instance, required to generate the activation key for the File Gateway.
Choose Review and Launch to review your configuration. Review Instance Launch page, choose Launch.
Select an existing key pair or create a new key pair and choose Launch instances.
Return to the EC2 console to the Instances When the instance state changes to running, select your instance and note the Private IPv4 address in the Details tab.
Create the VPC endpoints
Now create the VPC endpoints for AWS Storage Gateway to allow private access to the AWS Storage Gateway service from your VPC:
Sign in to the Amazon VPC console. In the navigation pane, choose Endpoints, and then choose Create Endpoint.
On the Create Endpoint page, provide a name and choose AWS Services for Service category. For Service Name, choose com.amazonaws region storage gateway with the Type as Interface, and choose the service name displayed:
For VPC, choose your VPC, and in Additional setting, verify that Enable Private DNS Name is not In Subnets, choose the relevant Availability Zone and subnet where the S3 File Gateway is deployed.
Open the Amazon EC2 console. Under Networking and security, choose Security Groups, then choose Create security group.
On the Create security group page, enter a security group name, choose your VPC, and under Inbound Rules, choose Add rule. Add inbound rules to allow traffic from the following TCP ports: 443, 1026, 1027, 1028, 1031, and 2222. Specify the source as the subnet CIDR range. Choose Create security group.
Go back to the Create Endpoint page, for Security groups, select the newly created security group and choose Create endpoint.
Go back to the list of endpoints. When the endpoint status is available, note the ID of the VPC endpoint.
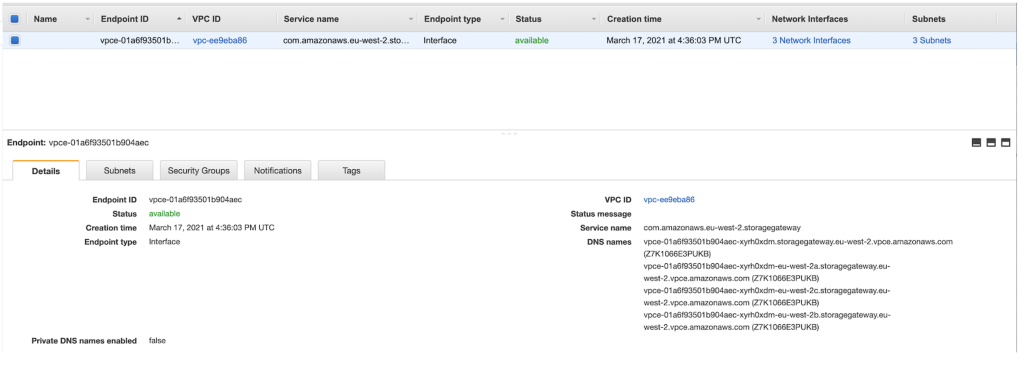
Under Details in the DNS Names section, copy the first DNS name that doesn’t specify an Availability Zone, for example:
Now create an S3 VPC Gateway endpoint to allow private access to Amazon S3 from your VPC:
Open the Amazon VPC console. In the navigation pane, choose Endpoints, and then choose Create Endpoint.
On the Create Endpoint page, specify name, choose AWS Services for Service category. For Service Name, choose com.amazonaws.region.s3 of type Gateway. For example:
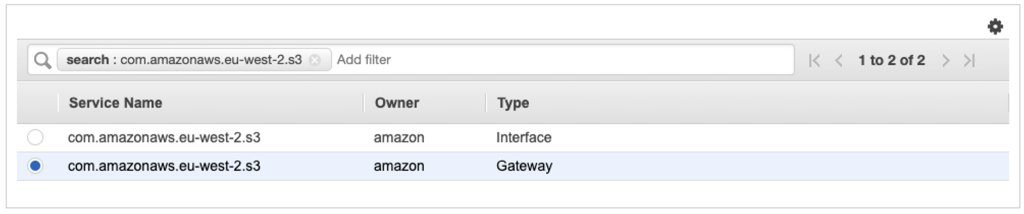
For VPC, choose your VPC. In Configure route tables, select the route table to associate the endpoint with (corresponding to your subnet).
In Policy, select either Full access or create a Custom policy according to your requirements.
In Tags, optionally add tags.
Choose Create Endpoint.
Generate the Amazon S3 File Gateway activation key
Connect to the EC2 instance that is the NFS client (refer to Figure 1). Find more information on connecting to your instance here.
Send an HTTP request with the following format:
http://S3 FILE GATEWAY PRIVATE IP ADDRESS/?gatewayType=FILE_S3&activationRegion=REGION&vpcEndpoint=VPCEndpointDNSname&no_redirect
We send this HTTP request using a curl command from the EC2 instance. Format the request with the private IP address of the S3 File Gateway, the Region, and the DNS name of the VPC endpoint for Storage Gateway. For example:
curl “http://203.0.113.100/?gatewayType=FILE_S3&activationRegion=us-east-1&vpcEndpoint=vpce-12345678e91c24a1fe9-62qntt8k.storagegateway.us-east-1.vpce.amazonaws.com&no_redirect”
This returns an activation key. For example:
BME11-LQPTD-DF11P-BLLQ0-111V1
Deploy S3 File Gateway
Go back to the Storage Gateway tab in your browser:
Confirm set up gateway, and choose
On the Connect to AWS page, in Endpoint options, choose VPC hosted.
In Choose how to identify an existing VPC endpoint, choose VPC endpoint DNS name or IP address, and enter the DNS name of your VPC endpoint. Then choose Next.
In Gateway connection options, choose Activation key, enter the Activation key, choose Next.

In the Review and activate page, choose Next.
In the CloudWatch log group, choose your desired settings.
In CloudWatch alarms, choose your desired settings, and choose Configure.
Create the NFS file share
Next, we will create the NFS file share and mount it onto the EC2 instance:
Open the AWS Storage Gateway Console. choose the AWS Region, and choose File shares.
Choose Create file share. On the File share settings page, for Gateway, choose your S3 File Gateway from the list:
For Amazon S3 location choose S3 bucket name. Enter the name of the S3 bucket to mount. For File share name, enter a name.
For PrivateLink for S3 do not choose Use VPC endpoint for S3. (This option is for cases where Amazon S3 File Gateway is used for on-premises gateway or you are using an AWS Storage Gateway Hardware Appliance.
For Access objects using choose Network File System (NFS) and choose Next.
For Audit logs Automated cache refresh from S3, and File upload notification, choose the desired option.
In Tags, add any tags, then choose Next.
On the Amazon S3 storage configuration page, make your desired changes and choose Next.
On the File access settings page, make your desired changes and choose Next.
On the Review and create page, review your configuration settings and then choose Create.
After your NFS file share is created, you can see your file share settings and connection instructions in Details:
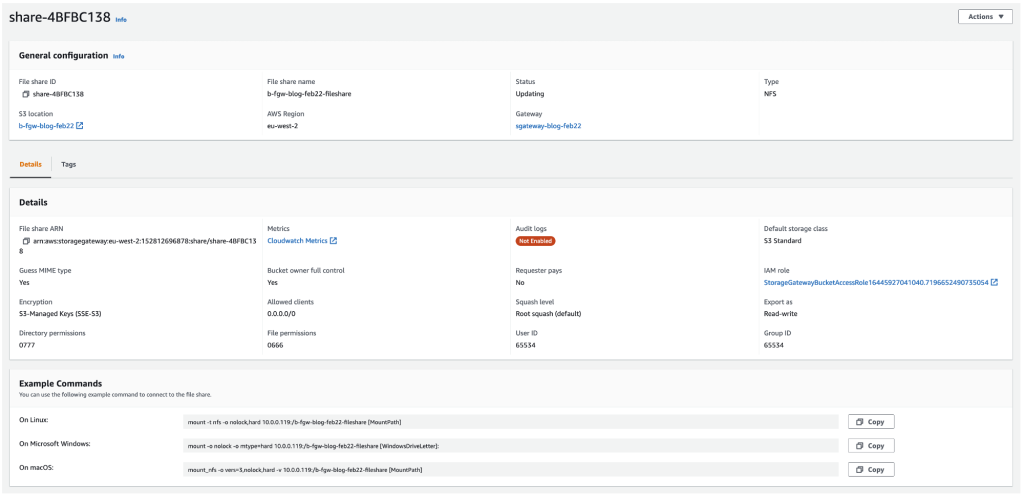
Mount your NFS file share
Mount your NFS file share. You can obtain the values of your gateway IP address and your S3 bucket name from the details tab in the previous section.
For Linux clients, type the following command in the NFS file share instance.
sudo mount -t nfs -o nolock,hard [Your gateway IP address]:/[S3 bucket name] [mount path on your client]
For Windows clients, type the following command (For a more natural Windows experience, you also have the option of sharing and mounting using SMB instead of NFS).
mount –o nolock -o mtype=hard [Your gateway IP address]:/[S3 bucket name] [Drive letter on your windows client]
Congratulations! You have now successfully mounted an S3 bucket to an EC2 instance using a private connection to File Gateway.
Validation
You can complete these steps to validate that the Amazon S3 File Gateway is mounted to your EC2 instance:
Connect to the EC2 instance on which you mounted S3.
Navigate into the folder you created and mounted in step 5. For example:
cd [path to]/fgw
Create a file in the folder:
touch test-123
In the AWS Management Console, navigate to the S3 bucket that was mounted and check that this file is present.
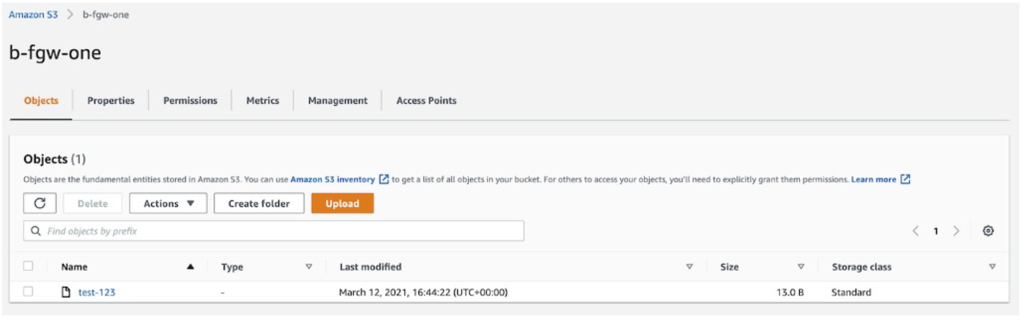
Conclusion
In this blog, we walked through mounting Amazon S3 as an NFS volume to an Amazon EC2 instance using private connections to AWS Storage Gateway and S3 using VPC endpoints. These steps included, creating an S3 File Gateway, creating the required VPC endpoints, deploying S3 File Gateway, and creating and mounting the NFS File share.
Using this solution you can store and share large files by mounting Amazon S3 as an NFS volume to an Amazon EC2 instance, and thereby achieve a cost-effective, performant, scalable, and highly available storage for applications dealing with large files without needing to change any source code. You also achieve a more secure architecture by having a private connection from the EC2 instance to AWS Storage Gateway and Amazon S3 using VPC endpoints.
Thanks for reading this blog post. We look forward to your feedback and questions in the comments section.
Native vs Hybrid: Which Mobile App Platform Should You Choose?
The mobile revolution
Before diving into native vs hybrid mobile app platforms, we need a little context. In the summer of 1983, at a conference in Aspen, a young Steve Jobs presented a vision of the future. This was many years before the advent of the iPhone. It was still six months before the launch of the first Macintosh computer. He was envisaging a new way to distribute software.
He imagined a store where people could download applications through phone lines. That predicted an app store. Twenty-four years later, the iPhone launched. In just over a year, the App Store emerged with 500 apps to choose from. Want to be able to create your own light saber? There’s an app for that.
The iPhone and its app store were a commercial, and critical success. It wasn’t long before other companies got in on the act. Google created the Android platform along with its Play Store. Amazon introduced the Amazon App Store, with the other big players following suit.
With the dawn of the smartphone came the emergence of the app developer. The possibilities provided by mobile technologies give developers the right skills, and opportunities to innovate. There are many things to consider when developing an app. An important choice is whether you should be developing a native app or a hybrid app.
Native vs Hybrid: 5 Key questions
Before deciding between native or hybrid, it’s a good idea to ask yourself some key questions.
Are you developing the app on behalf of a client, yourself, or an employer?
What is the development budget?
How quickly does it need to be launched?
Who is the target audience?
What features need to be included?
The answers to these questions will guide your decision-making. If you’re struggling to answer any of them, then refer to your IT Infrastructure Library (ITIL) training for guidance.
It’s not a question of whether one is superior to the other; consider what app is best to achieve your aims.
What is a native app?
Native apps are designed to work on a specific platform or device. Usually, there are two major mobile platforms that you’re most likely to be developing for.
iOS:
This is Apple’s operating system. Apps are coded using Objective-C or Swift.
Android:
You’ll be using Java if you’re developing native apps for Google’s platform.
Apps designed for specific devices can take advantage of hardware to a greater degree. An example of this would be a sketch pad app that takes advantage of the larger canvas provided by a tablet screen.
An app developed for a specific platform will have access to that platform’s User Interface (UI). This means that the controls, and layouts that users will already be familiar with, can be integrated into the app.
Native apps provide improved reliability, and speed. This is thanks to their ability to take full advantage of the specific hardware or platform. As a developer, you will have a better idea of the tools available to you when designing a native app.
Examples of native apps
WhatsApp – The communication app has a different version for iOS, and Android.Spotify – This music app can stream music over the internet. It can also download songs to the specific device being used.
Pokemon Go – The popular game uses GPS, and camera features. A native app provides the best user experience in this case.
Waze – By tapping into the device’s GPS, this native navigation app makes sure you don’t lose your way.

Some of the most recognizable brands in the world use native apps. For some of the examples above, it’s the functionality provided by this kind of app that’s key.
Native app benefits
As with any decision you make, a bit of cost-benefit analysis is in order. We’ve touched on some of the advantages of developing native apps. Let’s lay them out for the sake of clarity.
Native apps are stable, and reliable.
They can take advantage of the whole raft of platform-specific functionality.
A native app will offer the best mobile app performance regarding speed, and responsiveness.
The platform’s UI can be integrated into the app.
Users are provided with a great experience.
Native apps can function offline as well as online. This is dependent upon the specific utility of the app.
Apps with graphics-heavy functionality work better natively. High-definition games or complex animations can work through hybrid apps, but native apps have it easier.
Native apps are less vulnerable to security risks.
A quality experience should boost your digital customer engagement. This would be evident in the ratings your app receives.
Native apps can use push notifications.
So native apps are the way to go, right? Not necessarily. Read on to see why native app development isn’t always the best route.
Native app drawbacks
In an ideal world, you would have unlimited time, and resources. We don’t live in a perfect world, however, so you should consider the disadvantages of native apps.
To serve users across platforms, you need to code the app for iOS, and Android.
Developing on multiple platforms means a longer development schedule.
Teams would require a broader skills base, and would likely need to be larger.
Longer schedules, and larger teams equate to higher development costs. Therefore, native app development quickly eats up resources.
What is a hybrid app?
A hybrid app is a cross between a native application, and a web application. Web apps are accessed through web browsers. A hybrid app is installed directly to a device, rather than running from a browser, but functions much like a web app.
An example could be a hybrid business communication app designed for multiple team members. They would likely be using a combination of platforms and devices, so a hybrid application suits their needs.
When developing a hybrid app, keep in mind that it will require internet access for full functionality. They can still operate offline but will not offer users the entire experience.
They’re developed using coding languages such as JavaScript, CSS, or HTML. Using application program interfaces (APIs) can access the mobile device’s features. By developing apps this way, developers can quickly get their apps onto both major platforms.
Examples of hybrid apps
Evernote – the hybrid nature of this app allows users to sync their notes across devices.
Amazon Shopping – you can keep your shopping cart across platforms.
Instagram – HTML5 powers the social media app.
Twitter – Another top social media brand using a hybrid app.
Hybrid apps have proved helpful to some other well-known brands. For these examples, the ease at which the app can function across platforms is key.
Hybrid app benefits
By the end of 2020, a whopping 74% of the top 50 retail apps on the US App Store were hybrid apps. Continuing our cost-benefit analysis, we should examine hybrid apps more closely. Let’s look at the advantages of hybrid apps, and see why they have proved popular.
Using a single programming code language, hybrid apps can be used across platforms, and devices.
Using a single codebase means easier updates, and maintenance.
Development is made simpler by not having to build from the ground up for each platform.
Apps can be deployed much more quickly than a native app.
Reduced time frames equate to reduced resource drain.
Hybrid apps can take advantage of dynamic web content. This provides opportunities for mobile affiliate marketing.
Hybrid app drawbacks
As you can see, hybrid apps offer unique solutions that native apps cannot. You should consider the disadvantages too.
To operate correctly, hybrid apps require plugins, and APIs. These can present security risks.
The user experience can suffer as hybrid apps cannot take advantage of the platform’s UI.
A constant internet connection is required for full functionality. This is a result of hybrid applications’ commonalities with web apps.
Being unable to take full advantage of the hardware, it is challenging to make inclusive design choices that takes account of users’ differing levels of ability.
How to choose

Pokemon Go is an example of a Native Mobile App.
Now you’re familiar with the options, it’s time to decide. How do you choose between hybrid, and native apps? You need to answer the five key questions we posed earlier.
Are you developing the app on behalf of a client, yourself, or an employer? This will help you decide your priorities when developing an app. Are you looking to fulfil a brief as efficiently as possible Or are you creating your masterpiece
What is the development budget? If you have a reasonable budget, you may have enough to develop native apps for both Android, and iOS. If your resource pool is shallow, you may be better off going the hybrid route.
How quickly does it need to be launched? If speed is a priority, then you’ll likely consider a hybrid app. If you’ve got the time, and resources, a native app is worth considering.
Who is the target audience? If your audience is quickly put off by the odd stability issue or glitch, they may not be able to contend with a hybrid app. The needs of a business manager who wants to monitor call center SaaS aren’t the same as the needs of someone shopping for the latest trends.
What features need to be included? Consider how much the app needs to leverage the UI, and device features. Do you require the use of GPS? Will the camera be required?
Once you know what your app is trying to achieve while also considering budgetary parameters, you’ll be able to choose. Ensure that you keep the user experience in mind.
If the app must be able to access the camera, for example, quickly, then you’ll want to consider native apps. If, however, you’re developing an app for a retailer, then hybrid apps can easily integrate shopping cart software.
Budgets, and time pressures will often force our hands one way or another. Ensure that you keep the end-user experience in mind even when money, and schedule are to be considered.
Native apps: Key takeaways
Native apps provide the best stability, and security. They will tend to perform faster, and be able to handle the most demanding tasks. This kind of application is best placed to make use of the hardware functionality of specific devices. The user experience is smooth, and featureful.
When developing native apps, expect more extended time frames, and higher costs.
Hybrid apps: Key takeaways
Hybrid apps are easy to get onto iOS and Android. By utilizing a single codebase, you can reduce budget, and time costs. Hybrid apps can be the right choice for the proper purpose.
Users can experience hiccups more often than with native apps. Hybrid applications cannot take full advantage of available hardware, e.g., camera, GPS, etc. To reach their full potential, hybrid apps need a constant internet connection.
Summing up
One option is not better than the other option. Like tools in a hardware store, you want the right tool for the job.
App development is an exciting, and challenging pursuit. Deciding whether your app should be native or hybrid is one of those challenges. By considering everything discussed here, you should be better armed to make the right decision.
Native vs. Cross-Platform in AR App Development World
AR popularity is due both to games and to the popularity of Google Cardboards, Oculus Rift, and Gear VR. Cardboards and Gear VR are for virtual reality, an artificial computer simulation of a real situation. VR “transports” you into a whole new environment; whereas, Augmented Reality app development provides additional elements to an already existing environment. The best example is provided by Microsoft’s Holo lens. However, smartphone applications provide as good an AR experience as Holo lens. A great variety of applications with Augmented Reality functionality can be found in App Store or Play Store. The most popular apps are not limited to games, but include apps for tattoos, furniture retail, education, and tourism.
Customer demand for ground-breaking technology keeps increasing. Obviously, anything that can bring your business to a new level is a must have. Whether you have a picture gallery or a real-estate agency, you will certainly benefit from AR. The next question is to create a relevant app. The most important criterion on which your choice will be based is to balance quality and price. For this, you must choose a partner or team best suited for your project then choose the technology to develop.
Determine your business needs then decide on which platform you want to start—iOS or Android—or choose both for Augmented Reality app development. Then plan your budget and timeline. After your development team considers your requirements but before they suggest possible solutions, they will ask if you want a native or a cross-platform augmented reality app.
Native vs Cross-Platform Augmented Reality
Native app development means an application will be created for one platform only—iOS or Android or Windows—because it will be developed with native languages (Swift or Objective-C for iOS, Java or Kotlin for Android). Native languages bring numerous advantages for apps, such as:
Native look and feel. While choosing a smartphone, users choose an OS with its unique interface. For example, iPhone users appreciate the UI and UX of iOS, and with Swift or Objective-C, it is achievable for an application.
Code is robust—runs better and faster.
Integration with device’s functionalities is smoother. If your app uses a camera, compass, gyroscope or accelerometer—necessary for most AR apps—native development ensures these functionalities work better than a cross-platform one.
Changes and new features can be done simpler and faster.
Synergy of hardware and software, such as multitouch, geolocation tracking, swipe gestures, are much easier to implement. Still, there are some drawbacks:
Native apps are more expensive to develop.
Native apps take more time to develop.
Creating AR apps
At first glance, you might not even want to hear about cross-platform app development. Native sounds much better: it ensures quality, and quality always comes before price. However, cross-platform (hybrid) development is a great alternative when you have a limited budget. Cross-platform development means an application will be delivered on various platforms, while the code will be written in a single programming language. Technologies for cross-platform vary. The most popular is React Native app development (using a same-name framework of Java), Ionic Framework along with PhoneGap or Apache Cordova (based on HTML, CSS, and Angular), Xamarin(Where the programming language is C#), Appcelerator Titanium (JavaScript codebase).
The main pros of cross-platform development include:
A cheaper solution: one developer writes a single code and simply optimizes it to various platforms.
Libraries, such as Angular, React, Ember, etc., can be leveraged for web development.
Using native modules allows creating native experience.
But there are several cons:
Less accessibility of hardware, including camera, GPS, accelerometer, and push notifications.
Plain interface.
Performance is not as good as native.
Poor performance of apps with media components (audio, video functionalities).
It is more difficult to make changes and add new features (once you decide to implement new features, your app might perform less smoothly).
If your app is simple (seldom refers to Augmented Reality apps) and does not require a complex functionality set—or you just want to create a prototype—there is no need to spend a large amount of money. In this case, cross-platform apps are your best option. Conversely, a very complex app is best suited for native.
Unity and Vuforia
Delivery of Augmented Reality apps usually requires Unity, a cross-platform engine (in this case cross-platform means it can be used for any OS, no matter whether a native or cross-platform type of app development). Thirty-four percent of top games are made with Unity; it is essential for AR and VR games. With Unity, it becomes possible to gain access to many additional functionalities, such as animation and 3D, it empowers graphic with shading and various effects, enriches 2D, brings audio to a new level, etc. Unity also provides pre-designed game components such as characters or game props.
One of the most commonly used Unity extensions is Vuforia. Vuforia provides code necessary to create AR applications within the Unity game engine. Some of the most useable Vuforia features include recognition and tracking of a broader set of objects, ad and magazines image recognition, user-defined images, recognition of cylinders (such as bottles, cans, cups, and mugs) and boxes, English word recognition, VuMarks, and mapping additional elements via OpenGL.
3D Modelling
3D models bring the most advanced Augmented Reality experience to users. Games begin to look more realistic; galleries and museums can avoid paperwork and create digital signs for art objects, a real estate agent have greater chances of selling a house when showing customers where they can place furniture or how they can change the interior, and a student can better memorize dinosaur species while looking at it in 3D. Obviously, 3D modelling should include texturing, shading and rendering to make the graphics look real.
How all this Influences AR apps
There is no doubt that the process of creating Augmented Reality apps is intricate. Such apps need constant real-time information and access to low-level handset capabilities such as geolocation, gyroscope, accelerometer, camera, and motion sensors. 3D modelling requires working with third-party frameworks, libraries, and numerous extensions.
It all becomes possible when choosing to go with native app development. Of course, there are PhoneGap or React Native AR apps, but their functionalities are fist-bitingly limited. For example, Wikitude AR SDK works as a plugin for PhoneGap, a module for Titanium and a component for Xamarin.
ORACLE CLOUD REPORTING: OTBI AND BI PUBLISHER
WHAT IS ORACLE BUSINESS INTELLIGENCE (BI) PUBLISHER?
Oracle Business Intelligence Applications are complete, prebuilt BI solutions that deliver intuitive, role-based intelligence throughout an organization. BI Publisher can be used as an alternative reporting solution to OTBI. Some of the data sources available are SQL Query, XML, HCM Extract, and View Object (brought in through web service, ADPI, etc.). BI Publisher works as an enterprise reporting solution for authoring, managing, and delivering reports from multiple data sources in multiple formats through multiple channels (E.g., checks, invoices, remittance, etc.). Utilize BI Publisher for writing your own SQL query, formatting reports, joining historical data with real-time information, and report bursting. Typical end users include Technical Human Resource Information System (HRIS) and IT Developers.
WHAT IS ORACLE TRANSACTIONAL BUSINESS INTELLIGENCE (OTBI)?
OTBI provides a flexible and easy-to-use analysis tool that helps to gain real-time insight into transactional data. OTBI is aimed at business users and especially shines when the report creator is someone who does not know SQL and/or the underlying table structures. OTBI’s core functionality allows users to simply drag and drop selected data from subject areas and use different graphical views. Data can be filtered, drill-down can be enabled, and action links can be created. Reports or dashboards can be scheduled for delivery and reports can be exported to Excel, Word, and other formats. A reporting wizard (BI Composer) is available to guide casual business users through a few simple steps to run, edit or create OTBI reports and queries. Typical end users include Financial Analysts, Compensation Analysts, Benefit Analysts, and Human Resources Analysts.
COMPARISON: OBTI VS. BI PUBLISHER
OTBI
Drop and Drag interface/No SQL needed
Presentation Layer Developed so users does not needed to join different tables together
Subject Areas fields are intuitive
Reports can be built relatively quickly and updated rather quickly
Oracle investing heavily in this type of reporting so additional fields will continuously be added
Not all fields are availale in subject areas
Joining subject areas is not always possible and you may have requirements from multiple subject areas
Data in subject areas can be misleading drop and drag interface can make subject areas/data seem simpler than actuality and no visibility how data is actually retrieved from database.
As more and more clients adopt cloud. More and more reporting resources will be available
Viewing results is limited by use security
BI Publisher
More Technical/SQL needed
Thousands of tables multiple joins needed
Table name, Fields joins are not intuitive and documentation can be vague
Reports can take very long to build, Very complex, Difficult to update
OTBI is the Oracle preferred way of getting at data if possible
Can get at almost all needed information
Joins may be complicated. But joining multiple tables can be done to get all required fields
Once SQL is mastered. Creating data sets and modified past data sets can be easily
As more and more clients adopt cloud. More and more reporting resources will be available
Viewing results is not limited by user security
Conclusions
In choosing a reporting tool, there are a couple of key takeaways to keep in mind. Consideration of scalability is important, especially when it comes to payroll reporting or returning large amounts of data in general. Typically, HCM extracts are most scalable, then OTBI, then BI Publisher. Data security is also an important consideration. OTBI is more favorable when you want to use front-end security configurations to which data returns on your report. If you want to bypass front-end security or build in your own security parameters, BI publisher would be the tool. Both tools work well for the creation of reports. On projects where the decision to go with either OTBI or BI Publisher is a coin flip, Oracle tends to recommend OTBI. The typical business user will probably prefer using OTBI due to OTBI enables the customization and creation of user-friendly dashboards in a drag-and-drop fashion, whereas BI Publisher does not. Oracle maintains the presentation layer, so any changes to underlying tables Oracle will update, and thus keep your reports “upgrade safe”. BI Publisher is more favorable for technical users when the desired result is not a report, but data. BI Publisher is one of the primary ways of getting data out of Oracle Cloud (HCM Extract being the other). Users who are technically savvy enough to be using one of the other data source options such as web services would probably prefer the control of BI Publisher. There is also a set of APIs that allow retrieval of BI Publisher data in non-Cloud code.
The App Store: A Comprehensive Analysis

Despite their impressive pace, for the past two decades, the expansion rate of both the Google Play Store and the Apple App Store has yet to show any indications of slowing down.
The app market’s evolution seems justified, given the increase in demand for smartphone technology worldwide. As of now, 79% of mobile phone users own a smartphone, and the projection on the chart below posits a steady increase in that number over the next coming years.
With the way smartphone sales are escalating, now would be a great time to make a profit off the app store. If you think you’ve formed the next best idea for an app, then let us know and we’ll point you in the right direction: contact us. The longer you wait, the more heated the competition will be. To better understand just how quickly the market is growing.
The question is… Which platform should you develop for Android or iOS? To solve the question, consider the smaller questions first:
1. How many Apple and Android devices are currently active worldwide?
Android takes the lead for its density of active users: Apple announced its milestone of 1 billion active devices four months after Google announced their own 1.4 billion milestone in September of last year.
2. How do these numbers impact revenue acquisition from app purchases?
In 2015 alone, Android users worldwide downloaded a record 200,000 million apps off the Google Play store, or roughly 547, 945 apps daily. Meanwhile, about 100,000 million apps were downloaded off the Apple store, or 273,972 daily. Counter-intuitively, although more apps were downloaded from the Google Play store, more apps were purchased via the iOS App Store
The amount of paid vs. free apps could be to blame for this counter-intuitive relationship between app downloads and app revenue gained. The “apps downloaded” statistic does not take into account the disproportionate averages of free-to-paid app downloads globally. Compared to the staggering 211.31 billion downloads of free apps, paid app downloads only reached a cumulative 13.49 billion.
Perhaps the difference in user demographics between Android and Apple is to blame? A user from Quora speculates that, since iOS devices are more expensive on average than android devices, the iOS demographic is more willing to purchase a quality app. He also posits that, since iTunes saves credit card credentials, users can confirm their purchase with a single click, whereas Google Play sets up additional hurdles between a user and their potential purchase.
3. Which app category is currently the most popular?
As was expected, gaming apps tend to generate the most downloads across both the Android and iOS app stores – and by a landslide.Although gaming apps lead in ranking, they are far less abundant on the market than apps that’re listed under non-gaming categories. Between the dates of Jan 1-May 14, 2016
231,365 apps were uploaded onto the Google Play market. This means that 11,568 apps were uploaded weekly, or 1,652 on a daily basis; essentially, you can expect quite a bit of competition.There are currently 41 categories on both Google Play and the iOS App Store.According to AppBrain’s statistics on app categories…
The Top 5 app categories with 50k downloads PER APP on Google Play are:
Recorded May 18, 2016 (from highest to lowest):
1. Entertainment with 12,117 apps
2. Tools with 11,555
3. Casual gaming with 11,300
4. Personalization with 11,007
5. Lifestyle with 7,946
The Top 5 categories with the most apps on Google Play are :
6. Education with 172,131 apps
7. Lifestyle with 152,867
8. Entertainment with 152,077
9. Business with 143,173
10. Personalization with 130,211
The Education category is the most dilute category of apps on the market, ranking sixth for total downloads per app while leading with the most amount of apps in general.Lifestyle and Personalization apps are both heavily saturated categories; since they're also among thetop 5 for the most downloads per app, expect to encounter a lot of competition under these categories. Not surprisingly, gaming apps take the lead on both Android and iOS’s top 100 apps, yet oddly more-so on Google Play’s store than on the iOS App Store (June 2015).
4. But how big of a difference does being on the top 100 list make?
The apps which rank higher have a staggering and highly disproportionate increase in downloads than the apps which precede them in rank.
Apps which are closer to the top have a number of downloads which exceeds nearly 100 times that of apps with a lower ranking. Obviously, since more installs means more revenue, it makes sense that gaming is the highest grossing app category; yet, the gaming app category is not nearly as crowded as the others are. Counter-intuitively, app trends in yearly revenue across both app markets suggest that gaming will maintain its lead as the highest grossing app category, despite its low upload count.
Just how large is the margin of revenue between the top selling game apps and the game apps which rank lower beneath it?
The top gaming app in March 2016 weighed in with nearly twice as much revenue as the third top gaming app, 3.7 times as much as the fourth gaming app, and more than 5 times as much revenue as the fifth top-gaming app on the iOS market. In other words, the difference in revenue between the first spot and the fourth spot is a steep margin of one million dollars.
Summary
In summary, what you’re looking at now is that each respective app store is growing and some of the categories – especially gaming – are dominating more-so than others. Free apps tend to fare well on the Play Store and paid apps tend to sell better on the iOS App Store. With not just the mobile audience growing but also the number of paying users, you’ll see a slight tick in revenue across the board with even higher ticks for apps which rank at the top 100. With potential profits favoring those who succeed, now’s the best time to learn more about becoming an appreneur.
HCM software tools
HCM software is a suite of tools that helps organizations recruit, hire, develop, pay, manage, and retain employees. Here’s how to choose the best HCM software for your needs.
Today, human resources (HR) professionals are tasked with identifying, developing, managing, and retaining a talented workforce while also adhering to legal, regulatory, and compliance requirements. Human capital management (HCM) software can help HR professionals accomplish their objectives and improve HR processes across the entire business.
“A human capital management system implies that you’re able to engage workers more, deliver a better employee experience to them, and hopefully you have the predictive analytics to catch problems when they arise.
What is HCM software?
HCM software is a suite of tools that helps organizations recruit, hire, develop, pay, manage, and retain skilled, high-performing workers in today’s extremely competitive business climate.
HCM software is the core system of record for employee information and generally is an organization’s major HR transaction tool for such activities as new hires, transfers, promotions, etc.,
An HCM system can help organizations “improve diversity and inclusion as well as improve employee engagement—I.e., [the] degree to which employees feel supported by their organizations,”
HCM software provides the following key benefits:
Enhancing HR operations:
An HCM platform integrates all of an enterprise’s HR or employee data into a single system and serves as the central repository for storing employee records, processing payroll, managing benefits, time/attendance, compensation, performance reviews and depending on the application, could include more. The HCM application allows an organization to keep its employee data organized, helps to ensure regulatory compliance, and also enables the HR function to operate more efficiently.
Enabling data-driven decisions:
HCM software lets organizations take the employee data they’ve collected and use analytics to gain greater visibility into their workforces to make more informed business decisions based on reliable, accurate, and timely information. This helps ensure that processes and policies that organizations have put in place are having the desired impact on the organization.
Attracting and retaining top talent:
Talent acquisition and management tools help organizations meet today’s needs for top talent. An HCM suite’s talent acquisition tools enable an enterprise to comb through resumes and identify the best candidates for open jobs. The HCM talent management tools also enhance employee engagement by offering career planning and training to current employees.
Improving diversity and inclusion:
Today’s organizations understand the need to hire individuals from all backgrounds as different people bring different skills, knowledge, and experience that can enhance the business. And employees who feel more engaged and supported at work tend to work smarter and harder and produce higher quality work.
HCM software features
Although HCM software suites offer a wide range of capabilities, organizations should look for the following key features:
Employee data protection:
Companies need to ensure they protect employee to comply with global privacy laws. This puts pressure on the HR departments because they are the custodians of their employees’ data, Storing HR information in one place enables organizations to always know what data that have about each of their employees.
“At a minimum, the system should be able to store and report on an organization’s employee data,”. “What data can be stored can be tricky, depending on the global nature of your organization and the understanding that what is legally allowed to be stored by a company varies based on in-country laws and regulations.”
Talent acquisition:
This module supports the hiring process, including employee onboarding, and also includes features for job requisitions and candidate screening and selection.
Talent management:
The talent acquisition module helps companies manage recruitment, employee engagement, compensation, performance, and leadership development.
Workforce management:
The workforce management module helps organizations record, understand, and plan the size of their workforces. Companies that use external workers, such as freelancers and consultants, should look for HCM software that provides workforce management features that enable managers to record details regarding those external workers.
Performance management:
HCM tools can help companies streamline and automate performance management by enabling managers and their employees to work together on shared performance records that are then stored in one system. This module supports setting goals and tracking progress.
Training and development:
The best HCM software supports a company’s learning and development strategy by allowing managers to match employees with learning opportunities based on the personal development plans of those workers as well as letting employees select their own training.
Employee self-service:
Employees should also be able to use the HCM system to submit their expense reports and timesheets, as well as view and update their personal information.
Compensation management:
Organizations should be able to use their HCM tools to analyse and manipulate compensation information to ensure their compensation levels are fair and inclusive across the business. This can help companies plan future compensation.
Integrations:
An HCM system should integrate with organizations’ other business-critical systems, including third-party payroll providers and enterprise resource planning systems.
10 top HCM systems
There are dozens of human capital management systems on the market, so to help you begin your research, here are some of the top products, listed alphabetically, based on independent research and discussions with analysts.
Ceridian Dayforce HCM
Infor Global Human Resources
Oracle Fusion Cloud Human Capital Management
Paychex Flex
Paycor HCM
Ramco Human Capital Management – Cloud HCM Software
SAP SuccessFactors Human Experience Management (HXM) Suite
UKG Pro
UKG Ready
Workday Human Capital Management
1. Ceridian Dayforce HCM:
Ceridian Dayforce HCM is an all-in-one cloud-based HCM that offers core HR, talent acquisition, talent management, workforce management, employee self-service, payroll, time and attendance, and employee benefits management. Ceridian Dayforce is available hosted in a private cloud or in a public cloud managed by Ceridian or a third party. It is targeted to a wide range of industries. However, because of its native administrative HR, payroll, and workforce management capabilities, Ceridian Dayforce is suited for organizations with large numbers of blue-collar workers and/or hourly paid workers.
2. Infor Global Human Resources:
This cloud-based, mobile-enabled platform allows an organization to create a single resource record for all its core HCM business processes. Infor Global Human Resources offers such functionality as organizational planning, benefits enrolment, absence management, occupational health and safety, onboarding, offboarding, talent acquisition, talent management, compensation, and employee and manager self-service. The software provides a personnel system of record for employees and non-employees. Infor offers packaged functionality geared to large organizations in specific industries, including hospitality, the public sector, healthcare, and manufacturing.
3. Oracle Fusion Cloud Human Capital Management:
Offered as part of Oracle Fusion Cloud Applications suite, Oracle Fusion Cloud HCM enables companies to plan, manage, and enhance global people processes with one common data source, ensuring information is accurate and current. It offers modules for global HR, workforce management, recruiting, talent management, time tracking, payroll, learning, and work-life solutions. Oracle Fusion Cloud HCM is available on the Oracle Cloud Platform, which runs as a public cloud utility. The HCM Cloud mobile app gives users secure access to their Oracle HCM Cloud applications from anywhere. Oracle Fusion HCM Cloud is intended for midsize and large organizations worldwide.
4. Paychex Flex:
Paychex Flex is a modular, cloud-based HCM system that covers a number of areas, including core HR, payroll processing, benefits administration, time and attendance, performance management, new hire reporting, recruiting and screening, onboarding, employee self-service and compliance services. Geared to small to midsize businesses in a variety of industries, Paycheck Flex integrates with the general ledger and talent management analytics. The software allows HR administrators to customize dashboards and provides easy-to-understand analytics around hiring, benefits, labour costs, time and attendance, and changes in headcount. Paycheck Flex integrates with third-party systems for HR, finance, time and attendance, and benefits administration. The software is also available via the Paychex Flex Mobile App.
5. Paycor HCM:
Paycor HCM is a cloud-based unified HCM system that helps small and midsize organizations efficiently manage HR. It offers such functionality as core HR, onboarding and development, time tracking, payroll, recruitment, learning, employee self-service, HR reporting, workforce insights, talent development, and performance and goal setting. Users can access time and attendance, payroll, and HR features via Paycor’s mobile app.
6. Ramco Human Capital Management:
Cloud HCM Software: A cloud-based talent management system, Ramco Cloud HCM offers functionality for core HR, including performance management, recruitment, time and attendance, payroll, benefits administration, employee self-service, and workforce planning and analytics, among other features. The software enables midsize to large organizations to simplify their HR strategies through a unified end-to-end HR software system. Managers and employees can access Ramco Cloud HCM modules via self-service portals as well as via Ramco’s mobile app.
7. SAP SuccessFactors Human Experience Management (HXM) Suite:
The next generation of SAP SuccessFactors HCM, the HXM suite of tools offers core HR, payroll, talent management, and analytics solutions. SAP HXM Suite helps organizations manage the end-to-end employee lifecycle from recruiting to onboarding, payroll, and performance management. The HXM suite supports 43 languages and more than 45 localizations. The software is deployed in the cloud and is available as software as a service. The HXM Suite is available on the SAP SuccessFactors Mobile app. Best for all-size companies in a variety of industries.
8. UKG Pro:
UKG Pro is a cloud-based HCM suite that combines HR, payroll, and talent management into one solution to streamline people management processes. Hosted in the public cloud, UKG Pro offers all the features of a modern, unified HCM solution, including HR management, onboarding new hires, payroll management, leave and attendance management, employee self-service, HR reporting, and performance management. It also integrates out of the box with UKG Dimensions for advanced workforce management. Employees can use the UKG Pro mobile app to access upcoming events, schedules, pay details, as well as other HR and company information. UKG Pro is suited for midsize to large organizations. In addition to the U.S. and Canada, UKG Pro has more than 100 country localizations to enable multinational companies to better manage a global workforce.
9. UKG Ready:
UKG Ready is a cloud-based, mobile-enabled human capital management and workforce management solution geared to small and midsize businesses. UKG Ready offers such features as HR management, HR reporting, recruiting, onboarding, payroll management, performance management, performance tracking, and employee self-service. Companies whose headquarters are in the U.S., Canada, Mexico, the U.K., France, the Netherlands, Belgium, New Zealand, and Australia can use UKG Ready to support their employees in more than 85 countries. UKG Ready is geared to small and midsize organizations.
10. Workday Human Capital Management:
Workday HCM offers human resource management, employee experience, talent management, payroll and workforce management, help, knowledge, and case management, workforce planning, analytics and reporting, payroll, and workforce management. Workday’s payroll functionality is localized only for the U.S., Canada, the U.K., and France, but the company has a network of global payroll partners. Workday HCM streamlines manual tasks, enabling HR to focus on developing strategy and other initiatives. Workday HCM is also available via a mobile app. Hosted in a public cloud, Workday HCM is suited for midsize and large organizations in a variety of industries with global workforces.
Getting the most from HCM software
There are certain things organizations should be aware of that will prevent them from getting the most out of HCM software. These are:
Setting expectations too high. Typically, organizations tend to think that HCM software will solve “all” their HR problems/needs. “But it’s important to remember that the HCM application, at the core, is a data repository and a transaction engine. It’s not a tool that organizations can [use to] ‘push’ communications to their managers and employees and it’s not a place where employees and managers can search for HR-related information.”
Additionally, an organization shouldn’t expect its HCM system to fix its HR challenges overnight. There’s typically a learning curve for HR administrators and employees and as such it will take some time to realize the benefits of the new system.
Bad data:
An HCM system is only as good as the data that is loaded into and maintained in the system, although this isn’t something that’s unique to HCM applications. “Should an organization want to harness the true power behind the [HCM] tool, data accuracy is paramount,”.
Not devising a good implementation strategy:
Most of the well-known HCM solutions work and work well. However, the implementation process and an organization’s flexibility around adopting new processes and practices is really the determining factor in the long-term success of the HCM application within a company.
Not involving employees:
It’s important for companies to consult their employees about major change in their HR systems before implementation. Some organizations move forward with the process without really informing employees about what’s happening. And they also fail to ensure that the features of the new HCM system match the specific needs of the employees. Consequently, after the HCM systems are up and running, employees can become frustrated, thus slowing the user buy-in that’s essential to ensure the system works as expected.
Metaverse A Futuristic Ride to Virtual Worlds
What is Metaverse?
Metaverse has univered an alternate digital world of reality, where world’s finest brainiac storytellers guide the world into new narrative frontiers.
Metaverse, the term is buzzing around right now, but do you know what Metaverse is, and does it exist?
Recently, the announcement by Mark Zuckerberg concerning changing Facebook’s name to Meta has also ignited the debate about Metaverse.
The worlds, ‘meta’ and ‘universe’ combine to form a term, ‘metaverse.’ It refers to existing and future integrated digital platforms focused on augmented and virtual reality. Moreover, it’s widely discussed as the Internet’s future and an important business and financial opportunity for the tech industry and other fields.
However, one would be a fool to limit Metaverse to some domains, if anything it is a long-time science-fiction dream transmuted into reality.
The Metaverse is an emerging face of technology; continue reading to learn more about the metaverse and decide whether you should join the craze.
An Imperative Precis: Metaverse
The term ‘metaverse’ originated in the science fiction novel Snow Crash in 1992 as a portmanteau of “meta” and “universe.” This word has been preferred as a buzzword to showcase the development progress of many relevant technologies and projects for public relations purposes.
A network of 3D virtual worlds, Metaverse, targets social interaction. Scientifically, it’s usually taken as a universal virtual world that one can access using virtual and augmented reality headsets.
Metaverse allows you to connect with friends, visit remote locations, conduct business, and access educational opportunities, all in one environment, conducted through technology in a new way.
Another way we can define metaverse is that it is a spectrum of immersive digital experiences that users can access in the future. It will facilitate them to engage in a wide range of different activities in entirely digital spaces. Plus, it may refer to participating in a big VR multiplayer game accessed using a VR headset or witnessing integrated physical and digital spaces.
Therefore, the metaverse is not a digital space but multiple digital spaces and experiences. Various brands are working on it to provide realistic and immersive digital experiences.
The technology comes with a wide range of potential functionalities, from AR collaboration platforms to platforms for remote teams that allow better association and integration.
What To Consider About the Metaverse?
Metaverse is primarily used to indicate the Internet’s expected future interaction, known as Web 3.0.
This new face of the Internet will witness a rise in online 3D or virtually integrated environments that will allow users VR and AR experiences. The metaverse is a network of 3D virtual worlds targeted on a social connection in simple terms. In this virtual space, people will get an opportunity to shop, hang out, and meet friends.
As we have read, Metaverse is a new face of social connection. There are various ways to bring metaverse to reality; let’s catch a few
In the metaverse, the 3D spaces will allow you to learn, collaborate, play, and socialize in multiple ways to take you ahead of our expectations.
Social Commerce in Metaverse
Metaverse will craft a horizon marketplace to facilitate creators to sell and share 3D digital items and physical products. We hope it will enable more commerce and help grow the entire metaverse economy.
Furthermore, Metaverse will promise an immersive consumer experience that will permit modern customers to engage with brands virtually in various ways. Marketing teams will use visual and auditory senses to engage more consumers. They can use VR technology in an expansive metaverse landscape to craft an immersive brand experience. It will make consumers understand the brand better by allowing them to interact with their products and services and experience a real-life setting.
Entertainment in Metaverse
We will consider a scenario to get it better. Suppose your friends are at a concert somewhere on this globe, how about if you can also join them? Well, you can do that. You can join them and enjoy the entertainment virtually, choose the track you want to play, change the disco lights, etc.
Metaverse is working on one of the goals that may allow you to place a digital object into your physical world. It will let people interact with it, despite just witnessing simple visual effects.
Exercise in Metaverse
Many of us join fitness classes to stay fit, like the same old. But, with Metaverse, you can work out in an entirely new way. You just need to wear your VR headset and be all set to start with it. You can take boxing classes, play basketball, or even dance. You are going to witness a new world of workouts with Metaverse.
Education in Metaverse
What if we can learn anything in the world by bringing it closer to us. In the Metaverse, besides elaborating on any place, we can also go deeper into it at any time, like in the ancient era.
We will find a new way of learning, for instance, to get medical training being a medical practitioner. With VR apps, you can learn surgery techniques. Or, if you are studying water science, you can swim there in deep water and get close to earth’s minute insects and apprehend them more.
It is just one of the ways that would help us learn anything in the future. But isn’t it best that by reaching the exact destination, we can build our skillset better.
Gaming in Metaverse
But, people following this space, and participating in it, would say it’s all about gaming.
Gaming is the largest entertainment industry. In Metaverse, gaming will expand from the immersive experiences to the fantasy world to magnetize simple games into our routine lives. You’re going to play the same old games in a new way.
Most people will enter the Metaverse world through gaming. Metaverse is on the way toward building a happy and healthy AR and VR ecosystem. So the game studios can go building and game studios can keep devising.
As Metaverse is constantly emerging, the live service games would be one of the best aspects that can launch new downloadable content and updates regularly.
Game builders are working on creating active game communities that may allow constant game releases with fresh content, the new gaming series, the music, and more.
5 Qualities of a Successful Mobile App
Not since the dot com days has there been such flock of technology startups. Success stories such as Instagram and Twitter have tantalized people’s pallets to go follow in their footsteps. But with the increasing number of apps present in the app stores (1.6 million in the Google Play store, 2 million in the Apple app store as of June 2016) the competition is high.
We looked at what app development firms focus on when they’re building out an app for their clients. To ensure success, Messapps – an NYC app development firm – outlines 5 characteristics your app needs to implement.
1. Unique and appealing design
With so much competition app designers need to make their product look awesome. You’re essentially branding and packaging the app in this stage. Even if two existing companies offer practically the same service, the differentiation and ultimately triumph are heavily rooted in the design.
The design needs to be appealing to the senses. Sophistication and creativity should scream through the screen. And look is not the only factor in achieving peak design. The animations should be so good, it almost becomes a pleasure to press and swipe gestures within the app.
Examples of some wonderful designs:
Wonderful designs Though a spectacle for the eyes, design alone will not lead your app to the top of the app store. In fact, too much emphasis on intricate design may harm your app. An app is limited by its platform screen size. Too much going on will only take away from the user’s experience. Which leads to the next characteristic… Great UI
2. Great UI (User Interface)
It’s human nature to judge an app within the first few seconds of use. We judge books by their covers so it’s only natural that we treat an app the same way. So if there is one secret in making a not only great but lasting impression, it’s a killer user interface.
There’s one keyword that that is crucial to great UI, which is “intuitive.” So you want your app to do great things in ways people love. The tricky part is finding ways to carry out all the essential functions that constitute your app, in the simplest, most clean and fluid way possible.
The UI must be unobtrusive, avoiding design elements that don’t add a use or function to the app. If it doesn’t add value, it’s eliminated. It’s essential that the user finds navigating the app simple upon first use. Reducing the learning curve as much as possible but at the same time including all the necessary features that would make your app successful.
3. Platform appropriate
The app must be completely compatible with the platform it was developed for. It should take advantage of the natural qualities of that specific smartphone or tablet.
Each platform, iOS or Android offers various gesture-based navigation tools. Swipes generate a new screen while removing another, a pinch of the screen can zoom the image in or out. The gestures rely on the mobile platform itself. Developers need to understand these platform-specific gestures in order to provide an intuitive navigation experience.
4. Listen to feedback, aim for excellent reviews
Maintaining high user feedback scores encourages more users to sign up and spread the word. Many individuals look at others’ reviews of a certain product to staple their confidence in purchasing the item. In a digital world, analyzing others’ opinions is crucial as you cannot physically see or try the product beforehand in many cases. Tons of positive reviews will spark great confidence in a potential user. If such a large community loves the app, chances are that they will as well.
On the other hand, negative reviews will strongly hurt. The occasional negative review is practically unavoidable but if the negative ones equal or outweigh the positive ones, you’re in for a bad time and the death of your app legitimate concern.
5. Adaptation
Generating a bit of success great, but if you can’t maintain that success, it’s all for nothing. Rolling out new features, bug fixes, and effective updates are crucial for the growth and longevity of your app. Angry Birds, a gaming app sensation with over 250 million downloads was no doubt fun to play but was not the only reason for their success. Angry Birds released fresh and fun updates periodically. Prolonged sameness will eventually leave the user bored, eager to try something new.
Conclusion
Competition on the mobile app market is relentless. The market is congested as ever, but that should never deter you from belief in your idea. Successful implementation of these 5 qualities will help you not only defeat but massacre your competition.
3 New API’s In React 18 Every Developer Should Know

React version 18 was released, and since it is a major new version of React it does, as you would expect, introduce some new, exciting features. Thankfully, though it does not break your existing code, what you learned about react still applies. The code you write still is the same.
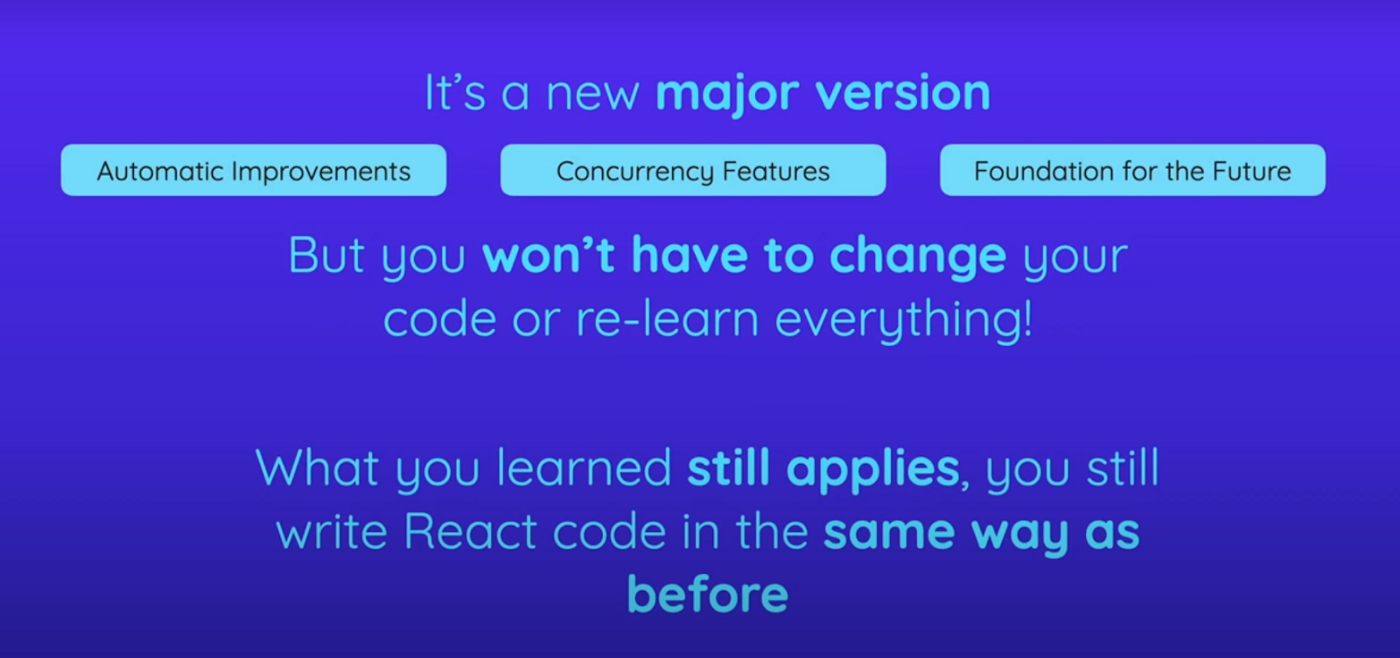
How To Upgrade
Updating, indeed, is a piece of cake. All you have to do is run npm install and install the latest versions of React and React DOM, and then there’s one single change you have to make to your codebase to take advantage of all the new features unlocked and added by React 18.
You have to go to your root entry file, typically index.js and then in that file replace the import of ReactDOM from react-dom with this import, where you import from react-dom/client.
So that’s a tiny addition you have to make to the import statement and replace the line where you called ReactDOM.render to render the root component into some element in the index.html file with the line below where you call to create a root on React DOM.
Instead, and you pass the root element in the index.html file to create root and then on this root object which is returned by createRoot, you call render to render the root component into this root element in index.html.
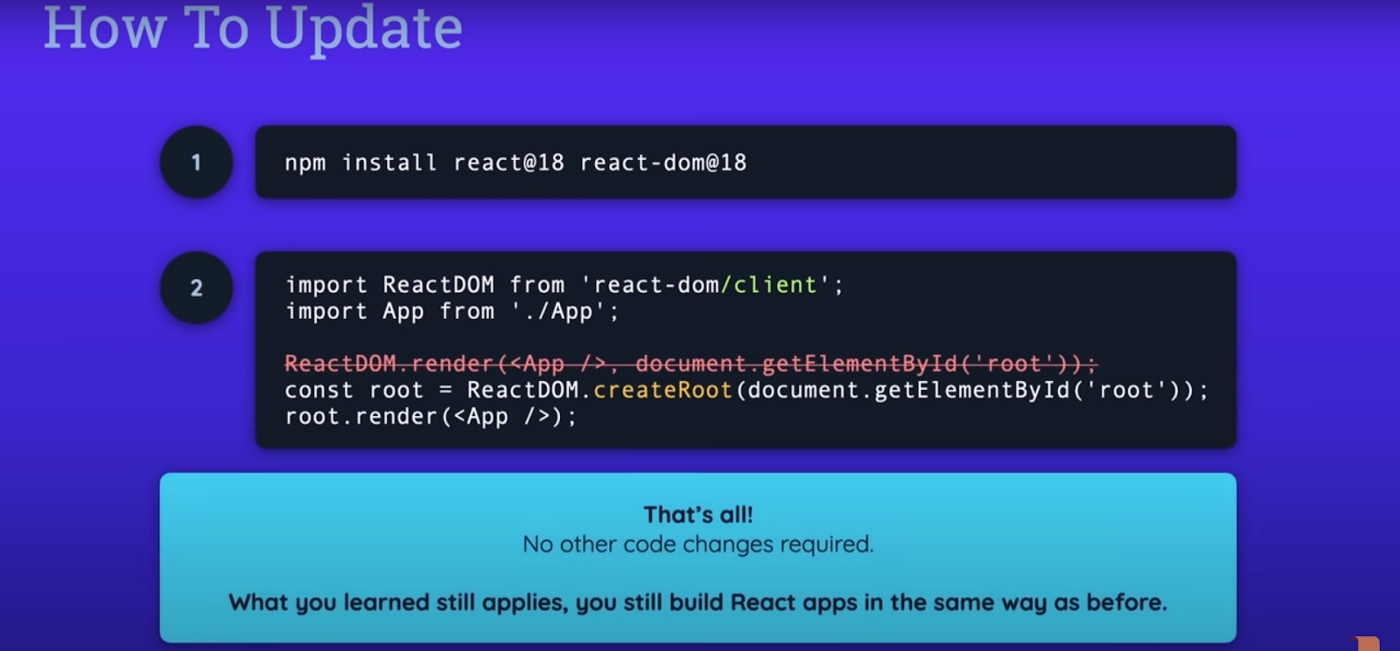
That’s the only change you have to make to your code, no other code changes are required, that’s only in one file and only in these two lines of that file.
Why You Need to Upgrade
Now, why was this change made? Why was this syntax changed? because by changing to it, you opt in to a new set of features and into a lot of behind the scenes, improvements, and changes that were introduced by React18.
The most important new feature introduced by React 18 is a feature called concurrency and that’s actually rather, a concept that is made up of a set of features that were unlocked and added by React 18.
Concurrency is all about processing, multiple simultaneous state updates. For example, a list that updates as a user types into an input field. If there is a lot of data to be processed, or the logic for processing the user input is rather complex, the user interface can get laggish and slow, especially on slower devices.
In the past prior to React version 18, React always processed all state updates in the order in which they were triggered, and the next state update could only be processed, once the previous one was done.
With React 18 and the addition of this concurrency concept, you can tell React that a certain state update has a lower priority than another state update, and react is then able to treat the other updates with higher priority.
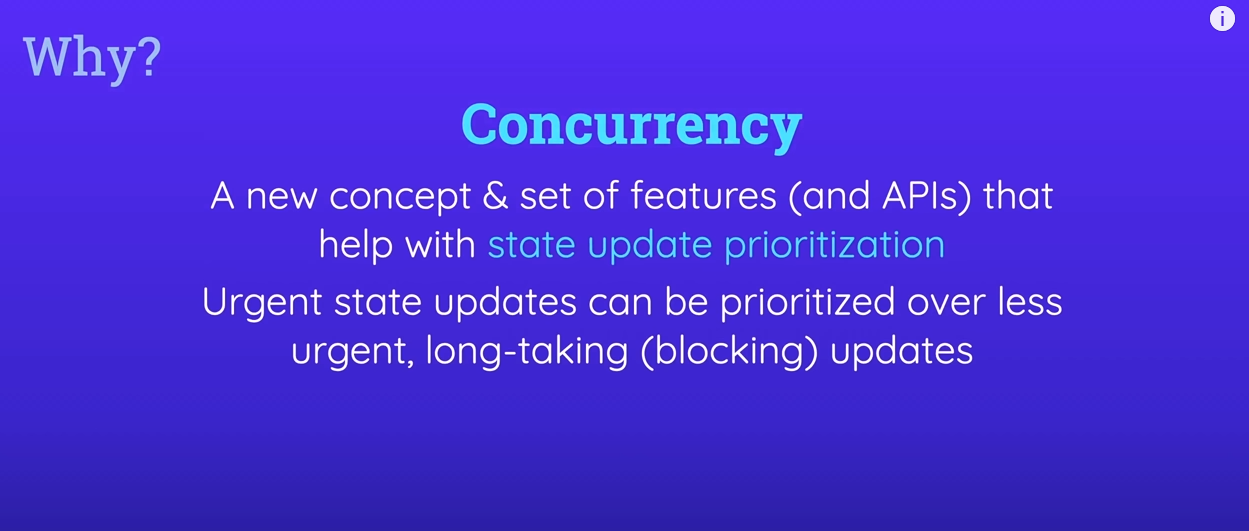
New APIs
Now you tell React about a state update that has a lower priority. By using one of the new APIs introduced with React 18.

you can use useTransition hook or just startTransition function in places where hooks can’t be used, for example, in class-based components. To tell React that a certain state update process is about to start and that it should not wait for this process to finish before processing other state updates.
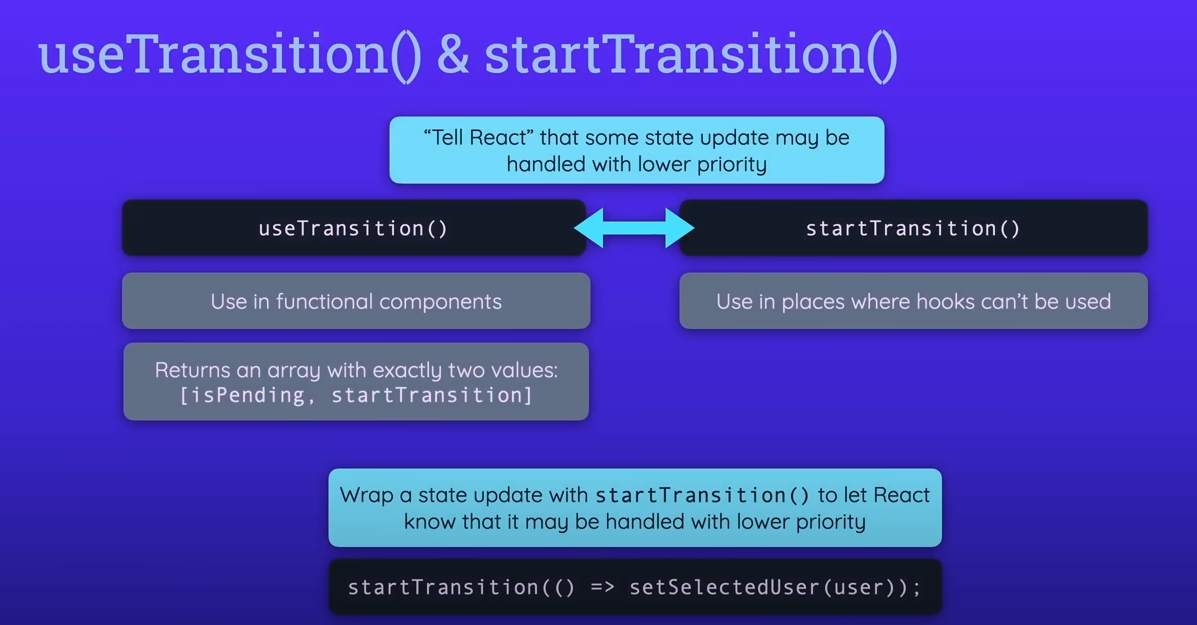
So the wrap state update will have a lower priority.
In other cases, you might have a value that’s generated by some state update, which you maybe don’t directly control, and you can use useDeferredValue to let React, know that an older version of the value should be shown until the new value is ready instead of waiting with the entire component and UI update until the new value is available.
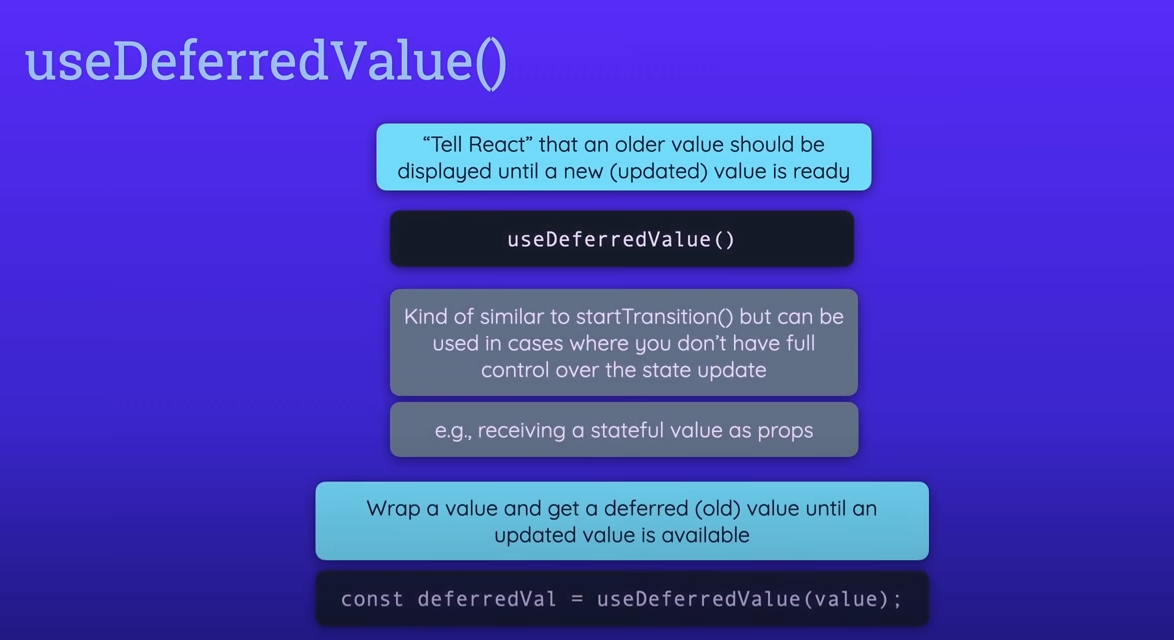
Now, these functions and hooks are obviously very new and therefore we will of course have to see which patterns and best practices will emerge based on them. You should definitely not start wrapping all your or state updating calls or all your values with those functions in hooks.
Instead, you should use them in niche cases where very complex calculations are going on where the interface is lagging and you have no other way of improving it or you have no other obvious error that could be causing this behavior than these functions and hooks can be helpful. Now React 18 also introduces a couple of other functions which are primarily intended to be used by library authors.
These hooks solve specific problems which may be encountered by specific libraries like CSS, JavaScript libraries and they allow the authors of these libraries to work around any problems they might face and utilized new concurrency features unlocked by React 18.
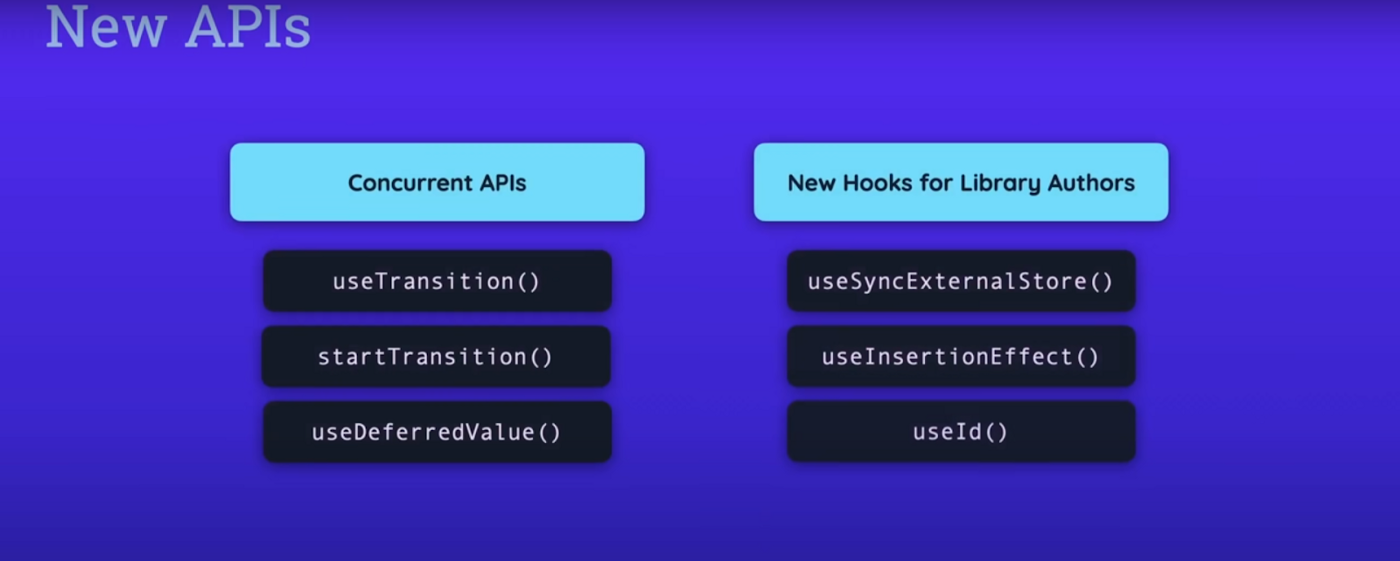
As an application developer, you will probably never work with these hooks.
Behind The Scenes Improvement
Now besides these new APIs and hooks, you also get some changes for existing features.
For example, state batching state batching already existed in older versions of React as well, and it’s all about grouping multiple state updating calls together so that they are executed as one state update call instead of multiple calls.
This ensures that the components to which the state updates belong are not evaluated and executed multiple times unnecessarily, but that at it instead is only executed once.
Now the problem is that with React 17 or older this feature already existed, but it only worked inside of synchronous React event handler functions.
if you, for example, had a function that was triggered because of a timer expires, state updates performed in that function were not batched together. This changed with React 18 and state batching now always works, no matter where you make your state updates.
Improved Suspense
Another important change affects the suspense component. The suspense component was already added in the older versions of React, and it can be used to be wrapped around lazily loaded components.
Lazy loading simply means that you implement code splitting to only load to code for a certain component when it is needed. This can help with performance, since less code has to be downloaded initially. This is often used in combination with routing.
Now you could already use the suspense component to show a fallback component.
For example, a loading spinner until the code for the lazily loaded component was downloaded.
However, prior to React version 18, you could not use the suspense component if you also use server-side rendering.
Now, of course many apps might not use that.
But if you did use it, you were not able to use the suspense component because it would cause an error.
With React 18 that’s changed and you can now use this component, as you always were able to use it on the client side on the server side as well.
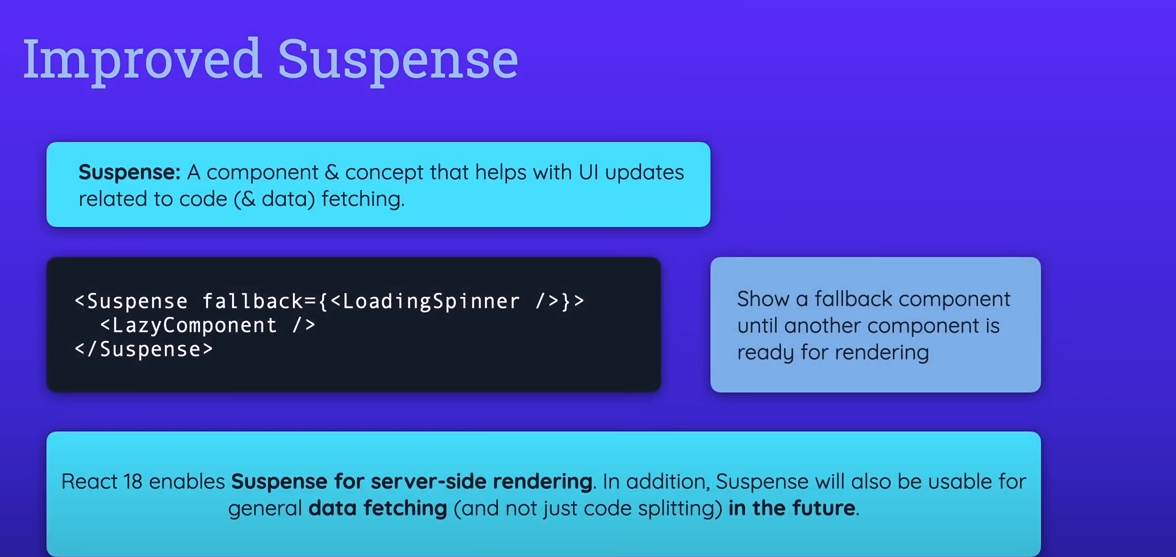
As a side note, we will probably see more exciting changes to the suspense component, in the future.
Now that React 18 is out because the React team does plan to also make the suspense component to work with data fetching, not just with code fetching for lazily loaded components.
The idea is that your components, if they are fetching data, can tell React that they are and tell React when they are done fetching data and then the suspense component, which is somewhere above the data fetching components in the component tree, is able to show a fallback for the components that are fetching data until the data is there.
This means that you won’t have to manage the loading state manually inside of your components any more, and you can decouple logic for doing that from your user interface. Now this feature is not there yet but it’s planned to be added in the future and React 18 also lays the foundation for that.
Another really exciting feature that isn’t there yet, but which we will probably see in the future.
Now that React 18 was released, are server components. These are components that are not just pre-rendered on the server, as you can already do it today with server-side-rendering, but instead, these are components that are meant to only execute on the server and yet work seamlessly together with client-side components.
Once this feature is added to React it will effectively turn React into the kind of full-stack framework or library which allows you to make server-side with client-side code so that you are not just limited to building user interfaces but you instead can also certain server-side only logic in your React app.
This could be used for performing tasks on the server that should not run on the client for security or performance reasons.
This feature is not there yet. You can’t yet use these components. It’s an alpha stage only and will probably change a lot over the next months. But we will probably see it in the future.
Create an ASP.NET Core app with React in Visual Studio
In this article, you learn how to build an ASP.NET Core project to act as an API backend and a React project to act as the UI.
Currently, Visual Studio includes ASP.NET Core Single Page Application (SPA) templates that support Angular and React. The templates provide a built in Client App folder in your ASP.NET Core projects that contains the base files and folders of each framework.
Starting in Visual Studio 2022 Preview 2, you can use the method described in this article to create ASP.NET Core Single Page Applications that:
Put the client app in a separate project, outside from the ASP.NET Core project
Create the client project based on the framework CLI installed on your computer
Prerequisites
Make sure to install the following:
Visual Studio 2022 or later with the ASP.NET and web development workload installed. Go to the Visual Studio downloads page to install it for free. If you need to install the workload and already have Visual Studio, go to Tools, Get Tools and Features..., which opens the Visual Studio Installer. Choose the ASP.NET and web development workload, then choose Modify.
npm (https://www.npmjs.com/), which is included with Node.js
npx (https://www.npmjs.com/package/npx)
Create the frontend app
In the Start window (choose File, Start Window to open), select Create a new project.

Search for React in the search bar at the top and then select Standalone JavaScript React Template. (The standalone TypeScript React Template is not currently supported in this tutorial.)
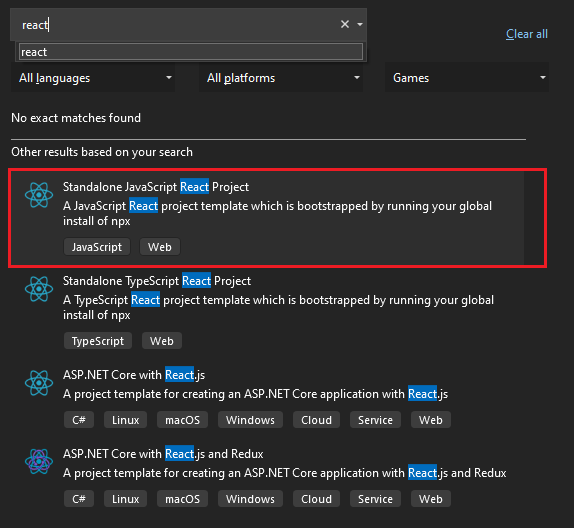
Give your project and solution a name. When you get to the Additional information window, be sure to check the Add integration for Empty ASP.NET Web API Project option. This option adds files to your React template so that it can be hooked up later with the ASP.NET Core project.

Once the project is created, you see some new and modified files:
aspnetcore-https.js
aspnetcore-react.js
setupProxy.js
App.js (modified)
App.test.js (modified)
Select an installed browser from the Debug toolbar, such as Chrome or Microsoft Edge.
If the browser you want is not yet installed, install the browser first, and then select it.
Create the backend app
In Solution Explorer, right-click the solution name, hover over Add, and then select New Project.

Search and select the ASP.NET Core Web API project.
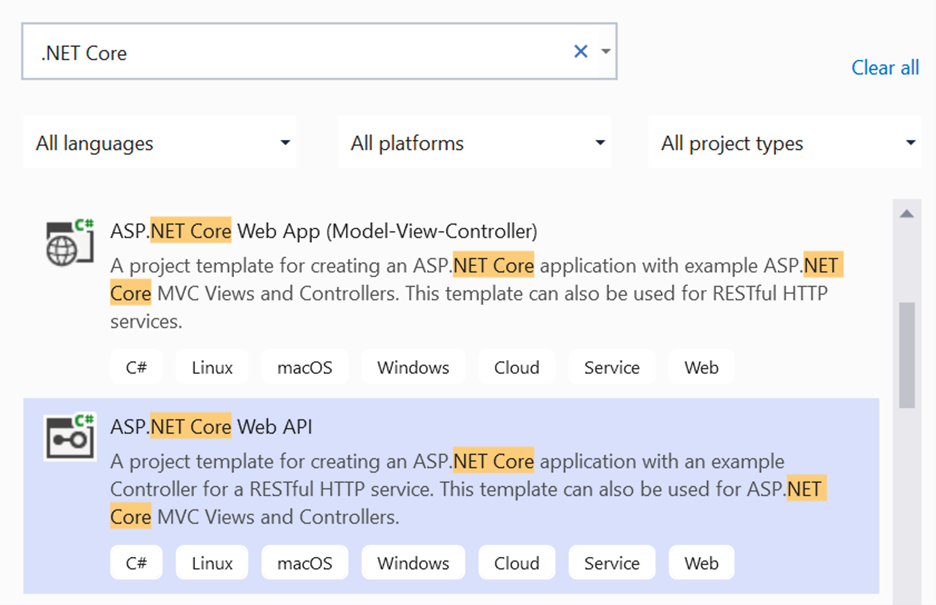
Give your project and solution a name. When you get to the Additional information window, select .NET 6.0 as your target framework.
Once the project is created, Solution Explorer should look like this:

Set the project properties
In Solution Explorer, right-click the ASP.NET Core project and choose Properties.
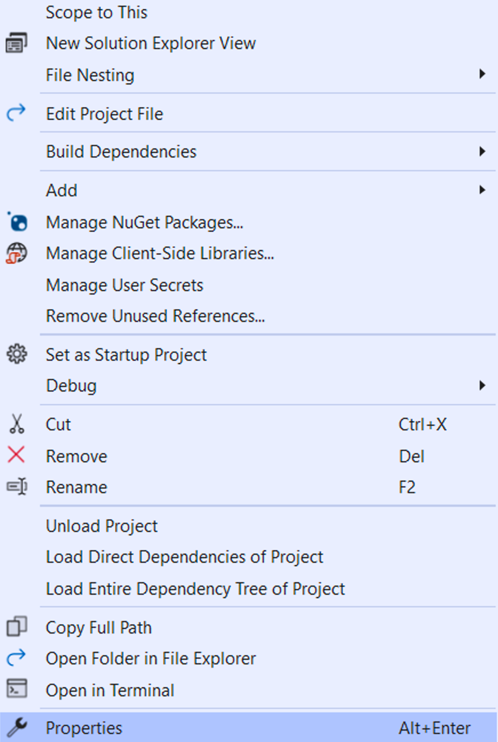
Go to the Debug menu and select Open debug launch profiles UI option. Uncheck the Launch Browser option.
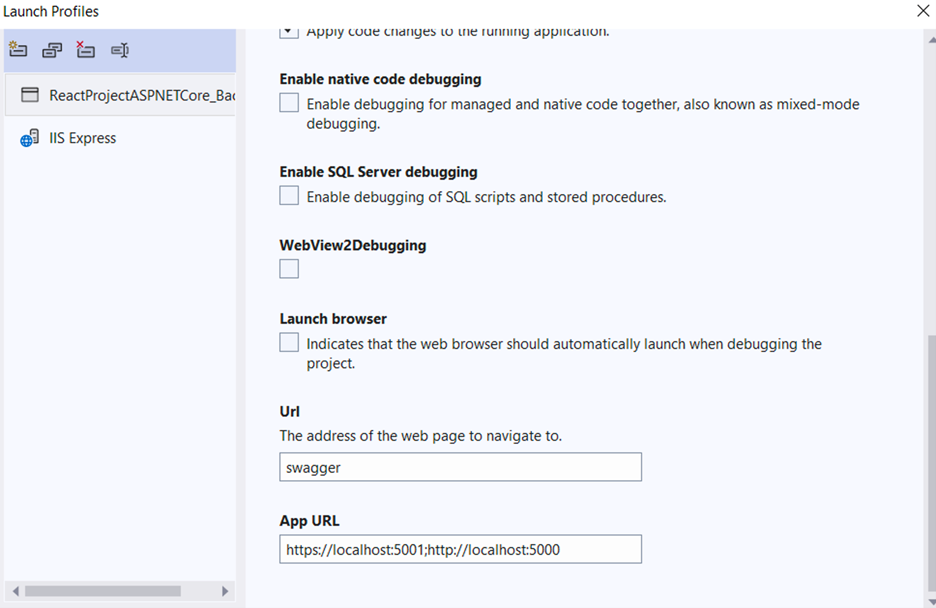
Currently, launch.json must be located under the .vscode folder.
Set the startup project
In Solution Explorer, right-click the solution name and select Set Startup Project. Change the startup project from Single startup project to Multiple startup projects. Select Start for each project’s action.
Next, select the backend project and move it above the frontend, so that it starts up first.
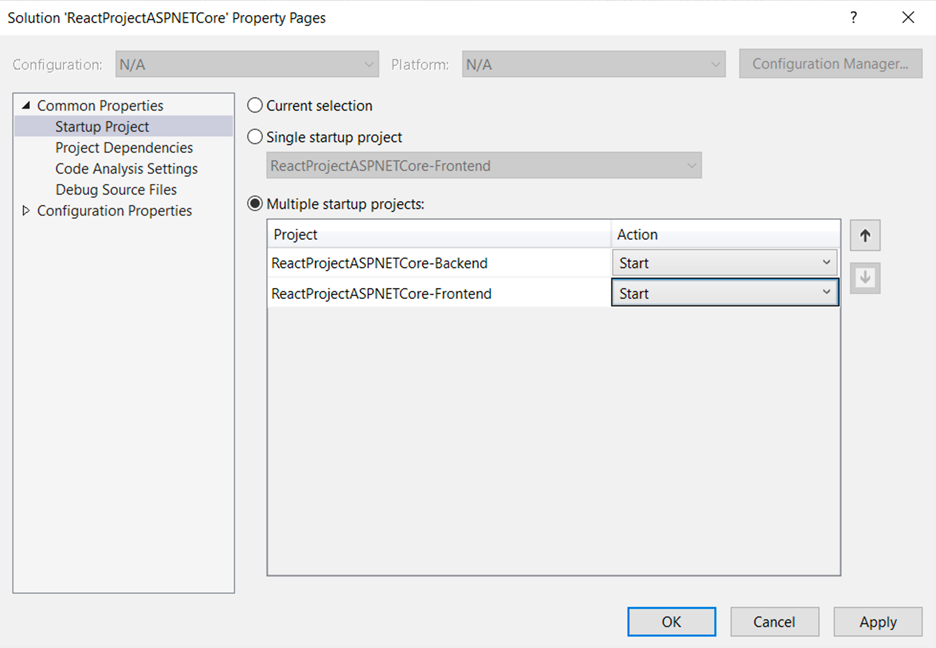
Start the project
Before you start the project, make sure that the port numbers match. Go to the launchSettings.json file in your ASP.NET Core project (in the Properties folder). Get the port number from the applicationUrl property.
If there are multiple applicationUrl properties, look for one using an https endpoint. It should look similar to https://localhost:7049.
Then, go to the setupProxy.js file for your React project (look in the src folder). Update the target property to match the applicationUrl property in launchSettings.json. When you update it, that value should look similar to this:
JavaScript
target: 'https://localhost:7049',
To start the project, press F5 or select the Start button at the top of the window. You will see two command prompts appear:
The ASP.NET Core API project running
npm running the react-scripts start command
Check console output for messages, such as a message instructing you to update your version of Node.js.
You should see a React app appear, that is populated via the API. If you don't see the app, see Troubleshooting.
Publish the project
Starting in Visual Studio 2022 version 17.3, you can publish the integrated solution using the Visual Studio Publish tool.
To use publish, create your JavaScript project using Visual Studio 2022 version 17.3 or later.
In Solution Explorer, right-click the ASP.NET Core project and choose Add Project Reference.
Select the React project and choose OK.
Right-click the ASP.NET Core project in Solution Explorer and choose Unload project.
This opens the .csproj file for the project.
In the .csproj file, update the project reference and add <ReferenceOutputAssembly> with the value set to false.
When you've updated the reference, it should look like this (substituting your own project folder and project name).
XML
<ProjectReference Include = "..\reactprojectfolder\reactprojectname.esproj">
<ReferenceOutputAssembly> false </ReferenceOutputAssembly>
</ProjectReference>
Right.click the ASP.NET Core project and choose Reload Project.
To publish, right click the ASP.NET Core project, choose Publish, and select options to match your desired publish scenario, such as Azure, publish to a folder, et al.
The publish process takes more time than it does for just an ASP.NET Core project, since the npm run build command gets invoked when publishing.
You can modify the npm run build command using the Production Build Command in the React project properties. To modify it, right-click the React project in Solution Explorer and choose Properties.

Is AR and VR bringing about Digital Transformation in Real Estate
can digital transformation of real-estate help current professionals and organizations differentiate themselves from the competition in these times of change
Why real-estate needs digital transformation?
According to analysts, the salability of a property heavily depends on its Days on Market (DOM) index. Factors – such as seasonal variability, condition of the property, whether it was staged to sell, buyer’s availability to see a property, as well as seller’s lead time to allow in-person showing – can have a significant impact on DOM.
Immersive technologies such as Augmented and Virtual Realities (AR/VR) can drastically improve this index by providing convenience and enhanced experiences to buyers, agents and sellers alike, and making way for digital transformation. AR/VR can save considerable time and expenditure not only for potential renters or buyers, but also for sellers and realtors during times of potential downturn where buyer-to-seller and buyer-to-agent ratios drop significantly. Thanks to immersive tech like AR, MR, and VR, potential buyers can soon be able to move freely in their future residence or office virtually, just by putting on a VR headset or by watching an AR representation of it on their smartphones or tablets. And perhaps this technology that combines VR and AR might just be the key to harnessing immediate success in the real-estate market in today’s highly volatile environment.
What are immersive technologies?
Since its inception by Laurence Manning in his late 1930’s science fiction stories, VR (and its close cousin AR) has only recently gained massive popularity. Technological progress and digital transformation has allowed the improvement of immersive User Experiences (UX) and reduction in costs, thus favouring their democratization – but the UX for AR and VR can be considerably different.
VR is a three-dimensional, computer- generated environment which can be explored and interacted with by a user. A range of devices (e.g. headsets) can be used to stimulate vision, hearing, and touch in order to create the illusion of a virtual reality that is created using a computer. AR, on the other hand, is an enhanced version of reality to add digital information on top of a captured image or video. AR is typically available in mobile apps that use a smartphone camera to capture videos of the real world, and then superimpose a layer of information on it, including text, images, and virtual 3D objects. But recent advancements have been able to combine the characteristics of VR and AR to give rise to immersive Mixed Reality (MR) experiences such as those possible with the Microsoft Hololens.
How does VR or AR concretely fit into the digital transformation of the process of sale or leasing of residential or commercial real-estate? The experience for potential clients wanting to visit a property could be of two types: Either remotely (by visiting the real-estate broker’s website,) or in-person with or without a real-estate professional to guide these virtual tours. To simplify the visit process, visitation developers can leverage AR and VR experiences by capturing 360 Videos of a property being offered, as well as creating its virtual model at a small fraction of the cost of physical staging and refinishing. Such modelled spaces can then be imported onto 2D media for AR experiences or presented as VR content using virtual headsets.
Enhanced customer experience through virtual visits and staging
90% of households today begin their real estate search on the Internet, with more than 50% of searches made on mobile devices. To enhance the user experience on the realtor’s website, a virtual presence of the property through VR and AR can highlight Points of Interest (POIs) that allow potential buyers a better understanding of the property. However, unproductive physical visits despite appealing POIs can result in the added cost of sale if buyers are unable to correlate their “imagined” property compared to how it really looks in real life.
While these technologies cannot offer the guarantees of a sale, they can undoubtedly allow customers to refine their search. This reduces the number of unproductive visits to the benefit of generating and following more serious leads by realtors. Customers can also make more educated selections from a realtor website using technologies that create immersive experiences, as they provide a spatially richer experience than mere photos or videos. Potential buyers can then decide much more easily whether specific properties are “worth the visit” for them.
Analysis has shown that around 50% of potential buyers can request on-demand (or same day) access to a property for viewing in a “buyer’s market”. While some mobile apps today have enabled on-demand availability of real-estate professionals, the actual viewing availability of the property can drastically impact the potential sale. By leveraging immersive technologies, realtors could at least generate interest for a deferred visit by offering an instant VR experience without the need for immediate physical access to the property. This also benefits real estate professionals, who will no longer be required to organize visits just to generate interest in a property. Instead, they can offer potential buyers with an immersive virtual experience of the property visit.
Better analytics to drive decision support
Analytics is also an important aspect of using immersive technologies since they allow realtors to gauge the client’s interest in a property, as well as that of the personalized experience. Popular analytics providers are able to offer some web-page related KPIs, such as pageviews, sessions, and exits. However, these technologies and experiences can provide realtors with deeper insight into specific aspects or features that are requested by potential buyers. For instance, a customer requests to see what a living room might look like with maple hardwood floor along with crown molding on ceilings can be captured digitally and provide useful data for prediction and next best actions.
Analytics from within VR and AR environments could also shed direct insight into nuanced buyer behaviors. For instance, the mere fact that buyers spend more time viewing a particular property within the virtual tour could indicate their interest in this and similar properties. The time spent within specific virtual sections could indicate potential problems with the property that need to be resolved in order to make a sale. This data, however, can be segmented not only at the demographic level, but also from geographic, seasonal, and behavioural points of view to better drive decision-making.
Putting it together
VR and AR technologies can help realtors make a stellar first impression on both homebuyers and sellers. These technologies can solve common communication and timing challenges with the prospects and lead to a digital transformation in the field of real estate. As we observed, VR and AR can help realtors and support professionals spend their time effectively and efficiently allowing targeted and personalized experiences. They can also substantially reduce unneeded staging and scheduling expenditures, and opportunity costs due to unproductive showings which can be directly passed to the consumer, thereby incentivising them to close. By helping customers visualize what is possible through VR or AR, eliminating non-productive viewings, and reducing overall costs of preparing a property for sale, the real-estate industry has a real opportunity to revitalise itself using immersive technologies and digital transformation.
While some software companies have started exploring this market, adoption of their solutions and products are not mainstream yet. However, we believe in the next 3-7 years, AR and VR experiences will change our lives in the same way that the web has done in the last 3 decades. And the time is now for real-estate stakeholders to give serious thought to these technologies. In order to stand out from the competition and better meet the expectations of buyers, current market players will have to adapt quickly. Investment in the adoption of 3D modelling, VR demonstration, and AR staging tools is therefore of tremendous value for builders, real estate agencies, and sellers alike. However, the end prize just might go to those who take the first step and differentiate themselves by transforming their digital engagement and experience.
API TESTING
What is an API?
API stands for application programming interface. In general, apis are a set of functions and procedures that allow for creating applications. They access the data and features of other applications, services, or operating systems. In essence, they act like a bridge between different platforms. They enable two unrelated applications to “talk” to each other.
Example:
If we go to a restaurant , you ordered the waiter. Waiter takes the order to kitchen/chef. Request is processed(food prepared) and provided to waiter for delivery. Waiter serves the food to us. Here Customer is the application, waiter is the Api and Kitchen/chef is the server.
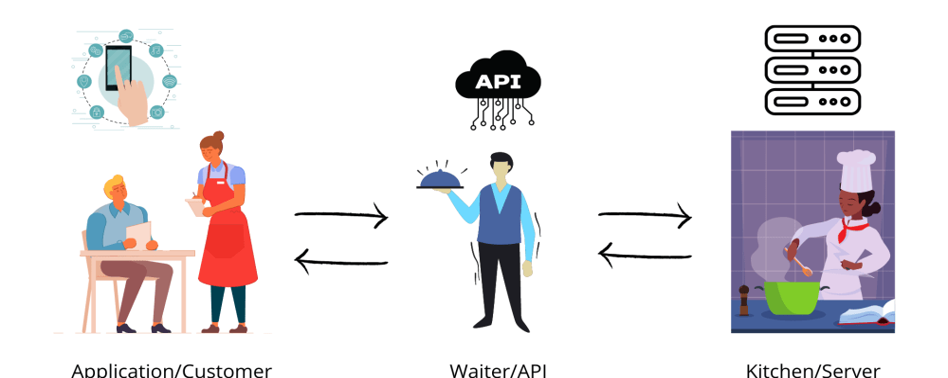
What is API testing?
API testing is a type of software testing that involves testing application programming interfaces (APIs) directly and as part of integration testing to determine if they meet expectations for functionality, reliability, performance, and security. Since APIs lack a GUI, API testing is performed at the message layer and can validate application logic very quickly and effectively.
API testing requires less maintenance effort compare to UI automation testing which makes it a preferred choice for Agile and DevOps teams.
Where we perform API Testing?
In general, applications have three separate layers including Presentation Layer or user interface, Business Layer or application user interface for business logic processing, and Database Layer for modeling and manipulating data.
API Testing is performed at the most critical layer, the Business Layer, where business logic processing is carried out, and all transactions between User Interface and Database happen.
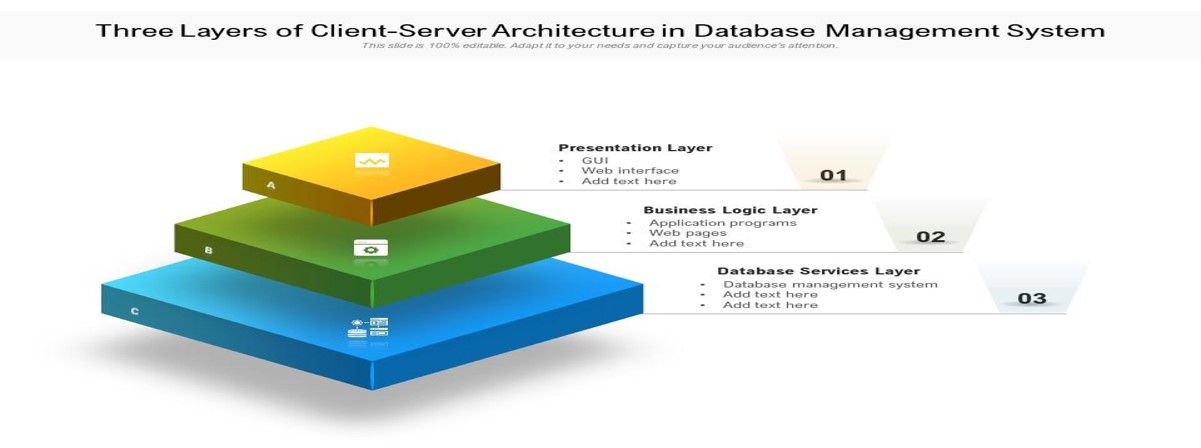
Advantages of API Testing:
Language independent
GUI independent
Improved test coverage
Faster releases
Challenges in API Testing:
Initial Setup of API testing
Testing Parameter Combinations
Sequencing the API Calls
Validating Parameters
API Testing with Postman
POSTMAN is an API client used to develop, test, share and document APIs. It is used for backend testing where we enter the end-point URL, it sends the request to the server and receives the response back from the server.
Advanced features of Postman:
API development.
Setting up Mock endpoints for APIs that are still under development.
API documentation.
Assertions for the responses received from API endpoint execution.
Integration with CI-CD tools like Jenkins, TeamCity, etc.
Automating API tests execution etc.
Walkthrough Postman Tool:
Postman initial Ui Screen:
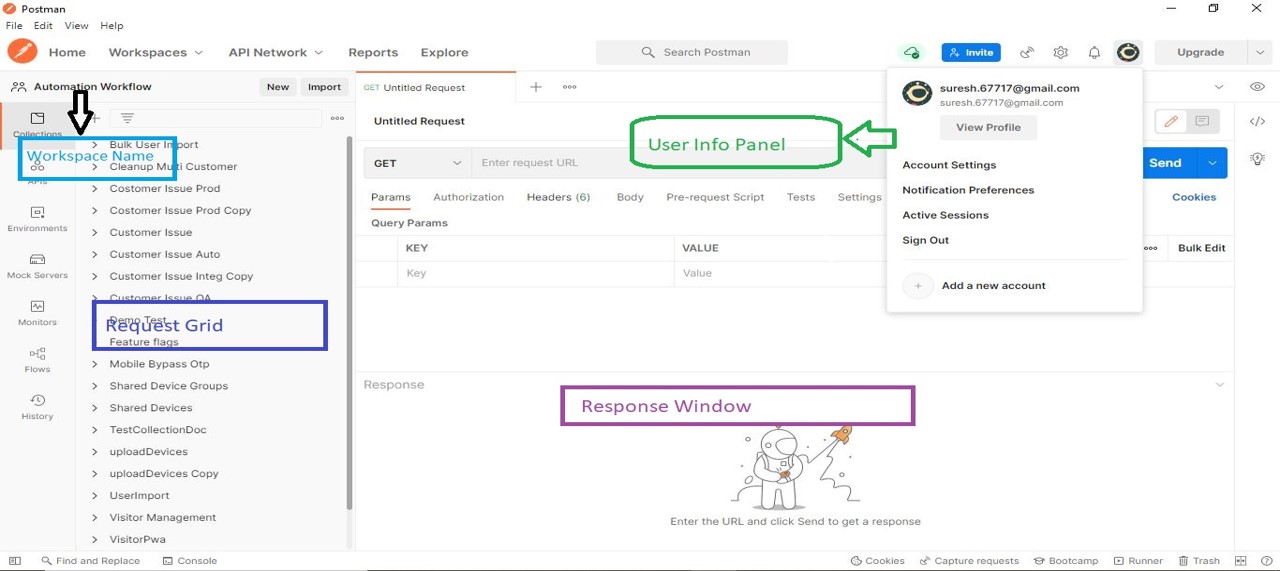
Ui sample for creating new Request:
Creating dummy Get Request
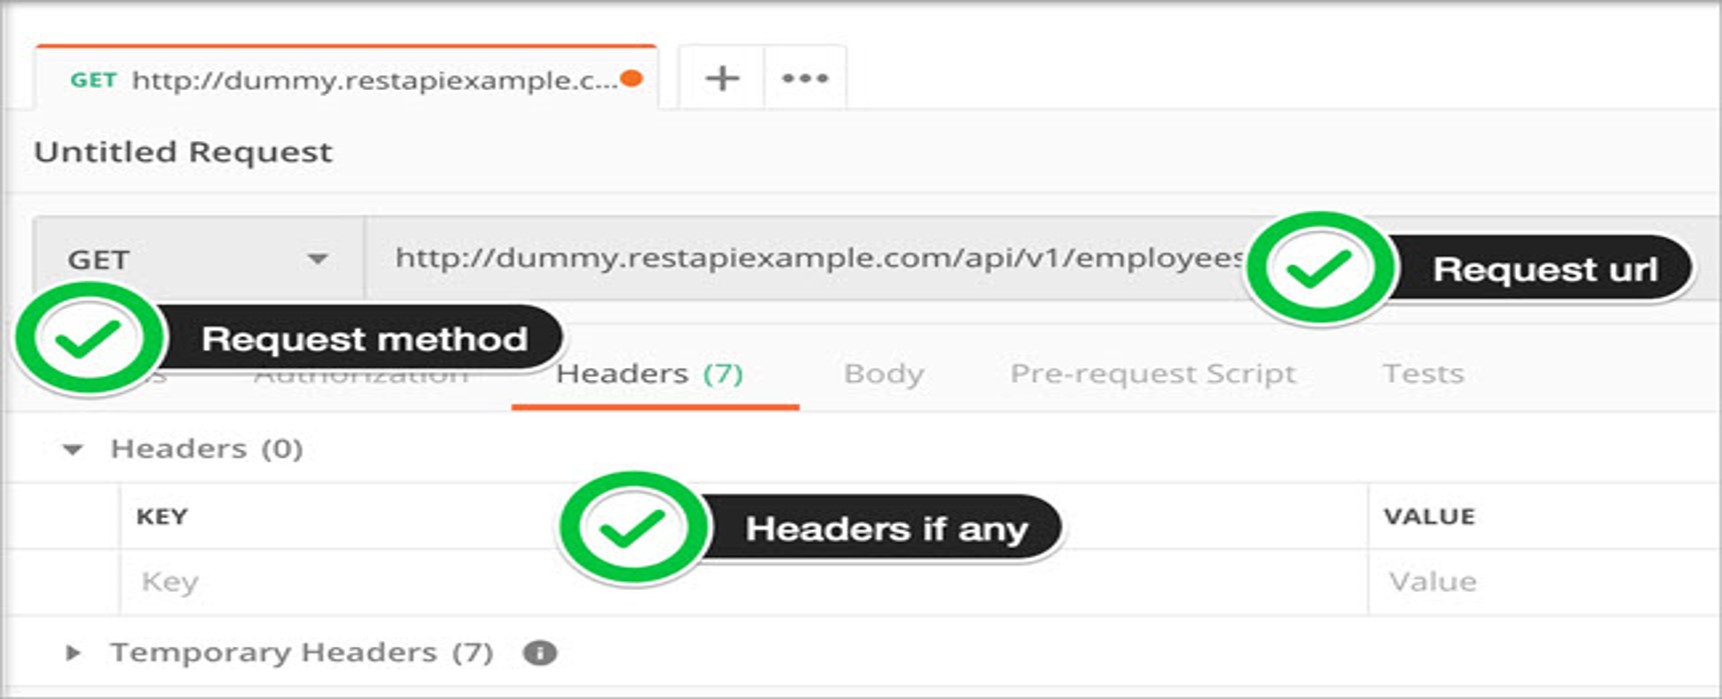
Sending a Request:
After filling up necessary request properties we need to hit the Send button to execute the request to the server hosting the endpoint.
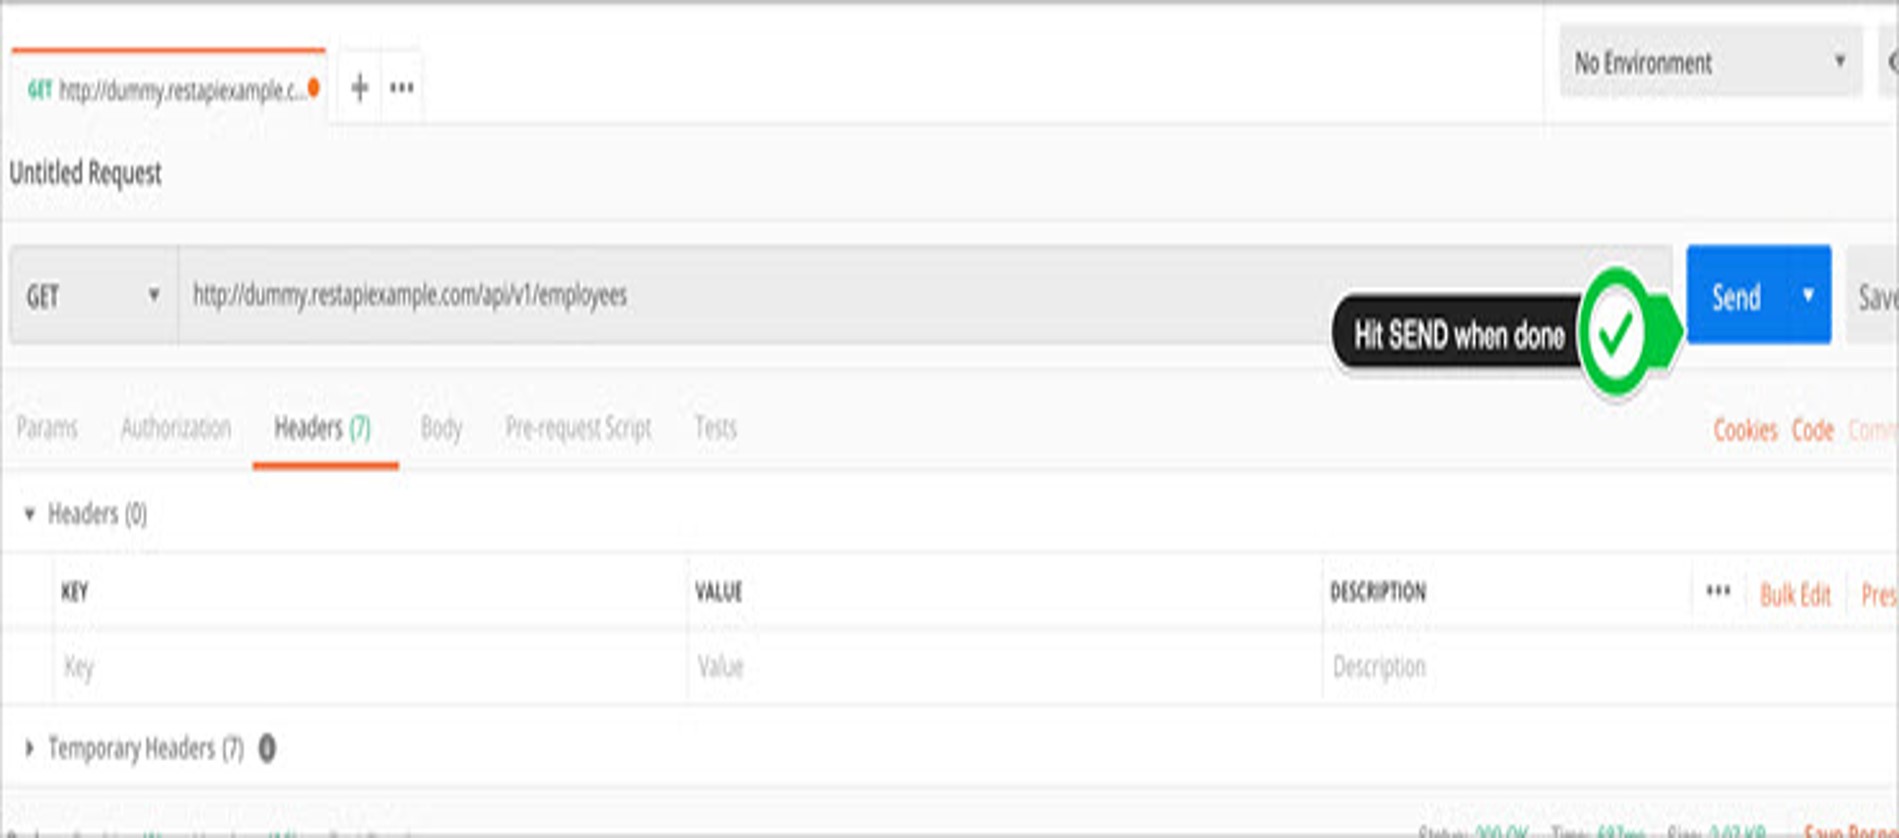
Receiving Response:
Once the request is executed, we will receive the response with various data like Status, Time, Size, Cookies, Headers etc .
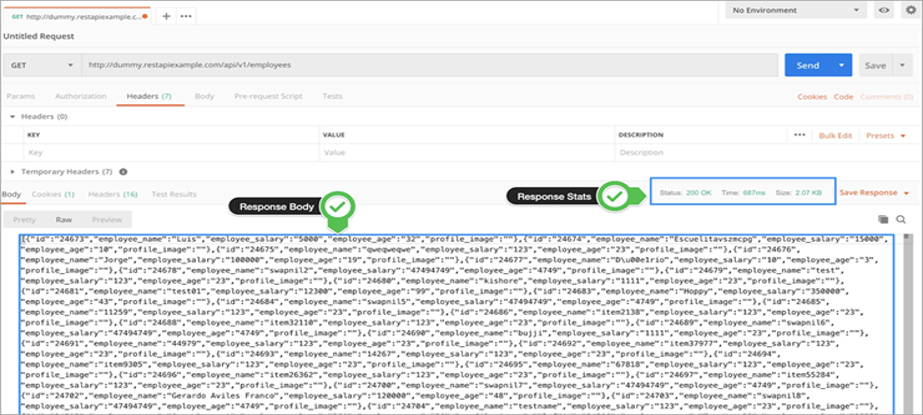
Response Cookies:
Cookies hold a lot of importance in terms of driving client-side experiences and lot of session related info to get all the information about the cookies that were returned from the server. Below is the sample cookies tab:
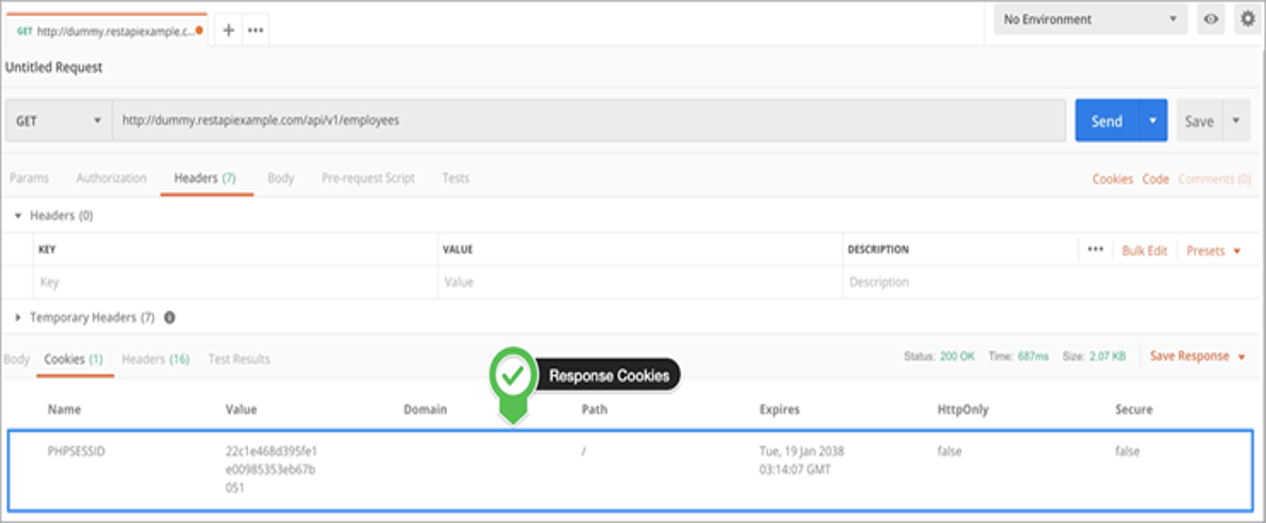
Response Headers:
Response Headers contains the information about the request that got processed. Below is the sample response headers.
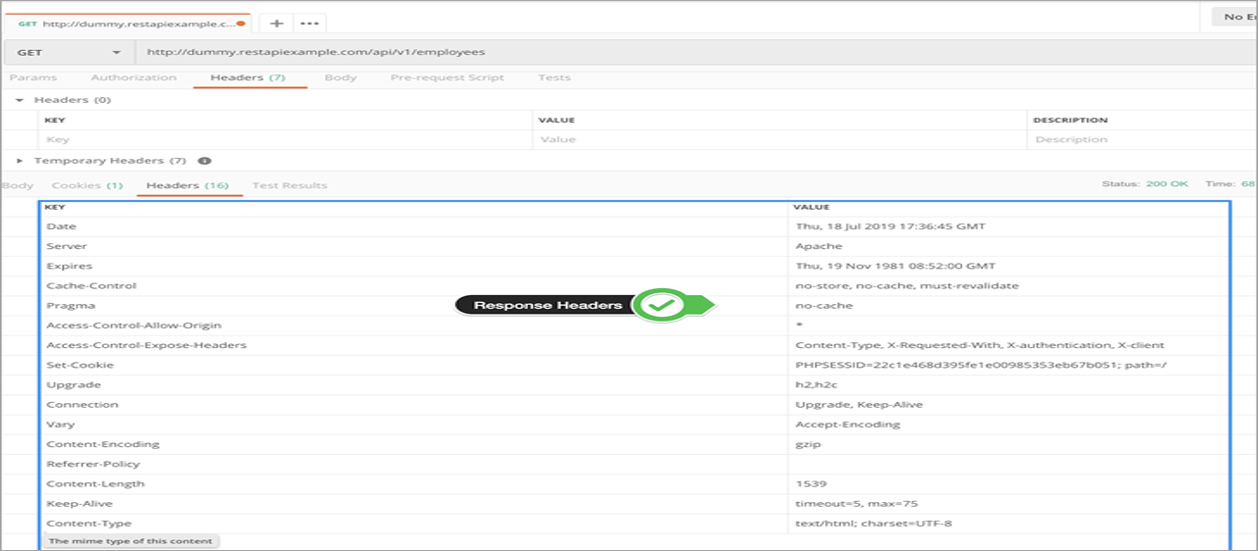
Building Blocks of Postman:
Primarily we use three building blocks in postman.
Request
Collection
Environment
Request:
Request is a combination of URI, headers and body/payload. We can save our request and use as many times we need.
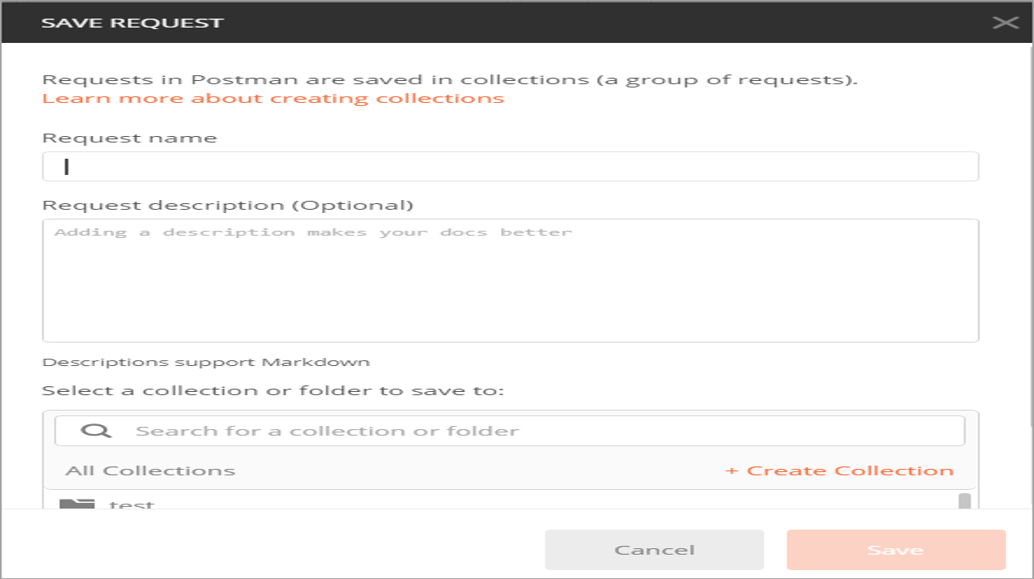
Collection:
A collection is a place where we save all our requests. Usually we save requests belong to same category under a collection.
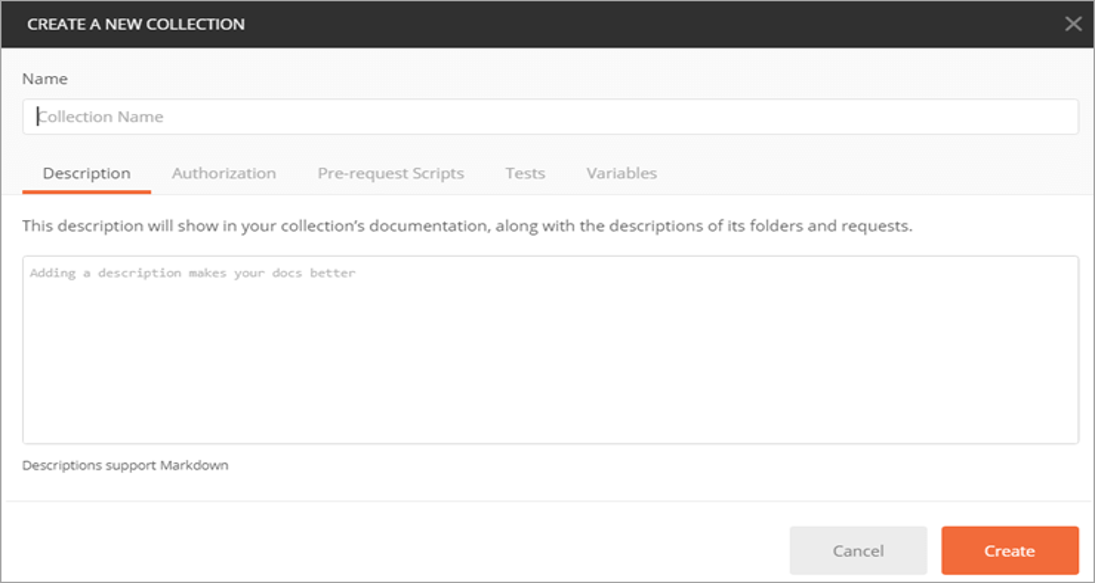
Environment:
An Environment is a region where all your operations on an API will take place. It could be QA, Dev, UAT or PROD. Each project will already have the regions configured and you just have to declare your global variables such as URL, token’s id and password, context keys, API keys, document keys and so on in it.

Different Methods in Api Testing:
There are many methods for calling Rest Api. Among them mostly we use four methods.
Post
Get
Put
Delete
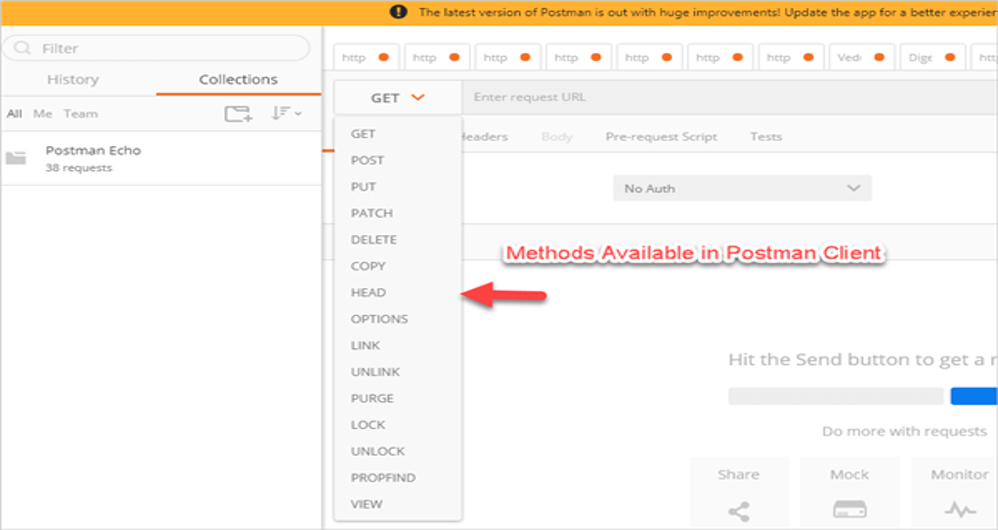
1. POST Method:
Create a new User or an entity
Steps to Execute:
Select a POST from the dropdown and use this service URI https://reqres.in/api/users/100
Go to Body – > select RAW -> As we are passing JSON.
Select JSON from the dropdown and pass the payload script in the request body.
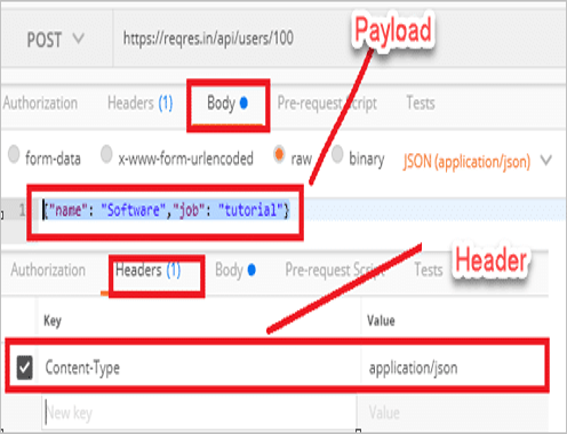
2. GET Method:
GET is used to retrieve the information. Steps for using GET method:
Select GET method from dropdown.
Pass the URI(Pass path and query parameters in url).
Parameters that are defined after ‘?’ in Url is termed as Query parameter and parameters before ‘?’ are termed as Path parameters.
Pass the headers if any and hit the send button for response/result.
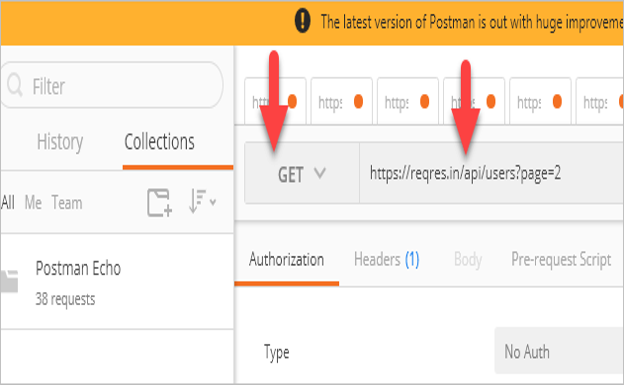
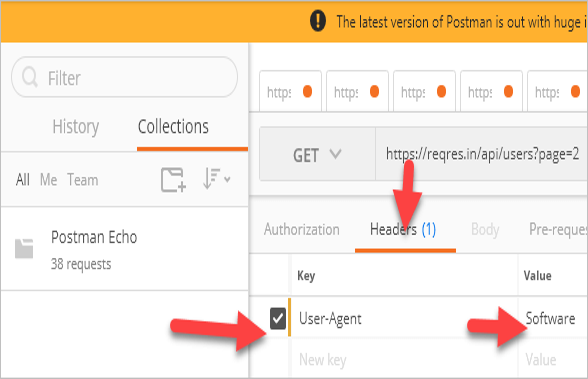
3. PUT Method:
PUT is used to update the entity or record. Steps for using Put method.
Select PUT from methods dropdown.
Provide URI in the url section.
Go to body-> Select Json-> Provide Json Payload
Provide headers if any and hit on Send for the response.
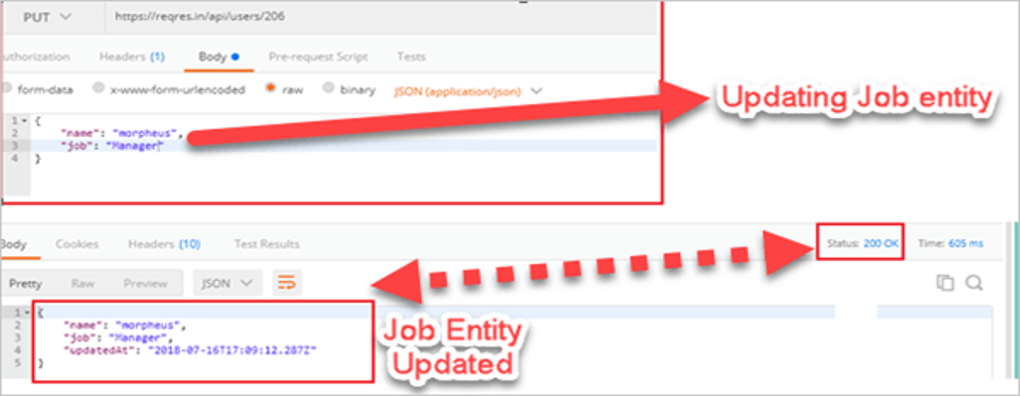
DELETE Method:
DELETE method is used to delete/remove an entity.
Steps for using Delete method.
Select DELETE from methods dropdown.
Provide the URI in url section.
Payload is not required for Delete call.
Provide headers if any and hit on Send.

HTTP Status Codes in Api:
HTTP defines some status codes that can be used to convey response of client’s request.
Usually, they are divided into five categories.
Communicates transfer protocol-level information
Indicates that the client’s request was accepted successfully.
Redirection – Indicates that the client must take some additional action in order to complete their request.
Client Error – This category of error status codes points the finger at clients.
Server Error – The server takes responsibility for these error status codes.
API Automation Using Karate:
Karate is an open-source tool to combine API test-automation, mocks, performance-testing and even UI automation into a single, unified framework.
Karate is based on Cucumber, another BDD testing framework with which it shares several features. The use of a Gherkin file, which describes the tested functionality, is one of them. Tests, unlike Cucumber, are not written in Java and are explained in detail in the Gherkin file.
The ".feature" extension is used to save Gherkin files. It starts with the Feature keyword and continues on the same line with the feature name. It also includes many test scenarios, each of which starts with the keyword Scenario and consisting of multiple steps with the keywords Given, When, Then, And, and But.
Features of Karate Framework:
The syntax is easy to understand by non-programmers.
Karate provides the users with the ability to execute the test cases in Parallel and perform the JSON & XML checks.
It makes use of the Cucumber feature file and the Gherkins language to write the test which is very easy to understand.
It requires no technical programming knowledge like Java.
We can call a feature file from another file.
Karate framework provides supports for the Data Driver Testing that is built in-house, hence no need to depend on external frameworks.
Built-in Native Rest Reports. Plus, it can be integrated with the Cucumber for better UI Reports and more clarity.
Provides in-house support for switching configuration across different testing environments (QA, Integ, Stage, Prod etc.).
Karate provides seamless support for CI/CD integration that can be useful.
Structure of Karate framework:
A Karate test script is known for the possession of the “.feature” extension. Maven guidelines instruct that the storage of non-Java files be done separately. They are done in a src/test/resources structure. And the Java files are kept under src/main/java. As per the creators of the Karate Framework, they strongly believe that we keep both Java and non-Java files side by side. As per them, it is much easier to look out for the *.java and *.feature files when they are kept together, rather than following the standard Maven structure.
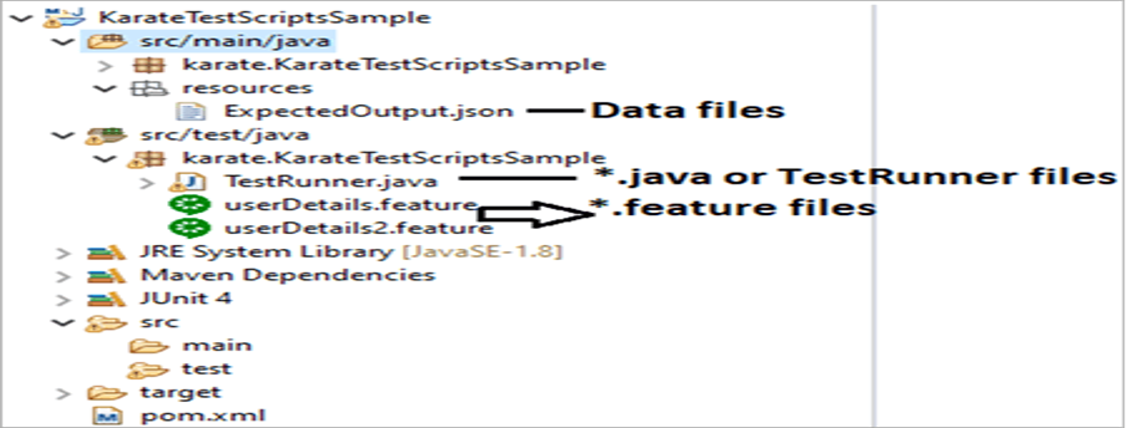
Basic Karate Script:
Install the following prerequisites on your PC before we begin writing the basic Karate test scripts:
Eclipse IDE
Maven. Set the appropriate Maven path.
JDK & JRE. Set the appropriate path.
A basic Karate script looks like this:
Feature : Admin Login
Background :
* url www.integaccessportal.zervinc.net
* header Content-Type = 'application/json'
Scenario : Admin Login with Valid credentials
Given path '/v1/portal/login'
And request { username" : "TESTADMIN__AUTOMATION_TEST","password":'#(password)' }
When method POST
Then status 200
And match response.status == "success"
And print response
Understanding the components in the sample feature file:
Feature:
Keyword explains the name of the feature we are testing.
Background:
This is an optional section that is treated as a Pre-requisite section. This can be used to define what all is needed to test the API. It contains HEADER, URL & PARAM options. Steps defined here applicable to all scenarios.
Scenario:
Every feature file that you will see will have at least one feature (although it can give multiple scenarios). It is the description of the test case.
Given:
It is the step that needs to be executed before any other test step is performed. It is a mandatory action to be performed.
When:
It specifies the condition that should be met to perform the next test step.
Then:
It tells us that what should happen in case the condition mentioned in the When is satisfied.
And:
It is used when we need to use Given, When and Then keywords.
Understanding the feature/Script:
Given feature above is for testing login functionality.
Under Background Section we are defining baseUrl and header.
Under Scenario, we will execute multiple steps.
Under Given we have provided endpoint we need to test.
Then we passed Json Payload/body by using ‘And’ instead of using Given keyword again.
Under ‘When’ we need to pass the Http Method(i.e. Post, Put, Delete, Get etc.)
By using ‘Then’ we are validating the response status is 200
And we are checking, in response body whether there is a field status is ‘success’ or not
And later we are printing the response.
How to run the script:
We can run our tests by integrating Karate with JUnit.
We can run our tests by running our features as Junit tests from Ide or by running through CLI.
A simple test runner usually looks like below
Class TestRunner {
@ Test
Void testParallel() {
Results results = Runner.path("classpath:features").tags("~@ignore").outputCucumberJson(true).parallel(1);
genarateReport(results.getReportDir());
assertEquals(0,results.getFailCount(), results.getErrorMessage());
Sample Karate Report:
Usually a simple karate report looks like below.
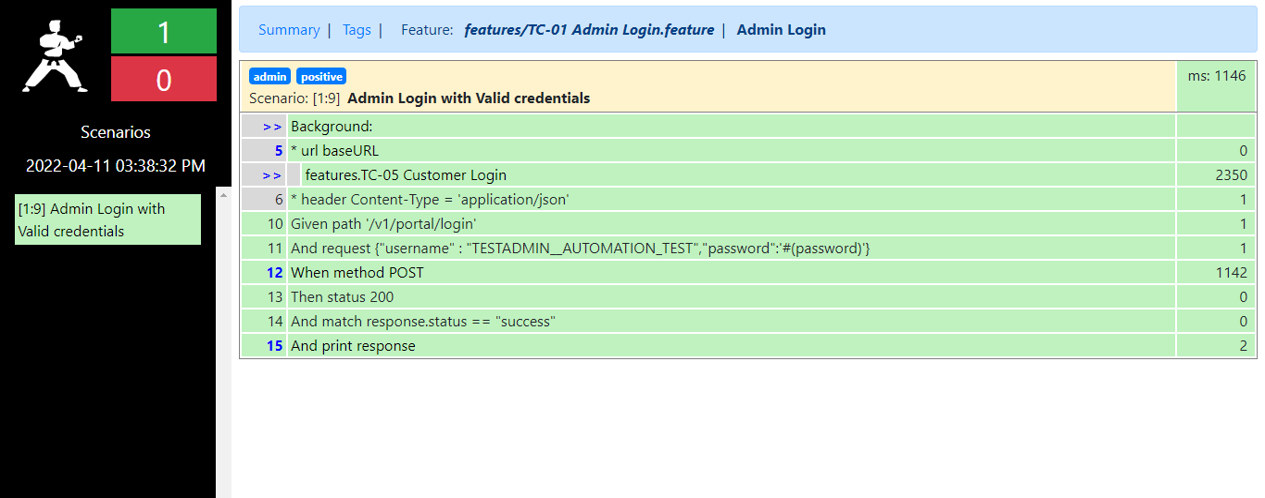
What is Geo fencing?

Geofencing is a service that triggers an action when a device enters or exit from the specified predefined location or geographical area for given radius. This is a location-based service in which a creator of an app or other platform/software uses GPS, RFID, Wi-Fi or cellular data to send/trigger messages like SMS, Email or In-App/App-based notifications (pre-programmed action) when mobile devices that enter, exit, or remain parked in the geographical location.
Android allow you to create a geo fence by specifying the radius and lat-long (short for latitude and longitude) of the center of the real geographical region that you wish to monitor.
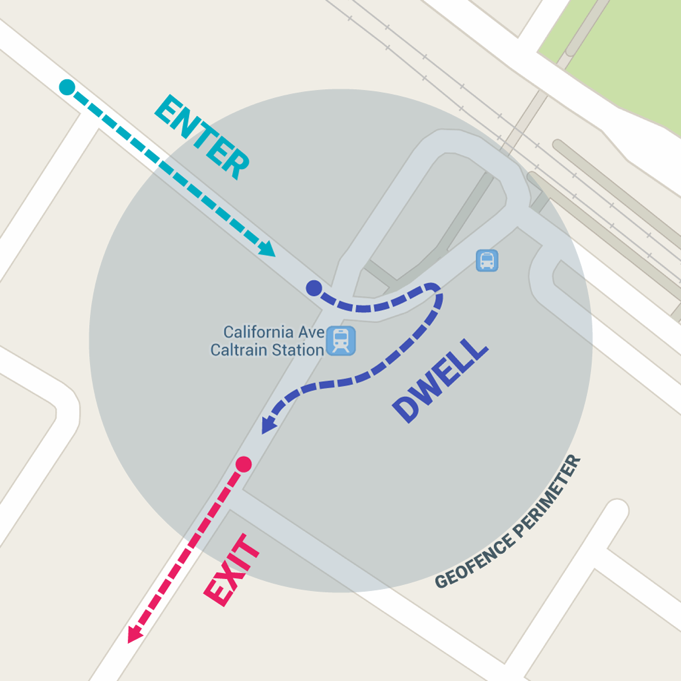
There are smart companies that send product offers or specific promotions to consumers’ smartphones when they trigger a search in a particular geographic location, enter a mall, neighborhood, or store.
How Does Geo fencing Work?
So far, we’ve covered a lot about Geo fencing and what it can do for your business. Do you know how it works?
It’s simple though. Geo fencing helps you to keep in control of your business by notifying you when a potential consumer is passing by your store, by a competitors, or entering a predefined area.
Main Benefits of Geofencing
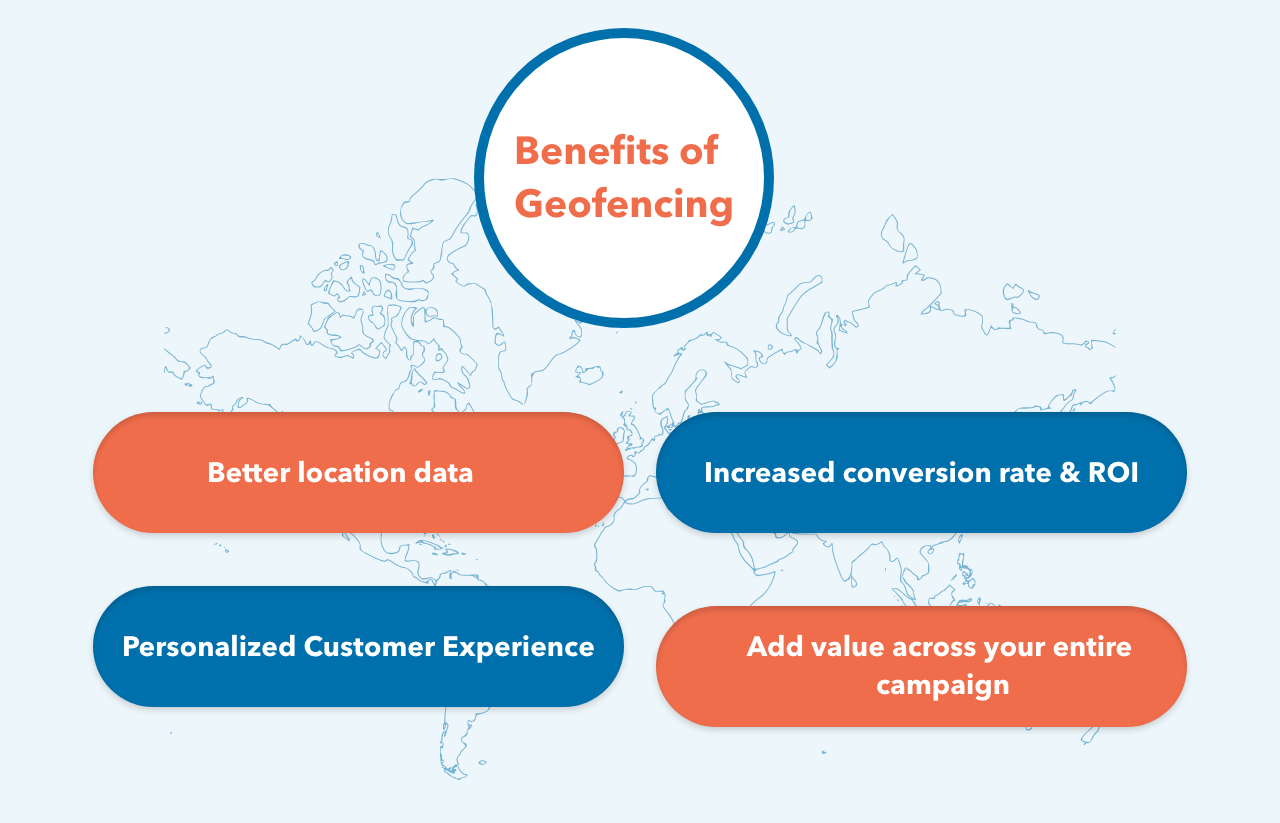
Better location data
By implementing geofencing in your app, you’ll enjoy access to a wealth of location insights about consumer behavior. Collect location data about user’s offline behaviors for audience segmentation, personalization, retargeting, competitive intelligence, and online-to-offline (O2O) attribution. This data can be used to build and refine your campaigns, increase engagement and better under users’ behavior.
Increased conversion rate & ROI
When your marketing and advertising is hyper-targeted in this way, you’ll enjoy better results and a better return on your marketing spend. By engaging your prospects at exactly the right moment – when they are out shopping near their favorite stores – you’ll be targeting the right prospects – those who are already close to the point of purchase. And not wasting your spend on those who are not.
Personalized Customer Experience
Geofencing also allows you to personalize the customer experience. If you’re marketing to a specific area, you can utilize the demographics of that local population and customize your promotions accordingly.
For example, if a popular, local high school basketball team is doing well this year, you could utilize that information to create some customized promotions (for example, 1 free coffee every time the Panthers win!).
Add value across your entire campaign
Geofencing can provide context to your analytics and cross-channel campaigns. From display to web and email, it can help you better understand performance. What’s more, it can be easily combined with Bluetooth beacons for more granular targeting.
Obtaining a Google Maps API Key
Because this app uses Google Maps, you’ll need to obtain an API key.
Open Google Cloud Platformand create a new project
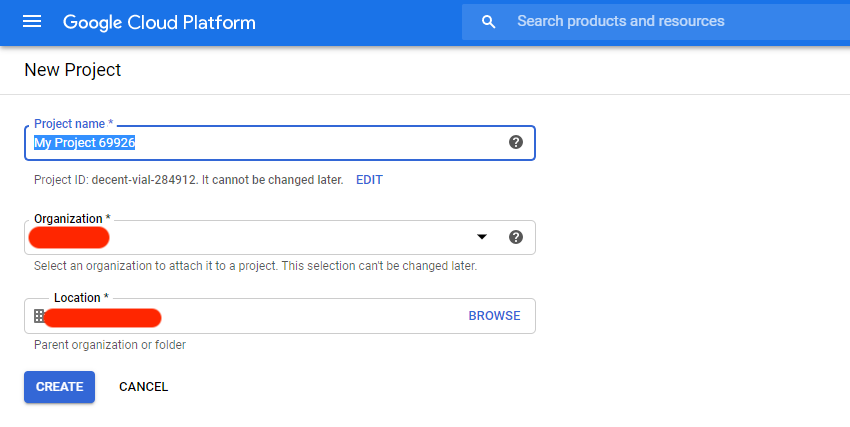
Select APIs & Services ▸ Maps SDK for Android ▸ Enable.
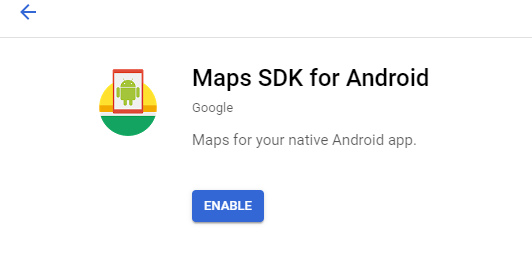
Click on Credentials, Credentials in the API Manager, CREATE CREDENTIALS and then choose API key.
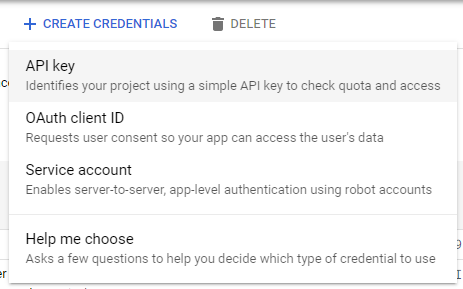
Copy your API key value. In your project, replace YOUR_KEY_HERE with the copied value.
In your project level Gradle file add this
classpath 'com.google.gms:google-services:4.3.3'
In your app-level Gradle file add these
Using geofences requires the play-services-location library added to your project. To do that, open the build.gradle file for the app module and add the following dependency:
apply plugin: 'com.google.gms.google-services'
dependencies {
implementation 'com.google.android.gms:play-services-location:17.0.0'
implementation 'com.google.android.gms:play-services-maps:17.0.0'
}
In your Activity Class
You have to implements OnMapReadyCallback, GoogleApiClient.ConnectionCallbacks and GoogleApiClient.OnConnectionFailedListener in activity class
Define variable in activity class:
private static final int REQUEST_LOCATION_PERMISSION_CODE = 101;
public static final String GEOFENCE_ID = "RLOGICAL";
public static final float GEOFENCE_RADIUS_IN_METERS = 100;
public HashMap<String, LatLng> LOCATION_LIST = new HashMap<String, LatLng>();
private GoogleMap googleMap;
private GeofencingRequest geofencingRequest;
private GoogleApiClient googleApiClient;
private boolean isMonitoring = false;
private MarkerOptions markerOptions;
private Marker currentLocationMarker;
private PendingIntent pendingIntent;
Add Location for where you have to create geofence.
LOCATION_LIST.put(GEOFENCE_ID, new LatLng(23.029840, 72.557776));
Connect with Google API
GoogleApiClient is used with a variety of static methods. Some of these methods require that GoogleApiClient be connected, some will queue up calls before GoogleApiClient is connected; check the specific API documentation to determine whether you need to be connected.
googleApiClient = new GoogleApiClient.Builder(this).addApi(LocationServices.API).addConnectionCallbacks(this)
.addOnConnectionFailedListener(this).build();
Check Location Permission
The first step in requesting geofence monitoring is to request the necessary permissions.
If your app needs to access the user’s location, you must request permission by adding the relevant Android location permission to your app.
if (ActivityCompat.checkSelfPermission(this, Manifest.permission.ACCESS_FINE_LOCATION) !=
PackageManager.PERMISSION_GRANTED && ActivityCompat.checkSelfPermission(this,
Manifest.permission.ACCESS_COARSE_LOCATION) != PackageManager.PERMISSION_GRANTED) {
ActivityCompat.requestPermissions(this, new String[]{Manifest.permission.ACCESS_FINE_LOCATION,
Manifest.permission.ACCESS_COARSE_LOCATION},REQUEST_LOCATION_PERMISSION_CODE);})
Start Location tracking
Used for receiving notifications from the LocationManager when the location has changed. These methods are called if the LocationListener has been registered with the location manager service using
the LocationManager#requestLocationUpdates(String, long, float, LocationListener) method.
private void startLocationMonitor() {
Log.d(TAG, "Start Location monitor");
LocationRequest locationRequest = LocationRequest.create()
.setInterval(2000).setFastestInterval(1000).setPriority(LocationRequest.PRIORITY_HIGH_ACCURACY);
try {
LocationServices.FusedLocationApi.requestLocationUpdates(googleApiClient, locationRequest, new LocationListener() {
@Override public void onLocationChanged(Location location ) {
if (currentLocationMarker != null) {
currentLocationMarker.remove();
}
markerOptions = new MarkerOptions();
markerOptions.position(new LatLng(location.getLatitude(), location.getLongitude()));
markerOptions.title("Current Location");
currentLocationMarker = googleMap.addMarker(markerOptions);
Log.d(TAG, "Location Change Lat Lng " + location.getLatitude() + " " + location.getLongitude());
}
});
} catch (SecurityException e) {
Log.d(TAG, e.getMessage());
}
}
Start Monitoring Geo Fence tracking
Geofencing combines awareness of the user’s current location with awareness of the user’s proximity to locations that may be of interest. To mark a location of interest, you specify its latitude and longitude. To adjust the proximity for the location, you add a radius. The latitude, longitude, and radius define a geofence, creating a circular area, or fence, around the location of interest.
To add geofences, use the GeofencingClient.addGeofences() method. Provide the GeofencingRequest object, and the PendingIntent
private void startGeofencing() {
Log.d(TAG, "Start geofencing monitoring call");
pendingIntent = getGeofencePendingIntent();
geofencingRequest = new GeofencingRequest.Builder().setInitialTrigger(Geofence.GEOFENCE_TRANSITION_ENTER)
.addGeofence(getGeofence()).build();
if (!googleApiClient.isConnected()) {
Log.d(TAG, "Google API client not connected");
} else {
try {
LocationServices.GeofencingApi.addGeofences(googleApiClient, geofencingRequest,pendingIntent)
.setResultCallback(new ResultCallback<Status>()
@Override public void onResult(@NonNull Status status) {
if (status.isSuccess()) {
Log.d(TAG, "Successfully Geofencing Connected");
} else {
Log.d(TAG, "Failed to add Geofencing " + status.getStatus());
}
}
});
} catch (SecurityException e) {
Log.d(TAG, e.getMessage());
}
}
isMonitoring = true;
}
@NonNull
private Geofence getGeofence() {
LatLng latLng = LOCATION_LIST.get(GEOFENCE_ID);
return new
Geofence.Builder().setRequestId(GEOFENCE_ID).setExpirationDuration(Geofence.NEVER_EXPIRE)
.setCircularRegion(latLng.latitude, latLng.longitude, GEOFENCE_RADIUS_IN_METERS).setNotificationResponsiveness(1000)
.setTransitionTypes(Geofence.GEOFENCE_TRANSITION_ENTER | Geofence.GEOFENCE_TRANSITION_EXIT).build();
}
Start Intent service in background
private PendingIntent getGeofencePendingIntent() {
if (pendingIntent != null) {
return pendingIntent;
}
Intent intent = new Intent(this, GeofenceService.class);
return PendingIntent.getService(this, 0, intent, PendingIntent.FLAG_UPDATE_CURRENT);
}
@Override
protected void onResume() {
super.onResume();
int response = GoogleApiAvailability.getInstance().isGooglePlayServicesAvailable(MainActivity.this);
if (response != ConnectionResult.SUCCESS) {
Log.d(TAG, "Google Play Service Not Available");
GoogleApiAvailability.getInstance().getErrorDialog(MainActivity.this, response, 1).show();
} else {
Log.d(TAG, "Google play service available");
}
}
Draw geofence on Google Map
If Google Play services is not installed on the device, the user will be prompted to install it, and the onMapReady(GoogleMap) method will only be triggered when the user has installed it and returned to the app.
@Override
public void onMapReady(GoogleMap googleMap) {
if (ActivityCompat.checkSelfPermission(this, Manifest.permission.ACCESS_FINE_LOCATION) != PackageManager.PERMISSION_GRANTED && ActivityCompat.checkSelfPermission(this, Manifest.permission.ACCESS_COARSE_LOCATION) != PackageManager.PERMISSION_GRANTED) {
return;
}
this.googleMap = googleMap;
LatLng latLng = LOCATION_LIST.get(GEOFENCE_ID);
googleMap.addMarker(new MarkerOptions().position(latLng).title("RLogical"));
googleMap.moveCamera(CameraUpdateFactory.newLatLngZoom(latLng, 17f)));
googleMap.setMyLocationEnabled(true);
// Draw Geofence on Map
Circle circle = googleMap.addCircle(new CircleOptions().center(new LatLng(latLng.latitude, latLng.longitude)).radius(GEOFENCE_RADIUS_IN_METERS).strokeColor(Color.RED).strokeWidth(4f));
} Connect with Google and Start Monitoring @Override public void onConnected(@Nullable Bundle bundle) {
Log.d(TAG, "Google Api Client Connected");
isMonitoring = true;
startGeofencing();
startLocationMonitor();
}
@Override public void onConnectionSuspended(int i) {
Log.d(TAG, "Google Connection Suspended");
}
@Override public void onConnectionFailed(@NonNull ConnectionResult connectionResult) {
isMonitoring = false;
Log.e(TAG, "Connection Failed:" + connectionResult.getErrorMessage());
}
Define an Intent Service for geofence transitions
An Intent sent from Location Services can trigger various actions in your app, but you should not have it start an activity or fragment, because components should only become visible in response to a user action. In many cases, an IntentService is a good way to handle a geofence transition. An IntentService gets updates when an event occurs, such as a transition into or out of a geofence, and can start long-running background work.
When Location Services detects that the user has entered or exited a geofence, it sends out the Intent contained in the PendingIntent you included in the request to add geofences. A intent service like GeofenceService notices that the Intent was invoked and can then obtain the geofencing event from the intent, determine the type of Geofence transition(s), and determine which of the defined geofences was triggered. The Intent service can direct an app to start performing background work or, if desired, send a notification as output.
public class GeofenceService extends IntentService {
private static final String TAG = "GeoIntentService";
public GeofenceService() {
super(TAG);
}
@Override protected void onHandleIntent(@Nullable Intent intent) {
GeofencingEvent geofencingEvent = GeofencingEvent.fromIntent(intent);
if (!geofencingEvent.hasError()) {
int transaction = geofencingEvent.getGeofenceTransition();
List<Geofence> geofences = geofencingEvent.getTriggeringGeofences();
Geofence geofence = geofences.get(0);
if (transaction == Geofence.GEOFENCE_TRANSITION_ENTER && geofence.getRequestId().equals(Constants.GEOFENCE_ID)) {
Log.d(TAG, "You are inside Rlogical (Geofence Location)");
} else {
Log.d(TAG, "You are outside Rlogical (Geofence Location)");
}
// Fetch Entering / Exiting Detail
String geofenceTransitionDetails = getGeofenceTrasitionDetails(transaction, geofences);
sendNotification(geofenceTransitionDetails);
}
}}
Create a detail message with Geofences received
private String getGeofenceTrasitionDetails(int geoFenceTransition, List<tGeofence> triggeringGeofences) {
// get the ID of each geofence triggered
ArrayList<String> triggeringGeofencesList = new ArrayList<>();
for (Geofence geofence : triggeringGeofences) {
triggeringGeofencesList.add(geofence.getRequestId());
}
String status = null;
if (geoFenceTransition == Geofence.GEOFENCE_TRANSITION_ENTER)
status = "Entering ";
else if (geoFenceTransition == Geofence.GEOFENCE_TRANSITION_EXIT)
status = "Exiting ";
return status + TextUtils.join(", ", triggeringGeofencesList);
}
Send a notification
private void sendNotification(String msg) {
// Intent to start the main Activity
Intent notificationIntent = new Intent(this, MainActivity.class);
TaskStackBuilder stackBuilder = TaskStackBuilder.create(this);
stackBuilder.addParentStack(MainActivity.class);
stackBuilder.addNextIntent(notificationIntent);
PendingIntent notificationPendingIntent = stackBuilder.getPendingIntent(0, PendingIntent.FLAG_UPDATE_CURRENT);
// Creating and sending Notification
long when = Calendar.getInstance().getTimeInMillis();
NotificationManager notificationManager = (NotificationManager) getSystemService(Context.NOTIFICATION_SERVICE);
if (notificationManager == null)
return;
if (Build.VERSION.SDK_INT >= Build.VERSION_CODES.O) {
// Configure the notification channel.
NotificationChannel notifChannel = new NotificationChannel(msg, msg, NotificationManager.IMPORTANCE_DEFAULT);
notifChannel.enableLights(true);
notifChannel.setLightColor(Color.GREEN);
notifChannel.setVibrationPattern(new long[]{0, 1000, 500, 1000});
notifChannel.enableVibration(true);
notificationManager.createNotificationChannel(notifChannel);
}
NotificationCompat.Builder noBuilder = new NotificationCompat.Builder(this, "CH_ID").setTicker(msg).setContentTitle(msg).setOngoing(false).setAutoCancel(true)
.setWhen(when).setSound(RingtoneManager.getDefaultUri(RingtoneManager.TYPE_NOTIFICATION)).setVibrate(new long[]{0, 100, 100, 100, 100, 100}).setSmallIcon(R.mipmap.ic_launcher_round);
notificationManager.notify((int) when, noBuilder.build());
}
In your Manifest add the below
Uses Permission
<uses-permission android:name="android.permission.ACCESS_FINE_LOCATION" />
<uses-permission android:name="android.permission.ACCESS_COARSE_LOCATION" />
<uses-permission android:name="android.permission.INTERNET" />
Inside Application tag:
<serviceandroid:name=".GeofenceService"android:enabled="true"android:exported="true" />
<meta-dataandroid:name="com.google.android.gms.version"android:value="@integer/google_play_services_version" />
<!-- The API key for Google Maps-based APIs. -->
<meta-dataandroid : name = "com.google.android.geo.API_KEY"android : value = "@string/YOUR_KEY_HERE" />
TOP 12 MICROSERVICES FRAMEWORKS

As a part of your business development plan, while determining the type of application you wish to create, it is advisable to select your tech stack at first to work upon its architecture before anything else. You may be winding up your day hearing success tales of the world’s biggest or Fortune 500 organizations, and you discover how they transformed their systems by employing microservices frameworks. Your eyes roll over success stories every day and that exactly is the moment you should start trusting the total potential of microservices.
Table of Content
Spring Boot / Spring Boot with Spring Cloud
Eclipse Vert.X
Oracle Helidon
GoMicro
Molecular
Quarkus
Micronaut
Lightbend Lagom
AxonIQ
Ballerina
DropWizard
Eclipse MicroProfile
To take on the task, a software development company must select a framework with all the interactive tools required to create a powerful and extremely performant application. Furthermore, these frameworks influence the capital costs, development period, handling simplicity, and long-term maintenance.
Microservices architecture is a method where monolithic single applications are fragmented into smaller apps. Different programming languages and frameworks are available to develop microservices. Their main goal is to create independent deployment models.
In this article, you’ll learn more about common microservices frameworks that you can completely trust this 2022!
Top 12 Frameworks That Support Microservices Development Teams
Here is the list of 12 frameworks describing their own process, and business capabilities covering the benefits of microservices frameworks in order to make you more decisive when it’s time for you to choose a proper framework for your project.
Let's start!
1. Spring Boot / Spring Boot with Spring Cloud
Spring Boot is a prominent Java framework for Microservices application development. It offers many add-on modules on Spring Cloud for developing microservices architecture. Spring Boot enables the construction of large distributed systems beginning with a basic design composed of several cooperating components. It may be used to construct both tiny and large-scale systems. Due to Reversal of Control, Spring boot is relatively easy to combine with other popular frameworks.
Key Benefits:
Spring MVC enables the construction of dynamic microservices apps with REST API.
Inversion of Control makes it simple to interface with top frameworks.
Micrometer, an additional framework for tracking useful data, distributed monitoring, and analytics.
Cloud Foundry is utilized for horizontal scalability and integrating numerous backend services with simplicity.
Time-to-market improvement for complicated application architecture.
2. Eclipse Vert.X
Eclipse Vert.X can be your top pick if you are searching for microservices solutions that are event-driven with regard to software development. It provides several language support, including Java, Ruby, Kotlin, Ceylon, JavaScript, Groovy, and Scala. Furthermore, the framework operates on a Java Virtual Machine, making it a perfect solution for service-oriented programs with complicated microservices architecture.
Unlike typical stacks and frameworks, Eclipse Foundation’s Vert.X features resource-efficient qualities that allow it to process several requests concurrently. It can conduct tasks in restricted environments, particularly containers. Vert.X is largely prominent as a microservice framework because of its functionalities and embedded qualities, which make it more of a flexible tool than a framework.
Key Benefits:
It is compact in size, with a 650kb base.
It is a flexible framework that enables developers to add as many components as necessary without introducing anything unnecessary.
Medical tests are readily executable via Vert.X web or an event bus.
Asynchronous unit tests are executed via Vert.XUnit
It supports gPRC in accordance with Google’s program code.
3. Oracle Helidon
Oracle created the microservices framework Helidon. It is a set of Java libraries for writing microservices. Helidon MP and Helidon SE are the two available variants. When compared to Helidon, Spring Boot is superior in a number of ways. Helidon is fairly new and there is currently a dearth of documentation, making it difficult to locate solutions on Stack Overflow.
Helidon MP is a MicroProfile standard implementation. This makes it an excellent option for Java EE programmers. Helidon SE is a small toolkit that supports the most recent Java SE features, including reactive streams, asynchronous and functional programming, and APIs with a fluid design. Helidon SE offers GraalVM native files for low storage use and flash -like launch. Helidon SE’s REST framework is based on Netty and provides a simplistic API for session handling.
Key Benefits:
The minimum starting time ranges between 0.09 and 2.03 secs.
Consists of a comprehensive cloud environment with all the required and universally supported technologies.
Comprises 2 variations, Helidon SE and Helidon MP, for specific programming needs.
4. GoMicro
Go Micro is a modular RPC-based framework that offers the core architectural blocks for constructing microservices in the Go programming language. It provides service discovery with the consul, networking with HTTP, and encryption by proto-RPC or JSON-RPC, as well as Pub/Sub.
Go Micro meets the essential criteria for constructing scalable systems. It translates the microservice architectural pattern into a set of tools that serve as the system’s building pieces. Micro addresses the complexities of parallel computing and provides programmers with simple representations they already understand.
Technology evolves continuously. Infrastructure stacks are always evolving. Micro is a modular toolkit that tackles the aforementioned problems. Plug any framework or core technology into the system. Create future-proof solutions with micro.
Key Benefits:
The micro API enables robust networking via discovery and modular processors to deliver HTTP, GRPC, WebSockets, and publish events, among other protocols.
The CLI provides all the functions necessary to comprehend the state of your microservices.
Create new application templates to rapidly get started. Micro offers established templates for microservice development. Always begin in the same manner and develop equivalent offerings to increase productivity.
5. Molecular
Molecular is an intriguing framework for microservices. As NodeJS gains popularity, this framework is ideal for JavaScript developers. Molecular is a quick, contemporary, and potent NodeJS microservices framework. It facilitates the creation of efficient, dependable, and accessible services.
Key Benefits:
Balance support for event-driven infrastructure
Built-in services registry and adaptive discovery of services
Load-balanced queries & responses
Numerous fault detection characteristics
Integrated caching approach
Modular monitors
Integrated metrics with report generators
Integrated tracing capability with exporters
6. Quarkus
Kubernetes enthusiasts can testify for the Quarkus microservices technology! Red Hat’s Quarkus is a Kubernetes-native JS framework created specifically for OpenJDK HotSpot and GraevalVM. The framework provides a dynamic and impulsive programming approach to handle microservices architectural difficulties.
Kubernetes is designed to maximize minimal memory utilization and rapid developer setup. The quick launch time allows microservices and Kubernetes to scale automatically.
Low memory utilization enables optimization of container capacity inside microservices, which separately launch many containers. However, novice programmers are leery of this framework due to its difficult GraalVM setup and OS-specific binary verification.
The Quarkus development paradigm works well with HTTP microservices, reactive apps and serverless architectural systems, which is one of its benefits. With their simple characteristics and very accessible system, which concentrates on the commercial side of the entire program, the performance of developers is much boosted. F furthermore, uniform setups, live programming, DEV UI, and test automation improve the microservice development experience for developers.
Key Benefits:
Possesses an extensive environment of technologies, frameworks, and APIs, making it simple to understand and utilize.
It is a framework for a generation that improves coding for JVM and native script to enhance application performance.
Comparable to other container-first frameworks, it promises quicker load times.
Minimal RSS memory and high memory usage.
7. Micronaut
Micronaut is a contemporary, JVM-based, full-stack framework aimed at developing microservices apps that are adaptable and readily tested.
Micronaut is created by the authors of the Grails framework and draws motivation from the experiences learned over the past when creating real-world systems from monoliths to microservices with Spring, Spring Boot, and Grails.
Micronaut intends to offer the resources required to create microservice apps with complete functionality.
Key Benefits:
Dependency Injection and Inversion of Control (IoC)
Adaptive Defaults and Automatic Settings
Service Discovery
HTTP Routing
HTTP Client with load-balancing on the client-side
8. Lightbend Lagom
Lagom is an open-source framework for developing Java or Scala microservices applications. Lagom is based on the established advanced technology Akka and Play, which are already in operation for a few of the desired applications.
The unified development ecosystem of Lagom enables you to concentrate on resolving business issues rather than connecting services together. A single operation creates the project, runs your microservices and accompanying modules, and boots the Lagom architecture. When it identifies modifications to the source code, the build is reloaded on the fly.
Key Benefits:
Properly defined development duties – to improve nimbleness
More regular launches with reduced risk — to increase development cycles
Systems have reactive features – reactivity, robustness, adaptability, and flexibility — to optimize current computer settings and fulfil high user demands.
9. AxonIQ
Axon provides a single, productive method for designing Java programs that can transition without major rework.
Axon consists of both a software system and dedicated architecture to offer corporation-ready assistance for the software system, particularly for enterprise software development process. Axon Framework provides the model, while Axon Server provides the architecture. Both are free sources.
Key Benefits:
It is a Java microservices framework that facilitates the development of microservices design using Domain-Driven Design concepts.
In addition to DDD, the Axon Framework supports the implementation of microservices paradigms like Command-Query-Responsibility-Segregation (CQRS) and Architecture.
Axon is capable of meeting even the most stringent business needs, such as the most effective scalability of information storage, encryption, networking, load-balancing, internationally dispersed data centres, third-party interface, statistics, and analytics.
10. Ballerina
Ballerina is one of the programming languages for writing network applications, not a framework. Built from the ground up for writing disconnected services. It is really simple to create network apps. It is an open-source coding language and framework that enables cloud-era app developers to design software that simply works with minimal effort.
There are other additional capabilities, such as multitasking, broadcasting, encryption, and native support for Microservices.
Key Benefits:
Particular linguistic structures for receiving and supplying network services.
Modules and grammar for asynchronous interaction that fit well with sequence diagrams, allowing bidirectional translation of Ballerina source code among written and visual presentations.
A dynamic architectural type model that permits looser coupling than typical strongly typed programs.
Includes continuous integration and delivery technologies, like Jenkins, Travis, and Codefresh; observability solutions, like Prometheus, Zipkin, and Honeycomb; and cloud orchestration platforms, like Kubernetes, in your project.
11. DropWizard
DropWizard is an additional effective framework for developing RESTful microservices. It utilizes famous Java technologies such as Jetty, Jackson, and Jersey to facilitate the creation of high-performance Software apps in a more expedient manner.
Key Benefits:
DropWizard provides built-in framework support for deployment, tracking, analytics, and several other operational activities. There is a limited range of materials accessible for mastering DropWizard.
12. Eclipse MicroProfile
The Eclipse MicroProfile initiative is an enhancement to Java EE that aims to optimize Enterprise Java for the development of Microservices architecture and cloud-based solutions. Because the system is built on an array of Jakarta EE WebProfile APIs, the procedure for developing MicroProfile apps stays largely unchanged.
Key Benefits:
MicroProfile is gaining popularity not only because of its simplicity of use but also because it attempts to define an API for microservices written in Java by pulling together a number of businesses and organizations. MicroProfile’s essential APIs are CDI, JAX-RS, JSON-P, Metrics, and Config.
Conclusion
Microservices are no less than an underpinning of modern applications as the need for increased reliability, production, service, and performance in the market. Due to the high cost of testing in different contexts, selecting the appropriate framework may appear to be a difficult task. To assert that the specified framework would yield the desired results takes a keen eye for precision and specialized knowledge.
Our dedicated development team at TatvaSoft is well-versed in the complexities of microservices and adept at elevating any organization to new heights. Consult with us immediately regarding the implementation of a fresh microservices framework and web development for your young firm.
WHY USE REACT?

Why use React? Because ReactJs is one of the most widely used front-end JavaScript libraries for creating Web Applications. Around 8,000 businesses around the world have chosen React over other popular libraries and frameworks for building rich user interfaces. React is a Facebook-developed JavaScript package that was used to create Instagram, among other things. It is like a panacea for developers to build user interfaces for websites and apps swiftly. The virtual DOM is the core notion of ReactJs.
React has grown in popularity as a front-end web development tool among react development companies since it only requires a basic familiarity of HTML and JavaScript. In March, 2015, Facebook released React Native, an open source UI framework, to develop applications for android, iOS, mac, and other various OS. We’ll discover what ReactJs is and why React is better than other JavaScript frameworks in this Article.
Table of Contents
What is ReactJS?
Why Use ReactJS?
Easy to Learn
Reusable Components
Fast Rendering
SEO Friendly
Strong Community Support
Proficient Data Binding
The Virtual DOM
Great Developer Tools
When to Use React JS?
When Not to Use React JS?
ReactJS VS Other JavaScript Frameworks
Conclusion
1. What is ReactJS?
The best fit for developing user interfaces is React, as it is a very declarative, fast, and flexible JavaScript library. It allows you to create complex user interfaces using “components,” or small, self-contained pieces of code. It controls the view layer in web applications. Despite the fact that React is more of a library than a language, it is frequently used in web development.
React is a novel technology when compared to previous available options. The JavaScript library was established in 2011 by Jordan Walke, a Facebook software engineer of the time. Frameworks like XHP, a simple HTML component framework for PHP, have influenced React. React was used in Facebook’s newsfeed in 2011 at the beginning. It was later picked up by Instagram and used in their system. React evolved over time, and in May 2013, at JSConf US, Facebook chose to open source it.
ReactJS provides a smooth solution to some of front-end programming’s most vexing issues, making it simple to create dynamic, interactive web programmes. A strong development community exists that is quick, scalable, versatile, powerful, and rapidly growing. There’s never been a better time to learn React.
Nowadays, it is a challenge to find a platform that is simple to use, provides an optimized development interface, has clear abstractions and also renders virtual DOMs comparatively faster than other platforms. Not just this, but ReactJS, as a development platform, is capable of offering much more than usual. Hence, it is important to understand why you should consider using ReactJS for your next development project.
2. Why Use ReactJS?
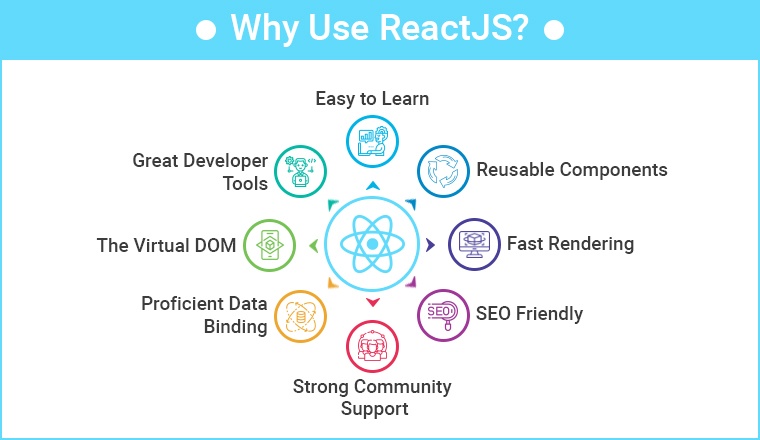
The developers have complete control over React JS. It can also be used to create SPA, and web apps. You can include any number of external libraries and tools to create large and complex web applications.
Many JavaScript developers have swiftly adopted React, and it appears to be here to stay. ReactJS has a rich ecosystem that includes must-have tools like Redux or flux, as well as Node.js on the backend, all of which are available on NPM. Developers can construct states in the DOM using the scalable React architecture pattern, which makes it easy to break down and test React components.
For good reason, React’s popularity and usage are growing by the day. As a developer, coding in React improves your knowledge of JavaScript, a language that accounts for nearly 90% of web development today. Its functionality in effortlessly managing different frameworks gives it a considerable edge for those who desire some code flexibility.
he front-end development ecosystem is constantly evolving. New tools with so many frameworks and libraries are releasing day by day, making it hard for businessmen to rely on correct choices. React JS is second to none in web development all the way along. React provides cost effective, high performance, reusable wrapper components, and many other benefits for web application development.
Here are eight key reasons to use ReactJs for your next project; I guarantee you’ll discover more once you start using it.
Easy to Learn:
Unlike Angular and Vue, learning React is like five-finger exercise, well of course on your keyboard! No wonder why, that’s a focal reason for React’s rapid adoption. It allows businesses to complete projects more quickly. React is more credible to be used by large firms as it is such a framework that is easy to get going with.
Reusable Components:
ReactJS provides developers with reusable components that they can use to create new applications. Reusability is like a developer’s miracle cure. This platform enables developers to reuse any react component created for another application that performs the same function. As a result, development effort is reduced while flawless performance is maintained.
One of the chief benefits of using React JS is that developers can reuse components as many times as they need to. Furthermore, changes made in one section of the application have no effect on other sections of the application. If you thought React was only for web development, you were dead wrong! Facebook has already developed the React Native framework for creating mobile apps for both the Android and iOS platforms.
Fast Rendering:
When developing a complex, high-load app, it is essential to define the structure of the app at the beginning as it can greatly influence the app’s performance. Simply put, As the DOM is tree-structured, even little changes at the root can cause major impacts on others. To solve this problem, Facebook has brought up a virtual DOM feature. Virtual DOM, which allows all modifications to be tested first for calculating risks. This approach contributes to app performance and a better user experience.
SEO Friendly:
As you know, Success of every online business relies on how well your search engine is optimised. Another benefit of React js is that it can cope with a common search engine failure to comprehend JavaScript-heavy apps. React significantly reduces load time of websites, which helps businesses to lead on the top spot on Google’s Search Engine Result Page.
There are some of the frameworks that React possesses which improves SEO , one of them is NextJs. The rendering part of NextJs is moved to the server, removing the need for the client to process the data. Since the server pre-renders the pages before sending the final HTML to the client, there is less JS to load, which improves performance and SEO.
Strong Community Support:
One of the main reasons to choose React for your project is a strong community behind it. A massive range of individual React developers contribute to creating a more robust frontend framework on a daily basis. React JS currently has around 189k stars on GitHub and around 38.9k active contributors. You can find a vast collection of React tutorials on Youtube and explanatory articles on the internet from professionals and experts. For example, a Google search for “Free React tutorial” brings around 5 crore results. Besides this, React professionals solve doubts on Stack Overflow and Quora, so whenever you feel stuck while working on React , you know where to find solutions.

As shown in the above graph, there are clear results that use of React is continuously increasing, as the questions related to React are increasing. This graph shows the Stack Overflow Trends.
Proficient Data Binding:
ReactJS lags behind one-way data binding. So that anyone can track all the changes made on particular portions of the data. This is often an illustration of its simplicity.
The Virtual DOM:
The virtual DOM(Document Object Model) is one of the most intriguing aspects of React. While creating an app with a lot of user interaction and data changes, you should think about how the structure of the app will affect speed. Extensive DOM manipulation can cause congestion in performance. Worse, As the DOM is tree-structured, even little changes at the root can cause major impacts on others.
A virtual DOM is used by React to solve this problem. This is a virtual version of the DOM, as the name implies. Any new view updates are made on the virtual DOM first, which is stored in memory rather than on your screen. It then finds the most efficient method of making these modifications, and only those changes are applied to the real DOM. This ensures that the real DOM is updated as quickly as possible, resulting in improved performance and a cleaner user experience overall.
Great Developer Tools:
React is a vast library for creating user interfaces, additionally it is supported by React Developer Tools which are browser extensions available for both Google Chrome and Mozilla Firefox.
The tools were created by Facebook and are constantly updated, with the most recent version being released on June 1, 2022. They have also been used by more than 3,000,000 people!
3. When to Use React JS?
You’ve learned why you should use React, but now let’s look at when you should use it.
When you’re capable enough to understand and deploy React properly in a project, It can be very time and money efficient. You can use the react library in the following cases.
When your visitors complain about slowness and unresponsive pages on your website, It’s time for you to use React. In this case, the DOM experiences too much load. React’s virtual DOM will come in handy for keeping your website’s performance intact and your visitors satisfied.
For a Project being just related to User Interface (UI), you can still utilise React because it’s easier to acquire talent. Because of its popularity, many developers have added React to their toolkit.
Also, you should use React in a project where the frontend UI requires so much user interaction. It’s a hassle to code all of those interactive features, and it ties time to the underlying business logic. As React handles the lower-level functionality, you can concentrate on the interface view model.
4. When Not to Use React JS?
React’s versatility makes it a good fit for practically any frontend project. Though, there are times when using ReactJs is not the best option. The following are some examples of cases:
React popularised the concept of a single component that includes both JavaScript and markup. This approach differs from the standard model view controller approach. While React’s approach has many advantages, some people may prefer separation.
For complex admin panels, ReactJS is not a good fit. If you stick with backend frameworks in this circumstance, it will make your life much easier. Typical admin panel elements require less code in backend frameworks than in ReactJS.
If your development team is already familiar with JavaScript, ReactJS may have a short learning curve, But ReactJS can be difficult to use if your development team employs other programming languages. When there’s a time limit, you should consider other options.
Angular, Vue, and Ember are more template-centric options, which can be advantageous for teams who are new to JavaScript. React, on the other hand, demands a solid understanding of current JavaScript.
5. ReactJS VS Other JavaScript Frameworks
| Parameters | ReactJS | Angular | VueJS |
|---|---|---|---|
| Virtual DOM | React uses Virtual DOM, which is a duplicate of the original DOM where changes can be made without impacting the original. This method greatly improves the application’s performance. | Angular uses the standard DOM and re-renders the complete web page, Even if only one item is updated. That affects performance. | Vue also uses virtual DOM, which gives it a higher performance. |
| Community | React has strong community support. | Angular also has strong community support. | Vue has a small community support compared to angular and react. |
| Data-Binding | Reducing side effects, as no modifications of view can’t affect model and vice-versa, React’s one-way data-binding shows the simplicity. | Angular works with two way data-binding, where any change in view can affect the model and vice-versa. It can not be good practice for big projects. | Like Angular, Vue also binds two way data. |
| Rendering | With use of virtual DOM and lightweight code, React performs fast rendering. | Due to less use of virtual DOM and heavy weighted code, rendering in Angular is very slow. | As Vue is a light framework, the code and built-in functions are light weighted, which results in fast rendering. |
| Scalable | In designing scalable applications, React with excellent results is up to the challenge, as it employs a component-based approach. | Angular also uses a component-based approach, hence it is easy to scale applications with angular. | Vuejs is losing spectacularly in terms of scalability due to its template-based syntax. |
6. Conclusion
There are numerous advantages of utilising React JS without a doubt. You should know when to leverage React professionally by now; there are illimitable possibilities.
React is a well-known JavaScript package that is adopted all around the world, as mentioned in the blog. Its features, cutting-edge functionalities are ideal for developers searching for a simple to use and highly productive JavaScript framework.
GUIDE TO CUSTOM SOFTWARE DEVELOPMENT

Table of Content
Introduction to Custom Software Development
What is Custom Software Development?
Bespoke Software Development: Benefits
Why to outsource Software Development Projects?
The who, why and when of Custom Software Outsourcing
How to choose a right vendor for Custom Software Services?
What is a Software Development Agreement?
Non-Disclosure Agreement in Software service business
The Cost factor in Custom Software Development Projects
Custom Software Development Methodologies
Software Development Maintenance And Support
Best Practices in Custom Software Development
Final Words
1. Introduction to Custom Software Development
Think back to some twenty years ago, the software development market back then had a completely different scenario compared to what it is now. The major difference that companies find now is the liberty to develop any type of application which in the IT industry is termed as developing custom software applications based on the desired technology stack, required skill-sets, expertise, and development methodologies.
To stay relevant, businesses nowadays are readily accepting changing trends of the digital market, and software development companies are an aid to it. A custom software development company can help businesses to exploit the maximum potential of custom software at their fingertips. For businesses looking for custom software development, this blog is a comprehensive guide to knowing the nitty-gritty of custom software development and will help you understand different phases of software development like requirements gathering, actual development, deployment, and maintenance. In addition, this blog will also provide information on how to identify the right custom company, how to communicate with the development team, and what aspects are to be taken care of while understanding the software development process. Also, we will take you through an insightful understanding of how vital NDA is, its needs, and a comprehensive take on how to safeguard your IP rights, why project agreements are important, and similar other information.
Businesses might have a different outlook towards developing a custom software application or would rather prefer to buy off-the-shelf applications for their day-to-day business processes. But if you are looking for a custom application for your business, this blog will enlighten your thoughts on custom software development services by showing some valid points of custom software development and a completely different perspective. Not all businesses find custom software development suitable for their processes and scenarios against ready-made products. So this comprehensive guide will help you to choose the best tailor-fit company for your software applications and the deciding factors on whether you should go for it or not. Let’s start with the basics.
2. What is Custom Software Development?
Changing spheres of the consumer market have made businesses chase innovation like never before. Consumer needs are just getting complex and tougher every passing day and hence there is always a necessity to develop custom-made applications. It clearly implies that customized software solutions are best-suited for changing business needs. Do we really understand the term custom software development service or it is just an application development service that is used by many other businesses.
Definition: “Custom software development can be defined as the process of designing, creating, deploying and maintaining applications that meet the unique business requirements of a specific company.”
It is also widely known as bespoke software or tailor-made software. Software products available in the market are known as commercial off-the-shelf software (COTS). There is a lot of difference between commercial off-the-shelf applications and custom apps that need to be understood before deciding which one to use.
For more clarity let’s take the example of Microsoft office. It is a packaged application combined together with multiple features that meet the general requirements of millions of organizations or individuals. While on the other hand, if your business wishes to allocate work to contractors and manage specific workflows, an organization needs to build its own custom software applications. This need can only be served by custom software development companies. To more elaborately understand the difference between the two, we have researched both the topics from the grassroots level and created a table that shows the major differences between customized software development and off-the-shelf products.
| Custom Software Development | Commercial Off-the-Shelf Software (COTS) |
|---|---|
| Custom Software development is designed to meet customized business requirements. | Customizing COTS is challenging sometimes customization is not possible and business requirements are not met using Off-the-shelf software. |
| Custom Software development demands thorough testing at all stages of development. | While in COTS tried and tested methods are only applied and so they are less prone to bugs. |
| Custom Software development services are costlier initially as it depends on custom business needs | COTS has a lower-cost investment compared to others since it is shared between multiple organizations |
| As the name suggests Custom software development is specific to the organization and not sold as per others’ needs. | COTS is sold as a packed commercial product for multiple businesses |
| The development cycle is longer in the case of custom software development and hence considerably large time is estimated for the completion and implementation of projects. | COTS is readily available in the market and so just implementation and training time is required which is much shorter comparatively. |
| Requirements gathering and testing happen organization-wide to check if a developed software solution fits the business requirements. | In COTS there are free trials available to match business needs. |
| Adopting custom software development in business makes changes easier. | In COTS, most of the time changes are not possible and purely dependent on vendors. |
| Custom-developed software has all rights reserved to the payer. | While in COTS, the rights are owned by the company that creates the application. |
Once the business decides on why custom software applications are beneficial, it’s time for them to know how these applications can make profitable changes to your business. The sole agenda of any business is to make a profit for its business stakeholders and this can only be achieved by increasing productivity and growth and thus accelerating profit rates. To improve accuracy and efficiency businesses build software that would do all the tasks automatically by reducing the manpower requirements while increasing the productivity of the organization on the other hand. Thus, custom software application businesses have an upper hand in competition and in no time can improve business performance by deviating their focus from ready-made apps to tailor-made application suites.
3. Bespoke Software Development: Benefits
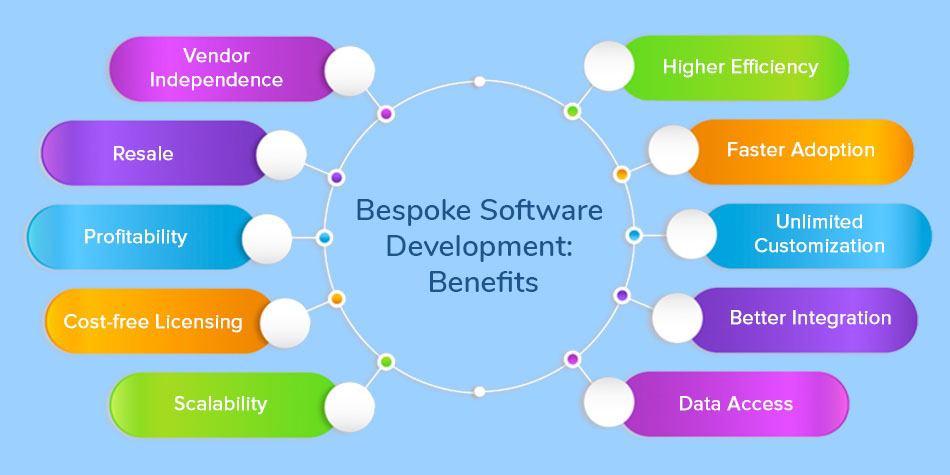
Customized software development companies understand the change a tailor-made software can aid in the business yet there are multiple organizations reluctant about outsourcing because of a lack of knowledge and unaware of the advantages it offers.
Here are some non-negligible factors of custom software development that contribute to making custom applications robust, future-ready, and performing.
Higher efficiency
Customized software apps are specifically designed to meet business needs that can smoothen the haywire business process. Since the applications are already programmed the way business functions, they know their jobs and hence the businesses can achieve better productivity, efficiency, and a competitive edge over their peers.
Faster Adoption
The developed custom application has tailored business solutions and features and so organization-wide adoption is faster and training time and cost is comparatively less. The organization implementing the custom-developed software solution doesn’t need to change the way of working according to the software but the software solution is developed according to the way they work.
Unlimited Customization
Businesses are free to develop whatever they want using the potency of custom software development. Custom apps provide unlimited customization facilities and various other benefits against limited customization options when compared to off-the-shelf products.
Better Integration
Application up-gradation or modernization with the development of custom apps strongly binds the existing IT infrastructure and integrates seamlessly with other applications and programs with minimal cost and time investments.
Data Access
Access to data through the developed application is complex, especially when the application is ready-made and doesn’t allow customization. While on the other hand, if we use custom applications, access rights can be easily managed from scratch at granular levels.
Scalability
Customized applications are considered the most stable and flexible applications. With the growth of the organization, custom apps grow equally by incorporating the latest features and enhancing the processes. In turn, if customized applications are developed suitably give longer life and offer software scalability.
Cost-free Licensing
There is no licensing fee involved when the application developed is customized and owned by the organization. Any new features or users can be easily incorporated without any additional expenses.
Profitability
It’s possible for businesses to earn from custom app development. Depending on the terms and conditions of the customized project, businesses can license or sell their customized apps to other organizations and get large margins of profit based on how demanding their application demand is and how much the market needs.
Resale
Custom apps have certain intellectual rights that need to be adhered to by businesses before the development process is initiated. An organization that pays custom software development firms for creating applications has full rights on IP, source code, patents, copyrights, or trademarks. So, if they wish to resale the application for profit or business demands they can.
Vendor Independence
An organization that pays for custom app development owns all the rights and at any time they can shift their development from one custom software development agency to another. So they are not locked to a particular vendor. Vendors can never take advantage of software development platforms that organizations pay hefty costs.
4. Why Outsource Software Development Project?
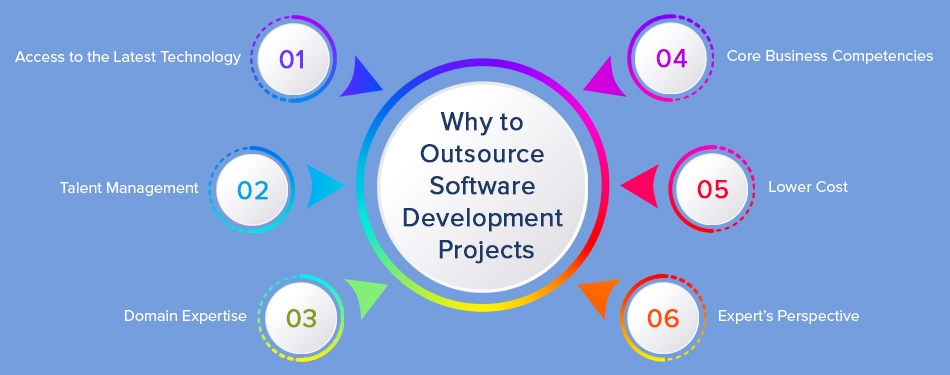
Your business goals are set free to achieve multiple successes stones as they could. To accomplish those objectives, businesses follow a growth path and achieve these goals by developing apps to streamline their processes. Extending the limits will offer businesses higher productivity, growth, and profitability but will also force them to take up some challenging tasks which can turn out to be a business barrier. Thus, to succeed businesses need to be quite clear with whatever they choose to create and should be flexible and adaptive to the latest cutting-edge technologies. Therefore, defining the applications developed are 100 % customized and scalable catering to tailored business needs.
It is not necessary to build an application in-house, there are multiple custom application development companies excelling to develop unique and high-performing software & mobile apps. These software outsourcing companies offer a variety of aids to businesses which turns out to be fruitful in the longer run. Here are some of the perks of what a custom software development team can offer.
Access to the latest technology
Expert software outsourcing companies are continuously striving with challenging projects by offering advanced technology solutions to their clients of all sizes and domains. Business no longer has to invest hefty infrastructural costs or pay for training and hiring new employees on the latest technology. Custom software development companies provide an exclusive set of resources with a knack for technology expertise to develop software that functions seamlessly.
Talent Management
Once the business has outsourced its project to a software development company, they have access to special talents who are proficient and experienced in enterprise application development. This reduces the cost of recruitment and knowledge management of an enterprise. Enterprise can focus more on core business and leaves their digital transformation journey into expert hands.
Domain Expertise
Software development companies work with a multitude of customers across various industry vertices like healthcare, education, financial & banking, etc. Hence these skilled custom software developers have exposure to a myriad of technology stacks and processes to help them follow industry best practices for any technical work they do. If you are looking for mobile app development, user experience skills become critical. Because customer buying behavior is heavily dependent on product experience.
Core Business Competencies
Developing a custom software application with a great user experience is definitely the need of the hour but not all businesses are able to reap benefits from it. Instead, businesses face a massive loss while experimenting with the technology. So custom software development outsourcing can help businesses focus on core competencies without facing losses.
Lower cost
Custom software development companies offer a flexible team of resources that can be increased or decreased as per the requirements of the projects. The payment to the dedicated development team can be offered based on the specified number of developers engaged during the payment period.
Expert’s Perspective
The holistic experience of catering to different industries, domains, regions, and technology has made them specialize in customized software development services bringing global experience and standards in their footsteps.
5. The who, why, and when of Custom Software Outsourcing
“Software is a great combination between artistry and engineering.” -BILL GATES
Definitely, custom application development is a great combination of creative thoughts of businesses and the true talent of custom software development companies rigorously engineering to develop cutting-edge applications. Developing a mobile app or an enterprise application is not a complicated process if you know what you want and how you will achieve it. But if you haven’t understood the enterprise’s needs then it can create turmoil in existing business processes and a huge loss. The right app has the capability to transform your business by conveniently streamlining processes and making business technically ahead with cutting-edge new technology keeping you ahead in the league. The moment you realize the vision of the custom software you wish to develop the next step is to find an outsourcing company that matches your business requirements and effectively caters to all your business needs. During the research, you might encounter a number of industry buzzwords, types of software applications that can be created, different architectural types & patterns, and a variety of technical skills required to develop a mobile app or distributed enterprise applications.
Touting for a business with the utmost knowledge of software development and can intellectually convert ideas into developed custom software. Businesses have an answer to when they should outsource software development but whom and how to evaluate which technology partner can bring radical changes to your business methods. Here we can go through some critical parameters necessary while deciding to outsource.
Here’s the quick checklist required for businesses in advance to choose a software development service provider
Before selecting the best-fit vendor, clearly comprehend the technology and service offering that your business needs.
Make a decision on what you want from the software development company whether to enhance the existing system with new features, develop applications from scratch, or need an eCommerce website with multi-functionalities and features.
Research and identify whether to work with onshore or offshore software development companies.
Create a list of custom software requirements and provide them to software outsourcing companies for analysis and quotation purposes.
Research and analyze the size of the software outsourcing company, its location, domain expertise, and service offerings.
Last but not the least, keeping a note of timezone is equally important when deciding to outsource to a software business so that the developers assigned to the projects will follow your time.
6. How to Choose the Right Vendor for Custom Software Services?
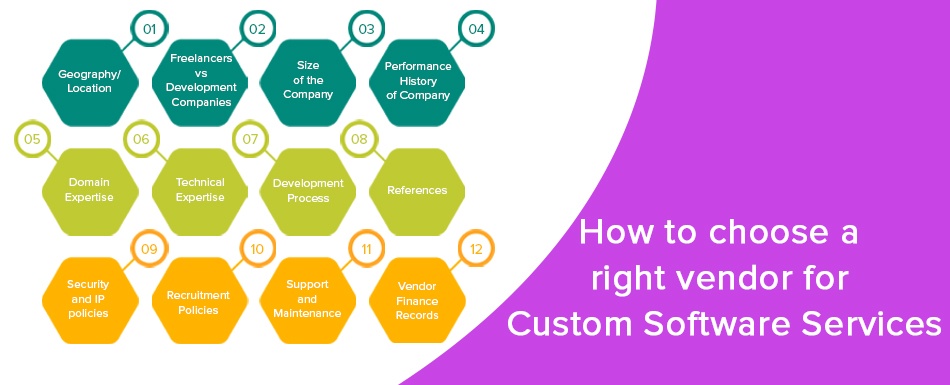
Enterprises are bound to meet essential parameters of software development when they plan to develop a bespoke application. From a gamut of software development companies, businesses can filter specific companies based on what type of software development service they offer and their focus. Here are some essential factors businesses should consider while deciding to outsource custom software development projects.
1. Geography/Location
The location of the custom software development service company is an essential factor for businesses to choose a provider. Onshore, Nearshore and Offshore are three options available for businesses. Onshore companies ensure faster turnaround time and better communication. Nearshore companies are located in almost similar time zones but in different countries like Argentina and Ukraine. And offshore companies are located in different time zones in countries like India and Vietnam. Offshore software development companies offer global access to huge talent pools and cost advantages for businesses to get benefited from their services. Many offshore companies have their offices in western countries like the USA and UK. Improved communication and requirement transfer are also possible with these offshore companies by dealing with their onsite office.
2. Freelancers vs software development companies
A price difference is an essential factor that brings businesses to a freelancer rather than specialized software developers from renowned development companies. The reason freelancers are preferred is that they are less expensive and can be assigned to work at any given point in time. But with ever-increasing advances in technology, it is essential for businesses to have multiple skillsets for their projects like front-end developers, backend developers, database administrators, software testers, and DevOps engineers, and hiring all of these skilled resources would not be a cost-effective method. But a software development company provides all these resources under a roof and manages all types of projects from complicated to cutting-edge technology solutions.
3. Size of the company
Most of the giants in the technology industry deal with large size companies doing multi-million dollar projects. While mid-size companies are happy doing isolated projects. Depending on your project size, you have to identify the right size company for you. For example, big banks tend to work with tech giants like IBM, TCS, and Accenture for their enterprise application development and support. While mid-size enterprises work with companies like TatvaSoft. In our opinion, you should not select a company where your project will be generating more than 15% of their revenue for that company. In that scenario, once your project moves from development to maintenance, team size decreases and will not affect the stability of that software development company.
4. Performance history of the company
Three questions are mandatory to ask while you decide to outsource your software development project.
Does the custom software development company have experience in executing projects of your size?
Have they successfully executed projects much bigger than yours?
What kind of custom software development experience do they carry
Once you have answers to these questions the filtration process will get easier. Analyze the experience of a software outsourcing company in different areas like enterprise application development & maintenance, mobile app development, SalesForce integration, etc. This will help you understand the knowledge they carry and their diversified role in different projects. The next question will help you understand the size of projects they have worked on and how successfully they have implemented challenging projects customized to business needs.
5. Domain Expertise
Looking at the holistic experience of businesses and the domains they serve justifies the complexity of projects they have developed in the past and their specific knowledge. The authenticity of work can be judged through the demonstrated work portfolios and the domains they work for like Education, Energy and Utility, Healthcare, Oil and Gas, Banking and Finance, logistics and Manufacturing, and similar.
6. Technical Expertise
The level of proficiency should be validated based on the technical knowledge and skills of the bespoke software development company. The type of technology offerings, the developer’s competencies, the number of specialists in each technology, and their programming experience are some vital factors for consideration.
7. Development Process
Every custom software development company doesn’t operate similarly as each one has a unique business process. Therefore, it is very important for businesses to outsource to companies that follow standard practices like Agile and DevOps.
8. References
Decisions can be taken based on references- either from past experience of some known company or through references of other businesses who rated the business based on their work( of course from a trusted website). Also, if you happen to meet the referrals, ask intelligent questions like what was good about their service, what was bad, what things can be improved, how to manage the team efficiently, what were the issues they faced, and how they mitigate, etc.
9. Security and IP policies
Data breaches, security, or IP issues are some of the common issues why businesses are reluctant to outsource software development. So before outsourcing, it is extremely important to understand the standard security practices abided by the business to secure data, apps, their details, information on intellectual properties of the developed application, IP related agreements signed between vendors and the company.
10. Recruitment Policies
The next important factor is to consider the recruitment policies of custom software development companies. The quality of your product depends on the custom software developers they hire and thus recruitment policies of that company directly impact the quality and code of the app developed. If the hiring policies are meticulous so the developers hired will be of top quality and deliver maximum productivity to enhance the overall process of software development. Hence, vetting out good resources during recruitment by software development companies will offer long-term benefits to your business.
11. Support and Maintenance
To keep the application up and running, it is essential for the business to avail of support and maintenance services from outsourcing companies. After the application is released, depending on the functioning of the application, the support services are decided. Some businesses might need continuous maintenance and support services while others may need just ad hoc software development services to remove bugs timely, resolve errors, optimize overall performance and add new features to the application.
12. Vendor finance Records
While considering hiring custom software development services, keep the finance aspect extremely clear. The past financial records of software development companies must be sound with zero to minimum debts portraying a strong and stable work profile. For any progressive business financial stability is an important aspect when deciding to outsource.
7. What is a Software Development Agreement?
Every business that seeks help from another business or company is bound to sign a legal contract. This contract which is between two companies for software development services is called a software development agreement. It is like a roadmap in case of future disputes and clearly mentions the legal duties of each party.
To elaborate, a Software/Project development agreement is a contract between two parties- One (the business which pays) and the Second (the supplier company). This agreement is bound by certain rules to provide assistance, support, and maintenance facilities during the whole project development. This business process can vary depending on the technology chosen and the team employed. Businesses may have multiple questions rising when they plan to outsource to a company located offshore. Before finalizing the outsourcing process, they should be certain about the development process, intellectual properties of both the companies, what should be made public and what shouldn’t, ownership of source code, patents, terms and conditions, and similar vital questions.
While considering outsourcing there are agreements that have rules and they should be abided by. Basically, there are two types of agreement
Project agreement
Non-disclosure agreement
We will elaborately discuss both these agreements but before that, it is important for us to know why businesses need to sign a project agreement when there can be a verbal pact between the two. So, when two parties are in a business sharing profits and losses, there has to be a legal pact which will be the virtue of trust. And thus there are agreements such as Project Agreements and Non-disclosure Agreements. Now project agreement is whenever a client initiates a project, or has added further enhancements to their existing project and would like to protect the idea and the intellectual properties of the project. Similarly, NDA ensures that none of the intellectual properties will be shared and must be kept confidential unless it needs to be made public.
Whenever a business works with cross-border companies, their agreements are difficult to enforce because of the different rules each country follows. This makes businesses reluctant to work with offshore companies. That’s why many businesses prefer to work with offshore companies having onsite registered offices. This makes it easier to enforce the agreement in case of a dispute.
"Provisions that can be included in your Project Agreements as a precautionary move"

If the customer wants to be defensive about their business operations and functions then there are a few precautionary steps that should be added to NDA to prevent the customer from any serious complications in the future. Let’s understand what are the additions and how does it impact the customer.
Scope of the project
In general, the scope of work includes everything from technical system designs, development tools, methodology, or the systems required to complete the project. Apart from that, everything that is needed during development and post support is also included in the agreement which is inclusive of the user and technical documentation, all hardware support, source code repositories, and hosting support necessary during the development and deployment of the software application.
Payment Terms
Depending on the scope of the project and the payment feasibility of the client the terms and conditions are decided. Some clients would choose a fixed cost model wherein after each module the payment is been performed while other clients choose monthly payment for time and material-based models where once in a month, the payment for the work is been performed.
Intellectual property rights
Intellectual property rights of projects include the right to a patent, trade marks, copyrights, topography rights, data extraction from database rights, the right to protect source code, and other forms of equal property rights that have a similar effect and may subsist anywhere in the world.
Penalty terms
For any case wherein the performance of the application is not met or there is a data breach occurrence, businesses must be prepared with a penalty payable amount for this damage. In such cases, businesses can fix a penalty amount that both parties agree upon and they can have fair compensation if the customer’s needs are not met.
Confidentiality
Many times customers have to disclose business secrets to the custom software development company while providing business requirements. To maintain the confidentiality customer and supplier must agree not to disclose any type of information about their project, business models, market strategies, trade secrets, know-how, patents, copyrights, financial information, sales distribution strategies, and internet and e-commerce strategies, or any such information which may be written, electronic in nature are collectively referred in the software agreement as “Confidential Information”.
Data Protection
A business may have collected lots of data over time which may include personal information also like name, address, email ID, phone number, etc. By law, it is required to keep this data protected. In case of breach or misuse, there are heavy financial penalties in countries like the US and UK. European Union has its own GDPR rules. While outsourcing, software development service providers may get access to data for development or maintenance purposes. In the development agreement, the role and responsibility of suppliers related to data protection should be clearly defined to avoid any disaster.
Law and Arbitration
Customers have started including a clause of arbitration in every software development contract created nowadays. Arbitration is generally an out-of-court proceeding wherein a neutral third party element called an arbitrator hears the allegations and evidence of both parties and makes a binding decision. This is an alternative method to resolve disputes by adding a clause for arbitration in SLA.
Limitation of liability
This clause is a provision in an SLA (service level agreement) that indicates the amount and type of damage that each party will be obliged to other businesses in different circumstances. It is basically a responsibility to compensate for some failure to perform when the development needs of the service are not met.
Employee Solicitation
If the recipient has significant access to the developers of your company and you may want to include a clause regarding the same. This could restrain businesses to hire your employees for at least 12-24 months. Sometimes the other party might not agree to do so and hence having a policy regarding that reference can limit the clients to hiring your employee and this can also be an application for the employee working for offshore projects from clients located in different countries.
Authority in case of disputes
In case of any conflict between the parties then businesses should be aware of the fact that the case will be operated in the judiciary location mentioned in the agreement. If the supplier is offshore and the judicial location is your location then it is always beneficial. However, if in case of dispute, if the supplier refuses to appear in the court, then it is challenging to enforce the agreement. If the judicial location is the supplier’s location then the local court can always enforce the agreement but there will be a huge loss of time and money in traveling multiple times and hiring lawyers at the supplier’s location. While dealing with offshore companies, it is better to deal with a software company that has a registered office in your country. So that the supplier and your business can keep the judicial location as the same country. This will be advantageous for both parties as in case of any dispute they can enforce the agreement easily.
Commandment
You can protect the business from breaching the agreement by adding a clause that gives you the right to injunctive relief. This clause simply says that the other party can get a court’s permission against the disclosing company and can prevent them from doing the breaching act. For issues involving money, injunctive relief is quite a late move.
8. Non-Disclosure Agreement in the Software Service Business
The non-disclosure agreement is used to barricade the confidential and proprietary information of the business exchanged during the engagement from getting disclosed. This agreement is made when you share the requirements for the purpose of time and cost estimation. In any case, the agreement can include a list of information that the client wants to keep confidential. This agreement isn’t bound to just source codes or software products developed business plans or any analytical detail that cannot be made public. But it depends on the business what they want to keep secretive under the NDA norm and what they want to keep public.
Key aspects of the Non-disclosure agreement
Introduction to both the parties and their business backgrounds
Defining the needs of what is to be kept confidential and what is not
The term limit of the agreement
The inclusions and exclusions of the agreement
Repercussions of not abiding by the NDA
Types of NDA
1. Unilateral non-disclosure agreement
As the name suggests, unilateral NDA is a one-way NDA where there is an agreement between the two parties and the first party( the company ) is the sole owner of the information and they are releasing it to a second party (the recipient). The recipient signs the document and agrees to keep the confidentialities of the project without tampering it or leaking it to any third party. They must also agree to not use confidential information for their own benefit. Usually, this type of agreement is preferred by freelancers or consultants.
2. Mutual non-disclosure agreement
The mutual NDA is for situations where each side may potentially share confidential information and may agree to keep it confidential. Generally, this kind of NDA is done as it is considered fair to both parties.
3. Terms and Conditions of Agreement
This is another essential part of why an NDA is important and what aspects should be taken care of while signing an NDA. The terms and agreements should be meticulously ideated and read before signing any NDA. Some of the basic questions that you should have while reading your NDA is
How long should the NDA last?
What is the reasonable term of lasting?
Which proprietary information does it contain?
What is excluded from confidentiality treatment?
What are the obligations and confidentiality of the agreement?
Answers to the following question will give a clear perspective of the terms and conditions of the NDA. These questions are necessary because after certain years the cost of obligations rises, depending on the industry the agreements keep on changing.
4. Deemed Confidential
The elucidated form of which information is to be conveyed through a Non-disclosure agreement should be precisely mentioned to prevent a business from any breach. This section of NDA clearly states which information is confidential and which is not. This part will elaborate on the disclosing party a clearer vision of information without any confusion or loopholes. Specifically, if we talk about oral information, it always leaves both parties in ambiguity with respect to the pact. Deemed confidential also refers to this oral information that the disclosing party has to confirm in a written format that would notify the receiving party to keep it confidential.
9. The Cost factor in Custom Software Development Projects
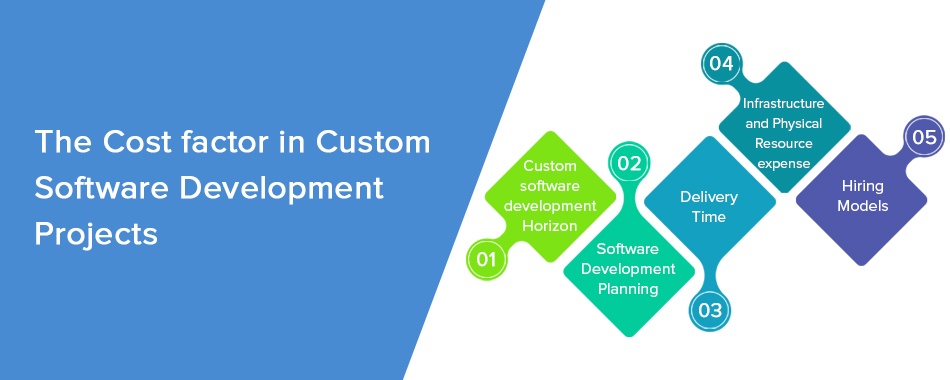
The unprecedented growth of technologies has led businesses to collaborate with global companies and do business across borders. In fact, there is just a handful of fortune 500 companies that aren’t harnessing the skills of globally proficient software developers to manage their operations. Building custom software is of equal importance to businesses in terms of time, technology, and cost investments. Hence every enterprise has to be efficient enough to take this decision on budget and other influential factors. We already know how enterprise application development adds a competitive advantage to development costs and higher price brackets. Before making a selection on the cost estimation there are certain aspects of custom software development services that need to be considered.
1. Software Development Horizon
The extensibility and proficiency of the hired developers are the first deciding factor for businesses in paying for custom software development. The Major part of the cost estimation depends on the requirement of the project, its criticality, and technology. In addition, the number of developers and their time spent is equally important. Without a well-planned budget, the business would have to compromise on certain essential aspects or cannot afford skilled resources because of a lack of budget.
2. Planning
Another essential important criterion is the platform chosen to develop. Once the project initialization, requirements, and developers are fixed the next bifurcation of the cost depends on the platform. The technology stack needed, software licensing costs, and other cloud-related costs are vital contributors to cost estimations.
3. Delivery Time
Having rightly said “Time is money”, the time factor will decide the amount you will have to pay in case of quicker deadlines or demand to complete the project at a rapid speed than normal.
4. Infrastructure and Physical Resource expense
Custom software may cost higher than expected in case of choosing an inappropriate outsourcing offshore partner. The location or geography to which the team decides to outsource will be an essential parameter to cost as well. Just like the development cost in the Philippines will be different in comparison to the development cost in India. So if you don’t choose the right location for outsourcing then you might end up paying some extra amount than required. Choose a technology partner wisely.
5. Hiring models
Each enterprise follows a different hiring method and depending on the hiring structure the cost is estimated. Depending on the experience of the team and their proven track record the hiring models can be finalized. The most common types of hiring models are the Dedicated development team and Fixed price models.
Dedicated team
In this model, businesses can hire a dedicated team of developers for a fixed project. The organization gives clients the freedom to choose the number of developers they want and to what time period. They can increase or decrease the team size as per the project demands. If your project requirements are variable then this model can be beneficial.
Fixed price model
Fixed cost models give the organizations an exact idea of the cost and time required to complete the project. Majorly, this will be applicable to pre-defined projects which come with a fixed timeline and price structure.
10. Custom Software Development Methodologies
Custom software services need are ever-changing as per the progress of businesses and their venture into newer avenues. As per the changing dynamics, businesses are trying to place themselves in the best possible way to maximize profitability. The standard methodologies are aimed to finalize features, agreeing on time, budget, technology stack, feature enhancements, code quality, and overall software development quality. And to achieve all of these businesses use some special tools and methodologies to manage the project and process of an existing business.
Some of the common development methodologies include:
1. Waterfall Model
One of the most common and conventional methods of software development is the waterfall method. As the name suggests waterfall methodology works flawlessly like a waterfall with its defined set of phases and the following sequence.
Requirement specification
Software designing
Integration to an existing process or creation of a new process
QA/Testing
Deployment
Maintenance
Beginners who are naive to software development can efficiently gain the benefits of waterfall methodology. It is simple to use, manage and maintain because of its simpler linear sequential method of implementation. Once you have implemented the changes, rectification or changes are not possible because of the approach it follows. But since it saves a significant amount of time and delivers qualitative codes at a faster turnaround time, therefore it is one of the popular custom software development methodologies.
2. Agile Development
The agile method of development uses a successive iterative approach to develop apps wherein the whole process is smartly bifurcated in multiple phases. The whole process of testing, validation, integration, and deployment is performed in each phase, and versions of the products are developed. The main benefit of this methodology is that you can always look back to the previous phase and rectify the errors. This is an adaptive approach used by most clients when their requirements are wavering. Direct communication with the client and continuous feedback makes the software robust and scalable.
3. Scrum
This development methodology enables businesses to Fastrack their Software Development Life Cycle and can be easily applied to any critical business process. The Scrum team initiates the project with brief planning, then a detailed analysis of the holistic project w.r.t other technology departments, and later the development process is implemented. The scrum team consists of cross-functional engineers who uphold expertise in analyzing requirements, designing, coding, testing, and installation. This is a flexible approach where if the user needs are changed they will be quickly developed and reflected in the next sprint.
4. DevOps
With a perfect amalgamation of Development and Operations – DevOps easily manages critical and mundane business processes with ease and simplicity. DevOps has a strong rapport with agile and lean approaches to maximize the effectiveness and reduce time to market. DevOps keeps an equilibrium between cross-functional departments and enhances effective communication that optimizes the overall development tasks. The fundamental aim of DevOps is to develop transparent communication between technology specialists and operational managers to create faster and high-performing applications.
11. Software Development Maintenance And Support

Businesses need to maximize their efficiency of software application development with minimal risks and errors. More than just development, every developed application needs continuous support and maintenance. Normally, software development teams are overloaded with tones of applications hindering their basic process of maintenance. End-to-end application development includes everything from development, design, QA/Testing, deployment, and maintenance. Software maintenance and real-time support enable businesses with high-performing sustainable apps and lower overhead costs. When we talk about maintenance, it is inclusive of up-gradation, maintenance, app migration, support, and future enhancement.
An application can be maintained in multiple ways and thus there are different types of software maintenance services
Adaptive Maintenance and support
Adhering to the latest technology trends, the application demands maintenance, and support services for businesses to transform apps into next-gen applications. Changes such as regulation changes, configuration changes, modifications to current software, operating system upgrades, or data format changes are some of the adaptive and maintenance changes.
Improvisation And Maintenance
Running applications with functional issues such as logical errors, coding errors, or designing misfits might hamper the overall performance of the application. Correcting and fixing these errors enables the software application to be bug-free and perform better.
Continuous Maintenance and support
Upkeep applications with the latest technology support, modifications, and future enhancements, businesses need to continuously examine software performance, keep track of each update and concurrently upgrade it as a part of continuous maintenance so that the application never breaks down and delivers consistent output.
Preventative Maintenance
As a proactive measurement from past experience of developing the same or similar type of software application probes businesses to take preventive measures for maintenance and support. This will alarm businesses of any type of futuristic problems that may degrade the quality performance of the application to be treated in advance. With continuous Maintenance and Support, businesses can achieve wider benefits from software development.
Improved Performance
With timely updates, support, and maintenance processes, all the software applications of the business have now become multi-functional, high-performing, and robust architecture.
Updated Current Trends
Real-time application support allows businesses to jump to the latest trends by staying abreast of evolving technologies and trends. Application maintenance can help you pave your own path with cutting-edge software solutions and get ahead in this digital market.
Minimal cost
Thinking that a one-time investment is a cost-effective solution for businesses is an incorrect ideology. Getting up-to-date on technology changes for cloud-based software solutions is a lucrative option that covers most of the expenses including maintenance costs too.
12. Best Practices in Custom Software Development

Undoubtedly, developing custom software is an indispensable part of every business which might seem challenging at first instance. Not all organizations are able to afford to make mistakes with the risk of bearing monetary losses. Though the objective of custom software application development is extremely fruitful, it could only reap benefits if businesses know to choose the right outsourcing partner. In any case, if the business is unable to partner with an expert software application development company then as per the standard norms followed worldwide, we have mentioned a few handfuls and efficient practices for software development that could be advantageous to the business in transforming their business with technology-enabled solutions.
Understand the existing process and future demands
A fundamental reason for outsourcing is the lack of skilled resources and the inability to understand the need. So before you decide to outsource, analyze whether a custom software will bring a game-changing effect to your organization, and if your answer is “Yes” then start evaluating your present process by looking at the system from the grassroots level. Also, a thorough understanding of the current process, what to be achieved using this custom software, and how could the current state of the company be improved using technology understanding.
Choose the right custom software development company to collaborate
In case you think you know what you want, now the next step is to hire the right resources to work for you. Software development is a critical process and not everybody can match your needs. So, check with your internal IT team, software development vendors, and companies. Start the filtration process by exploring each custom software development company website with the company’s location, size of the company, domain expertise, References, Company history, Security, and IP policy.
Keep an eye on your budget
The key important consideration here is to find a custom software product development company that fits your needs and budget. So while you find a technology partner, make sure your business-critical needs are effortlessly met within your estimated budget and stringent delivery timelines.
Choosing the appropriate technology for development
Your first and foremost goal is to understand why you need this custom software and what benefits it will offer. Your needs can be anything from automating the process to accelerating productivity, improving inefficient processes, or making the customer experience incredible. Once this has been identified, it would be quite easy for businesses to approach experts and match preferred technology as per their business needs.
Plan to achieve realistic milestones
Your application needs consistent testing performed by experts. Since your software application needs can be unique, anything that is created should be tested and accomplished with qualitative benchmarks and then set a real milestone. Testing application is significantly important otherwise it has the potential to damage your customer base and brand image in the longer business run.
Meticulous Testing and Documentation
Once the software application is built, the most essential stage is to check the versatility of the software developed in all environments. Testing an application using all essential parameters will make the application run seamlessly on different devices and browsers before going live and will avoid unnecessary mistakes. In addition to testing, finely documenting the entire process is another essential factor in all stages of development and implementation.
13. Final Words
Running through the whole discussion, I think Custom software development is here to stay and grow. If there is anything that could bring change to the digital market is by developing custom software applications tailored to business needs. In the upcoming years, more and more businesses will be adopting this culture of offshore outsourcing to countries like India, and hence our extensive blog will be your guide. Our extensive blog will help you have fine-grained control over outsourcing, what terms are important, and the business gains in the future. Custom software will become the backbone of your business progression and the custom software developing companies will back you with their robust, responsive, and high-performing services.